Indledning
Thank you for choosing the hygger 18W Rechargeable Aquarium Air Pump. This device is designed to provide consistent aeration for various aquatic environments, functioning as both a standard oxygen pump and an emergency backup during power outages. It is suitable for home aquariums, hydroponic systems, live wells, outdoor koi ponds, commercial applications, and fish transportation.
This manual provides detailed instructions for the safe and efficient operation, setup, maintenance, and troubleshooting of your air pump. Please read it thoroughly before use and retain it for future reference.
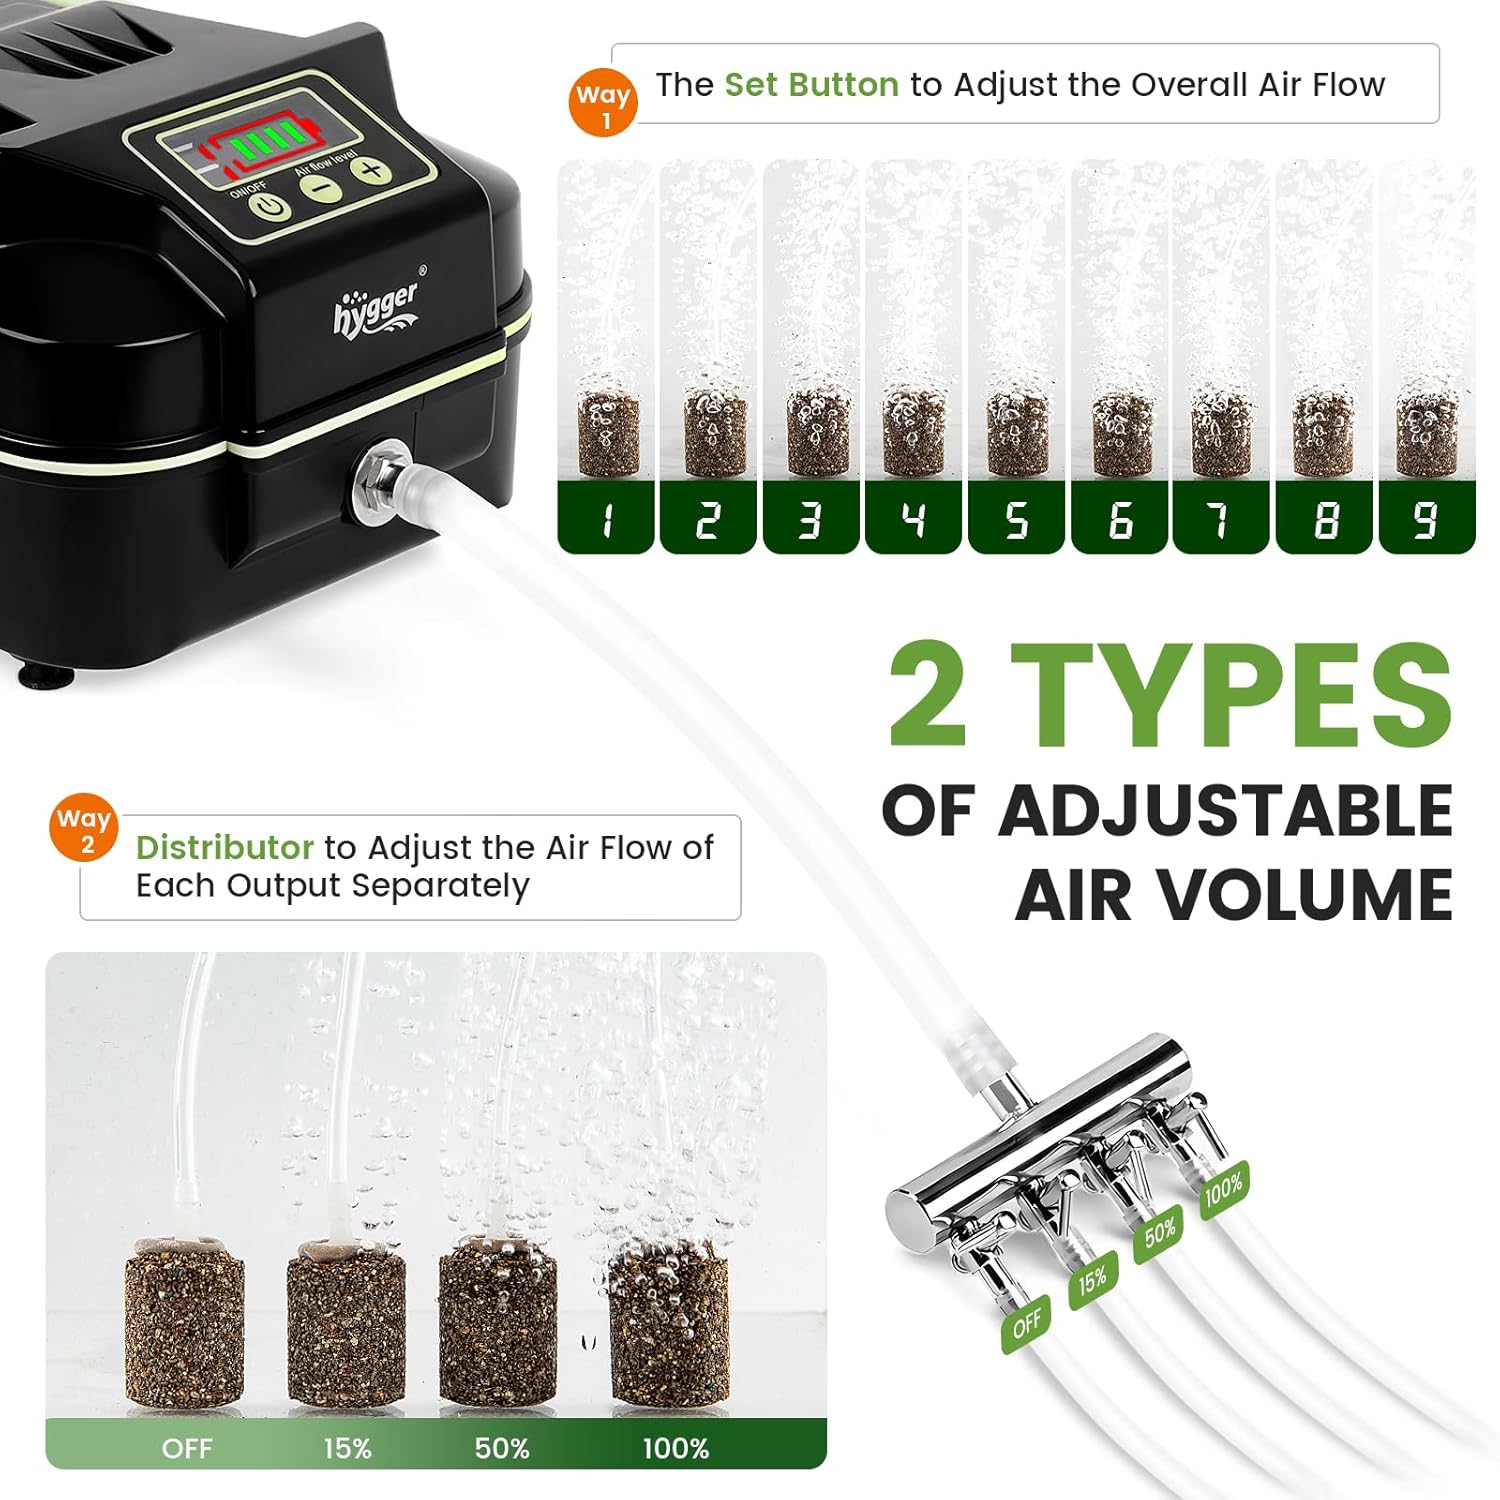
Image: The hygger 18W Rechargeable Aquarium Air Pump connected to air stones in an aquarium, demonstrating its function.
Sikkerhedsinstruktioner
- Afbryd altid strømforsyningen, før du udfører vedligeholdelse eller rengøring.
- Do not immerse the air pump in water. The unit is IPX4 splash-proof, but not submersible.
- Ensure the power adapter and electrical outlet are dry before plugging in the device.
- Opbevares utilgængeligt for børn og kæledyr.
- Brug kun den medfølgende strømadapter.
- Anvend ikke, hvis netledningen eller stikket er beskadiget.
- Place the air pump on a stable, dry surface.
Pakkens indhold
Bekræft at alle varer er til stede i pakken:
- 1 x Air Pump (18W)
- 1 x brugermanual
- 1 x strømadapter
- 1 x Diverter (4-hole manifold)
- 1 x Hovedslange
- 4 x 6.5ft Air Hoses
- 4 x Air Stones (+ 2 Spare)
- 1 x kontraventil
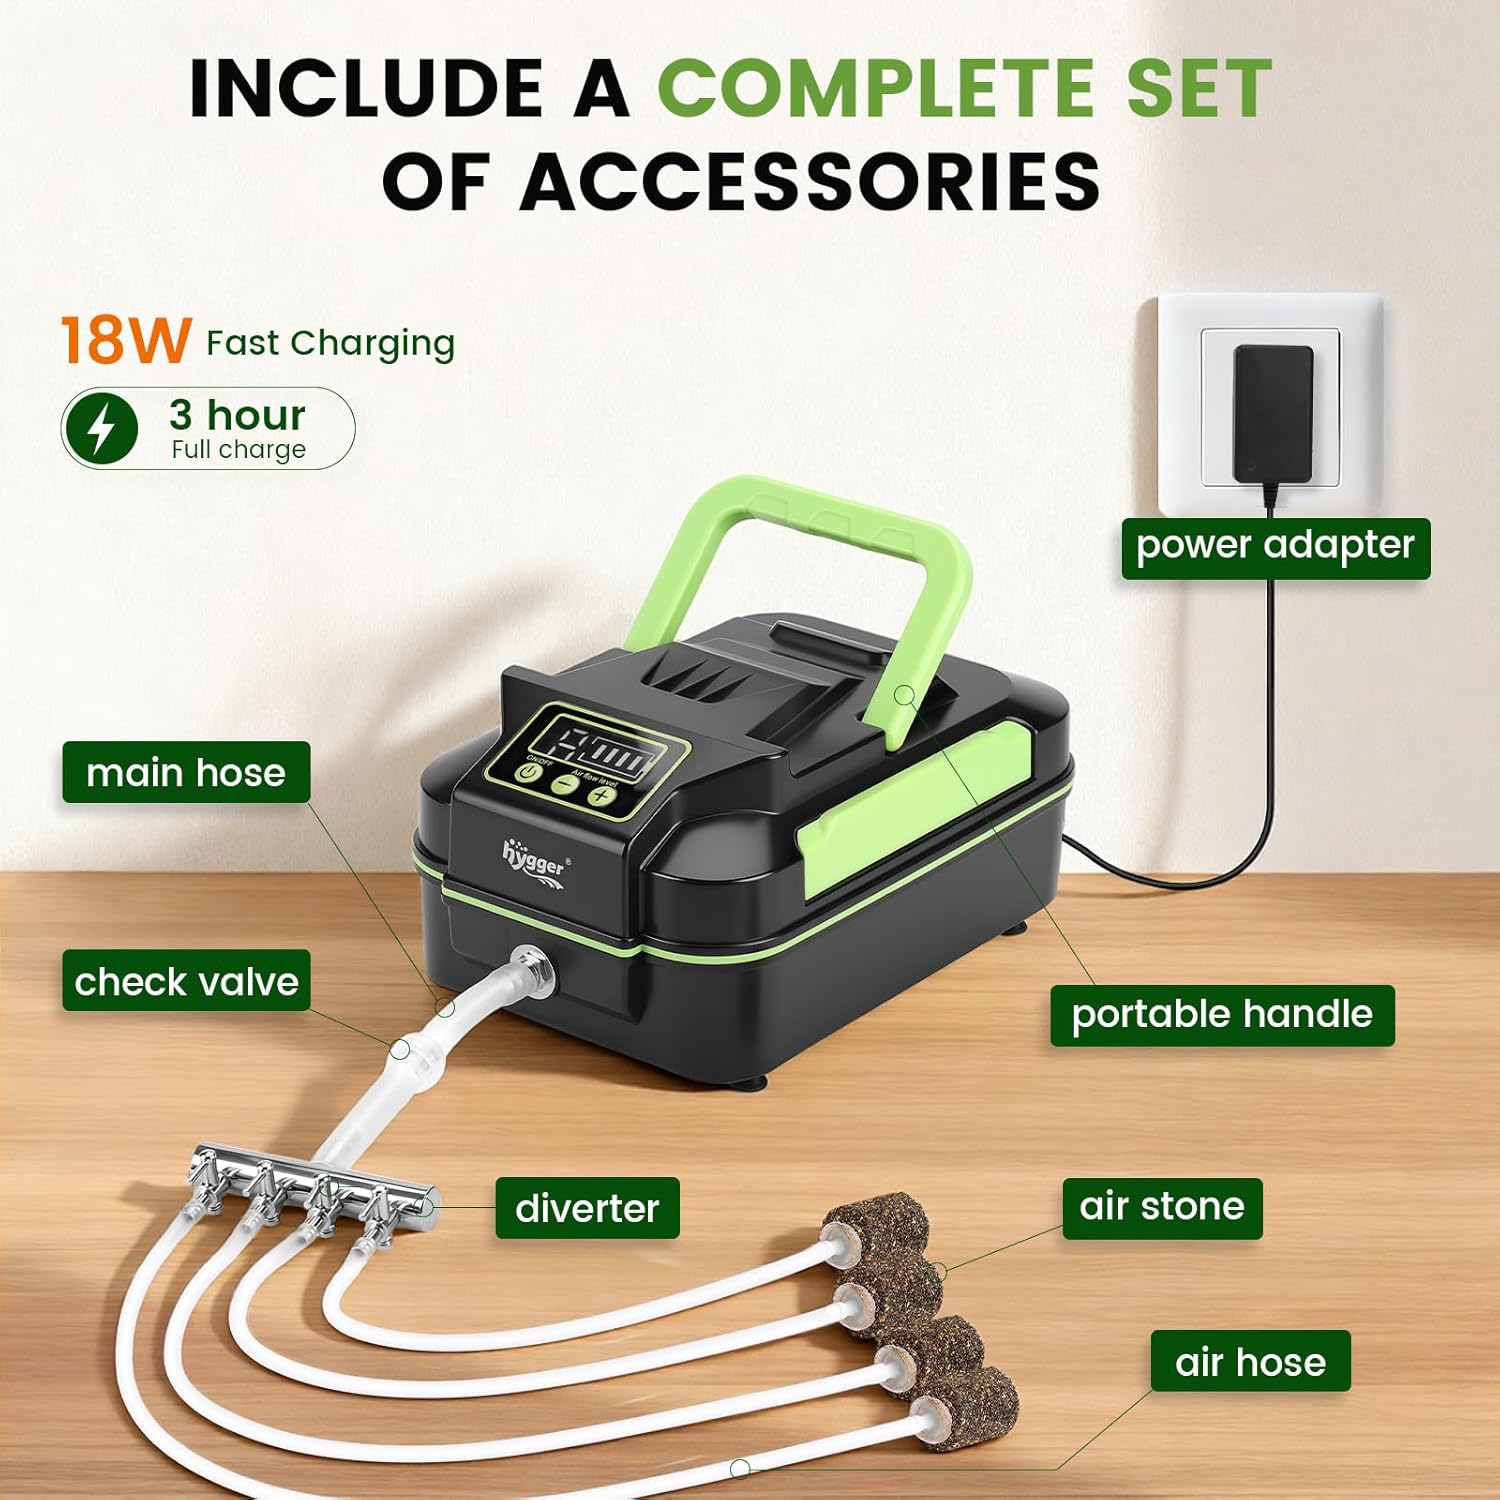
Image: A complete set of accessories included with the hygger 18W Rechargeable Aquarium Air Pump, including the pump, hoses, air stones, diverter, check valve, and power adapter.
Opsætning
Follow these steps to set up your hygger 18W Rechargeable Aquarium Air Pump:
- Tilslut hovedslangen: Attach one end of the main hose to the copper metal outlet on the air pump.
- Insert Check Valve: Cut the main hose and insert the check valve. Ensure the arrow on the check valve points towards the diverter/aquarium to prevent water backflow into the pump.
- Connect Diverter: Attach the other end of the main hose (with the check valve) to the inlet of the 4-hole diverter.
- Tilslut luftslanger: Connect each of the four 6.5ft air hoses to the outlets of the diverter.
- Connect Air Stones: Attach an air stone to the end of each air hose. Place the air stones in your aquarium or pond.
- Strømtilslutning: Plug the power adapter into the pump and then into a wall outlet for daily use and charging.
Important Note on Check Valve Placement:
- If the air pump is placed below the water level of the aquarium, a check valve is essential to prevent water from siphoning back into the pump during a power outage, which can cause damage.
- If the air pump is placed above the water level, a check valve is not strictly necessary but is still recommended for added safety.

Image: Illustration demonstrating the importance of a check valve when the pump is placed below water level to prevent backflow.

Image: A visual guide showing the five steps to easily install the air pump, main hose, check valve, diverter, and air stones.
Operation
Kontrolpanel overview
The air pump features an intuitive LCD screen and control buttons for easy operation.

Billede: Detaljeret view of the digital display screen and control buttons, including ON/OFF, airflow level adjustment, and battery indicator.
- ON/OFF knap: Press and hold for 3 seconds to turn the pump on or off.
- +/- knapper: Adjust the overall airflow volume from level 1 to 9.
- Batteridisplay: Viser batteriets aktuelle opladningsniveau.
- DC/AC Indicator: Indicates whether the pump is running on DC (battery) or AC (plugged in) power.
Justering af luftstrøm
There are two ways to adjust the airflow:
- Overall Airflow: Use the "+/-" buttons on the control panel to adjust the total air output from level 1 (minimum) to level 9 (maximum).
- Individual Output Airflow: The 4-hole diverter allows you to fine-tune or completely close the airflow to each individual air stone. Rotate the valves on the diverter to adjust the flow from OFF to 100%.

Image: Visual representation of adjusting the overall airflow output from level 1 to 9, showing varying bubble intensity.

Image: Illustration demonstrating how to separately control the air flow of each output using the diverter, with settings from OFF to 100% shown.
Dual-Power Mode (AC/DC)
The hygger air pump operates in a dual-power mode for continuous aeration:
- AC Power (Plugged In): When connected to the power adapter and a wall outlet, the pump runs on AC power and simultaneously recharges its internal lithium battery.
- DC Power (Battery Backup): In the event of a power failure, the pump automatically switches to DC power, utilizing its built-in large-capacity lithium battery to ensure uninterrupted operation.

Image: Comparison of the air pump operating with plug-in AC power (charging) and automatically switching to DC battery power during an outage.
The built-in battery charges fully in approximately 3 hours. It can provide up to 8 hours of operation at maximum airflow or up to 100 hours at minimum airflow, making it a reliable backup for emergencies.
Video: An official product video demonstrating the features and operation of the hygger rechargeable battery aquarium air pump, including its digital display and adjustable airflow.
Opretholdelse
Regelmæssig vedligeholdelse sikrer din luftpumpes levetid og optimale ydeevne:
- Batteriets sundhed: To maintain battery health, regularly (every 2 months is recommended) unplug the pump and allow it to run on battery power until it fully discharges. Then, recharge it completely. This helps to calibrate the battery and prolong its lifespan.
- Air Stone Cleaning: Over time, air stones can become clogged, reducing airflow. Clean or replace air stones as needed to ensure efficient bubble production.
- Slangeinspektion: Periodically check air hoses for kinks, cracks, or blockages. Replace any damaged hoses to maintain proper airflow.
- Pumpens ydre: Tør pumpens yderside af med en blød, tør klud.amp cloth. Do not use harsh chemicals or abrasive cleaners. Ensure the pump is dry before reconnecting power.
Fejlfinding
If you encounter issues with your hygger air pump, refer to the following common problems and solutions:
| Problem | Mulig årsag | Løsning |
|---|---|---|
| Ingen luftudgang eller svag luftstrøm |
|
|
| Pumpen oplades ikke |
|
|
| Pumpen larmer |
|
|
| Vandtilbageløb i pumpen |
|
|
Specifikationer
Detailed specifications for the hygger 18W Rechargeable Aquarium Air Pump:
| Feature | Specifikation |
|---|---|
| Magt | 18 watt |
| Vægt | 3.85 lb |
| Max luftgennemstrømning | 158 GPH |
| Lufttryk | 27 kPa |
| Outlets | 4 huller |
| Voltage/Frequency Input | AC 100-240V / 50-60 Hz |
| Produktion | DC 7.8V |
| Ledningslængde | 4.9 FT |
| Produktmål (L x B x H) | 9.1 cm x 5.9 cm x 4.3 cm |
| Materiale | Plast |
| Farve | Grøn |

Image: A comparison of the 18W and 40W hygger air pump models, showing their physical dimensions and a table of key specifications.
Garanti & Support
The hygger 18W Rechargeable Aquarium Air Pump comes with a 1 års producentgaranti. Denne garanti dækker fejl i materialer og udførelse ved normal brug.
For warranty claims, technical support, or any questions regarding your product, please contact hygger customer service. Keep your purchase receipt as proof of purchase for warranty validation.
For additional information and support, please visit the official hygger webwebsted eller kontakt din forhandler.