Indledning
Tak for købetasing the OLIGHT Perun 3 Mini Headlamp. This compact and powerful device is designed for versatile lighting needs, offering both white and red light options. Please read this manual carefully before use to ensure proper operation and maintenance.

Billede: Overview of the OLIGHT Perun 3 Mini Headlamp, highlighting its compact size and powerful illumination capabilities.
Hvad er der i æsken
- Perun 3 Mini (batteri og lommeklips inkluderet)
- MCC1A Magnetic Charging Cable
- Pandebånd og beslag
- Brugermanual

Image: The package contents laid out, including the headlamp, charging cable, headband, and user manual.
Opsætning
1. Oprindelig opkrævning
Before first use, fully charge the Perun 3 Mini. Connect the MCC1A Magnetic Charging Cable to the magnetic tailcap of the headlamp and plug the USB end into a power source. The indicator on the charging cable will show red while charging and turn green when fully charged.

Image: The Perun 3 Mini Headlamp connected to its magnetic charging cable, illustrating the charging process.
2. Attaching to Headband
The Perun 3 Mini can be easily attached to the included headband. Slide the headlamp into the bracket on the headband until it clicks securely into place. To remove, press the 'PUSH' button on the side of the bracket and slide the headlamp ud.

Image: A user demonstrating the quick-detach feature, showing how to transition the headlamp til en håndholdt lommelygte.
3. Justering af hovedbøjlen
The breathable headband features an adjustable strap for a comfortable and secure fit. Adjust the strap length using the buckles to fit your head size. The light can also be tilted up to 140 degrees for optimal illumination angle.

Image: Close-up of the adjustable headband, showing the breathable material and reflective elements.
Betjeningsvejledning
1. Tænd/sluk
Press the metal button on the top of the headlamp once to turn it on or off.
2. White Light Modes
When the light is on, press and hold the button to cycle through Moonlight, Low, Medium, and High modes. Release the button to select the desired brightness. Double-click for Turbo mode.
Image: Visual representation of Moonlight, Low, Medium, High, and Turbo white light modes in different outdoor scenarios.
3. Red Light Modes
When the light is off, double-click the button to activate the red light. Press and hold to cycle between Low Red and High Red. Triple-click for SOS mode.

Billede: Eksamples of red light usage, including Low Red, High Red, and SOS blinking for emergencies.
4. Batteriindikator
The laser micro-perforated tri-color power indicator on the button provides real-time battery status:
- Grøn: >60 % batteri
- Orange: 60%~10% battery
- Red: 10%~5% battery
- Flashing Red: <5% battery

Image: A diagram illustrating the tri-color battery indicator on the headlamp's button and its corresponding battery levels.
5. Spærringstilstand
To prevent accidental activation, press and hold the button for approximately 2 seconds until the light briefly flashes and then turns off. The headlamp is now in lockout mode. To exit lockout mode, press and hold the button again until the light turns on.
Funktioner og design
The Perun 3 Mini is crafted from durable 6061-T6 aluminum alloy, ensuring resistance to scratches, corrosion, and impacts. Its compact size and magnetic tailcap allow for multi-use scenarios, functioning as a headlamp, pocket light, or magnetic work light.

Image: Demonstrations of the headlamp's versatility, showing it attached magnetically, hanging, and clipped to clothing.
Official Product Video: Olight Perun 3 Mini Short
Video: A short overview of the Olight Perun 3 Mini, showcasing dens kompakte design og nøglefunktioner.
Official Product Video: Olight Perun 3 Mini Premium Quick Review
Video: En hurtig gentagelseview of the Olight Perun 3 Mini Premium, highlighting its performance and design aspects.
Opretholdelse
To maintain optimal performance, keep the magnetic charging port clean and free of debris. Regularly inspect the headlamp for any physical damage. If the headlamp is exposed to water, ensure it is thoroughly dried before charging or storing.
Fejlfinding
Lyset tænder ikke:
- Check if the headlamp is in lockout mode. Refer to the 'Lockout Mode' section to disable it.
- Ensure the battery is charged. Connect to the MCC1A charger and check the indicator light.
Opladningsproblemer:
- Verify the magnetic charging cable is securely attached to the tailcap and the USB end is connected to a working power source.
- Clean the magnetic contacts on both the headlamp and the charging cable to ensure good connection.
Specifikationer
| Feature | Detalje |
|---|---|
| White Brightness (Max) | 1250 lumen |
| Stråleafstand (maks.) | 155 meter |
| Red Light Brightness (Max) | 45 lumen |
| Strømkilde | Battery Powered (1 12V battery included) |
| Batteritype | Lithium-ion |
| Materiale | 6061-T6 aluminiumslegering |
| Vandmodstandsniveau | Vandtæt (IPX8) |
| Drop modstand | 1.5 meter |
| Varens vægt | 5 ounce |
| Produktdimensioner | 25.3" D x 8.1" B x 8.6" H |
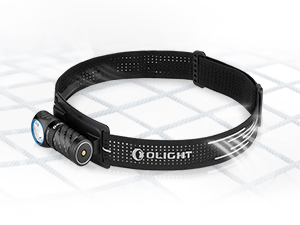
Image: Detailed table showing specifications for white light (Turbo, High, Medium, Low, Moon) and red light (High, Low) modes, including lumens, runtime, and beam distance.
Garanti og support
The OLIGHT Perun 3 Mini Headlamp comes with a Lifetime Warranty. For support, please visit the official OLIGHT webwebstedet eller kontakt kundeservice gennem din forhandler.
For additional information and products, visit the OLIGHT Butik.


