1. Produktet er slutview
The ERYITRDK A19 Mini Security Camera is a versatile device designed for various monitoring needs, offering both Wi-Fi and non-Wi-Fi operation modes. Its compact size and advanced features make it suitable for indoor security, pet monitoring, and child supervision.
Nøglefunktioner:
- Dobbelt tilslutning: Operates with or without Wi-Fi for flexible monitoring.
- High Definition: Records in 1080P resolution with a 140° wide-angle lens.
- Nattesyn: Infrared LEDs provide clear visibility up to 10 meters in low-light conditions.
- Bevægelsesdetektion: Automatically records when movement is detected.
- Lang optagetid: Built-in 1000mAh battery supports 4-5 hours of continuous recording.
- Kompakt design: Weighs only 48g and measures 31x31x38mm, with a built-in magnet for easy placement.
- Loop-optagelse: Overskriver automatisk ældre files for at sikre kontinuerlig optagelse.
Inkluderede komponenter:
- Mini camera body x1
- Rotatable bracket x1
- Type-C charging cable x1 (USB-A terminal)
- 3M replacement double-sided tape x2
- Japanese instruction manual x1

Image: The ERYITRDK A19 Mini Security Camera demonstrating its night vision feature, capturing clear images of a dog in both daytime and nighttime settings.

Image: The ERYITRDK A19 Mini Security Camera highlighting its ultra-compact design and various installation possibilities in different indoor environments.
Video: En udpakning og mereview of the ERYITRDK A19 Mini Security Camera, demonstrating its components and compact design.
2. Opsætning
2.1 Indledende forberedelse
- Oplad kameraet: Connect the camera to a power source using the provided Type-C USB cable. Ensure the camera is fully charged before first use.
- Indsæt MicroSD-kort: Insert a microSD card (up to 256GB, sold separately) into the TF card slot. The camera requires a microSD card for recording.
- Tænd: Locate the power switch (often labeled A/B/OFF or similar) and slide it to the 'ON' position.
2.2 Indstilling af dato og klokkeslæt
For at sikre nøjagtige tideramps on your recordings, set the date and time:
- Tilslut kameraet til din computer ved hjælp af USB-kablet.
- Open the camera's storage drive on your computer.
- Locate and open the 'time.txt' file.
- Edit the date and time in the format YYYY-MM-DD HH:MM:SS Y (e.g., 2025-03-25 14:23:30 Y). Ensure the format is strictly followed.
- Save the 'time.txt' file and safely eject the camera from your computer.
Video: Instructions on how to set the date and time for the camera by editing the 'time.txt' file på en computer.
2.3 Appinstallation og -forbindelse
Download the dedicated app (e.g., O-KAM Pro) from your smartphone's app store. The camera supports two connection methods:
- Wi-Fi Connection (Remote Monitoring):
- Ensure your camera is powered on and within range of your Wi-Fi network.
- Åbn appen, og følg instruktionerne på skærmen for at tilføje en ny enhed.
- Vælg dit Wi-Fi-netværk, og indtast adgangskoden.
- Once connected, you can remotely view live footage and adjust settings.
- Direct Connection (AP Mode - No Wi-Fi):
- In areas without Wi-Fi, the camera can create its own Wi-Fi hotspot.
- Connect your smartphone directly to the camera's Wi-Fi hotspot (usually named something like 'OK-XXXXXX').
- Åbn appen for at view live footage, set date/time, and configure motion detection. Note that remote viewing is not possible in this mode.
Video: Demonstrates the process of connecting the camera to a smartphone app for live viewing og drift.
3. Betjeningsvejledning
3.1 Optagelsestilstande
- Kontinuerlig optagelse: By default, the camera records 24 hours a day when an SD card is inserted and power is supplied. This mode is ideal for constant surveillance.
- Optagelse af bevægelsesdetektering: Activate this mode via the smartphone app. The camera will only record when it detects movement, saving storage space and battery life.
- Loop-optagelse: When the microSD card is full, the camera automatically overwrites the oldest footage, hvilket sikrer kontinuerlig optagelse uden manuel indgriben.
3.2 Live View og afspilning
- Levende View: Access real-time video feed through the connected smartphone app.
- Afspilning: Optaget footage stored on the microSD card can be accessed and played back through the app or by connecting the camera to a computer.
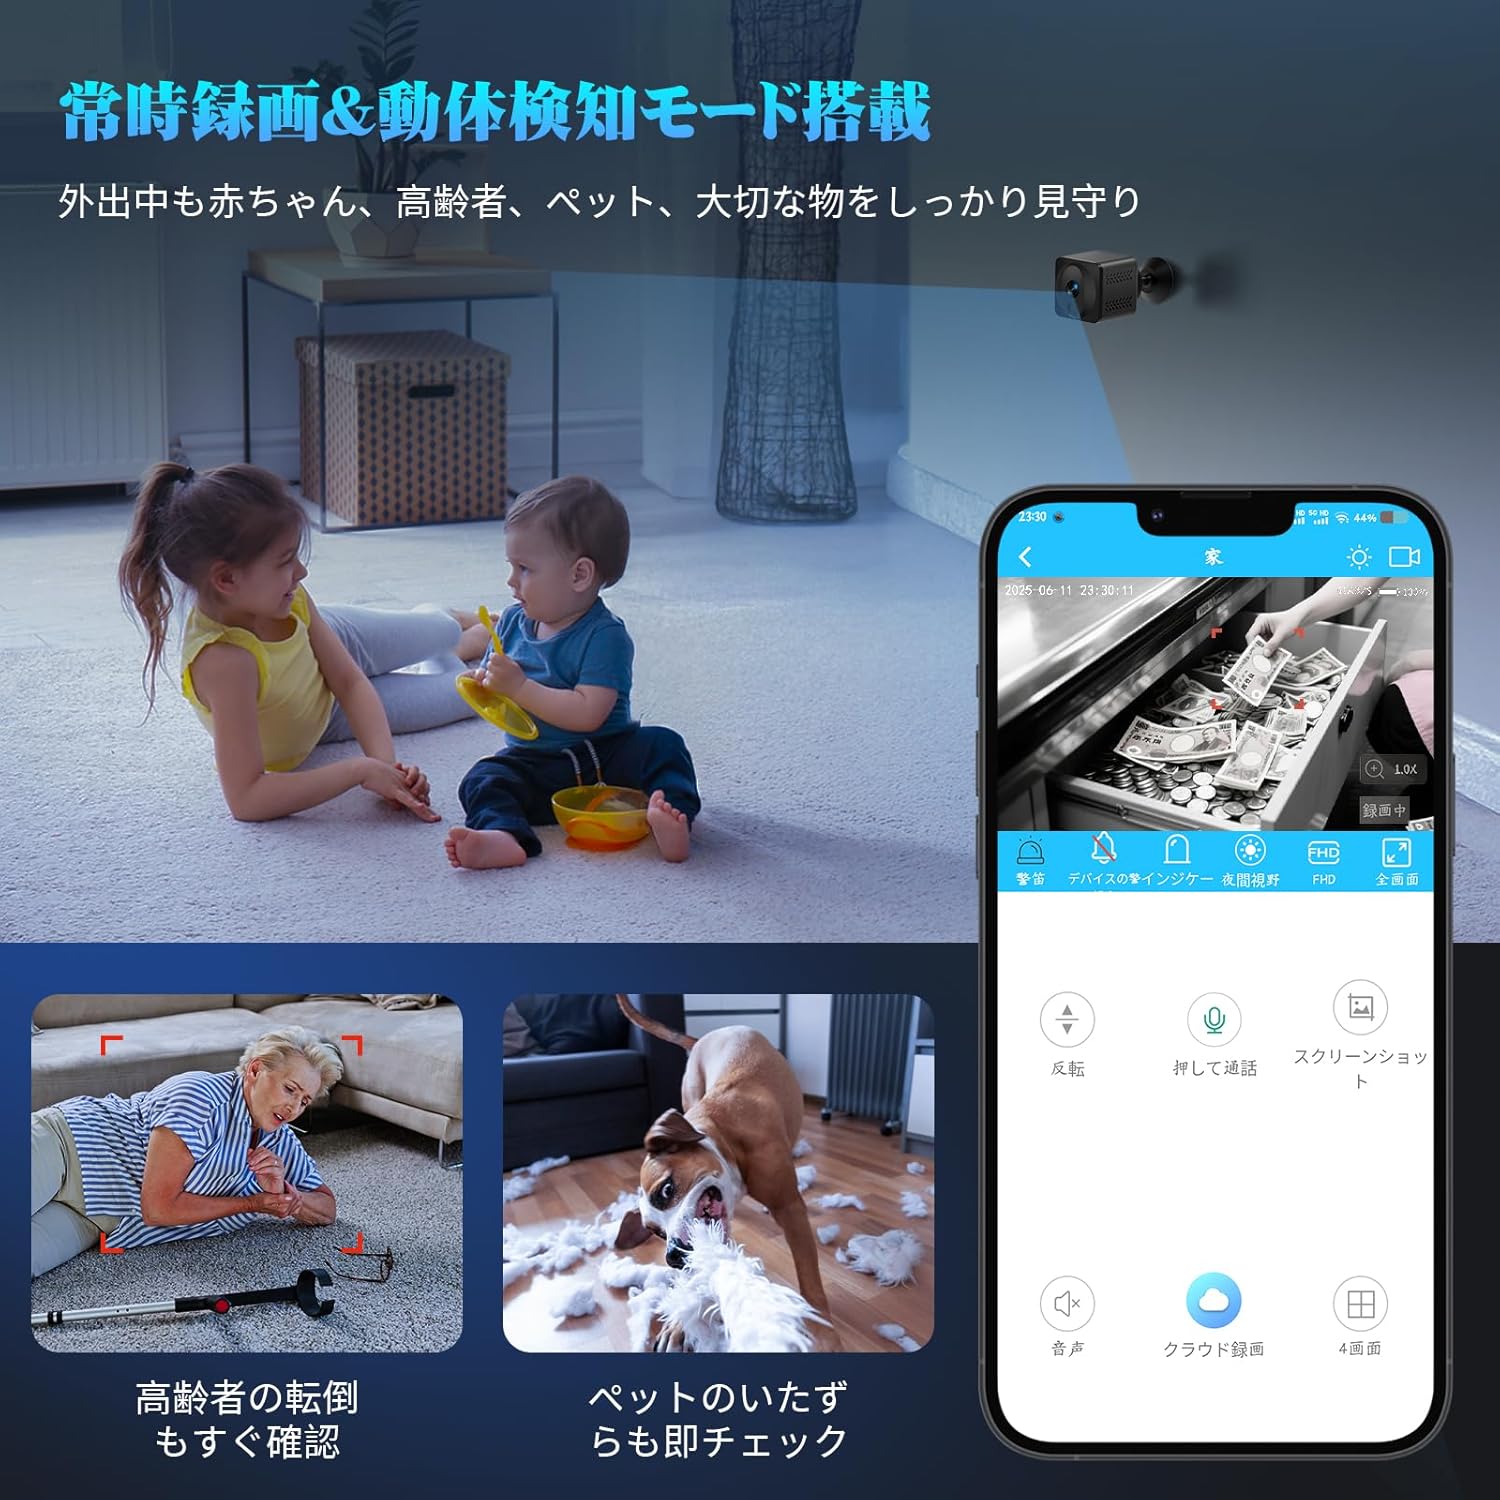
Image: The ERYITRDK A19 Mini Security Camera illustrating its continuous recording and motion detection capabilities for monitoring various subjects.
Video: An outdoor shooting test demonstrating the video quality and performance of the camera in a real-world scenario.
4. Vedligeholdelse
- Rensning: Brug en blød, tør klud til at rengøre kameralinsen og huset. Undgå at bruge skrappe kemikalier eller slibende materialer.
- Batteripleje: For optimal battery life, avoid fully discharging the camera frequently. Charge the camera regularly, especially if it will be stored for an extended period.
- Firmwareopdateringer: Check the app periodically for any available firmware updates to ensure optimal performance and new features.
- Opbevaring: Opbevar kameraet et køligt og tørt sted, væk fra direkte sollys og ekstreme temperaturer.
5. Fejlfinding
- Kamera tænder ikke: Sørg for, at batteriet er opladet. Tilslut kameraet til en strømkilde, og prøv igen.
- Kan ikke oprette forbindelse til Wi-Fi:
- Verify your Wi-Fi network name and password are correct.
- Sørg for, at kameraet er inden for rækkevidde af din Wi-Fi-router.
- Kameraet understøtter kun 2.4 GHz Wi-Fi-netværk. 5 GHz-netværk understøttes ikke.
- Try resetting the camera using the reset pin.
- Dårlig billedkvalitet: Ensure the lens is clean. Check the app settings to confirm 1080P resolution is selected.
- Problemer med optagelse:
- Ensure a formatted microSD card is inserted correctly.
- Check if the microSD card is full (loop recording should prevent this, but verify).
- Ensure the camera is in the correct recording mode (continuous or motion detection).
- Forkert dato/tidspunkt: Re-follow the steps in Section 2.2 to set the date and time via the 'time.txt' file.
- Batterilevetiden er kortere end forventet: Continuous recording and frequent Wi-Fi usage can consume battery faster. Ensure the camera is fully charged.
6. Specifikationer
| Feature | Specifikation |
|---|---|
| Mærke | ERYITRDK |
| Modelnavn | A19 |
| Farve | Sort |
| Produktmål (LxBxH) | 31 x 31 x 38 mm |
| Produktets vægt | 48 g |
| Videooptagelsesopløsning | 1080p |
| Vidvinkel | 140° |
| Night Vision Range | 10 meter |
| Forbindelsesteknologi | Wi-Fi (kun 2.4 GHz) |
| Batteritype | Lithium polymer |
| Batterikapacitet | 1000mAh (approx. 4-5 hours recording) |
| Understøttelse af microSD-kort | Up to 256GB (sold separately) |
| Anbefalet brug | Indendørs sikkerhed |
| Monteringstype | Wall Mount (with included bracket) |
7. Garanti og support
The ERYITRDK A19 Mini Security Camera comes with a 1 års producentgaranti.
If you encounter any issues or have questions regarding your product, please contact customer support through Amazon:
- Go to 'Your Account' on Amazon.
- Select 'Your Orders'.
- Find the ERYITRDK A19 Mini Security Camera in your purchased items.
- Click on 'Contact Seller' to reach our support team.


