1. Introduktion
This manual provides essential information for the proper setup, operation, and maintenance of your EVICIV 15.6" 1080P Portable Monitor. Please read this manual thoroughly before using the product to ensure optimal performance and longevity. This monitor is designed to extend your visual workspace, offering a Full HD IPS display with versatile connectivity for various devices.
2. Pakkens indhold
Kontroller venligst, at alle nedenstående varer er til stede i din pakke:
- EVICIV 15.6" 1080P Portable Monitor
- Protective Sleeve Case
- 2 x USB-C til USB-C kabler
- 1 x USB-A til USB-C-kabel
- 1 x Mini HDMI til HDMI kabel
- 1 x PD30W Power Adapter
- 4 x M4 x 4mm VESA Screws
- Brugervejledning (dette dokument)
3. Produktet er slutview
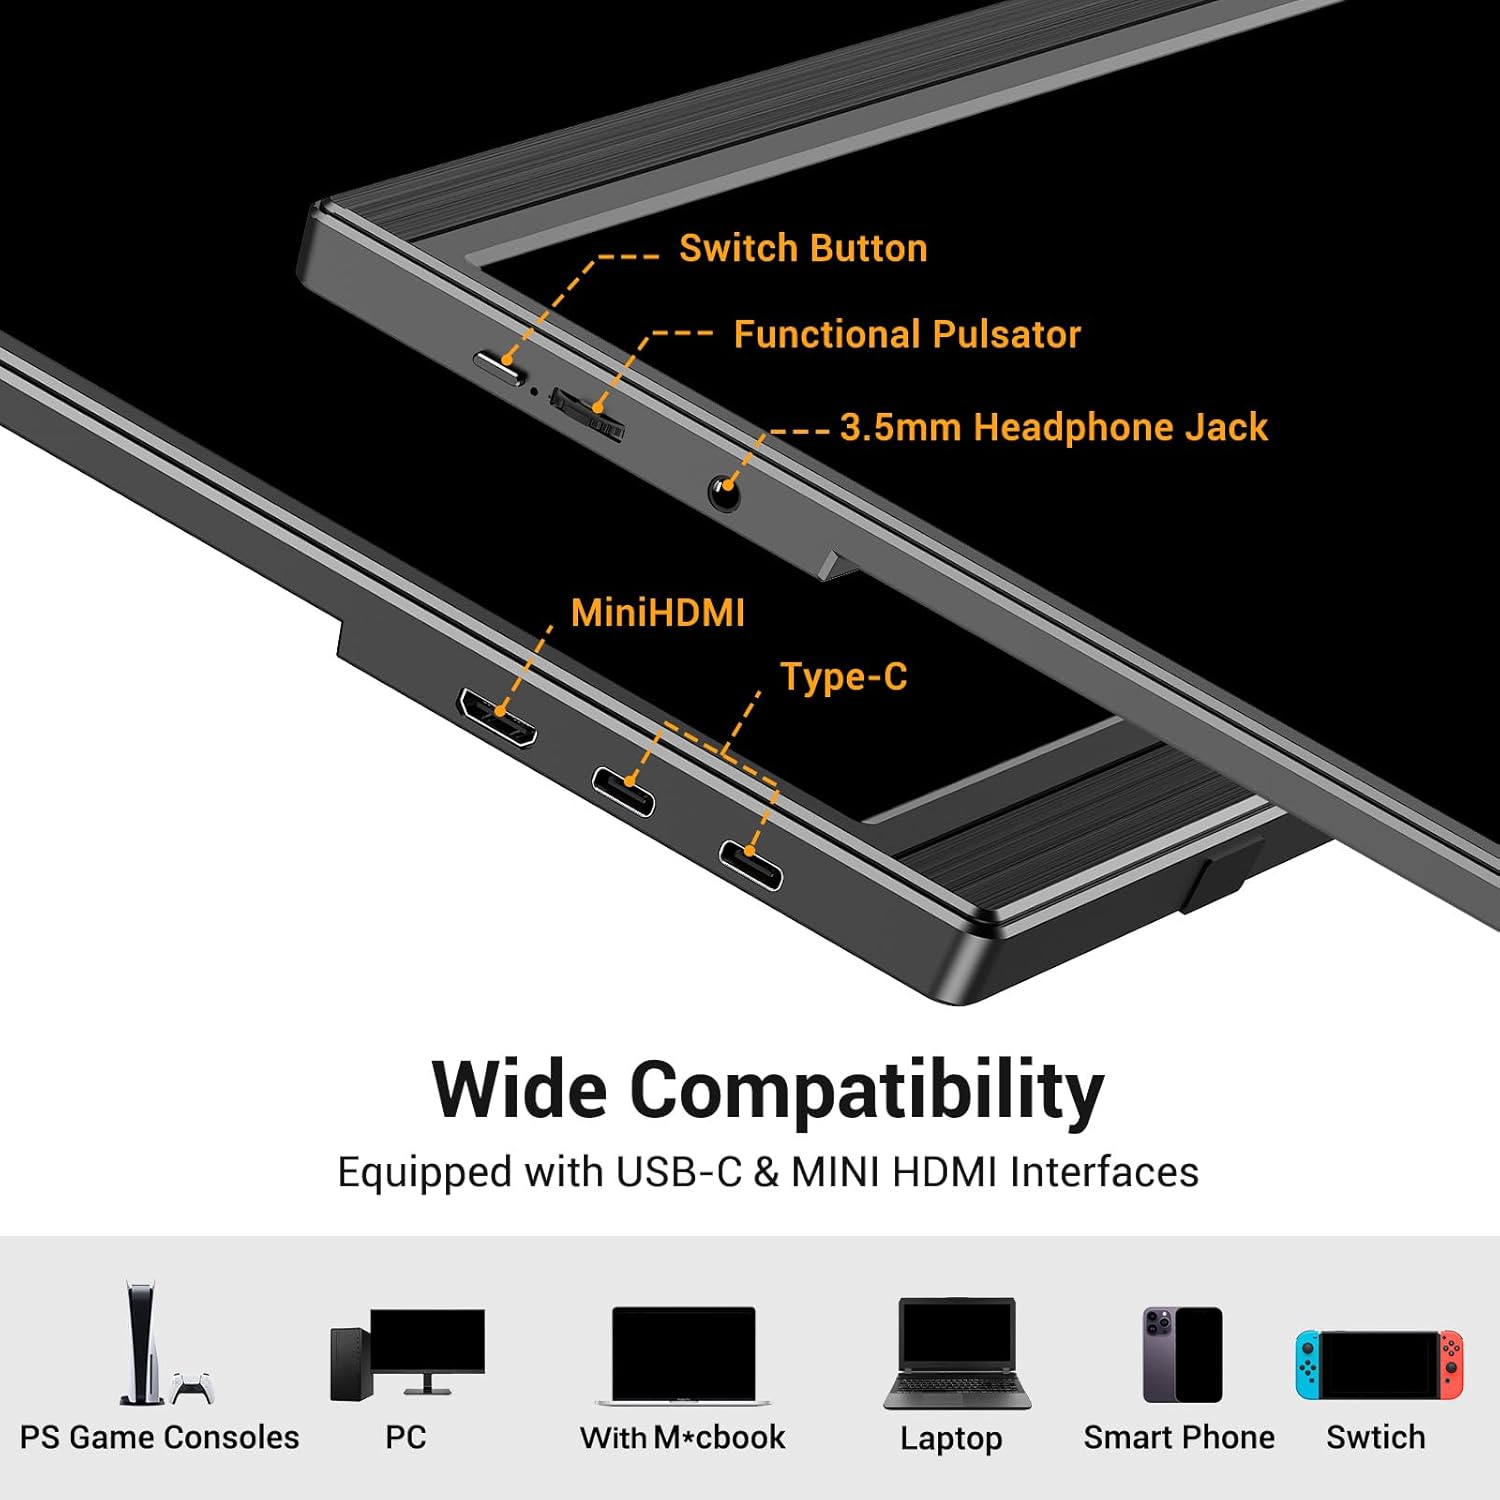
The EVICIV portable monitor features a sleek design with essential ports and controls for ease of use.

Dette billede viser sideprofile of the EVICIV portable monitor, highlighting its connectivity options. From left to right, it shows a Switch Button, a Functional Pulsator (likely for OSD navigation), a 3.5mm Headphone Jack, a Mini HDMI port, and two Type-C (USB-C) ports. Below these ports, icons illustrate compatibility with PS Game Consoles, PC, MacBook, Laptop, Smart Phone, and Switch.
Nøglefunktioner:
- 15.6-inch Full HD (1920x1080) IPS Display: Giver bred viewvinkler og nøjagtig farvegengivelse.
- Alsidig tilslutning: Equipped with USB-C and Mini HDMI ports for broad device compatibility.
- Integreret stativ: Built-in adjustable stand for ergonomic viewing.
- VESA Mount kompatibel: Understøtter 75x75 mm VESA-montering for fleksibel installation.
- Indbyggede højttalere: For integrated audio output.
- Lightweight and Ultra-Slim: Designed for portability.
4. Opsætning
4.1 Connecting to Devices via USB-C
For devices with a full-function USB-C port (supporting DisplayPort Alternate Mode and Power Delivery), a single USB-C cable can transmit both video signal and power to the monitor.
This image illustrates a laptop connected to the EVICIV portable monitor via a single USB-C cable. The diagram shows that this connection provides both simultaneous power supply and signal transmission. Text indicates that the connected device needs a Type C 3.1 interface or a Thunderbolt 3/4 full-function USB-C port for this functionality.
- Connect one end of the USB-C to USB-C cable to your device's full-function USB-C port.
- Connect the other end of the USB-C to USB-C cable to one of the monitor's USB-C ports.
- Skærmen burde automatisk registrere signalet og tænde.
4.2 Connecting to Devices via Mini HDMI
For devices that do not support full-function USB-C, or if you prefer HDMI, you can use the Mini HDMI port for video signal and a separate USB-C cable for power.
The lower part of the image above shows a laptop connected to the EVICIV portable monitor using a Mini HDMI cable for video and a USB-C to USB-C cable for power. Text explains that if the device does not have a USB-C port, the display can be connected via an HDMI cable and a USB-C power cable. A 5V/3A power plug is provided in the package for this purpose.
- Connect one end of the Mini HDMI to HDMI cable to your device's HDMI port.
- Connect the other end of the Mini HDMI to HDMI cable to the monitor's Mini HDMI port.
- Connect one end of the USB-A to USB-C cable to the included PD30W power adapter (or another suitable power source).
- Connect the USB-C end of the cable to one of the monitor's USB-C ports for power.
- Ensure the power adapter is plugged into a wall outlet.
4.3 Brug af den integrerede stander
The monitor features a built-in adjustable stand for comfortable viewing vinkler.

This image compares the EVICIV monitor's adjustable stand with a non-adjustable one. The EVICIV monitor features an ergonomic stand allowing 0-90° tilt adjustment, which helps reduce strain on the cervical spine and eyes. In contrast, a non-adjustable stand increases this burden.
- Træk forsigtigt den integrerede stativ ud fra bagsiden af skærmen.
- Juster stativet til det ønskede viewing angle (0-90° tilt adjustment).
- Ensure the monitor is stable on a flat surface.
4.4 VESA-montering
For more permanent or flexible mounting solutions, the monitor is VESA compatible.

This image demonstrates the VESA mounting capability of the EVICIV portable monitor. It shows the back of the monitor with a VESA hole spacing of 75mm x 75mm and a hole depth of 3mm. The image illustrates both horizontal and vertical installation options using a VESA mount, noting that 2 screws (included) are required.
- Locate the VESA mounting holes on the back of the monitor (75x75mm spacing).
- Attach your VESA-compatible mount using the provided M4 x 4mm screws.
- Ensure the mount is securely fastened before releasinskærmen.
5. Betjening
5.1 Tænd/sluk
To power on the monitor, press the 'Switch Button' located on the side. To power off, press and hold the 'Switch Button' for a few seconds.
5.2 OSD-menu navigation
The On-Screen Display (OSD) menu allows you to adjust various monitor settings. Use the 'Functional Pulsator' (joystick-like button) to navigate the menu.
- Press the Pulsator: For at åbne OSD-menuen.
- Move Pulsator Up/Down: Til at navigere gennem menupunkter.
- Move Pulsator Left/Right: For at justere værdier eller åbne undermenuer.
- Press Pulsator Again: To confirm a selection or exit a sub-menu.
5.3 Skærmindstillinger
Within the OSD menu, you can customize display parameters:
- Lysstyrke/kontrast: Juster den samlede luminans og kontrastforhold.
- Farveindstillinger: Rediger farvetemperatur, farvetone og mætning.
- HDR-tilstand: Enable or disable High Dynamic Range for enhanced visual experience (if supported by the source).
- Aspektforhold: Select between 16:9 or other available aspect ratios.
- Øjenplejetilstand: Reducer udsendelse af blåt lys for komfort viewunder længerevarende brug.
5.4 Lydindstillinger
The monitor includes built-in speakers. You can adjust the volume or mute the audio through the OSD menu. Alternatively, connect external headphones or speakers to the 3.5mm headphone jack.
6. Vedligeholdelse
Korrekt vedligeholdelse sikrer din skærms levetid og ydeevne.
- Rengøring af skærmen: Brug en blød, fnugfri klud lidt dampened with water or a non-abrasive screen cleaner. Avoid harsh chemicals or abrasive materials.
- Rengøring af Casing: Tør skærmen c afasinmed en blød, tør klud.
- Opbevaring: When not in use, store the monitor in its protective sleeve in a cool, dry place away from direct sunlight and extreme temperatures.
- Håndtering: Avoid dropping or subjecting the monitor to strong impacts. Do not place heavy objects on the monitor.
7. Fejlfinding
Hvis du støder på problemer med din skærm, kan du se følgende almindelige problemer og løsninger:
| Problem | Mulig løsning |
|---|---|
| Ingen visning/meddelelsen "Intet signal" |
|
| Skærmen tænder ikke |
|
| Billedet er forvrænget eller flimrer |
|
| Ingen lyd fra højttalerne |
|
If the problem persists after trying these solutions, please contact EVICIV customer support.
8. Specifikationer
| Feature | Detalje |
|---|---|
| Mærke | EVICIV |
| Modelnummer | 180385a4-07e3-4163-96db-21a5f0816169 |
| Skærmstørrelse | 15.6 tommer |
| Opløsning | FHD 1080p (1920 x 1080) |
| Paneltype | IPS |
| Aspektforhold | 16:9 |
| Opdateringshastighed | 60 Hz |
| Svartid | 3 millisekunder |
| Skærmoverflade | Mat |
| Produktdimensioner | 1.3D x 36W x 22.8H centimeter |
| Varens vægt | 650 g |
| Voltage | 5 volt (AC) |
| Strømforbrug | 7 watt |
| Særlige funktioner | Portable, Built-In Speakers, High Dynamic Range (HDR) |
| Farve | Sort |
9. Garanti og support
EVICIV is committed to providing comprehensive customer care for your product.
- Garantiperiode: This product comes with a 2-year support period from the date of purchase.
- Kundeservice: We offer 24-hour assistance for any inquiries or issues you may encounter.
- Resolution Timeframe: Our goal is to address and resolve any inquiries efficiently, targeting resolution within an 8-hour timeframe.
For support, please refer to the contact information provided with your purchase or visit the official EVICIV webwebsted.


