1. Introduktion
This manual provides detailed instructions for the installation, operation, and maintenance of your UNITOPSCI Android 15 Car Stereo. Please read this manual thoroughly before using the product to ensure proper functionality and safety. This unit is specifically designed for Lexus ES models from 2001 to 2005 (ES250, ES300, ES330).

Image 1.1: UNITOPSCI Android 15 Car Stereo with main accessories.
2. Pakkens indhold
Bekræft, at alle nedenstående varer er inkluderet i din pakke:
- 1 x bilradioenhed
- 1 x strømkabel
- 1 x bil bag View Kamera
- 1 x installationsværktøjssæt
- 1 x GPS-antenne
- 1 x bagkameraindgangskabel
- 1 x RCA-kabel
- 2 x USB-kabler
- 1 x brugermanual
- 1 x mikrofon

Image 2.1: Visual representation of the package contents and unit dimensions.
3. Kompatibilitet og vigtige bemærkninger
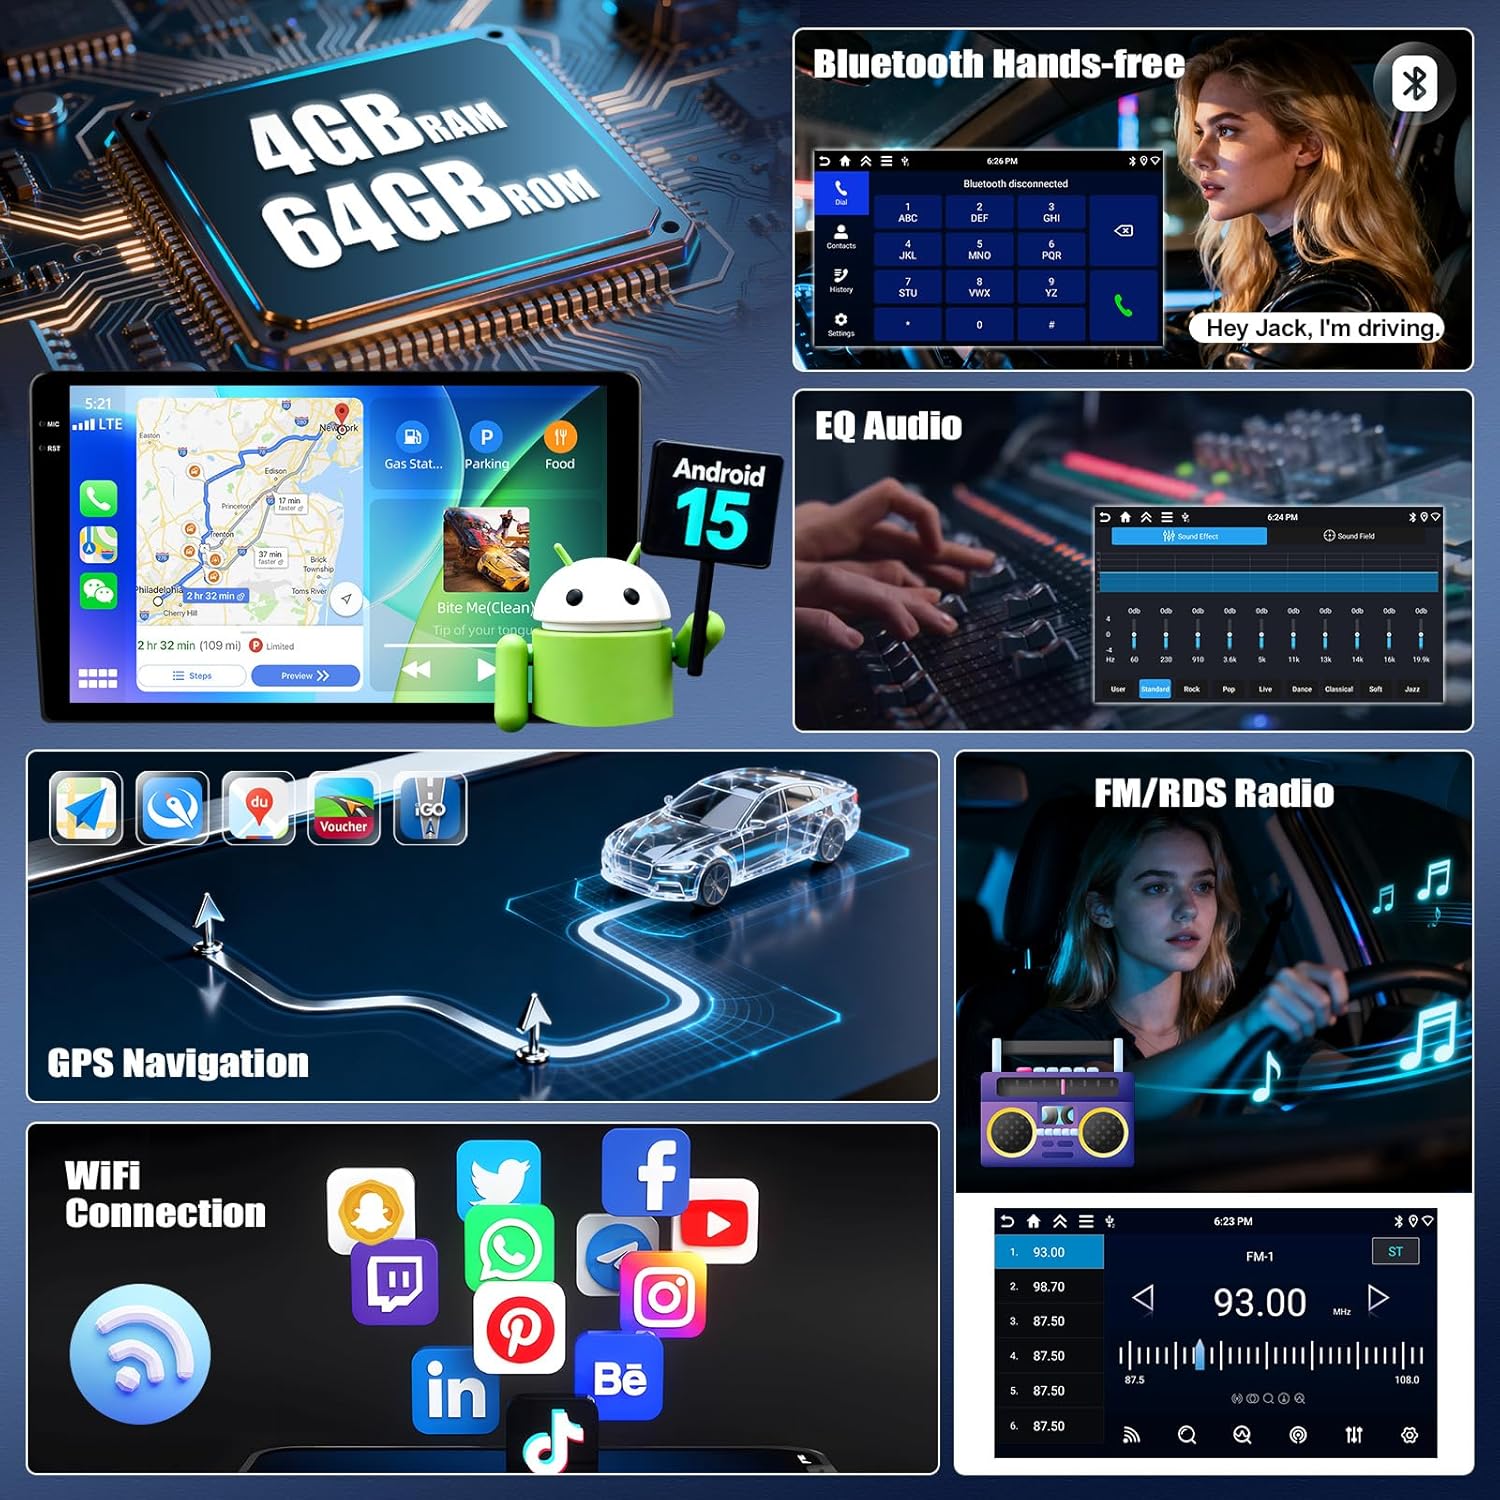
This car stereo is designed for Lexus ES 2001-2005 ES250/300/330 models. It features a 9-inch IPS touchscreen with 1280*720P resolution and runs on Android 15 with 4GB RAM and 64GB ROM.
3.1 Wiring Harness and CANBUS
Vigtig: If your vehicle's original CD player has an incompatible back interface (as shown in Image 3.1, types B, C, or D), you may need to purchase an additional wiring harness and CANBUS decoder separately. The standard wiring harness included is for basic configurations (Type A). Please consult customer support if you are unsure about your vehicle's specific configuration.
Billede 3.1: Eks.amples of compatible (A) and incompatible (B, C, D) CD player back interfaces.
4. Opsætning og installation
Installation of this car stereo requires technical knowledge. It is recommended to seek professional installation to avoid damage to the unit or your vehicle. Ensure the vehicle's battery is disconnected before beginning installation.
4.1 General Installation Steps (Consult a professional or vehicle-specific guide for detailed steps):
- Remove the original car stereo unit from the dashboard.
- Connect the provided power cable, RCA cables, USB cables, GPS antenna, and rear camera input cable to the new head unit.
- If required, connect the additional wiring harness and CANBUS decoder.
- Carefully route all cables to their respective locations in the vehicle.
- Mount the new car stereo into the dashboard opening.
- Tilslut køretøjets batteri igen, og test alle funktioner.
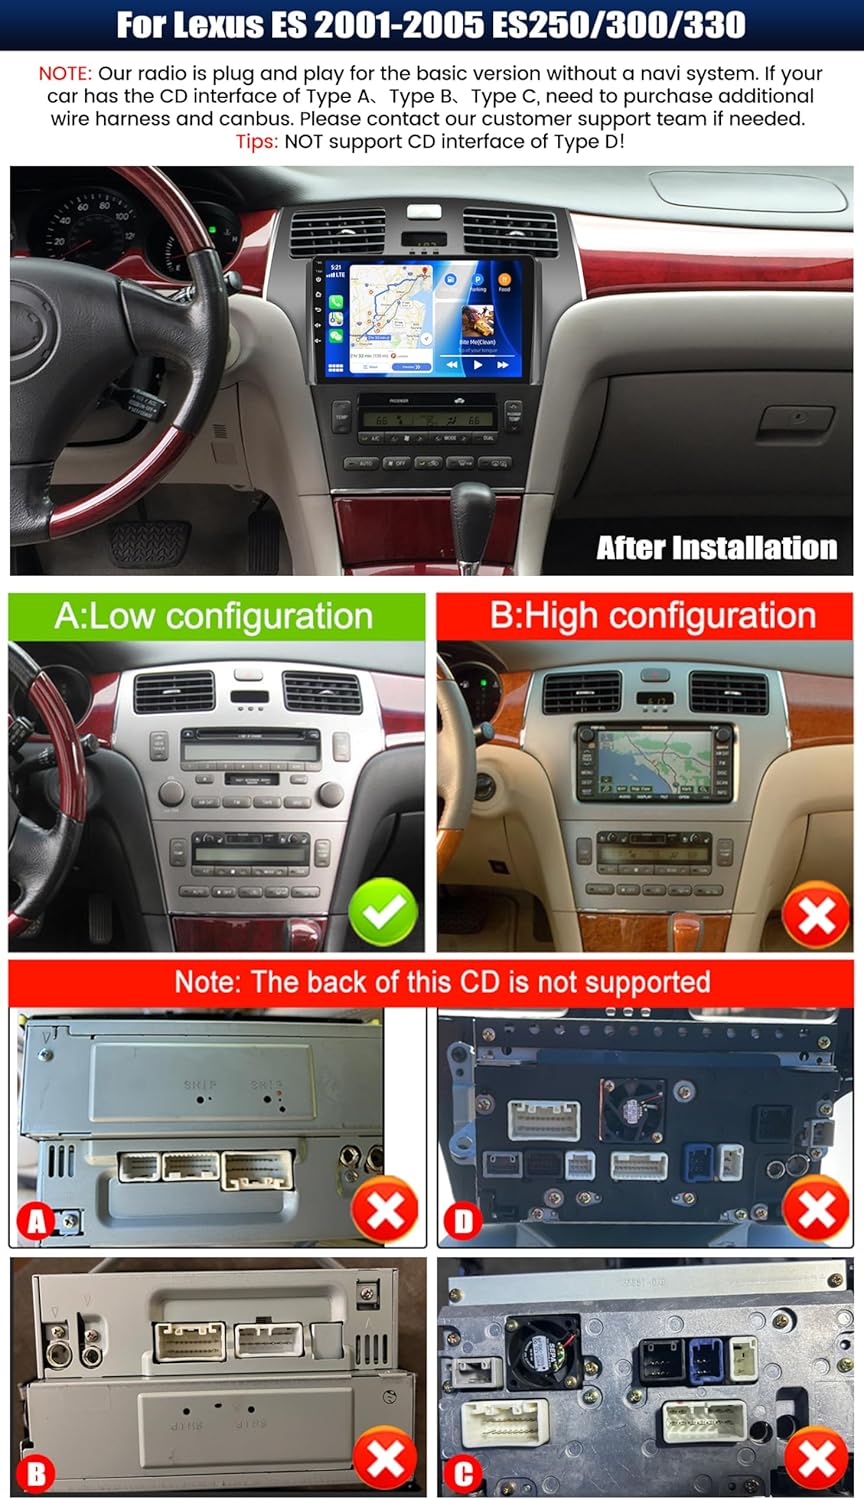
Billede 4.1: Eks.ample of the car stereo installed in a Lexus ES dashboard.
5. Betjeningsvejledning
5.1 Trådløs CarPlay / Android Auto
The unit supports wireless CarPlay for iOS devices and wireless Android Auto for Android devices. This allows seamless integration of your smartphone's navigation, music, calls, and messaging functions directly on the car stereo display.
- Sørg for, at Bluetooth og Wi-Fi er aktiveret på din smartphone.
- Naviger til CarPlay- eller Android Auto-appen på bilstereoen.
- Følg vejledningen på skærmen for at parre din enhed.
- Once connected, you can access compatible apps and use voice commands (Siri or Google Assistant).

Image 5.1: Wireless CarPlay and Android Auto functionality.
5.2 Spejllinkfunktion
Mirror Link allows you to display your smartphone's screen on the car stereo. For Android devices, you can also control the phone directly from the stereo's touchscreen.
- Connect your smartphone to the car stereo via USB or Wi-Fi.
- Open the 'Mirror Link' application on the car stereo.
- Follow the instructions on the screen to establish the connection.
5.3 GPS-navigation
The unit features a built-in GPS module supporting both online and offline navigation. Pre-installed maps for North America and worldwide are available.
- To use online navigation, ensure the unit is connected to Wi-Fi.
- For offline navigation, download map data in advance.
- Access navigation through the dedicated 'GPS' or 'Maps' application.

Image 5.2: GPS Navigation and Wi-Fi connectivity.
5.4 Bluetooth 5.0
Tilslut din smartphone via Bluetooth for håndfri opkald og streaming af lyd.
- Aktiver Bluetooth på din smartphone og bilstereoen.
- Søg efter available devices on the car stereo and select your phone.
- Bekræft parringskoden på begge enheder.
- Når den er parret, kan du foretage/modtage opkald og afspille musik trådløst.
5.5 FM/RDS-radio
The built-in FM/RDS tuner provides enhanced radio signal reception. You can store up to 18 preset stations.
- Access the 'Radio' application.
- Brug scanningsfunktionen til at finde tilgængelige stationer.
- Tryk og hold en forudindstillet knap nede for at gemme den aktuelle station.
5.6 EQ-lydindstillinger
Adjust audio output with the integrated Equalizer (EQ) to customize your listening experience. Multiple preset sound effects are available.
- Navigate to 'Sound Settings' or 'EQ' in the main menu.
- Choose from various preset sound modes (e.g., Pop, Rock, Jazz) or manually adjust frequency bands.

Image 5.3: Bluetooth, FM/RDS Radio, and EQ Audio interfaces.
5.7 Ratbetjening (SWC)
The unit supports steering wheel controls, allowing you to manage audio functions (volume, track skipping, call answering) without taking your hands off the wheel.
- Få adgang til indstillingerne for 'Ratbetjening' i systemmenuen.
- Follow the on-screen instructions to program each button on your steering wheel to the desired function.
5.8 Opdelt skærmfunktionalitet
The split-screen feature allows you to run two applications simultaneously on the display, such as navigation and music playback. You can adjust the size and position of each app.
- From a running application, swipe from the side or long-press the recent apps button (method may vary by UI theme) to activate split-screen mode.
- Vælg et andet program, der skal køres sammen med det første.

Image 5.4: Display features including IPS touchscreen, UI themes, and split screen.
6. Bagside View Kamerabetjening
Det medfølgende AHD-bakkamera giver et klart billede view of the area behind your vehicle when reversing. It automatically activates when the vehicle is shifted into reverse gear.
- Ensure the rear camera is properly installed and connected to the 'Rear Camera Input' on the head unit.
- When the vehicle is in reverse, the display will automatically switch to the camera feed, showing parking assist lines.

Image 6.1: Steering Wheel Control interface and AHD Backup Camera view.
7. Specifikationer
| Feature | Specifikation |
|---|---|
| Operativsystem | Android 15 |
| VÆDDER | 4 GB |
| ROM | 64 GB |
| Skærmstørrelse | 9 tommer |
| Skærmopløsning | 1280 x 720P IPS |
| Bluetooth version | 5.0 |
| Forbindelse | Bluetooth, Wi-Fi, USB |
| Særlige funktioner | Wireless CarPlay, Android Auto, Mirror Link, GPS Navigation, FM/RDS, EQ, Steering Wheel Control, AHD Backup Camera, Multiple UI Themes, Split Screen |
| Korttype | North America, Worldwide (offline/online) |
| Varens vægt | 3.89 pund |
| Pakkedimensioner | 15.35 x 9.65 x 3.35 tommer |
8. Fejlfinding
Hvis du støder på problemer med din bilstereo, kan du se følgende almindelige fejlfindingstrin:
- Ingen strøm: Kontrollér alle strømtilslutninger og sikringer. Sørg for, at køretøjets batteri er korrekt tilsluttet.
- Ingen lyd: Kontroller højttalertilslutninger. Kontroller lydstyrkeniveauer og EQ-indstillinger. Sørg for, at den korrekte lydkilde er valgt.
- GPS-signaltab: Sørg for, at GPS-antennen er korrekt installeret og har en klar view af himlen. Kontroller GPS-indstillingerne i enheden.
- Problemer med Bluetooth-forbindelse: Sørg for, at Bluetooth er aktiveret på begge enheder. Slet tidligere parringer, og forsøg at parre igen.
- CarPlay/Android Auto opretter ikke forbindelse: Ensure Wi-Fi and Bluetooth are active on your phone. Try restarting both the phone and the car stereo. Check for software updates for the car stereo.
- Bakkamera viser ikke: Check the camera's power and video input connections. Ensure the reverse gear signal wire is correctly connected.
- Touchskærm reagerer ikke: Prøv at genstarte enheden. Hvis problemet fortsætter, kan en fabriksnulstilling være nødvendig (bemærk: dette vil slette alle brugerdata).
Ved vedvarende problemer bedes du kontakte kundesupport.
9. Vedligeholdelse
Korrekt vedligeholdelse sikrer din bilstereos levetid og optimale ydeevne.
- Rengøring af skærmen: Brug en blød, fnugfri klud til forsigtigt at tørre berøringsskærmen af. Ved genstridige pletter, tør let afampRengør kluden med vand eller et skærmsikkert rengøringsmiddel. Undgå skrappe kemikalier eller slibende materialer.
- Softwareopdateringer: Periodically check for available software updates to ensure optimal performance and access to new features. Follow the instructions provided with the update.
- Miljøforhold: Undgå at udsætte enheden for ekstreme temperaturer, direkte sollys i længere perioder eller for høj fugtighed.
- Kabelforbindelser: Kontrollér regelmæssigt, at alle kabler er korrekt tilsluttet for at forhindre periodiske problemer.
10. Garanti og support
UNITOPSCI offers comprehensive support for your product:
- Garanti: The product comes with a 12-month replacement service.
- Penge-tilbage-garanti: Der tilbydes en 30-dages pengene-tilbage-garanti.
- Returnerer: Enjoy 60-days no-worry returns.
- Teknisk support: Dedicated 24/7 professional after-sales team is available to assist with installation or usage inquiries. Lifetime after-sales consultation and technical support are provided.
Kontaktoplysninger:
For online support, kontakt venligst: UNITOPSCI@126.com

Image 10.1: UNITOPSCI customer support information.


