Indledning
Thank you for choosing the Geek AiroCook Torix 25 Litre Smart Air Fryer Oven. This appliance combines the functions of an air fryer and an OTG (Oven Toaster Griller), allowing you to air fry, grill, bake, roast, and toast with ease. This manual provides essential information for safe operation, proper use, and maintenance of your new appliance. Please read it thoroughly before first use and keep it for future reference.
Vigtige sikkerhedsinstruktioner
Ved brug af elektriske apparater skal grundlæggende sikkerhedsforanstaltninger altid følges for at reducere risikoen for brand, elektrisk stød og personskade.
- Læs alle instruktioner før brug af apparatet.
- Rør ikke ved varme overflader. Brug håndtag eller knapper. Brug altid ovnhandsker eller -vanter, når du håndterer varme materialer.
- For at beskytte mod elektrisk stød må ledningen, stikkene eller apparatets kabinet ikke nedsænkes i vand eller anden væske.
- Tæt opsyn er nødvendigt, når et apparat bruges af eller i nærheden af børn.
- Træk stikket ud af stikkontakten, når det ikke er i brug, og før rengøring. Lad det køle af, før du sætter dele på eller af.
- Betjen ikke noget apparat med en beskadiget ledning eller stik, eller efter at apparatet ikke fungerer korrekt eller er blevet beskadiget på nogen måde. Kontakt kundesupport for at få hjælp.
- Brug af tilbehør, der ikke er anbefalet af apparatets producent, kan forårsage skader.
- Må ikke bruges udendørs.
- Lad ikke ledningen hænge ud over kanten af et bord eller bord, eller rør ved varme overflader.
- Må ikke placeres på eller i nærheden af en varm gas- eller elektrisk brænder eller i en opvarmet ovn.
- Der skal udvises ekstrem forsigtighed ved flytning af et apparat, der indeholder varm olie eller andre varme væsker.
- Sæt altid stikket i apparatet først, og sæt derefter ledningen i stikkontakten. For at afbryde forbindelsen skal du slukke for en vilkårlig knap og derefter tage stikket ud af stikkontakten.
- Brug ikke apparatet til andet end tilsigtet brug.
- For store fødevarer eller metalredskaber må ikke sættes i en brødristerovn, da de kan skabe brand eller risiko for elektrisk stød.
- Der kan opstå brand, hvis ovnen er tildækket eller berører brandfarligt materiale, herunder gardiner, draperinger, vægge og lignende, under brug.
- Placer ikke andre materialer end producentens anbefalede tilbehør i ovnen.
- Anbring ikke pap, plastik, papir eller lignende materialer i ovnen.
- Opbevar ikke andre materialer end producentens anbefalede tilbehør i denne ovn, når den ikke er i brug.
- Rengør ikke med metal skuresvampe. Stykker kan brække puden af og røre ved elektriske dele, hvilket skaber risiko for elektrisk stød.
- Forsøg ikke at skubbe mad ud, når apparatet er tilsluttet en stikkontakt.
- Always ensure the appliance is placed on a stable, heat-resistant surface with adequate ventilation around it.
Pakkens indhold
Carefully unpack your Geek AiroCook Torix and check that all items are present and in good condition.
- 1x Geek AiroCook Torix 25 Litre Smart Air Fryer Oven
- Crumb Bakke
- Roterende kurv
- Ovnstativ
- Varmebestandig handske
- Opskriftsbog
- Rotisseriestang
- Fetch Tool (for rotisserie and hot trays)
- Bageplade
- Airfryer kurv

Figur 1: Medfølgende tilbehør. This image displays the nine smart accessories that come with the Geek AiroCook Torix oven: a crumb tray, rotating basket, oven rack, heat-resistant glove, recipe book, rotisserie rod, fetch tool, baking tray, and airfryer basket.
Produkt overview
Familiarize yourself with the components and control panel of your Geek AiroCook Torix oven.
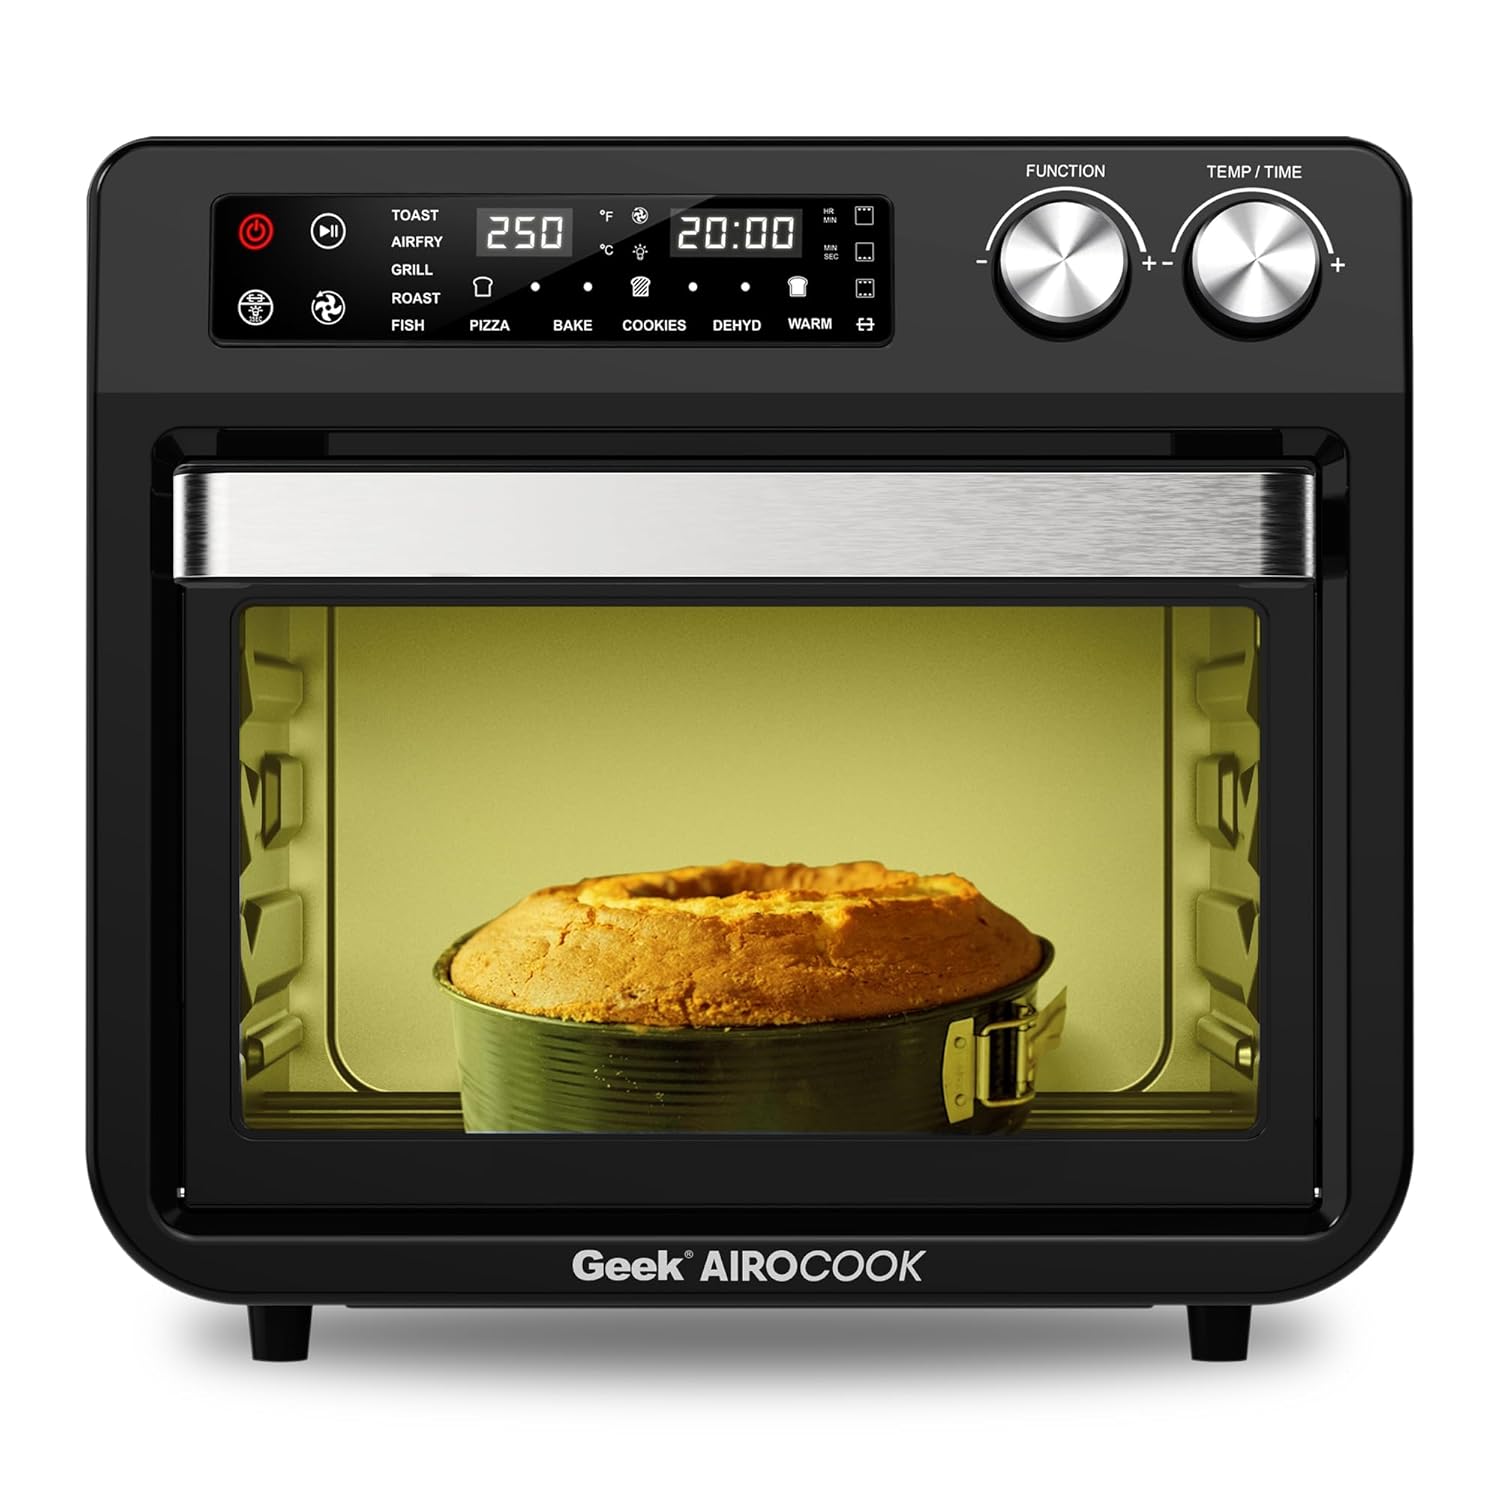
Figur 2: Forside View of the Geek AiroCook Torix. This image shows the overall design of the air fryer oven, featuring the digital display, control knobs, and the transparent glass door with an internal light.
Kontrolpanel

Figure 3: Digital Control Panel. This image highlights the "Smart Touch" control panel with its various buttons and digital display.
- Power knap: Tænder/slukker for apparatet.
- Start/Pause knap: Starter eller sætter tilberedningscyklussen på pause.
- Lys knap: Controls the internal oven light.
- Rotisserie-knap: Aktiverer/deaktiverer rotisseriefunktionen.
- Fan -knap: Controls the convection fan.
- Menu-knap: Cycles through preset cooking functions.
- Time/Temperature Knobs: Justerer tilberedningstid og temperatur.
- Digital LCD-skærm: Shows current settings, time, and temperature.
Opsætning
- Udpakning: Remove all packaging materials, stickers, and labels from the appliance and accessories.
- Indledende rengøring: Tør det udvendige af ovnen af med adamp cloth. Wash all removable accessories (baking tray, airfryer basket, rotating basket, rotisserie kit, oven rack, crumb tray) with warm soapy water, rinse thoroughly, and dry completely.
- Placering: Place the oven on a stable, level, heat-resistant surface. Ensure there is at least 10-15 cm (4-6 inches) of clear space on all sides and above the oven for proper ventilation. Do not place it near flammable materials.
- Første brug (indbrænding): Before cooking food, it is recommended to run the oven empty for about 15-20 minutes at 200°C (390°F) to burn off any manufacturing residues. A slight odor or smoke may be present during this process; this is normal. Ensure the area is well-ventilated.
Betjeningsvejledning
Grundlæggende betjening
- Tænd: Plug the appliance into a grounded electrical outlet. Press the Power Button to turn on the oven. The digital display will illuminate.
- Vælg funktion: Use the Menu Button to cycle through the available cooking functions (e.g., Toast, Air Fry, Grill, Roast, Fish, Pizza, Bake, Cookies, Dehydrate, Warm).
- Juster tid og temperatur: Once a function is selected, use the Time/Temperature knobs to adjust the desired cooking time and temperature. The display will show the current settings.
- Begynd at lave mad: Press the Start/Pause Button to begin the cooking process. The oven light may turn on, and the fan will activate depending on the selected function.
- Pause/Stop: Press the Start/Pause Button again to pause cooking. Press the Power Button to stop the cooking cycle and turn off the oven.
Brug af forudindstillede menuer
The Geek AiroCook Torix features 10 precise preset menus for common dishes.

Figure 4: 10 Preset Menu Options. This image illustrates the various preset cooking functions available, including Toast, Air Fry, Roast, Pizza, Cookies, Fish, Grill, Cake, Dehydrate, and Warm, along with their default temperature and time settings.
- Ristet brød: 250 ° C / 5 min
- Air Fry: 204 ° C / 25 min
- Stege: 204°C / 1 hr
- Pizza: 232 ° C / 15 min
- Cookies: 170 ° C / 12 min
- Fisk: 210 ° C / 16 min
- Grill: 230 ° C / 18 min
- Kage: 177 ° C / 30 min
- Dehydrere: 66 ° C / 5 min
- Varm: 82°C / 1 hr
To use a preset, simply select it using the Menu Button. The oven will automatically set the recommended time and temperature. You can then adjust these settings manually if desired before pressing Start/Pause.
Rotisserie funktion
The rotisserie function is ideal for roasting whole chickens or other large cuts of meat.
- Prepare your food and secure it onto the rotisserie rod using the forks. Ensure the food is centered and balanced.
- Insert the rotisserie rod into the designated slots inside the oven.
- Select a cooking function (e.g., Roast, Grill) and set the desired time and temperature.
- Tryk på rotisserie-knappen for at aktivere rotationen.
- Tryk på Start/Pause for at begynde tilberedningen.
- Once cooking is complete, use the Fetch Tool to safely remove the hot rotisserie rod and food from the oven.
Vedligeholdelse og rengøring
Regelmæssig rengøring sikrer optimal ydeevne og forlænger apparatets levetid.
- Tag altid stikket ud: Tag altid stikket ud af stikkontakten og lad ovnen køle helt af, inden du rengør den.
- Ydre: Tør det udvendige af med adamp klud og mildt rengøringsmiddel. Brug ikke slibende rengøringsmidler eller skuresvampe af metal.
- Indre: Tør de indvendige vægge af med adamp cloth. For stubborn food residue, use a non-abrasive sponge with mild soap. Ensure the interior is dry before next use.
- Tilbehør: Wash the baking tray, airfryer basket, rotating basket, rotisserie kit, oven rack, and crumb tray with warm soapy water. Rinse thoroughly and dry completely. Note: These accessories are not dishwasher safe.
- Krummebakke: Regularly remove and empty the crumb tray located at the bottom of the oven to prevent grease buildup and potential fire hazards.
- Fordyb ikke: Nedsænk aldrig hovedenheden, ledningen eller stikket i vand eller anden væske.
Fejlfinding
| Problem | Mulig årsag | Løsning |
|---|---|---|
| Apparatet tændes ikke. | Ikke tilsluttet; problem med stikkontakt; tænd/sluk-knap ikke trykket ned. | Ensure the power cord is securely plugged into a working outlet. Press the Power Button. |
| Maden tilberedes ikke jævnt. | Overfyldthed; forkert temperatur/tid; maden er ikke vendt rundt. | Do not overcrowd the basket/tray. Adjust temperature/time. For best results, flip or shake food halfway through cooking. |
| Hvid røg kommer fra ovnen. | Grease/oil residue; fatty food cooking. | Clean the oven and accessories thoroughly. For fatty foods, ensure the crumb tray is clean and consider using less oil. |
| Rotisseriefunktionen virker ikke. | Rotisserie rod not properly installed; Rotisserie button not pressed. | Ensure the rotisserie rod is correctly seated in its slots. Press the Rotisserie Button to activate. |
Specifikationer
| Modelnavn | AiroCook Torix |
| Kapacitet | 25 liter |
| Strømudgang | 1800 watt |
| Voltage | 220 volt |
| Produktmål (D x B x H) | 39.5D x 37.5B x 43.5H Centimeter |
| Varens vægt | 10 kilo |
| Materiale | Rustfrit stål |
| Speciel funktion | Air Fryer oven + OTG |
Garanti og support
Your Geek AiroCook Torix 25 Litre Smart Air Fryer Oven comes with a 1 års garanti from the date of purchase. This warranty covers manufacturing defects under normal use. Please retain your purchase receipt as proof of purchase.
For warranty claims, technical support, or any other inquiries, please contact Geek Customer Care:
- Kundeservicenummer: 1800 121 922922
You can also refer to the included recipe book and access the Geek Recipe App for additional cooking inspiration and tips.


