1. Introduktion
Thank you for choosing the AODSK 88-Key Weighted Hammer Action Digital Piano and Storage Bench. This manual provides essential information for the safe and efficient use of your new instrument. Please read it thoroughly before assembly and operation, and retain it for future reference.

Image 1.1: The AODSK 88-Key Digital Piano and accompanying white storage bench.
2. Sikkerhedsinstruktioner
- Strømforsyning: Brug kun den angivne strømadapter. Sørg for, at lydstyrkentage matcher kravene i din region.
- Vand og fugt: Do not expose the instrument to rain, moisture, or excessive humidity. Avoid placing objects filled with liquids on or near the piano.
- Ventilation: Sørg for tilstrækkelig ventilation. Bloker ikke ventilationsåbningerne.
- Varmekilder: Hold instrumentet væk fra varmekilder såsom radiatorer, varmeregistreringsapparater, komfurer eller andre varmeproducerende apparater.
- Rensning: Rengør kun med en tør klud. Brug ikke flydende rengøringsmidler eller aerosoler.
- Børn: Supervise children when they are near the instrument. Small parts could be a choking hazard.
- Moving the Instrument: When moving the piano, ensure it is unplugged and handled carefully to prevent damage or injury.
3. Pakkens indhold
Kontroller venligst, at alle nedenstående varer er inkluderet i din pakke:
- AODSK 88-Key Digital Piano Unit
- White Storage Bench
- Tredobbelt pedalenhed
- Møbelstativkomponenter
- Glidende nøgledæksel
- Strømadapter
- Hovedtelefoner
- Støvdæksel
- Monteringshardware og værktøj
- Brugervejledning (dette dokument)
- Online Lesson Access Information
4. Opsætning
4.1. Digital Piano Assembly
Follow these steps to assemble the digital piano and its stand:
- Pak alle komponenter ud, og læg dem på en blød, ren overflade for at forhindre ridser.
- Attach the side panels of the furniture stand to the main piano body using the provided screws and tools. Ensure all connections are secure.
- Install the triple pedal unit into its designated slot on the stand. Connect the pedal cable to the corresponding port on the piano.
- Carefully place the assembled piano unit in its desired location.
- Slide the key cover into its tracks above the keyboard.
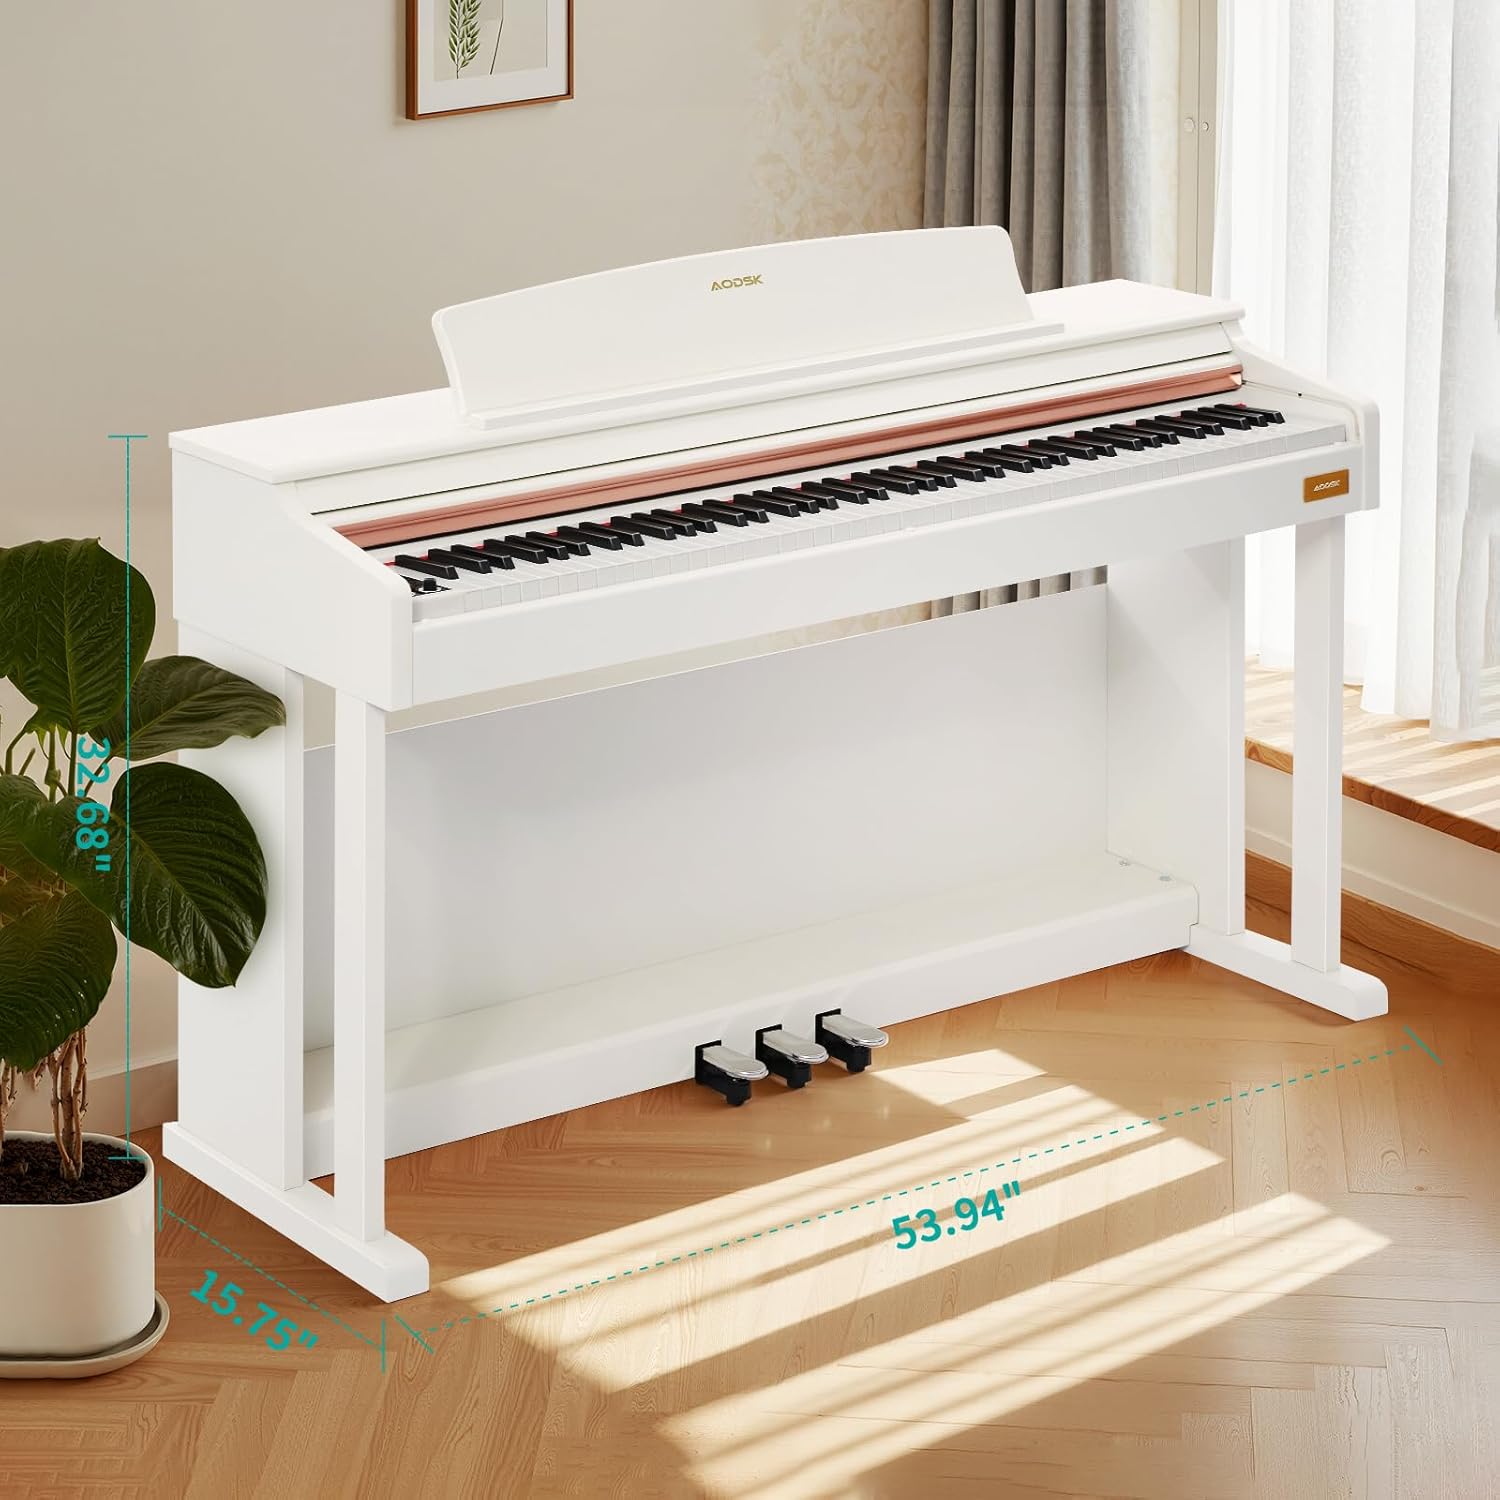
Image 4.1: Digital piano dimensions for placement planning. (Approx. 53.94" W x 15.75" D x 32.68" H)
4.2. Storage Bench Assembly
The storage bench is designed for quick, tool-free assembly:
- Remove the bench legs and hardware from the storage compartment under the seat.
- Screw each leg firmly into the designated corner mounts on the underside of the bench seat. No tools are typically required for this step.
- Ensure all legs are stable and the bench is level before use.

Image 4.2: The storage bench with its lid open, revealing the internal compartment.
5. Komponenter overview
5.1. Kontrolpanel
The control panel provides access to various functions and settings of the digital piano.

Billede 5.1: Nærbillede view of the digital piano's control panel, showing buttons for tone, rhythm, demo, volume, and other features.
- Power knap: Tænder eller slukker klaveret.
- Lydstyrkeknapper: Juster masterlydstyrken.
- Tone knap: Selects from 680 available tones.
- Rytme knap: Selects from 600 available rhythms.
- Demoknap: Plays demonstration songs (80 available).
- Split -knap: Activates dual keyboard split tone function.
- MP3 Play/Pause: Controls MP3 playback via USB.
- Optag/afspil: Initiates and plays back two-track recordings.
- Numerical Select: Used to input specific tone, rhythm, or demo numbers.
- USB-stik: For MP3 playback and potentially other data transfer.
5.2. Triple Pedal System
The piano features a standard triple pedal system for expressive playing.
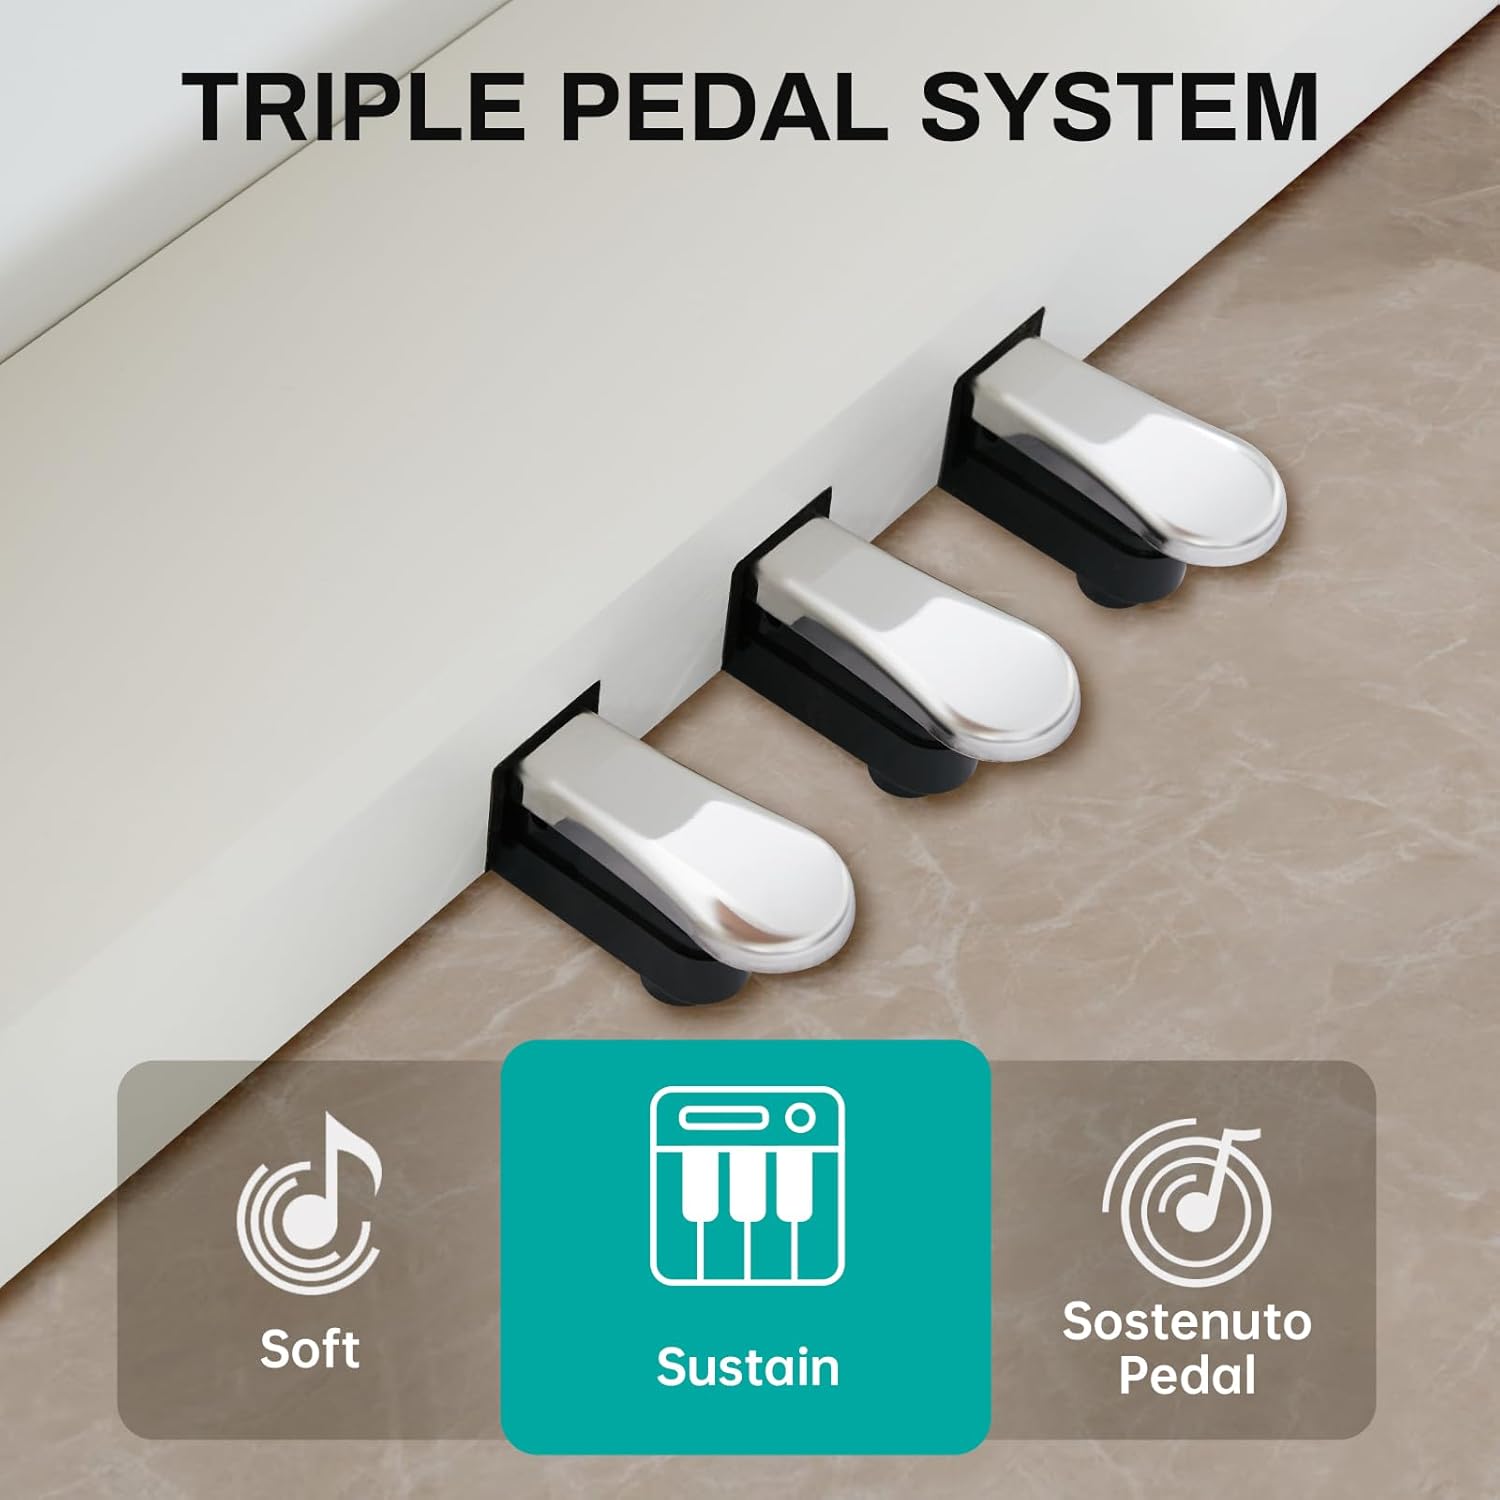
Image 5.2: Close-up of the three pedals: Soft, Sustain, and Sostenuto.
- Blød pedal (venstre): Reduces the volume and changes the timbre of the notes.
- Sustain Pedal (Middle): Sustains the notes, allowing them to ring out after the keys are released.
- Sostenuto Pedal (Right): Sustains only the notes that are held down at the moment the pedal is pressed, while subsequent notes remain unaffected.
5.3. 88-Key Weighted Hammer Action Keyboard
The 88-key keyboard is designed to replicate the feel of an acoustic grand piano, providing a realistic playing experience.
- Weighted Hammer Action: Provides a heavier touch in the lower register and a lighter touch in the higher register, similar to an acoustic piano.
- Berøringsfølsomhed: The piano responds to the force with which keys are played, allowing for dynamic expression.
6. Betjeningsvejledning
6.1. Tænd/sluk
Tryk på Power knap on the control panel to turn the piano on. Press it again to turn the piano off.
6.2. Lydstyrkekontrol
Brug Lydstyrkeknapper on the control panel to adjust the overall output volume of the piano.
6.3. Tonevalg
Tryk på Toneknap, then use the numerical keys or navigation buttons to select from the 680 available instrument tones.
6.4. Rytmevalg
Tryk på Rytme knap, then use the numerical keys or navigation buttons to select from the 600 available rhythm patterns.
6.5. Demonstrationssange
Tryk på Demoknap to cycle through or select one of the 80 built-in demonstration songs.
6.6. Dual Keyboard Split Tone
Aktiver Split knap to divide the keyboard into two sections, allowing two different tones to be played simultaneously or for two players to use the keyboard independently.
6.7. MP3-afspilning
Indsæt et USB-drev med MP3 files ind i USB-stik. Brug MP3 Play/Pause and navigation buttons to control playback.
6.8. Two-Track Recording
Tryk på Optag knap to start recording your performance. Press it again to stop. Use the Afspil-knap to listen to your recorded tracks.
6.9. Pedal Functions
Brug den Soft, Sustain, and Sostenuto Pedals as described in Section 5.2 to add expression to your playing.
7. Vedligeholdelse
Proper maintenance ensures the longevity and performance of your digital piano.
- Rensning: Wipe the piano and bench surfaces with a soft, dry cloth. For stubborn dirt, slightly dampen the cloth with water and mild soap, then wipe dry immediately. Avoid abrasive cleaners or solvents.
- Støvdæksel: Use the provided dust cover when the piano is not in use to protect it from dust and debris.
- Nøglepleje: Hold tasterne rene. Hvis de bliver snavsede, skal du tørre dem forsigtigt af med en blød, let fugtig klud.amp klæde.
- Miljøforhold: Store the piano in a stable environment, away from direct sunlight, extreme temperatures, and high humidity, which can affect electronic components and wood finishes.
8. Fejlfinding
Hvis du støder på problemer, bedes du se tabellen nedenfor for almindelige problemer og løsninger.
| Problem | Mulig årsag | Løsning |
|---|---|---|
| Ingen lyd | Power off; Volume too low; Headphones connected; Pedal issue. | Ensure power is on. Increase volume. Disconnect headphones. Check pedal connections. |
| Taster reagerer ikke | Instrument off; Specific setting activated (e.g., local control off). | Turn piano on. Check manual for advanced settings like local control. |
| Pedalerne virker ikke | Pedal cable loose; Pedal unit faulty. | Ensure pedal cable is securely connected to the piano. |
| Problemer med MP3-afspilning | USB-drev er ikke formateret korrekt; Inkompatibelt file type; USB drive loose. | Sørg for, at USB-drevet er formateret til FAT32. Brug MP3 files. Reinsert USB drive. |
| Forvrænget lyd | Volume too high; Speaker interference. | Reduce volume. Ensure no objects are blocking speakers. |
Hvis problemet fortsætter efter at have forsøgt disse løsninger, bedes du kontakte kundesupport.
9. Specifikationer
- Tastatur: 88-Key Weighted Hammer Action
- Polyfoni: 128-seddel
- Toner: 680 built-in tones
- Rytmer: 600 indbyggede rytmer
- Demonstrationssange: 80
- Pedaler: Triple Pedal System (Soft, Sustain, Sostenuto)
- Funktioner: Dual Keyboard Split, MP3 Playback, Two-Track Recording
- Bænkens dimensioner: 29-inch width, 2.68-inch deep storage bin
- Bench Weight Capacity: 300 pund
- Forbindelse: USB-stik
10. Garanti og support
This AODSK product is covered by a standard manufacturer's warranty against defects in materials and workmanship. Please refer to the warranty card included in your package for specific terms and conditions, including the warranty period and how to make a claim.
For technical support, troubleshooting assistance, or warranty inquiries, please contact AODSK customer service through the retailer where you purchased the product or visit the official AODSK webwebsted for kontaktoplysninger.


