1. Introduktion
This user manual provides essential information for the safe and efficient operation of your Mitsubishi 18,000 BTU SEER 18 Wall Mount Ductless Mini-Split Inverter Cool & Heat Pump System. Please read all instructions carefully before installation and use. Retain this manual for future reference.
2. Sikkerhedsoplysninger
Professionel installation påkrævet: This system must be installed by a qualified, licensed HVAC technician. Improper installation can lead to electric shock, fire, serious injury, or death, and may void the product warranty. Ensure all local and national electrical codes are followed.
Elektrisk sikkerhed: Ensure the power supply matches the unit's requirements (220V, 20 AMP Breaker). Always disconnect power before performing any maintenance or service.
Kølemiddelhåndtering: The system contains refrigerant. Only qualified personnel should handle refrigerant to prevent environmental damage or injury.
3. Produktfunktioner
- 18,000 BTU (1.5 Ton) capacity, suitable for rooms up to 750 sq ft.
- Cooling and Heating functionality.
- SEER 18 energy efficiency rating.
- Inverter-driven compressor for precise temperature control and energy efficiency.
- Blue fin coating on the outdoor unit for enhanced corrosion protection.
- Individual zone/room control for optimal comfort.
- Choice of fan speeds: Quiet, Low, Medium, High, and Super High, with Auto fan speed control.
- Dehumidifying mode to improve humidity control.
- Jet Cool feature for rapid cooling.
- Automatic restart following a power outage.
- "Smart Set" feature for pre-programming desired settings.
- 50 degrees F Setting in Heat mode.
- Econo Cool function for energy saving while maintaining comfort.
- Smart Dry Mode for improved humidity control with minimal over-cooling.
- Advanced microprocessor technology.
4. Opsætning og installation
The Mitsubishi Mini-Split System consists of an indoor wall-mounted unit and an outdoor condenser unit. Proper placement and connection are crucial for optimal performance.
4.1. Komponent overview

Figure 4.1: The complete Mitsubishi 18,000 BTU Mini-Split System, including the indoor wall-mounted unit, the outdoor condenser unit, and the handheld remote control.
4.2. Installationsdiagram
Installation involves mounting the indoor unit on a wall, placing the outdoor unit on a stable pad, and connecting them via refrigerant lines and electrical wiring through a drilled wall opening. A detailed diagram is provided below for reference.

Figure 4.2: An illustrative diagram showing the typical installation of a ductless mini-split system, detailing the connection between the indoor evaporator unit and the outdoor condenser unit through a wall opening. A 3-inch hole is typically drilled through the wall for the line set and communication wires.
Note: Ensure proper drainage for the indoor unit to prevent water accumulation.
5. Betjeningsvejledning
Your Mitsubishi Mini-Split System is controlled by a handheld remote. Familiarize yourself with the remote's functions for optimal comfort.
5.1. Fjernbetjening
Figure 5.1: The handheld remote control allows you to adjust temperature, fan speed, operating mode, and set timers.
5.2. Driftstilstande
- Køletilstand: Select this mode for cooling. Adjust the temperature using the remote.
- Opvarmningstilstand: Select this mode for heating. The system can maintain temperatures as low as 50°F.
- Ventilatortilstand: Circulates air without heating or cooling. Choose from Quiet, Low, Medium, High, Super High, or Auto fan speeds.
- Affugtningstilstand: Reducerer luftfugtigheden i rummet.
- Jet Cool: Provides rapid cooling for quick comfort.
- Econo Cool: Automatically adjusts airflow and slightly increases the set temperature to save energy while maintaining comfort.
- Smart Dry-tilstand: Improves humidity control with minimal over-cooling.
5.3. Timer funktion
The 12-hour timer allows you to program the unit to turn on or off at specific times, enhancing convenience and energy management.
6. Vedligeholdelse
Regular maintenance ensures the longevity and efficiency of your mini-split system. Refer to the full product manual for detailed cleaning instructions.
- Filterrensning: Regularly clean the air filters in the indoor unit to maintain optimal airflow and air quality.
- Udendørs enhed: Keep the outdoor unit clear of debris, leaves, and other obstructions to ensure proper airflow.
- Professionel servicering: Annual professional servicing by a qualified technician is recommended to check refrigerant levels, clean coils, and ensure all components are functioning correctly.
7. Fejlfinding
If you experience issues with your system, perform basic checks before contacting a technician.
- Ingen strøm: Check the circuit breaker (20 AMP) and ensure the unit is properly plugged in.
- Not Cooling/Heating: Verify the correct mode is selected and the temperature setting is appropriate. Check if air filters are clean.
- Usædvanlige lyde: Mindre driftslyde er normale. Hvis der opstår høje eller usædvanlige lyde, skal du kontakte en kvalificeret tekniker.
For persistent issues, contact a qualified, licensed HVAC technician for diagnosis and repair.
8. Specifikationer
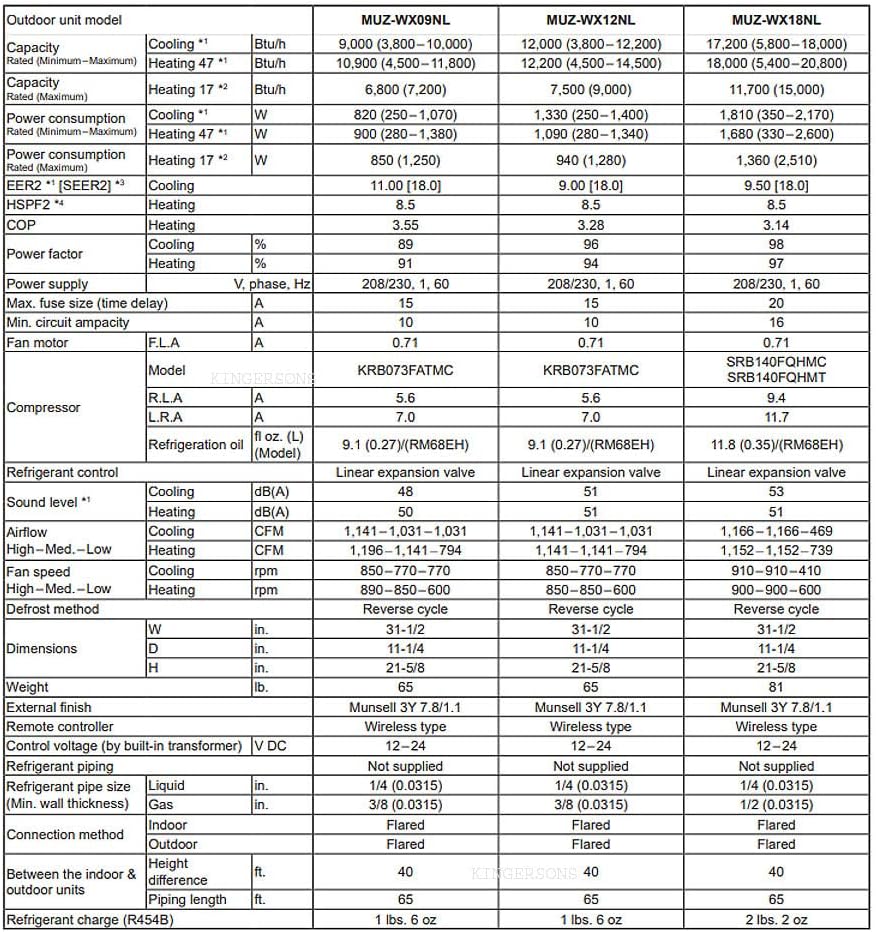
Figure 8.1: Technical specifications for Mitsubishi mini-split units, including capacity, power, and efficiency ratings.
- Mærkenavn: MITSUBISHI
- Model info: MUZWX-MSZWX18NL-NEW
- Varens vægt: 150 pund
- Produktdimensioner: 12 x 36 x 14 tommer
- Kapacitet: 1.5 tons (18,000 BTU)
- Årligt energiforbrug: 1333 wattimer
- Støjniveau: 30 decibel
- Installationstype: Opdelt system
- Formfaktor: Mini-Split
- Særlige funktioner: Auto Clean, Fast Cooling, Heating & Cooling Function, Inverter Compressor
- Farve: Hvid
- Voltage: 220 volt
- Wattage: 2170 watt
- Inkluderede komponenter: Fjern
- Etageareal: 750 kvadratmeter
- Sæsonbestemt energieffektivitetsforhold (SEER): 18.00
8.2. Energieffektivitet
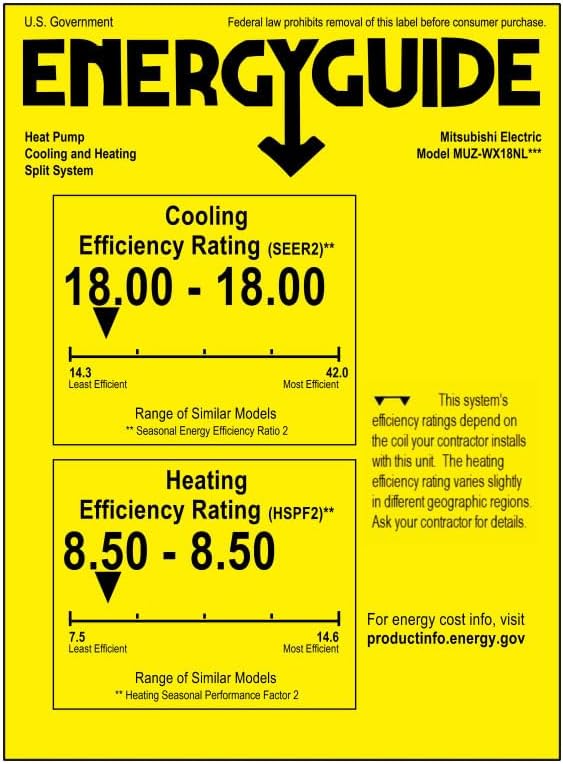
Figure 8.2: The EnergyGuide label details the cooling and heating efficiency ratings for the MUZ-WX18NL model.
9. Garanti og support
The manufacturer covers parts only under warranty. The installer is responsible for labor warranty. Please refer to your purchase documentation or contact your licensed HVAC technician for specific warranty details and support.


