1. Introduktion
Welcome to the user manual for your new Zalman Chronix ATX Gaming PC Case and Zalman 700W 80 Plus Bronze Power Supply. This guide provides essential information for the proper installation, operation, and maintenance of your product. Please read this manual thoroughly before beginning assembly to ensure a safe and successful build.
2. Sikkerhedsoplysninger
Always observe the following safety precautions to prevent injury or damage to your components:
- Disconnect the power supply from the electrical outlet before installing or removing any components.
- Ensure proper grounding to prevent electrostatic discharge (ESD), which can damage sensitive electronic components. Use an anti-static wrist strap or touch a grounded metal object before handling components.
- Åbn ikke strømforsyningsenheden. Høj lydstyrketages inside can cause severe injury or death. There are no user-serviceable parts inside.
- Keep all components and packaging materials away from children and pets.
- Avoid installing the PC case or power supply in areas with high humidity, extreme temperatures, or excessive dust.
- Use only the provided screws and accessories for installation to prevent damage.
3. Pakkens indhold
Kontroller venligst, at alle varer er til stede i din pakke:
- Zalman Chronix ATX Gaming PC Case
- Zalman 700W 80 Plus Bronze Power Supply Unit (PSU)
- PSU Power Cable
- Tilbehørsæske (indeholder skruer, afstandsstykker, kabelbindere osv.)
- Brugervejledning (dette dokument)
4. Produktet er slutview
4.1. Zalman Chronix ATX Gaming PC Case
The Zalman Chronix ATX Gaming PC Case features a panoramic tempered glass design, offering a clear view of your internal components. It is designed for optimal airflow and compatibility with high-performance hardware.

Billede: Samlet set view of the Zalman Chronix ATX Gaming PC Case bundled with the 700W Power Supply.
Nøglefunktioner:
- Panoramisk hærdet glas: Front and side panels for aesthetic display.
- Optimeret luftstrøm: Includes 3 pre-installed Prism ARGB fans (2 reverse blade for side intake, 1 standard blade for rear exhaust).
- Rummeligt interiør: Supports graphics cards up to 410mm and CPU coolers up to 165mm.
- Bundkort kompatibilitet: Supports Mini-ITX, Micro ATX, and ATX motherboards.
- AIO Support: Accommodates up to 360mm All-in-One liquid coolers.

Image: Diagram highlighting key features of the Chronix ATX Mid-Tower case, including fan configuration, AIO support, GPU length, PCI slots, and USB Type-C 3.2.
Frontpanel I/O:
Frontpanelet giver nem adgang til vigtige porte og kontroller:

Billede: Detaljeret view of the Zalman Chronix front panel I/O, showing the location of USB Type-C, USB 3.0, USB 2.0, 3.5mm Stereo, Power Button, and ARGB Control Button.
- USB Type-C 3.2: 1 port for high-speed data transfer.
- USB 3.0: 2 ports for fast data transfer.
- USB 2.0: 1 port for general peripherals.
- 3.5mm Stereo: Lydindgangs-/udgangsstik.
- Power knap: To power on/off the system.
- ARGB Control Button: Tap to change ARGB color, or hold for 5 seconds to sync with the motherboard or ARGB controller.
4.2. Zalman 700W 80 Plus Bronze Power Supply
The Zalman 700W 80 Plus Bronze Power Supply provides reliable and efficient power to your system. Its 80 Plus Bronze certification ensures up to 87% efficiency at 100% load (115-240AC).

Billede: Top-down view of the Zalman 700W 80 Plus Bronze Power Supply, highlighting its fan grill and branding.
Nøglefunktioner:
- 700W udgang: Sufficient power for most gaming systems.
- 80 Plus Bronze Certified: High energy efficiency, reducing heat and power consumption.
- Stabilt output: Equipped with 105° capacitors for consistent stability.
- Flat Cables: All black and flat cables for easier cable management and improved aesthetics.

Billede: Nærbillede view of the Zalman PSU's flat, black, sleeved cables, designed for clean cable arrangement and easy installation.
Cable Connectors and Lengths:
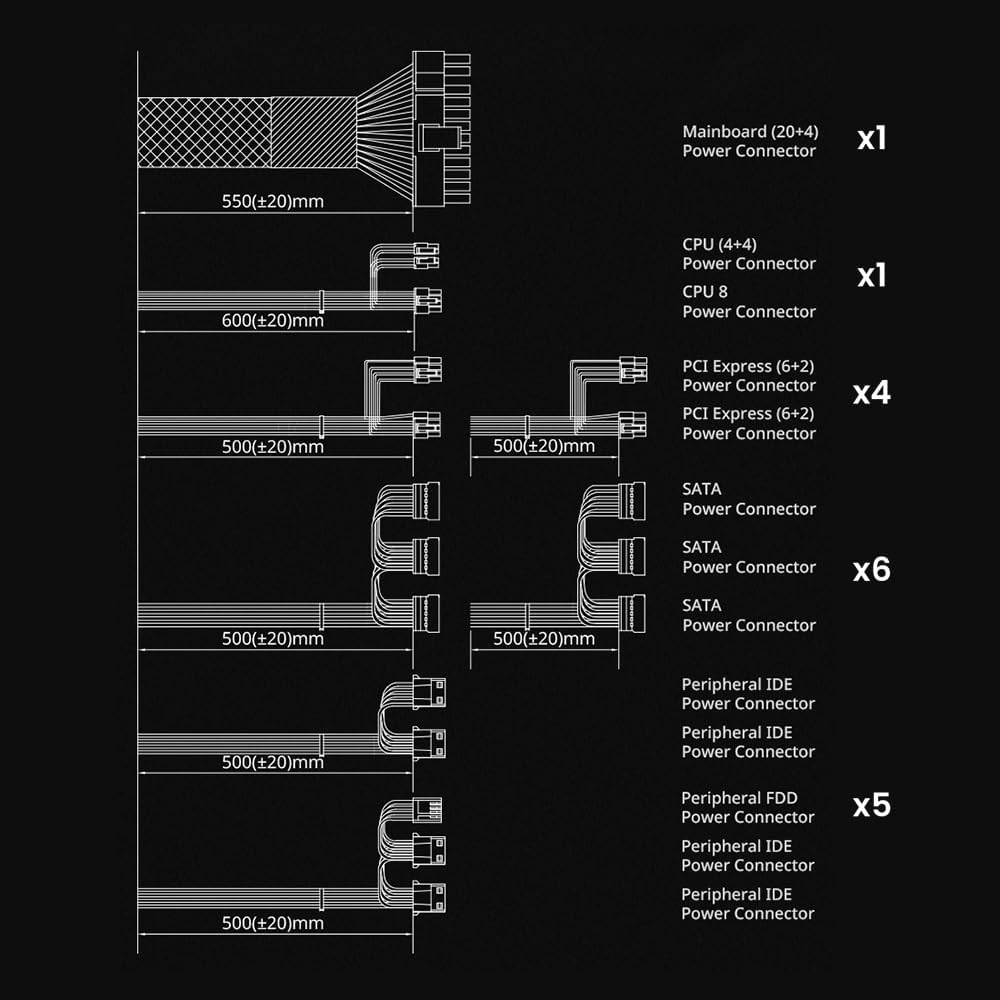
Image: Diagram illustrating the types, quantities, and approximate lengths of the power connectors included with the Zalman 700W PSU.
- Mainboard (20+4) Power Connector: x1 (approx. 550mm)
- CPU (4+4) Power Connector: x1 (approx. 600mm)
- PCI Express (6+2) Power Connector: x4 (approx. 500mm each)
- SATA Power Connector: x6 (on multiple cables, approx. 500mm each)
- Peripheral IDE Power Connector: x5 (on multiple cables, approx. 500mm each)
- Peripheral FDD Power Connector: x1 (approx. 500mm)
5. Opsætning og installation
Follow these steps for assembling your PC components within the Zalman Chronix case and installing the power supply.
5.1. Case Preparation
- Placer etuiet på en stabil, flad overflade.
- Carefully remove the tempered glass side panel(s) by unscrewing the thumb screws at the rear of the case and gently pulling the panel away. Set them aside in a safe place to prevent damage.
5.2. Installation af strømforsyning
- Locate the PSU mounting area at the bottom rear of the case.
- Slide the Zalman 700W PSU into the designated bay, ensuring the fan faces downwards (if there's a bottom vent) or upwards (if no bottom vent).
- Secure the PSU to the case using the provided screws from the accessory box.
5.3. Installation af bundkort
- Install the I/O shield (if applicable) into the rear opening of the case.
- Ensure the correct standoffs are installed for your motherboard form factor (Mini-ITX, Micro ATX, or ATX). The Chronix case supports these sizes.
- Placer forsigtigt dit bundkort på afstandsstykkerne, og juster skruehullerne.
- Fastgør bundkortet med de passende skruer. Undgå at overspænde det.

Image: Diagram illustrating the internal layout of the Zalman Chronix case, showing compatibility for various motherboard sizes (Mini-ITX, Micro ATX, ATX), maximum GPU length (410mm), and AIO cooler support (up to 360mm).
5.4. Component Installation (CPU, RAM, GPU, Storage)
Install your CPU, RAM, graphics card, and storage drives according to their respective manuals and motherboard instructions. Ensure all components are seated correctly and secured.
5.5. Kabelforvaltning
- Connect all necessary power cables from the PSU to your motherboard and components (CPU, GPU, storage drives, case fans, front panel I/O).
- Utilize the cable routing cutouts and tie-down points behind the motherboard tray to manage cables. The flat design of the PSU cables aids in this process.
- Connect the front panel I/O cables (USB, audio, power switch, reset switch, ARGB) to the corresponding headers on your motherboard. Refer to your motherboard manual for header locations.
- Ensure no cables obstruct fan blades or airflow paths.
6. Betjeningsvejledning
6.1. Første opstart
- Before powering on, double-check all connections to ensure they are secure.
- Connect the PSU power cable to the power supply and then to a wall outlet.
- Sæt tænd/sluk-knappen på strømforsyningen i positionen 'ON'.
- Press the power button on the front panel of the case to start your system.
6.2. Front Panel I/O Usage
- USB-porte: Use the USB Type-C 3.2, USB 3.0, and USB 2.0 ports for connecting peripherals such as keyboards, mice, external drives, and other USB devices.
- 3.5 mm stereostik: Connect your headphones or speakers to this port for audio output, or a microphone for audio input.
6.3. ARGB Control
The Zalman Chronix case includes pre-installed ARGB fans. You can control their lighting effects:

Billede: Nærbillede view of the vibrant ARGB lighting effect from the pre-installed fans in the Zalman Chronix case.
- ARGB Control Button: Tap the ARGB button on the front panel to cycle through various lighting modes and colors.
- Bundkort synkronisering: Hold the ARGB button for 5 seconds to synchronize the lighting with your motherboard's ARGB software (if connected to a compatible ARGB header).
7. Vedligeholdelse
Regelmæssig vedligeholdelse er med til at sikre optimal ydeevne og levetid for dine pc-komponenter.
- Støvrensning: Periodically clean dust filters and internal components using compressed air. Ensure the system is powered off and unplugged before cleaning.
- Udvendig rengøring: Tør de ydre overflader af kabinettet af med en blød, tør klud.amp klæde. Undgå skrappe kemikalier.
- Rengøring af ventilator: Gently clean dust from fan blades to maintain efficient cooling.
8. Fejlfinding
Hvis du støder på problemer, kan du se følgende almindelige fejlfindingstips:
- Ingen strøm: Ensure the PSU power cable is securely connected to both the PSU and the wall outlet. Check that the PSU's main power switch is in the 'ON' position. Verify all internal power connections (24-pin motherboard, 8-pin CPU, GPU power).
- Ingen visning: Confirm that your monitor is connected to the graphics card (not the motherboard's integrated graphics ports, unless you are using integrated graphics). Reseat the graphics card and RAM modules.
- Ventilatorer drejer ikke/ARGB virker ikke: Check that all fan power cables and ARGB cables are correctly connected to the motherboard or ARGB controller. If using motherboard sync, ensure the software is correctly configured.
- Systemustabilitet: Ensure all components are properly seated. Check for overheating using monitoring software. Verify PSU connections.
For more complex issues, consult your motherboard manual or contact Zalman customer support.
9. Specifikationer
9.1. Zalman Chronix ATX Gaming PC Case
| Formfaktor | ATX Mid-Tower |
| Bundkort support | Mini-ITX, Micro ATX, ATX |
| Forudinstallerede ventilatorer | 3 x Prism ARGB (2 reverse blade side intake, 1 standard blade rear exhaust) |
| AIO Cooler Support | Op til 360 mm |
| Max GPU-længde | 410 mm |
| Max CPU kølerhøjde | 165 mm |
| PCI -udvidelsespladser | 7 |
| Front I / O-porte | 1x USB Type-C 3.2, 2x USB 3.0, 1x USB 2.0, 1x 3.5mm Stereo, Power Button, ARGB Control Button |
9.2. Zalman 700W 80 Plus Bronze Power Supply
| Wattage | 700W |
| Effektivitetscertificering | 80 Plus Bronze (up to 87% efficiency) |
| Kondensatorer | 105° rated |
| Kabeltype | Flat, black sleeved cables |
| Stik | 1x Mainboard (20+4), 1x CPU (4+4), 4x PCI Express (6+2), 6x SATA, 5x Peripheral IDE, 1x Peripheral FDD |
10. Garanti og support
For garantioplysninger og teknisk support henvises til den officielle Zalman-side. webwebstedet eller kontakt din lokale forhandler. Gem din købsbevis til garantikrav.
You can visit the Zalman store for additional product information and support: Zalman Official Store


