1. Introduktion
This manual provides essential instructions for the proper setup, operation, and maintenance of your KYOCERA DuraXV Extreme+ E4811 ultra-rugged flip phone. Designed for durability, this device features IP68 dust and waterproof rating, MIL-STD-810G protection, 4G LTE connectivity, and a 5MP camera. Please read this manual thoroughly before using your device to ensure optimal performance and longevity.
2. Pakkens indhold
Bekræft, at din pakke indeholder følgende varer:
- KYOCERA DuraXV Extreme+ E4811 Handset
- Strømadapter
- USB kabel
- Batteri (forinstalleret eller separat)
3. Enhedslayout
Familiarize yourself with the physical components of your DuraXV Extreme+ E4811.
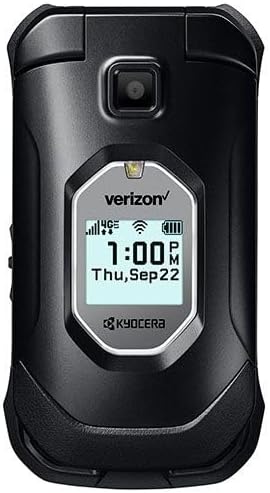
Figur 3.1: Front view of the KYOCERA DuraXV Extreme+ E4811 in its closed position, displaying the external screen with time and network status.

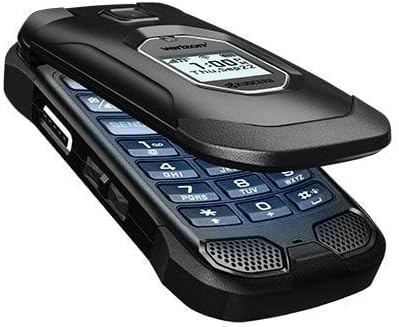
Figur 3.2: Front view of the KYOCERA DuraXV Extreme+ E4811 in its open position, revealing the main display and the physical keypad with navigation buttons.

Figur 3.3: Tilbage view of the KYOCERA DuraXV Extreme+ E4811 in its open position, showing the rear casing and charging contacts.
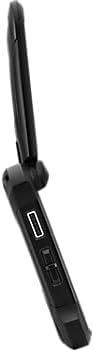
Figur 3.4: Side view of the KYOCERA DuraXV Extreme+ E4811, highlighting the USB charging port and other side buttons.
Figur 3.5: Vinklet view of the KYOCERA DuraXV Extreme+ E4811 in its open state, providing a perspective of both the display and keypad.
4. Opsætning
4.1. Batteriinstallation og opladning
- If the battery is not pre-installed, remove the back cover of the phone.
- Align the battery (1770 mAh) contacts with the phone's terminals and gently press it into place.
- Sæt bagdækslet på igen, og sørg for, at det er sikkert fastgjort for at opretholde vand- og støvtætheden.
- Tilslut USB-kablet til telefonens opladningsport og strømadapteren. Sæt adapteren i en stikkontakt.
- Allow the phone to charge fully before initial use. The charging indicator will show progress.
4.2. SIM-kort installation
Your DuraXV Extreme+ E4811 requires a Nano-SIM card for cellular service.
- Sluk telefonen, og fjern bagcoveret.
- Find SIM -kortstikket.
- Insert the Nano-SIM card with the gold contacts facing down and the notched corner aligned with the slot. Push until it clicks into place.
- Sæt bagdækslet på igen.
4.3. Tænd/sluk
- For at tænde: Tryk på tænd/sluk-knappen/afslut opkald, og hold den nede, indtil skærmen lyser.
- For at slukke: Press and hold the Power/End Call button, then select 'Power off' from the options on the screen.
5. Betjeningsvejledning
5.1. Grundlæggende navigation
Use the directional pad and center select button to navigate menus and select options. The 'Send' button initiates calls, and the 'End' button terminates calls or returns to the home screen.
5.2. Foretage og modtage opkald
- Sådan foretager du et opkald: Enter the phone number using the keypad and press the 'Send' button.
- For at besvare et opkald: When the phone rings, press the 'Send' button.
- Sådan afslutter du et opkald: Press the 'End' button.
5.3. Afsendelse og modtagelse af beskeder
- Navigate to the 'Messages' application from the main menu.
- Select 'New Message' to compose a text message. Enter the recipient's number and your message.
- Press the 'Send' option to transmit the message.
- Received messages will appear as notifications on the screen and can be accessed through the 'Messages' application.
5.4. Brug af kameraet
Your phone is equipped with a 5MP camera.
- Open the 'Camera' application from the main menu.
- Frame your subject using the display.
- Press the center select button or a dedicated camera button (if available) to capture a photo.
5.5. Connectivity (Bluetooth, Wi-Fi, 4G LTE)
- Bluetooth: Access Bluetooth settings from the main menu to pair with compatible devices like headsets or car kits.
- Wi-Fi: Connect to available Wi-Fi networks via the settings menu to access the internet without using cellular data.
- 4G LTE: The phone automatically connects to the 4G LTE network for high-speed data and calls, provided a valid SIM card and service plan are active.
6. Vedligeholdelse
- Rensning: Brug en blød, damp klud til at rengøre telefonens yderside. Undgå skrappe kemikalier eller slibende materialer.
- Vand- og støvmodstand: The phone is IP68 rated. Ensure all port covers are securely closed to maintain water and dust resistance. Do not expose the phone to saltwater or other liquids. If exposed to water, rinse with fresh water and dry thoroughly.
- Batteripleje: Avoid extreme temperatures. Do not puncture or disassemble the battery. Use only approved chargers.
- Miljøbeskyttelse: The phone is MIL-STD-810G compliant, offering protection against drops, shock, vibration, and extreme weather conditions. However, avoid unnecessary harsh treatment.
7. Fejlfinding
If you encounter issues with your phone, refer to the following common solutions:
- Phone Does Not Power On: Ensure the battery is charged. Connect the phone to the charger and attempt to power on after a few minutes.
- Intet netværkssignal: Check that the SIM card is correctly inserted. Move to an area with better network coverage. Contact your service provider if the issue persists.
- Kan ikke foretage/modtage opkald: Verify that you have active cellular service. Check call barring settings. Ensure the phone is not in Airplane Mode.
- Screen is Unresponsive: If the screen is frozen, try performing a soft reset by removing and reinserting the battery (if accessible) or holding the Power button for an extended period.
- Dårlig lydkvalitet: Check the volume settings. Ensure the speaker or earpiece is not obstructed.
8. Specifikationer
| Feature | Specifikation |
|---|---|
| Modelnummer | E4811 |
| Operativsystem | Android 11.0 |
| CPU model | MediaTek Helio |
| CPU hastighed | 2 GHz |
| VÆDDER | 2 GB |
| Intern opbevaring | 16 GB |
| Skærmopløsning | 480 x 800 |
| Bagkamera | 5 MP |
| Batterikapacitet | 1770 mAh |
| Forbindelse | 4G LTE, Wi-Fi, Bluetooth |
| Holdbarhedsvurderinger | IP68 Dust & Waterproof, MIL-STD-810G |
| Formfaktor | Vend |
| Lydstik | 3.5 mm |
| Varens vægt | 8 ounce |
9. Garanti og support
Your KYOCERA DuraXV Extreme+ E4811 is covered by a manufacturer's warranty. For specific warranty terms and conditions, please refer to the warranty card included with your product or visit the official KYOCERA website. For technical support, product registration, or further assistance, please visit the KYOCERA support page or contact their customer service directly.
Online support: www.kyoceramobile.com/support/


