1. Introduktion
The MicroTech Glucometer Kit is designed for convenient and accurate blood glucose monitoring. This manual provides essential information for the proper use, maintenance, and troubleshooting of your device to ensure reliable results and effective diabetes management.
The system requires a tiny 0.5µL blood sample and provides results in just 5 seconds. It features a wide Hematocrit (HCT) range of 10%-70%, making it suitable for a broad range of users, including infants, pregnant women, and individuals with specific health conditions. The meter can store up to 500 test results, offering 7/14/30/60/90-day average blood glucose values for easy tracking.
2. Hvad er inkluderet
Your MicroTech Glucometer Kit includes the following components:
- 1 x Gocheck2 Blood Glucose Monitor
- 10 x blodprøvestrimler
- 10 x 30 gauge Lancets
- 1 x Lancing device
- 1 x Bærbar opbevaringspose
- 1 x meter brugervejledning
- 1 x Test Strip User Guide
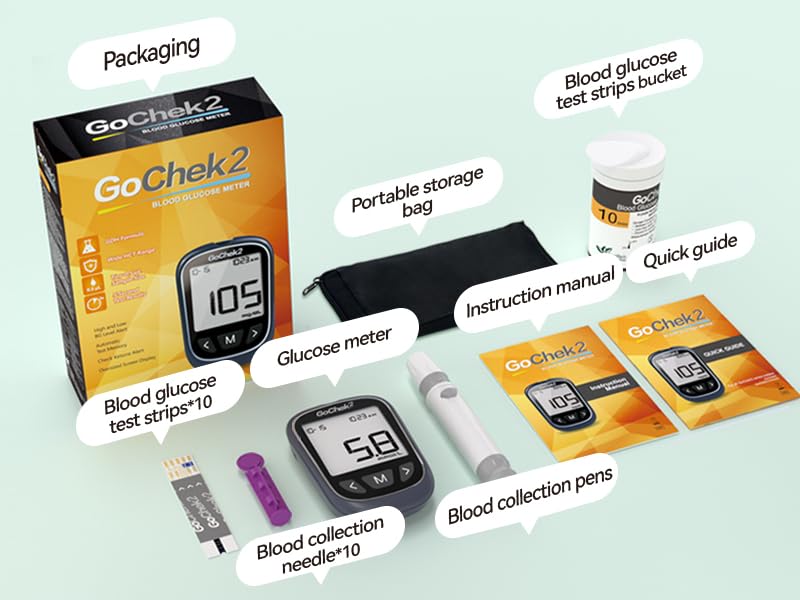
Figure 2.1: Complete Blood Glucose Monitoring Kit Components.
3. Opsætningsvejledning
3.1. Installation af batterier
The Gocheck2 Blood Glucose Monitor requires 2 CR2032 batteries (included). To install:
- Find batterirummet på bagsiden af måleren.
- Åbn batteridækslet.
- Insert the batteries according to the polarity indicators (+/-).
- Luk batteridækslet forsvarligt.
3.2. Preparing the Lancing Device
The lancing device is used to obtain a blood sample.
- Unscrew the cap of the lancing device.
- Sæt en ny lancet godt fast i lancetholderen.
- Twist off the protective cap of the lancet.
- Sæt hætten på fingerprikkeren på igen.
- Adjust the penetration depth by rotating the cap. Start with a shallower setting (e.g., 2-3) and adjust as needed for a sufficient blood sample.
- Pull back the cocking barrel until it clicks, indicating it is ready for use.

Figure 3.1: Initial setup steps for the MicroTech Glucometer Kit.
4. Betjeningsvejledning
4.1. Performing a Blood Glucose Test
Follow these steps for an accurate blood glucose measurement:
- Prepare Your Hands: Vask dine hænder grundigt med sæbe og varmt vand, og tør dem derefter helt.
- Indsæt teststrimmel: Remove a test strip from its vial and immediately close the vial cap tightly. Insert the test strip into the test strip port of the meter. The meter will turn on automatically and display a blood drop symbol.
- Få blod Sampdet: Use the prepared lancing device to prick the side of your fingertip. Gently squeeze your finger to form a small drop of blood (approximately 0.5µL).
- Påfør Blood Sampdet: Touch the tip of the test strip to the blood drop. The strip will draw the blood into the sample area. Do not apply blood to the top of the strip.
- Read Result: The meter will begin counting down. Your blood glucose result will appear on the display in 5 seconds.
- Skub teststrimmel ud: Press the strip ejection button to safely discard the used test strip without touching it, preventing cross-infection.
- Dispose of Lancet: Carefully remove the used lancet from the lancing device and dispose of it in a sharps container.

Figure 4.1: Rapid result display on the MicroTech Glucometer.

Figure 4.2: Only a small 0.5µL blood sample er påkrævet.

Figure 4.3: Automatic strip ejection for convenient and hygienic disposal.
4.2. Understanding Display and Alerts
The meter's display shows the date, time, test result, and measurement units (mg/dL). It also features personalized high and low blood sugar alerts, which can be set according to your doctor's advice.

Figure 4.4: High and low blood sugar alerts.

Figure 4.5: GoCheck2 Blood Glucose Monitor product description and parts.
5. Vedligeholdelse og opbevaring
5.1. Rengøring af måleren
Tør måleren af ydersiden med en blød kludamp klud. Måleren må ikke nedsænkes i vand, og der må ikke anvendes skrappe rengøringsmidler.
5.2. Test Strip Storage
Proper storage of test strips is crucial for accuracy:
- Store test strips in their original sealed container.
- Keep them away from heat, moisture, and direct sunlight.
- Må ikke opbevares i køleskab.
- Discard any remaining test strips 6 months after opening the vial, or by the expiration date printed on the vial, whichever comes first.

Figure 5.1: Test strip validity periods.
6. Fejlfinding
If you encounter issues with your MicroTech Glucometer Kit, refer to the following common questions and answers:
| Spørgsmål | Svar |
|---|---|
| Why do different test results from brand A to brand B? | Each manufacturer's blood glucose meter has different settings, so the same blood sample may yield different results. |
| If various error letters such as "E-1" are displayed on your blood glucose meter, what should you do? | At the end of the instruction manual, we have provided explanations for each type of error screen display. You can find the answers by matching them one by one. |
| Why were results different after measuring blood sugar twice in a row? |
|

Figur 6.1: Almindelige spørgsmål og løsninger til fejlfinding.
7. Specifikationer
| Feature | Detalje |
|---|---|
| Modelnavn | Gocheck2 |
| Varemodelnummer | 10KIt |
| Driftstid | 5 sekunder |
| Blod Sample Bind | 0.5 µL |
| Hukommelseslagring | Op til 500 testresultater |
| Hematocrit (HCT) Range | 10% - 70% |
| Batterier | 2 CR2032-batterier (inkluderet) |
| Battericellesammensætning | Lithium metal |
| Test Strip Validity (Opened) | 180 dage (6 måneder) |
| Certificeringer | FDA, CE, GMP, ISO 15197:2015 |
| Pakkedimensioner | 7.2 x 6.65 x 1.93 tommer |
| Varens vægt | 8.15 ounce |
8. Garanti og support
MicroTech provides an exclusive Lifetime Warranty and Technical Support for your Glucometer Kit. For any questions, concerns, or technical assistance, please refer to the contact information provided in your product packaging or visit the official MicroTech webwebsted.


