1. Introduktion
The GuliKit ES PRO is an advanced wireless e-sports game controller designed for competitive gaming. It features ultra-low wireless latency, magnetic TMR joysticks for anti-drift performance, and broad compatibility across multiple platforms. This manual provides essential information for setting up, operating, maintaining, and troubleshooting your GuliKit ES PRO controller.

Figure 1: GuliKit ES PRO Wireless Game Controller (Black)
2. Nøglefunktioner
- World's Fastest Wireless Speed: Utilizes GuliKit Hyperlink 2 technology for revolutionary wireless dynamic channel selection. Achieves 3.25ms latency with 730Hz polling rate in Bluetooth mode on PC, and 1.87ms latency with 1000Hz polling rate in wired mode.
- Instant Switch 1 / 2 Wake-up: Supports waking up Nintendo Switch and Switch 2 consoles directly from sleep mode.
- Bred enhedskompatibilitet: Compatible with PC Windows, Switch 2, Switch, Switch Lite, Switch OLED, Steam Deck, ROG Ally/ROG Ally X, Android, iOS, and macOS.
- Upgraded TMR Joysticks: Features Tunnel Magnetoresistance electromagnetic thumbsticks for anti-drift, long-lasting durability, and 4000-level high precision.
- 256-Level Hall Effect Triggers: Provides superior precise analog response for triggers.
- Langtidsholdbart genopladeligt batteri: Equipped with a 950mAh battery, offering up to 30 hours of usage with minimal standby drain. Features quick recharging and an auto-sleep function after 15 minutes of inactivity.
- Advanced Customizable Functions: Supports joystick sensitivity and vibration adjustment, Turbo function, 6-axis gyroscope motion control on Switch, patented Gyro Motion Aim for PC FPS gaming, joystick dead-zone on/off, D-pad 8/4-direction mode, and physical ABXY SWAP (Switch-layout key-caps not included). Customization can be done directly on the controller or via the GuliKit web-baseret værktøj.
- Tactile Switch D-pad: Provides sensitive and accurate directional input.

Figure 2: GuliKit ES PRO highlighting 3.25ms wireless latency.

Figure 3: GuliKit ES PRO controller with Nintendo Switch and Switch 2 consoles, illustrating wake-up support.

Figur 4: Bagside view of the GuliKit ES PRO controller, indicating compatibility with PC, Android, iOS, macOS, Switch, and Switch 2.

Figure 5: Close-up of the GuliKit ES PRO controller's TMR joysticks, emphasizing anti-drift and high precision.

Figure 6: Close-up of the GuliKit ES PRO controller's Hall Effect triggers, showcasing their precise analog response.

Figure 7: Diagram illustrating the 950mAh battery capacity of the GuliKit ES PRO controller.

Figure 8: Chart showing 3 levels of adjustable joystick sensitivity (50%, 100%, 150%) for the ES PRO controller.

Figur 9: Overview of advanced features including non-physical A-B/X-Y button swap, Gyro Motion Aim, D-pad direction support, and Turbo function.
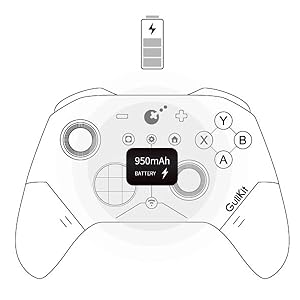
Figure 10: Close-up of the GuliKit ES PRO controller's tactile switch D-pad, emphasizing its sensitivity and accuracy.
3. Opsætningsvejledning
3.1 Indledende opladning
Before first use, fully charge the GuliKit ES PRO controller using the included USB-C cable. Connect the cable to the controller's USB-C port and the other end to a USB power source (e.g., computer USB port, wall adapter). The charging indicator will show the charging status.
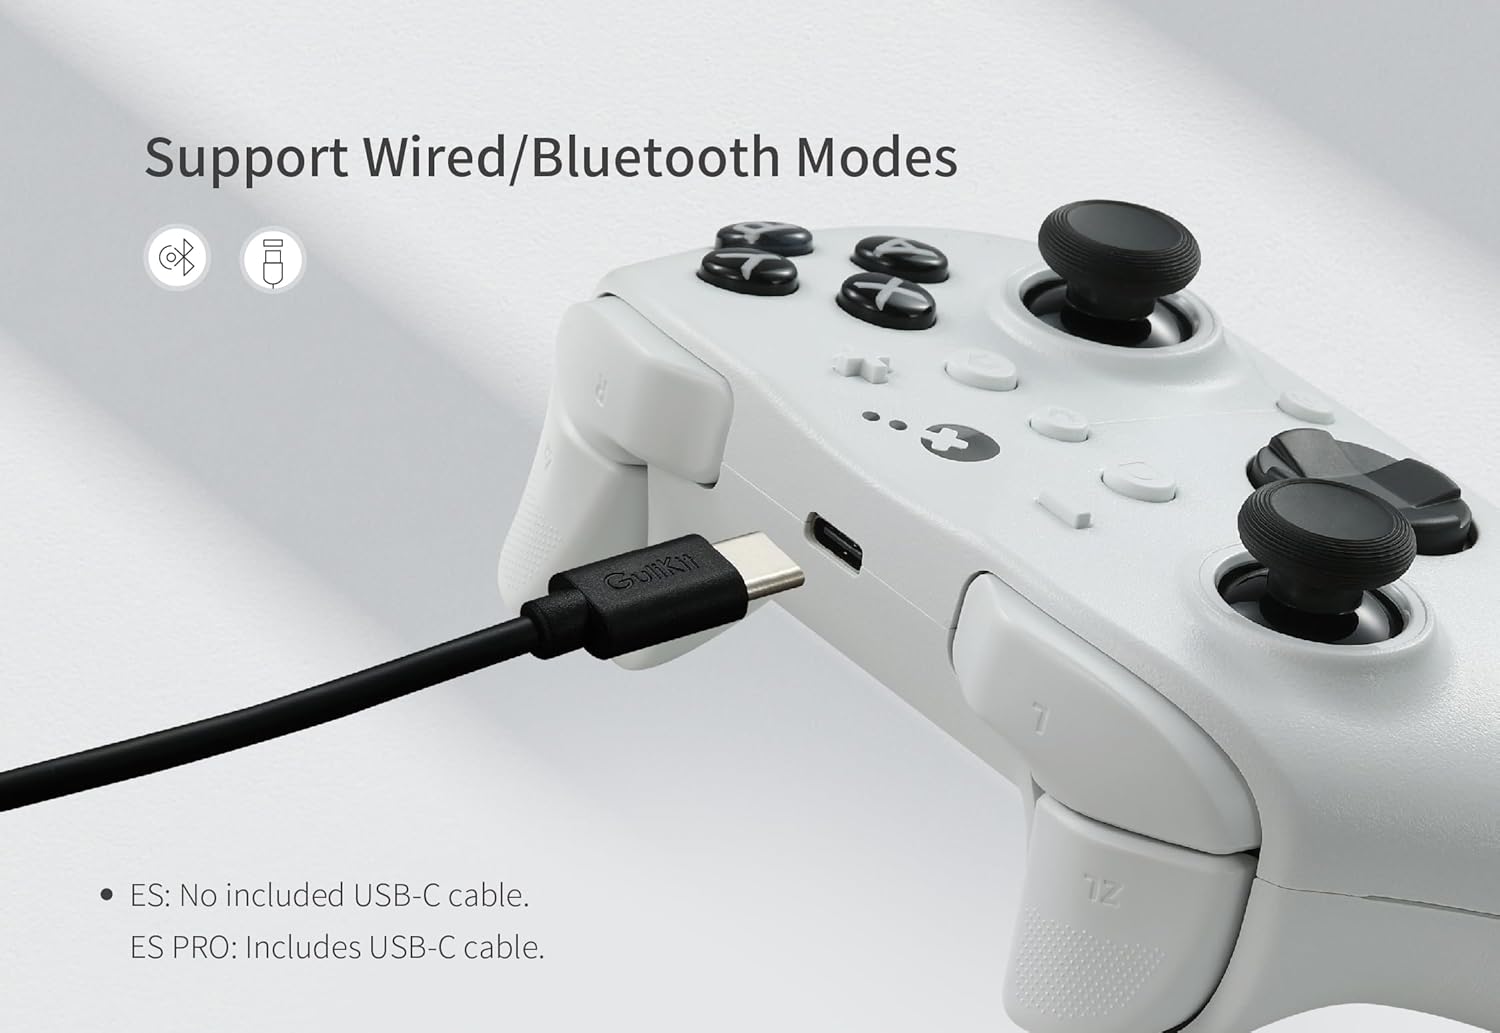
Figure 11: GuliKit ES PRO controller connected via USB-C cable, illustrating wired and Bluetooth mode support.
3.2 Firmwareopdatering
It is highly recommended to update the ES PRO controller to the latest firmware (V2.8 or newer) from the official GuliKit website before use. Firmware updates often include performance improvements and bug fixes, such as addressing latency issues on iOS and Android devices in PC mode.
3.3 Parringsinstruktioner
3.3.1 PC (Windows) Pairing
- Set the controller to PC mode using the switch on the back.
- Tænd for controlleren.
- Hold the pairing button for 2 seconds until the indicator flashes quickly.
- On your PC, go to Bluetooth & other devices settings and add a new Bluetooth device. Select the GuliKit ES PRO controller to pair.
- For optimal performance on Windows 10/11, disable "Show notifications to connect using 'Swift Pair'" in Bluetooth settings. This can reduce latency by 50-300Hz.
- Når du tilslutter flere enheder til én Bluetooth-adapter, kan båndbreddedeling sænke pollinghastighederne. Brug én adapter pr. controller for optimal ydeevne.
- Use 5GHz Wi-Fi to avoid 2.4GHz interference with Bluetooth, which may reduce polling rates.
3.3.2 Nintendo Switch / Switch 2 Pairing (with Wake-up)
To enable Switch 2 wake-up capability, follow this specific pairing method:
- Set the controller to NS mode using the switch on the back.
- Tænd for controlleren.
- Hold the pairing button for 2 seconds until the indicator flashes quickly to start pairing.
- Set your Switch 2 console into sleep mode first (black screen).
- Tryk på HOME-knappen på en Joy-Con for at vække skærmen.
- Next, enter the controller pairing interface on your Switch 2 and pair the GuliKit ES PRO.
Note: Pairing by the regular method without setting Switch 2 into sleep mode first will result in pairing but without Switch 2 wake-up support.
3.3.3 Android, iOS, and macOS Pairing
Pairing with Android, iOS, and macOS devices is done in PC Mode on the back of the controller. Follow the standard Bluetooth pairing procedure for your device after setting the controller to PC mode and initiating pairing.
4. Betjening af controlleren
4.1 Skift tilstande
The controller features a mode switch on the back to easily toggle between different compatibility modes (e.g., PC, NS). Ensure the correct mode is selected for your target device.
4.2 Adjustable Joystick Sensitivity (ES PRO Only)
The ES PRO allows adjustment of joystick sensitivity to three levels:
- 50 %: Recommended for anti-motion sickness or more precise aiming.
- 100 %: Default setting for regular use.
- 150 %: Recommended for games requiring faster turning or diagonal running, particularly in FPS games.
Refer to the controller's direct customization instructions or the GuliKit web-based tool for details on how to adjust this setting.
4.3 Turbofunktion
The controller supports semi-auto and full-auto Turbo functions for various buttons (A/B/X/Y/R/ZR). Consult the controller's specific button combination instructions for activation and deactivation.
4.4 Gyroscope Motion Control
- 6-akset gyroskop: Supported for motion control in compatible Switch games.
- Patented Gyro Motion Aim: Available for PC FPS gaming, allowing for faster and more precise aiming.
4.5 D-pad Modes
The D-pad can be switched between 8-direction and 4-direction modes. This feature can be useful for precise weapon swapping in FPS games. Refer to the controller's direct customization instructions for mode switching.
4.6 Physical ABXY SWAP
The controller supports physical swapping of ABXY key-caps to match different layouts (e.g., Switch layout). Note: Switch-layout key-caps are not included in the package and must be purchased separately.
5. Vedligeholdelse
5.1 Pleje af batterier
- To prolong battery life, avoid fully discharging the controller frequently.
- Opbevar controlleren et køligt og tørt sted, når den ikke er i brug i længere perioder.
- The auto-sleep function after 15 minutes of inactivity helps conserve power.
5.2 Rengøring
Use a soft, dry cloth to clean the surface of the controller. For stubborn dirt, a slightly damp cloth can be used, but ensure no moisture enters the controller's ports or openings. Do not use harsh chemicals or abrasive cleaners.
5.3 Opbevaring
When storing the controller, especially for long periods, ensure it is turned off. Keep it away from extreme temperatures, direct sunlight, and high humidity.
6. Fejlfinding
6.1 Controlleren opretter ikke forbindelse/parrer ikke
- Sørg for, at controlleren er opladet.
- Verify the mode switch on the back of the controller is set to the correct platform (PC, NS).
- Ensure the controller is in pairing mode (indicator flashing quickly).
- On your device, remove any previous pairings of the controller and attempt to pair again.
- Restart both the controller and the device you are trying to connect to.
6.2 Latency Issues
- Firmware: Ensure the controller has the latest firmware installed from the GuliKit webwebsted.
- Wi-Fi Interference: If using 2.4GHz Wi-Fi, consider switching your Wi-Fi network to 5GHz to minimize interference with the controller's Bluetooth signal.
- PC-indstillinger: On Windows, disable "Show notifications to connect using 'Swift Pair'" in Bluetooth settings.
- Flere Bluetooth-enheder: If multiple Bluetooth devices are connected to a single adapter, consider using a dedicated Bluetooth adapter for the controller.

Figure 12: Comparison table of polling rates and latencies for GuliKit ES/ES PRO, PS5, and Xbox Series controllers, along with polling rate test results.
6.3 Joystick-drift
The GuliKit ES PRO features TMR joysticks designed to be anti-drift. If you experience any joystick drift, ensure the controller's firmware is up to date. If the issue persists, a recalibration might be necessary via the GuliKit web-based tool or specific controller button combinations (refer to GuliKit's official support resources).
6.4 Switch 2 Wake-up Not Working
Ensure you followed the special pairing method for Switch 2 wake-up as described in Section 3.3.2. The Switch 2 must be in sleep mode before initiating the pairing process from the controller and then waking the console with a Joy-Con.
7. Specifikationer
| Feature | Specifikation |
|---|---|
| Modelnummer | ES PRO |
| Dimensioner | 5.9 x 3.9 x 2 tommer |
| Vægt | 11.3 ounce |
| Batterikapacitet | 950mAh |
| Batterilevetid | Op til 30 timer |
| Forbindelse | Wireless (GuliKit Hyperlink 2, Bluetooth), Wired (USB-C) |
| Wireless Latency (Bluetooth PC) | 3.25ms (730Hz polling rate) |
| Kablet latenstid | 1.87ms (1000Hz polling rate) |
| Joystick-type | Magnetic TMR (Tunnel Magnetoresistance) |
| Trigger type | Hall Effect (256-level) |
| Kompatibilitet | PC Windows, Switch 2, Switch, Switch Lite, Switch OLED, Steam Deck, ROG Ally/ROG Ally X, Android, iOS, macOS |
8. Garanti og support
8.1 Garantioplysninger
The GuliKit ES PRO controller comes with a manufacturer's warranty. Please refer to the warranty card included with your product or visit the official GuliKit webwebstedet for detaljerede garantivilkår og -betingelser, der er specifikke for din region.
8.2 Kundesupport
For technical assistance, troubleshooting beyond this manual, or warranty claims, please contact GuliKit customer support through their official website. Ensure you have your product model number (ES PRO) and purchase details ready when contacting support.
Official GuliKit Webwebsted: www.gulikit.com


