1. Introduktion
This manual provides detailed instructions for the installation, operation, and maintenance of your new electrosmart Android 14 Car Radio QLED Screen. This unit is designed to enhance your driving experience with advanced features such as wireless CarPlay, Android Auto, GPS navigation, and a high-definition touch screen. Please read this manual thoroughly before installation and use to ensure proper function and safety.
2. Køretøjskompatibilitet
This car radio is specifically designed for Lexus IS250 models manufactured between 2006 and 2012. It is a plug-and-play kit for compatible vehicles.
Vigtig bemærkning: Denne enhed er ikke kompatibel with high-version Lexus IS250 models that feature a "setup button" or a "metal frame" around the original radio unit. Please verify your vehicle's dashboard configuration before proceeding with installation.

Image: Compatibility guide for Lexus IS250 dashboards (2006-2012). Displays various dashboard layouts, indicating which are compatible ('Fit' for low version) and which are not ('Not Fit' for high version with 'setup' button or metal bezel).
3. Pakkens indhold
Bekræft, at alle nedenstående varer er inkluderet i din pakke:
- electrosmart Android 14 Car Radio Unit (10.4-inch QLED Screen)
- Power Cable (A)
- RCA Cable (B)
- USB-kabel (C)
- Radio Antenna (D)
- GPS Cable (E)
- Reversing Line (F)
- Backup kamera
- Ekstern mikrofon
- Canbus-dekoder

Billede: Bagside view of the car radio unit with labeled connection points (A-F) and a visual representation of all included accessories such as cables, camera, GPS antenna, microphone, and Canbus.
4. Opsætning og installation
The electrosmart car radio is designed for plug-and-play installation in compatible Lexus IS250 models. However, professional installation is recommended to ensure correct wiring and optimal performance.
4.1 Kontrol før installation
- Confirm vehicle compatibility as described in Section 2.
- Sørg for, at køretøjets tænding er slukket, og at batteriet er frakoblet, før installationen påbegyndes.
- Saml alt nødvendigt værktøj (f.eks. værktøj til afmontering af beklædning, skruetrækkere).
4.2 Installationstrin (generel vejledning)
- Carefully remove the original car radio unit and dashboard trim using appropriate tools.
- Connect the provided wiring harness to the vehicle's existing wiring. Ensure all connections are secure. Refer to the wiring diagram in Section 3 for cable identification.
- Connect the GPS antenna, radio antenna, and external microphone to the new head unit. Position the antennas for optimal signal reception.
- If installing the backup camera, route the camera cable to the rear of the vehicle and connect it to the designated input on the head unit.
- Carefully slide the new electrosmart car radio into the dashboard opening.
- Secure the unit in place and reattach any removed dashboard trim.
- Tilslut køretøjets batteri igen, og tænd for tændingen for at teste enheden.

Image: A side-by-side comparison showing the original Lexus IS250 dashboard ('Before') and the dashboard with the new 10.4-inch electrosmart car radio installed ('After').
5. Betjeningsvejledning
5.1 Grundlæggende betjening
The unit features a 10.4-inch 2.5D capacitive touch screen with a resolution of 1280*800. Navigate the interface by tapping, swiping, and pinching as you would on a smartphone or tablet.

Image: A hand interacting with the responsive 10.4-inch touch screen, demonstrating its ease of use.
5.2 Trådløs CarPlay og kablet Android Auto
Integrate your smartphone for navigation, music, calls, and voice control.
- Trådløs CarPlay: For iPhone users, connect via Bluetooth and then follow on-screen prompts to enable wireless CarPlay.
- Kablet Android Auto: For Android users, connect your phone via a USB cable and follow on-screen prompts to activate Android Auto.

Image: The car radio display showing the CarPlay interface with various apps, and the Android Auto interface, both integrated with a smartphone.
5.3 GPS-navigation
The unit supports both online and offline GPS navigation. You can use pre-installed maps or download additional navigation applications via WiFi.
- Online navigation: Requires a WiFi connection to access real-time traffic and map updates.
- Offline-navigation: Download map data for your region to use navigation without an internet connection.

Image: The car radio screen showing a navigation map, with icons for popular GPS applications like iGO, Google Maps, and Here WeGo.
5.4 WiFi-forbindelse
Connect the unit to a WiFi hotspot (e.g., from your smartphone) to access online services, download apps, and stream content.
- Gå til Indstillinger > Netværk og internet > Wi-Fi.
- Vælg dit ønskede WiFi-netværk, og indtast adgangskoden, hvis du bliver bedt om det.
- Once connected, you can access the Google Play Store to download applications like Spotify, YouTube, etc.

Image: The car radio display showing a selection of applications such as Spotify, Pinterest, Facebook, and YouTube, indicating successful WiFi connectivity.
5.5 Bluetooth-funktioner
The unit features Bluetooth 5.2 for hands-free calling, phonebook access, and music streaming.
- Enable Bluetooth on your smartphone and on the car radio (Settings > Connected devices > Bluetooth).
- Søg efter available devices on your phone and select the car radio's Bluetooth name.
- Bekræft parringskoden på begge enheder.
- Once paired, you can make/receive calls, sync your phonebook, and play music wirelessly.
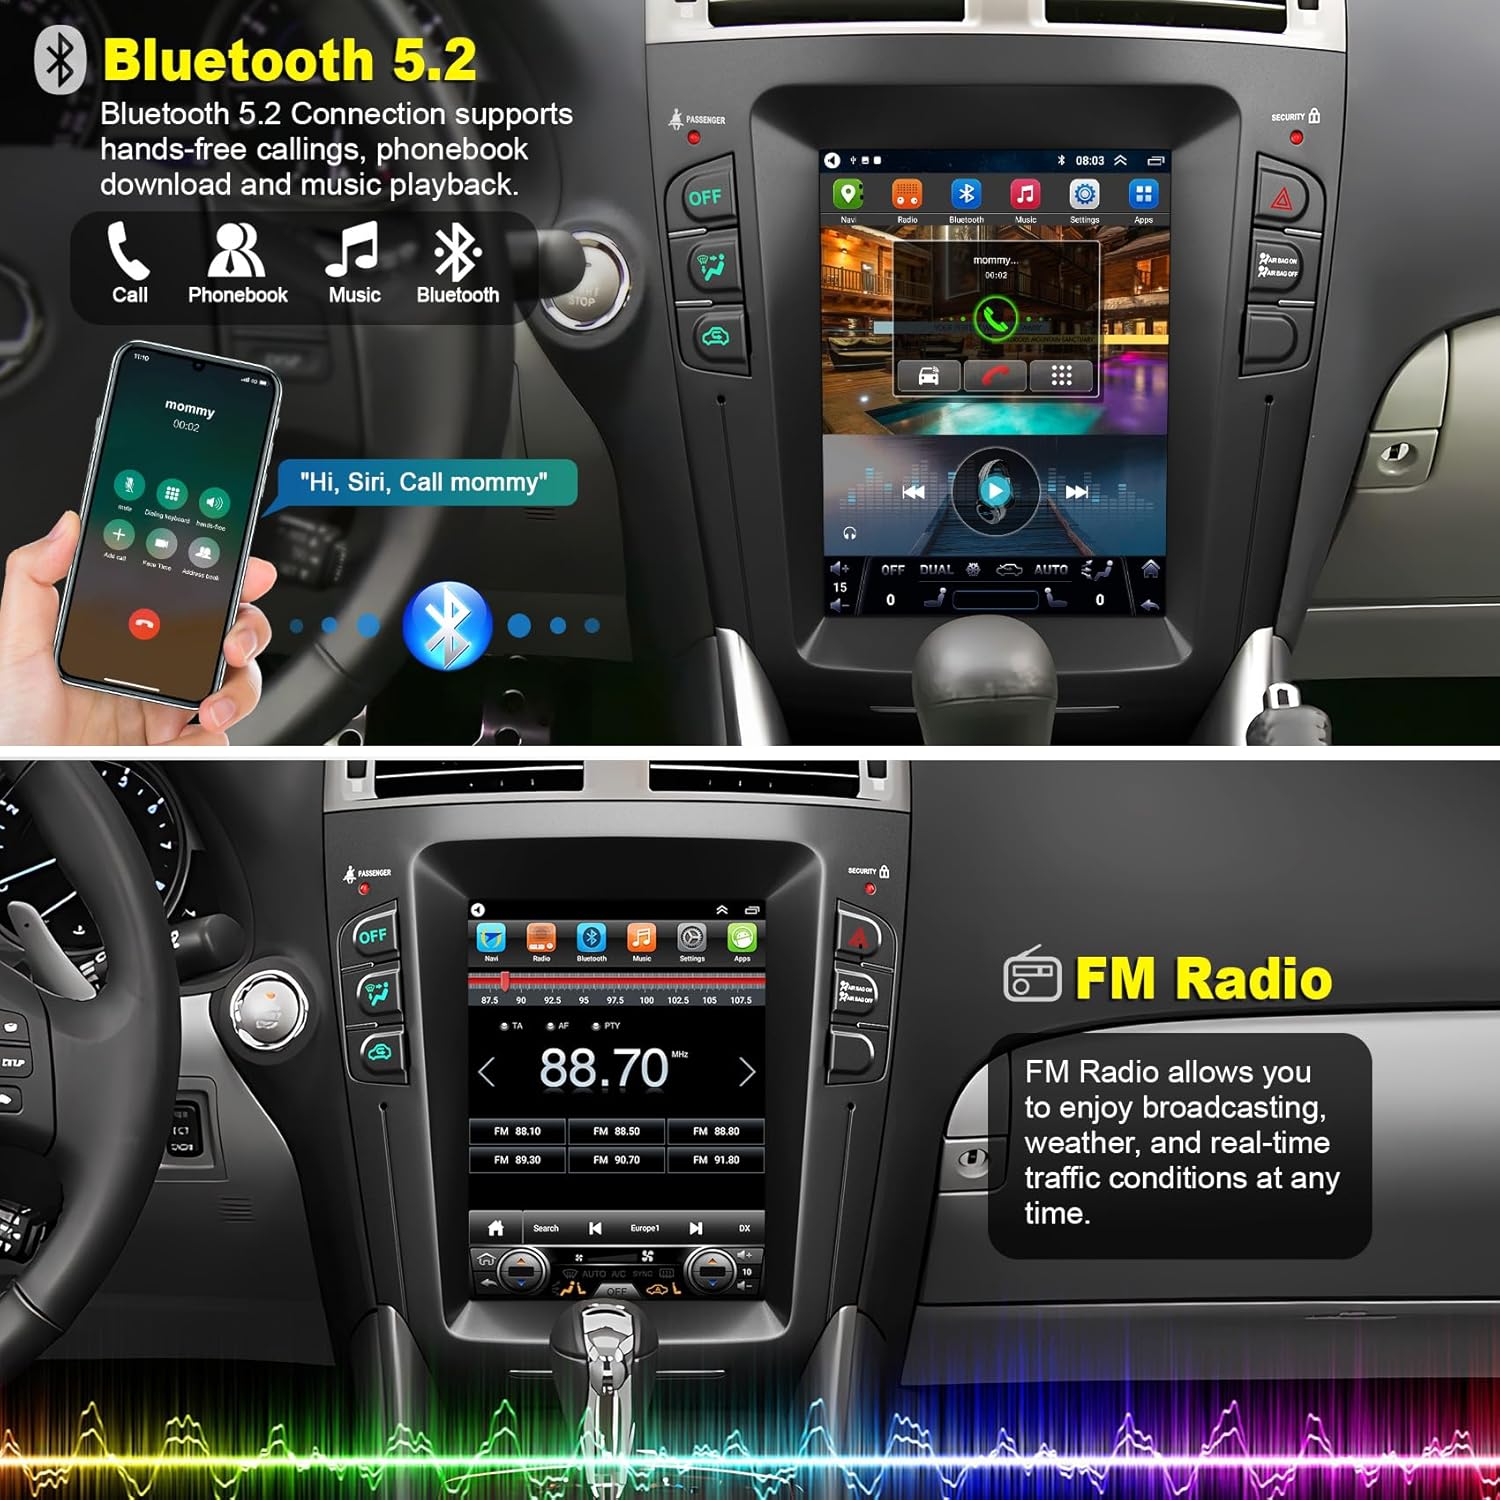
Image: The car radio display showing a Bluetooth call in progress and music playback controls, alongside the FM radio interface.
5.6 AM/FM-radio
Access local radio stations with the built-in AM/FM tuner, which also supports RDS (Radio Data System) for displaying station information.
- Tryk på ikonet "Radio" på startskærmen.
- Use the on-screen controls to scan for stations, manually tune, or select from presets.
- Gem dine yndlingsstationer for hurtig adgang.

Image: The car radio display showing the FM radio interface, tuned to a specific frequency with options for scanning and presets.
5.7 Ratbetjening (SWC)
The unit retains the functionality of your vehicle's original steering wheel controls, allowing you to manage audio, calls, and other functions without taking your hands off the wheel.
- After installation, the SWC should function automatically.
- If controls do not work, navigate to Settings > Steering Wheel Control to configure them manually.

Image: The car radio display showing the steering wheel control configuration menu, with an inset image highlighting the steering wheel buttons.
5.8 Bakkamera
Det medfølgende bakkamera giver et klart billede view of the area behind your vehicle when reversing, enhancing safety. The camera features HD imaging, waterproofing, night vision, and a 170° wide view vinkel.
- Når bilen sættes i bakgear, skifter displayet automatisk til kameraet. view.
- Dynamic guidelines may appear on the screen to assist with parking.

Image: The car radio display showing the live feed from the backup camera, complete with parking assist lines and icons indicating HD, waterproof, night vision, and wide-angle features.
5.9 Split Screen & Mirrorlink
Utilize the split-screen function to run two applications simultaneously, such as navigation and music. Mirrorlink allows you to display your smartphone's screen directly on the car radio.
- Opdelt skærm: Drag an app icon to one side of the screen to activate split-screen mode, then select another app for the other side.
- Spejllink: Connect your smartphone via USB or WiFi and follow the on-screen instructions to mirror its display.

Image: The car radio display showing two applications running side-by-side in split-screen mode, for example, an equalizer and a music player.

Image: The car radio display showing a mirrored image from a smartphone, illustrating the Mirrorlink feature.
6. Vedligeholdelse
For at sikre din bilradios levetid og optimale ydeevne skal du følge disse vedligeholdelsesretningslinjer:
- Rengøring af skærm: Brug en blød, fnugfri klud lidt damprengøres med vand eller en skærmrens, der er specielt designet til elektroniske skærme. Undgå skrappe kemikalier eller slibende materialer.
- Softwareopdateringer: Periodically check for available software updates through the unit's settings menu (if applicable) to ensure you have the latest features and bug fixes.
- Miljøforhold: Undgå at udsætte enheden for ekstreme temperaturer, direkte sollys i længere perioder eller for høj fugtighed.
- Kabelforbindelser: Sørg for, at alle kabler er korrekt tilsluttet og ikke er beskadigede.
7. Fejlfinding
Hvis du støder på problemer med din bilradio, kan du se følgende almindelige problemer og løsninger:
| Problem | Mulig årsag | Løsning |
|---|---|---|
| Enheden tænder ikke | Loose power connection, blown fuse, incompatible vehicle version. | Check power cable connections. Inspect vehicle fuses. Verify vehicle compatibility (Section 2). |
| Ingen lyd | Lydstyrken er for lav, forkert lydkilde, løse højttalerledninger. | Increase volume. Select correct audio source. Check speaker wire connections. |
| GPS-signalet er svagt eller unøjagtigt | GPS antenna improperly placed, environmental interference. | Sørg for, at GPS-antennen har en fri view of the sky. Avoid placing near metal obstructions. |
| Bluetooth forbinder ikke | Bluetooth off on phone/unit, pairing issue. | Sørg for, at Bluetooth er aktiveret på begge enheder. Slet tidligere parringer, og par dem igen. |
| Ratbetjeningen virker ikke | Incorrect wiring, software configuration. | Check Canbus connection. Go to Settings > Steering Wheel Control to configure. |
Hvis problemet fortsætter efter at have forsøgt disse løsninger, bedes du kontakte teknisk support.
8. Specifikationer
| Feature | Detalje |
|---|---|
| Mærke | electrosmart |
| Modelnummer | Explorer |
| Operativsystem | Android 14 |
| Processor | 8-kerne |
| Skærmtype | QLED Touch Screen (2.5D Capacitive) |
| Skærmstørrelse | 10.4 tommer |
| Skærmopløsning | 1280*800 |
| VÆDDER | 2 GB |
| ROM | 32 GB |
| Forbindelse | Bluetooth 5.2, Wi-Fi, USB |
| Understøttede funktioner | Wireless CarPlay, Wired Android Auto, GPS Navigation, FM/AM/RDS Radio, EQ Settings, Split Screen, Mirrorlink, Backup Camera Input, Steering Wheel Control |
| Lydudgangstilstand | Stereo (2 Channels) |
| Kompatible enheder | Smartphone |
| Indbyggede medier | Backup kamera |
9. Garantioplysninger
This electrosmart car radio unit comes with a 1-års garanti fra købsdatoen. Denne garanti dækker fabrikationsfejl og funktionsfejl ved normal brug. Den dækker ikke skader forårsaget af forkert installation, misbrug, ulykker eller uautoriserede ændringer. Gem venligst din købsbevis i tilfælde af garantikrav.
10. Teknisk support
Our professional technical support team is available to assist you with any questions or issues you may encounter. For technical assistance, please contact us through the platform where you purchased the product. We aim to reply as soon as possible to address your needs.