1. Introduktion
Thank you for choosing the Clemas H6 Rechargeable Camping Light. This versatile lighting solution is designed for various outdoor and emergency situations, offering powerful illumination, flexible adjustment, and convenient features. Please read this manual thoroughly before use to ensure proper operation and maintenance.
2. Sikkerhedsoplysninger
- Always ensure the device is fully charged before its first use.
- Udsæt ikke lyset for ekstreme temperaturer eller direkte sollys i længere perioder.
- Opbevares utilgængeligt for børn.
- Forsøg ikke at skille enheden ad eller ændre den, da dette vil ugyldiggøre garantien og kan forårsage skade eller personskade.
- Brug kun det medfølgende opladningskabel eller et certificeret Type-C-kabel til opladning.
- Ensure the light is stable when extended to its full height to prevent tipping.
3. Pakkens indhold
Bekræft at alle varer er til stede i din pakke:
- Camping-lysenhed
- Campi L.amp Stand (Telescopic Tripod)
- Fjernbetjening
- Ladekabel (Type-C)
- Storage Box for Light Unit
- Storage Bag for Stand
- Ground Nails (for securing stand)
- Brugermanual

Figur 3.1: Pakkens indhold
4. Produktet er slutview
The Clemas H6 features a compact design with powerful lighting capabilities. Key components include the main light unit with four adjustable LED panels, a telescopic tripod stand, and a wireless remote control.

Figure 4.1: Clemas H6 Camping Light Components
5. Opsætningsvejledning
5.1 Indledende opladning
Før første brug skal du oplade camping light unit. Connect the provided Type-C charging cable to the charging port on the light unit and to a 5V/2.4A USB power adapter (not included). A full charge takes approximately 5.5 hours.

Figure 5.1: Charging the Light Unit
5.2 Assembling the Stand and Light
- Skru Lamp: Gently screw the main light unit into the threaded socket at the top of the stand bracket.
- Loosen Tension Knob: Locate the tension knob on the stand bracket and loosen it to allow movement.
- Unfold Tripod: Carefully unfold the tripod legs until they are fully extended and stable.
- Juster højden: Lift the bracket by hand and rotate it to adjust the height of the light to your desired position, from 48 inches (4 feet) to 98 inches (8.2 feet). Secure the height by tightening the tension knob.

Figure 5.2: Stand Assembly Steps
6. Betjeningsvejledning
6.1 Tænd/sluk
Press the power button on the light unit to turn it on or off. The light will remember your last used settings.
6.2 Justering af lysstyrke og farvetemperatur
The Clemas H6 offers 10 brightness levels and 3 color temperatures:
- Køligt hvidt lys: 8300K
- Naturligt lys: 3100K
- Varmt lys: 1700K
Use the 'M' button on the light unit or remote to cycle through color temperatures. Use the '+' and '-' buttons for stepless brightness adjustment (long press for continuous change).

Figure 6.1: Lighting Adjustment and Color Modes
6.3 Brug af fjernbetjening
The included remote control allows convenient operation from up to 33 feet away. Vigtig: Before using the remote, always manually turn on the light unit using its physical power button.

Figure 6.2: Remote Control in Use
6.4 SOS-tilstand
For emergency situations, the light features an SOS flash mode. Activate this mode by pressing the dedicated SOS button on the light unit or remote. The lamp head is IPX7 rated, and the body is IPX5 water-resistant, making it suitable for various weather conditions.

Figure 6.3: SOS Mode and Water Resistance
6.5 Alsidige placeringsmuligheder
- Teleskopisk stativ: Adjust height from 4 to 8.2 feet for wide area illumination.
- Magnetisk base: The base contains 6 Neodymium magnets, allowing secure attachment to metal surfaces like car hoods or workshop benches.
- Ophængskrog: A metal hook at the bottom allows the light to be hung upside down from branches, ropes, tents, or backpacks.

Figure 6.4: Magnetic Base and Hanging Hook
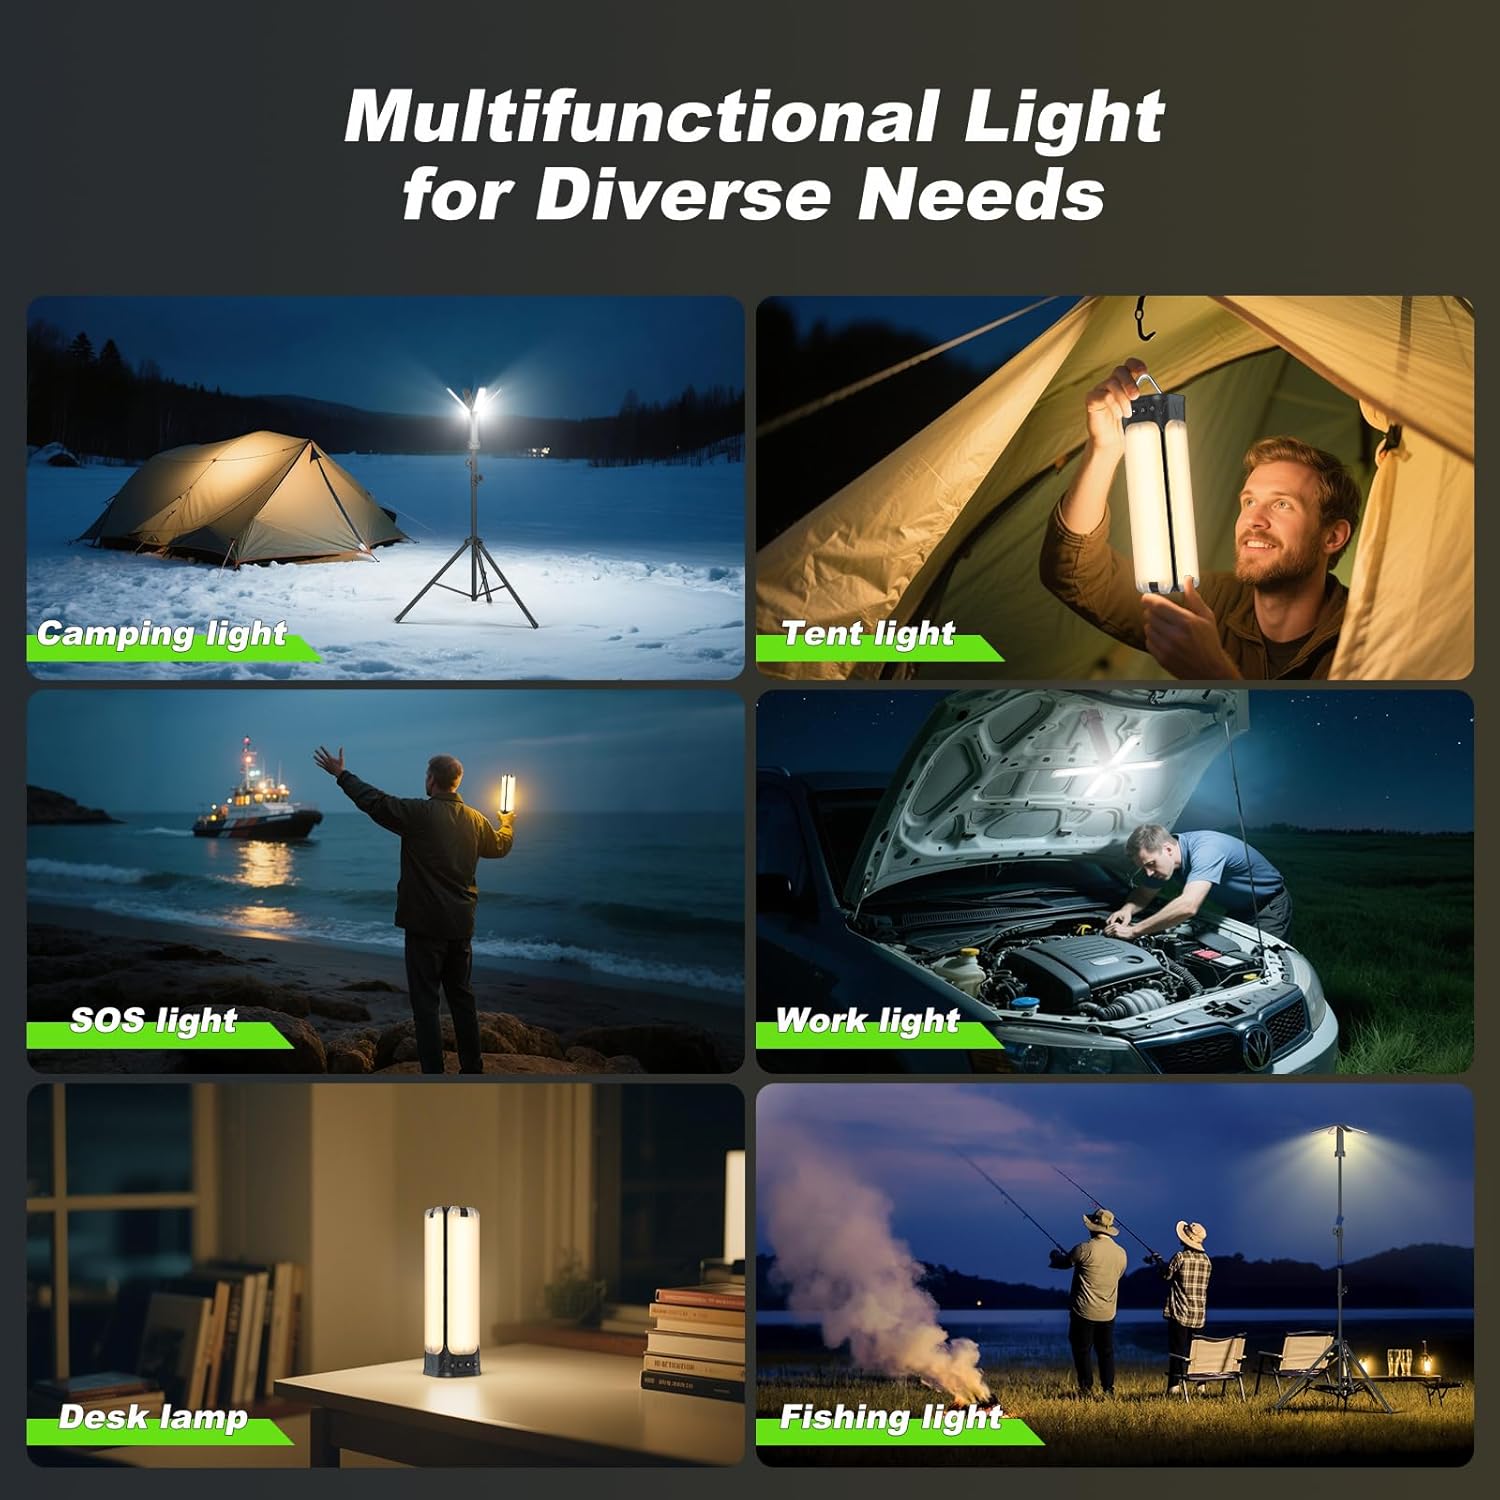
Figure 6.5: Multifunctional Uses
7. Batteri og opladning
The Clemas H6 is equipped with a high-capacity 14000mAh Lithium-Ion battery, providing extended illumination. It also functions as a portable power bank.
- Batterilevetid: Up to 3.5 hours at maximum brightness (all 4 panels) and up to 80 hours at minimum brightness (1 panel).
- Opladningsindgang: 5V/2.4A via Type-C port.
- Power Bank Output: 5V/2.4A via USB-A port for charging mobile devices.

Figure 7.1: Battery Capacity and Power Bank Function
8. Vedligeholdelse
- Rensning: Tør lampeenheden af og stil den med en blød klud.amp klæde. Brug ikke slibende rengøringsmidler eller opløsningsmidler.
- Opbevaring: When not in use, store the light and stand in their respective storage cases/bags in a cool, dry place. Ensure the device is fully charged before long-term storage to preserve battery health.
- Batteripleje: Recharge the battery at least once every three months if stored for extended periods to prevent deep discharge.
9. Fejlfinding
| Problem | Mulig årsag | Løsning |
|---|---|---|
| Lyset tændes ikke. | Batteriet er afladet. | Charge the light unit fully. |
| Fjernbetjening virker ikke. | Light unit not manually turned on. | Ensure the light unit is first turned on using its physical power button. |
| Lysudgangen er svag. | Low battery or brightness setting. | Recharge the unit or increase brightness using '+' button on light/remote. |
| Stativet er ustabilt. | Tripod legs not fully extended or tension knob loose. | Ensure tripod legs are fully spread and tension knob is tightened. Use ground nails on soft surfaces. |
10. Specifikationer
| Feature | Detalje |
|---|---|
| Modelnummer | H6 |
| Lysudbytte (maks.) | 6000 lumen |
| Batterikapacitet | 14000 mAh Lithium-Ion |
| Opladningstid | Cirka 5.5 timer (via Type-C) |
| Batterilevetid (maksimal lysstyrke) | Ca. 3.5 timer |
| Battery Life (Min Brightness) | Ca. 80 timer |
| Højdejustering | 48 to 98 inches (4 to 8.2 feet) |
| Farvetemperaturer | 8300K (Cool), 3100K (Natural), 1700K (Warm) |
| Vandmodstandsniveau | Lamp: IPX7, Body: IPX5 |
| Materiale | Metal, Plast |
| Varens vægt | 6.73 pund |
| Produktdimensioner (foldet) | 7.09 x 3.54 x 34.25 tommer |
11. Garanti og support
Clemas products are designed for durability and performance. For any questions about your order or the product, please contact our customer service team. The manufacturer is Clemas.
Kontaktoplysninger: Please refer to the packaging or the official Clemas webwebstedet for de mest opdaterede kontaktoplysninger til kundesupport.
Figur 11.1: Produktemballage

Figure 11.2: Warranty Information on Packaging


