1. Introduktion
Thank you for choosing Quntis Solar Christmas Star Lights. This manual provides essential information for the safe and efficient use of your product. Please read it thoroughly before installation and operation, and retain it for future reference.
2. Sikkerhedsoplysninger
- Ensure the solar panel is placed in an area that receives 4-6 hours of direct sunlight daily for optimal opladning.
- Do not attempt to modify or disassemble the product. This may void the warranty and pose safety risks.
- Hold produktet væk fra åben ild eller ekstreme varmekilder.
- While the lights are IP44 waterproof, avoid submerging the solar panel or light strings in water.
- Handle the LED strings with care to prevent damage to the wiring.
3. Pakkens indhold
Bekræft at alle komponenter er til stede i pakken:
- 1x Star-shaped LED topper
- 9x LED light strings (3.5 meters each)
- 1x Solar panel with integrated control unit
- 1x Remote control (battery included)
- 1x Ground stake for solar panel
- 9x Ground stakes for light strings
- Cable ties for organization
- 1x USB-C ladekabel
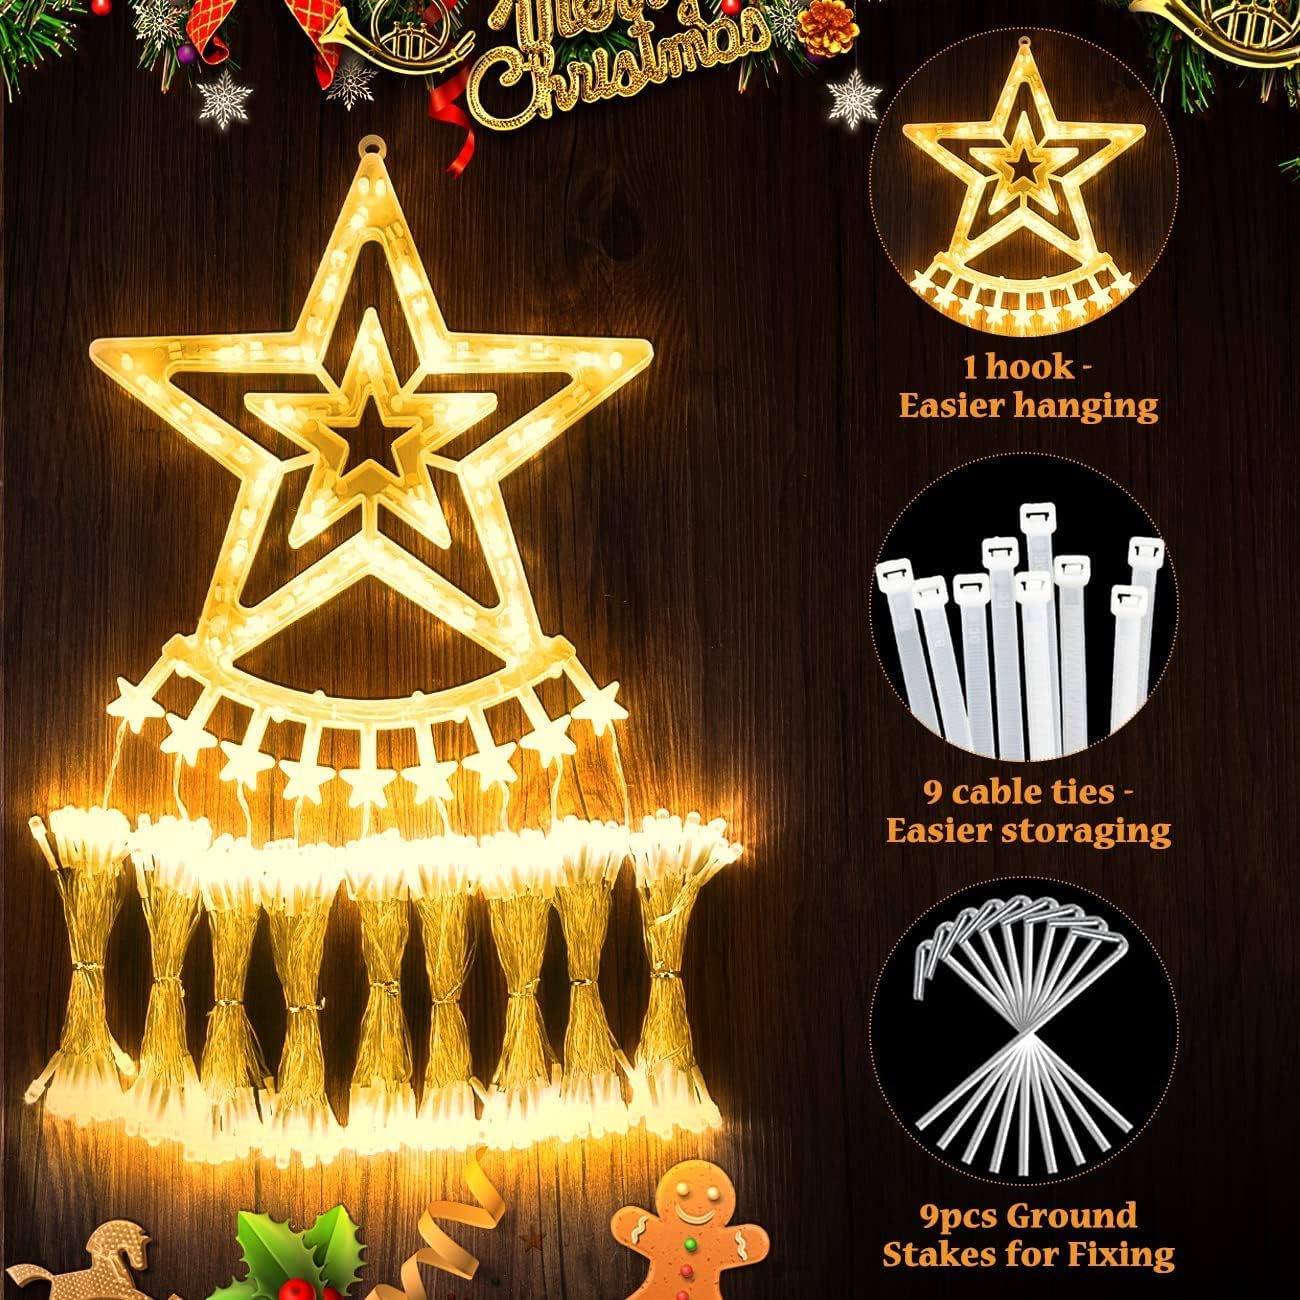
Image: Components of the Quntis Solar Christmas Star Lights, showing the star topper with a hook, cable ties, and ground stakes.
4. Opsætningsvejledning
- Oplad solpanelet: Before first use, ensure the solar panel is fully charged. Place it in direct sunlight for 4-6 hours. An additional USB-C charging port is available for charging on cloudy days.
- Installer solpanelet: Attach the ground stake to the solar panel unit. Insert the stake firmly into the ground in a location that receives maximum direct sunlight. Alternatively, the solar panel can be mounted on a wall or hung.
- Position the Star Topper: Hang the star-shaped LED topper at your desired height on a tree, wall, or roof using its integrated hook.
- UNFurl Light Strings: Carefully uncoil each of the 9 LED light strings, allowing them to drape downwards from the star topper.
- Secure Light Strings: Use the provided ground stakes to secure the end of each light string into the ground, creating a tree-like or cascading effect.
- Tilslut til solpanel: Ensure the light strings are securely connected to the solar panel's control unit.

Image: Quntis Solar Christmas Star Lights illuminating a house and front yard, demonstrating a typical outdoor setup.

Image: Illustration showing the solar panel automatically charging during the day (4-6 hours direct sunlight) and the lights automatically turning on at night (up to 8 hours).
5. Betjeningsvejledning
The Quntis Solar Christmas Star Lights can be controlled via the button on the solar panel or the included remote control.
5.1 Tænd/sluk
- Automatisk drift: The lights will automatically turn on at dusk and turn off at dawn, provided the solar panel has received sufficient charge during the day.
- Manuel kontrol: Use the 'ON/OFF' button on the solar panel or the remote control to manually turn the lights on or off.
5.2 belysningstilstande
The lights feature 8 distinct lighting modes. Cycle through them using the 'MODE' button on the solar panel or the remote control.
- Kombination
- I bølger
- Sekventiel
- Langsom glød
- Chasing/Blitz
- Langsom fade
- Blink/Blitz
- Konstant på

Image: Visual representation of the 8 lighting modes available, along with an image of the remote control.
5.3 Justering af lysstyrke
Adjust the brightness level using the remote control. There are 4 adjustable brightness settings: 100%, 75%, 50%, and 25%.

Image: Four examples demonstrating the adjustable brightness levels (100%, 75%, 50%, 25%) of the diamond-style LED lights.
5.4 Timer funktion
The lights include a timer function to automatically turn off after a set duration. Select from 3-hour, 5-hour, or 8-hour timer options using the remote control.
- 3H timer: Lights on for 3 hours, then off.
- 5H timer: Lights on for 5 hours, then off.
- 8H timer: Lights on for 8 hours, then off.

Image: Visual guide to the 3 timer modes (3H, 5H, 8H) and how to activate them using the remote control.
5.5 Hukommelsesfunktion
The lights are equipped with a memory function. They will remember the last selected lighting mode and brightness setting when turned on again, eliminating the need to re-select your preferred settings.
6. Vedligeholdelse
- Rensning: Tør solpanelet regelmæssigt af med en blød kludamp cloth to remove dust and debris, ensuring optimal charging efficiency.
- Opbevaring: When not in use for extended periods, store the lights in a cool, dry place. Use the provided cable ties to keep the strings organized and prevent tangling.
- Batteri: The solar panel contains a rechargeable battery. If the lights' performance significantly degrades over time, the battery may need replacement. Contact customer support for assistance.
7. Fejlfinding
| Problem | Mulig årsag | Løsning |
|---|---|---|
| Lysene tændes ikke om natten. | Insufficient solar panel charge. | Ensure the solar panel is placed in direct sunlight for 4-6 hours daily. Use the USB-C charging option if sunlight is limited. |
| Lysene flimrer eller er svage. | Lav batteriopladning eller snavset solpanel. | Clean the solar panel. Allow more charging time. Check for obstructions blocking sunlight. |
| Fjernbetjening virker ikke. | Battery depleted or remote too far from receiver. | Ensure the remote control battery is functional and remove the battery separator before first use. Operate the remote closer to the solar panel's control unit. |
| Lights turn off unexpectedly. | Timer function activated or battery depleted. | Check timer settings on the remote. Ensure adequate solar panel charging. |
8. Specifikationer
- Mærke: Quntis
- Model: B0FCFSD4WR
- Lystype: LED
- LED mængde: 349
- Lys farve: Varm hvid (2700 Kelvin)
- Strømkilde: Solar (with USB-C charging option)
- Vandtæt vurdering: IP44
- Særlige funktioner: Adjustable Brightness, Timer Function, Memory Function, Remote Control
- Lys strenglængde: 3.5 meters (each of 9 strings)
- Længde af ledningskabel: 5 meter
- Batteri: 1 Non-standard battery (included)
9. Garanti og support
For warranty information or technical support, please refer to the product packaging or contact Quntis customer service directly. Keep your purchase receipt as proof of purchase.


