1. Introduktion
This user manual provides essential information for the safe and efficient operation of your KEENSTAR 3.5 Bar Espresso Machine. Please read this manual thoroughly before first use and retain it for future reference.

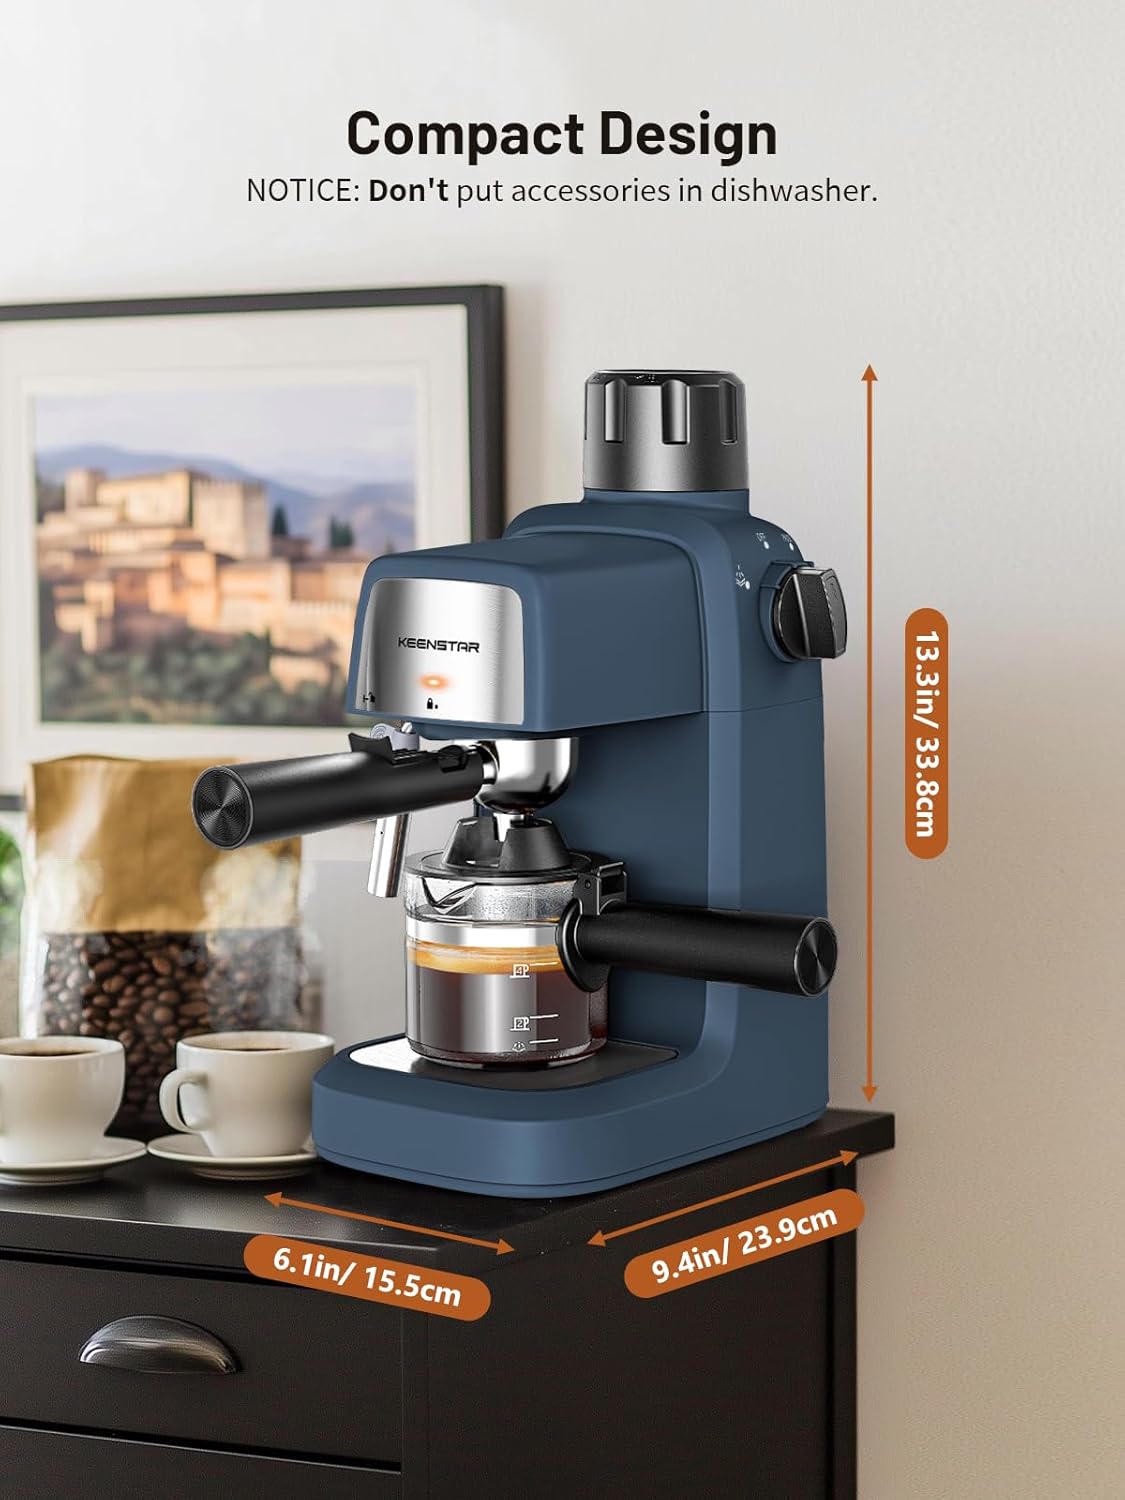
Figure 1: KEENSTAR 3.5 Bar Espresso Machine (Sapphire color)
2. Vigtige sikkerhedsinstruktioner
- Læs alle instruktioner før brug af apparatet.
- Do not immerse the appliance, cord, or plugs in water or other liquid.
- Tæt opsyn er nødvendigt, når et apparat bruges af eller i nærheden af børn.
- Træk stikket ud af stikkontakten, når det ikke er i brug, og før rengøring. Lad det køle af, før du sætter dele på eller af, og før du rengør apparatet.
- Betjen ikke noget apparat med en beskadiget ledning eller stik, eller efter at apparatet ikke fungerer korrekt eller er blevet beskadiget på nogen måde.
- Brug af tilbehør, der ikke er anbefalet af apparatets producent, kan resultere i brand, elektrisk stød eller personskade.
- Må ikke bruges udendørs.
- Lad ikke ledningen hænge ud over kanten af bordet eller bordpladen eller røre ved varme overflader.
- Må ikke placeres på eller i nærheden af en varm gas- eller elektrisk brænder eller i en opvarmet ovn.
- Always turn the control knob to the "OFF" position to relieve pressure before opening the water tank cap or removing the portafilter.
- Do not add water immediately after making coffee to prevent burns.
- Kom ikke tilbehør i opvaskemaskinen.
3. Produktkomponenter

Figur 2: Eksploderet view of the espresso machine and its parts.
- Steam Espresso Machine (Main Unit)
- Vandtank (integreret)
- Betjeningsknap
- Rotating Steam Wand
- Ske/Tamper
- Filterkurv
- Funnel (Portafilter)
- Carafe (240ml capacity for 4 cups coffee)
- Aftagelig drypbakke
4. Opsætning og første brug
4.1 Udpakning
Carefully remove all packaging materials and components. Ensure all parts listed in Section 3 are present and undamaged. Keep packaging for future storage or transport.
4.2 Indledende rengøring
Before first use, wash the carafe, filter basket, funnel (portafilter), and spoon in warm, soapy water. Rinse thoroughly and dry. Wipe the exterior of the machine with a damp klæde.
4.3 Klargøring af maskinen
To prime the machine and remove any manufacturing residues, perform a water-only cycle:
- Fill the carafe with clean water up to the 4-cup (240ml) mark.
- Pour the water into the water tank at the top of the machine.
- Placer den tomme kande på drypbakken.
- Turn the control knob to the "Coffee" symbol.
- Allow the machine to complete a full cycle, dispensing all water into the carafe.
- Discard the water. Your machine is now ready for use.
5. Betjeningsvejledning
5.1 Fremstilling af espresso
- Tilsæt vand: Fill the carafe with water up to the desired level (e.g., 2-cup or 4-cup mark, max 240ml). Pour the water into the water tank. Note: Do not exceed 240ml, otherwise the nozzle may leak.

Figure 3: Adding water to the water tank using the carafe.
- Tilsæt kaffegrums: Place the filter basket into the portafilter. Add medium-ground coffee (recommended >0.5mm) to the filter basket. Do not use too fine coffee ground. Tamp the coffee lightly with the spoon/tampeh. Note: Ensure the coffee ground does not exceed the 4-cup mark in the filter.

Figure 4: Adding and tamping medium-ground coffee.
- Install Portafilter: Insert the portafilter into the machine and turn the handle to the "Lock" symbol to secure it. Note: The filter must be fully locked.

Figure 5: Correctly installing and locking the portafilter.
- Sted Karaffel: Place the carafe on the drip tray directly under the portafilter spout.
- Begynd at brygge: Turn the control knob to the "Coffee" symbol. The indicator light will illuminate. The machine will begin brewing espresso. Brewing typically takes 2-3 minutes for 4 cups.
Video 1: Demonstration of espresso brewing process.
- Stop med at brygge: Once the desired amount of espresso is brewed, turn the control knob to the "OFF" position.
- Lindre trykket: Before removing the portafilter, ensure the control knob is in the "OFF" position to relieve any remaining pressure.
5.2 Skumning af mælk (til cappuccino/latte)
- Forbered mælk: Fill a pitcher with cold milk (dairy or non-dairy). Do not fill more than one-third full to allow for expansion.
- Preheat Steam Wand: Turn the control knob to the "Steam" symbol. Wait for the indicator light to illuminate, indicating the machine has reached steaming temperature (approx. 40 seconds).
- Rens damprør: Åbn kort dampventilen for at lukke eventuelt kondensvand ud. Luk ventilen.
- Skummælk: Immerse the steam wand tip just below the surface of the milk. Turn the control knob to the "Steam" symbol. Move the pitcher up and down slowly to create micro-foam. Continue until the milk reaches desired temperature and consistency.

Figure 6: Using the professional steam wand to froth milk.
- Stop med at dampe: Drej betjeningsknappen til "OFF"-positionen.
- Rengør damprør: Tør straks dampdysen af med en damppistol.amp klud for at fjerne eventuelle mælkerester. Åbn kort dampventilen igen for at fjerne eventuel mælk fra indersiden af røret.
6. Vedligeholdelse og rengøring
Regelmæssig rengøring sikrer optimal ydeevne og forlænger levetiden på din espressomaskine.
6.1 Daglig rengøring
- Portafilter og filterkurv: After each use, remove the portafilter and discard used coffee grounds. Rinse the filter basket and portafilter under running water. Ensure no coffee grounds remain on the edge of the filter.

Figure 7: Proper cleaning of the filter basket.
- Dampstang: As mentioned in Section 5.2, clean the steam wand immediately after frothing milk to prevent blockages.
- Drypbakke: Drypbakken er aftagelig for nem rengøring. Tøm og skyl den regelmæssigt.
Figur 8: Aftagelig drypbakke for nem rengøring.
- Ydre: Tør maskinens ydre af med en blød, damp klæde. Brug ikke slibende rengøringsmidler eller skuresvampe.
6.2 Afkalkning
Med tiden kan der ophobes mineralaflejringer (kalk) i maskinen, hvilket påvirker ydeevnen. Afkalk din maskine hver 2.-3. måned eller oftere, hvis du har hårdt vand.
- Forbered en afkalkningsopløsning i henhold til afkalkningsmiddelproducentens anvisninger (f.eks. hvid eddike og vand eller et kommercielt afkalkningsmiddel).
- Hæld opløsningen i vandtanken.
- Placer en stor beholder under portafilteret og damprøret.
- Run a brewing cycle with the descaling solution until half of the solution has passed through.
- Turn the control knob to the "Steam" symbol and let the remaining solution pass through the steam wand.
- Skyl vandtanken grundigt og fyld den med frisk vand.
- Run two full cycles with fresh water to rinse out any remaining descaling solution.
7. Fejlfinding
| Problem | Mulig årsag | Løsning |
|---|---|---|
| Der kommer ingen kaffe ud. | No water in tank; portafilter not locked; coffee too fine/tamped too hard; machine clogged. | Fill water tank; ensure portafilter is locked; use medium ground coffee and tamp lightly; descale machine. |
| Water leaks from nozzle. | Too much water added to tank. | Ensure water added is max 240ml (4 cups). |
| Damprøret producerer ingen damp eller svag damp. | Steam wand clogged with milk residue; machine not hot enough. | Clean steam wand immediately after use; allow machine to fully preheat for steaming. |
| Kaffen smager svagt eller vandig. | Utilstrækkelig kaffegrums; kaffen er for grov; maskinen skal afkalkes. | Use adequate amount of coffee; use medium ground coffee; descale machine. |
8. Specifikationer
- Mærke: KEENSTAR
- Modelnavn: BCM2201N
- Tryk: 3.5 Bar
- Magt: 800W
- Kapacitet: 4 kopper (240 ml)
- Produktdimensioner: 9.4" D x 6.1" B x 13.3" H
- Varens vægt: 4 pund
- Kaffeindgangstype: Malet kaffe
- Filtertype: Genanvendelig
- Driftstilstand: Manuel
- Speciel funktion: Milk Frother, Preheating Function
9. Garanti og support
For warranty information and customer support, please refer to the warranty card included with your product or visit the official KEENSTAR website. You can also contact the seller, xFTech Inc, for assistance.
Sælger: xFTech Inc