1. Introduktion
This manual provides detailed instructions for the installation, operation, and maintenance of your UNITOPSCI A4196H1MI2 Android Car Stereo. Please read this manual thoroughly before using the product to ensure proper functionality and to prevent damage. This unit is designed for Chevrolet Cruze J300 models manufactured between 2009 and 2015.
2. Sikkerhedsoplysninger
- Brug altid enheden ansvarligt og i overensstemmelse med lokale færdselsregler. Uopmærksom kørsel kan føre til ulykker.
- Do not attempt to install or repair the unit if you are not qualified. Improper installation can cause damage to the vehicle's electrical system or the unit itself.
- Sørg for, at alle ledninger er korrekt tilsluttet og isoleret for at forhindre kortslutninger.
- Hold enheden væk fra vand og overdreven fugt.
- Undgå at udsætte enheden for ekstreme temperaturer eller direkte sollys i længere perioder.
- Rengør skærmen med en blød, tør klud. Brug ikke slibende rengøringsmidler.
3. Pakkens indhold
Bekræft, at alle nedenstående varer er inkluderet i din pakke:
- Android Car Stereo Unit
- Backup kamera
- Strømkabel
- Lille horn
- RCA-kabel
- Bagkamera indgangskabel
- Radio Antenne
- Mikrofon
- Canbus kasse
- GPS antenne
- 4/6 Pin USB Cable
- Brugervejledning (dette dokument)
- USB-adapterkabel
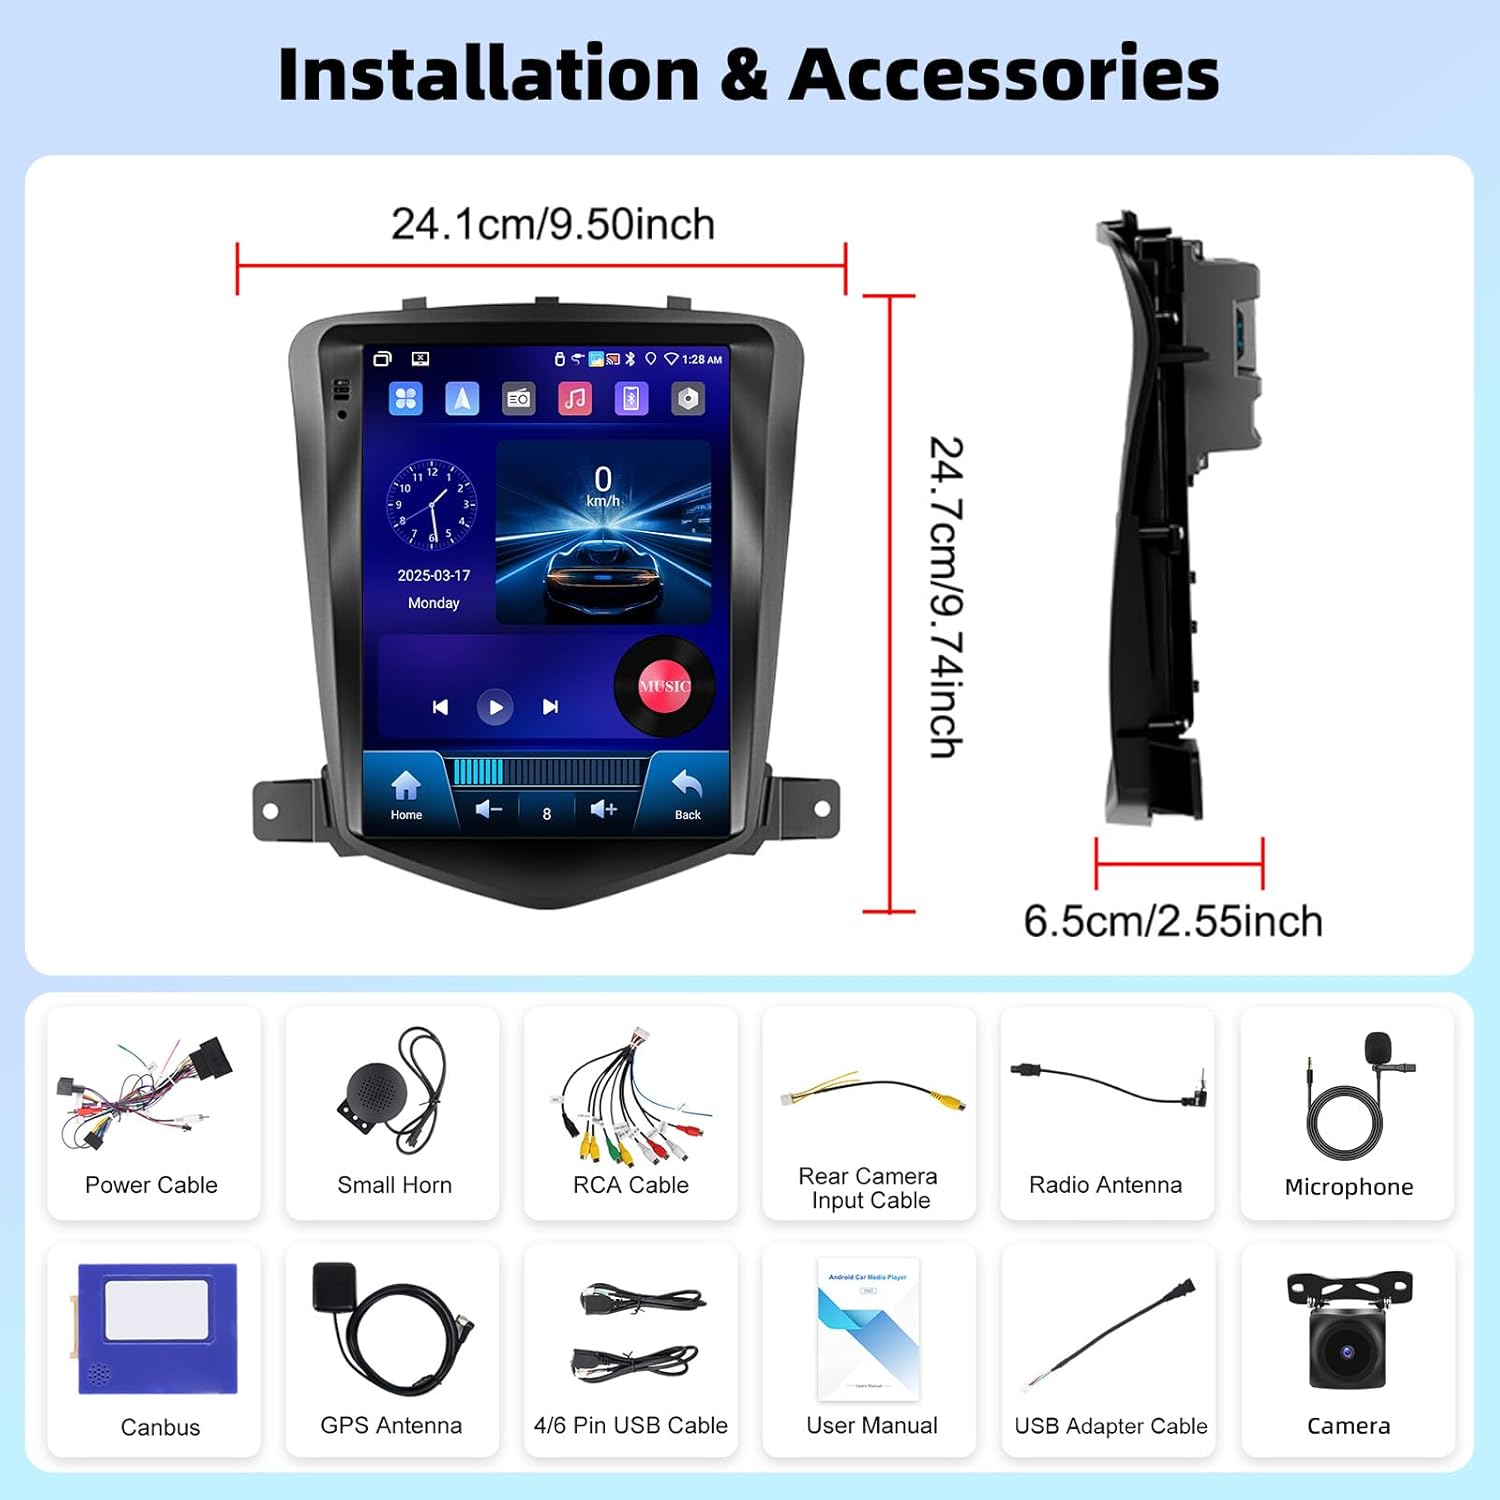
Billede 3.1: Overview of the UNITOPSCI A4196H1MI2 car stereo dimensions and included accessories, such as power cables, antennas, and the backup camera.
4. Installation
4.1. Kontrol før installation
- Ensure your vehicle is a Chevrolet Cruze J300 model (2009-2015).
- Frakobl køretøjets batteri, før du påbegynder elektrisk arbejde.
- Bekræft, at alle komponenter, der er anført i afsnit 3, er til stede.
4.2. Removing the Original Radio
Carefully remove the trim panels and screws securing the factory radio. Refer to your vehicle's service manual for specific instructions on dashboard disassembly.
4.3. Ledningsforbindelser
- Strømkabel: Connect the provided power harness to the vehicle's wiring. Ensure correct polarity.
- RCA-kabler: Connect for audio output (e.g., external amplifier) if applicable.
- GPS-antenne: Monter GPS-antennen på et sted med frit view af himlen, typisk på instrumentbrættet eller under forruden.
- Radioantenne: Tilslut køretøjets radioantenne til enheden.
- Mikrofon: Connect the external microphone for improved call quality. Position it near the driver.
- Backup kamera: Connect the rear camera input cable to the unit and route the camera cable to the rear of the vehicle. Connect the camera's power to the reverse light circuit for automatic activation.
- USB kabler: Connect the USB extension cables for external storage or wired CarPlay/Android Auto.
- Canbus-boks: Connect the Canbus box as instructed to ensure proper communication with the vehicle's systems, including steering wheel controls.
4.4. Montering af enheden
Secure the UNITOPSCI A4196H1MI2 unit into the dashboard opening using the provided brackets and screws. Reassemble the dashboard trim panels.

Image 4.1: Visual comparison of the Chevrolet Cruze J300 dashboard, illustrating the appearance before and after the UNITOPSCI A4196H1MI2 Android car stereo is installed.
5. Betjeningsvejledning
5.1. Tænd/sluk
To power on the unit, start your vehicle. The unit will typically power on automatically. To power off, turn off your vehicle's ignition. The unit may have a soft power-off feature that allows it to resume quickly.
5.2. Berøringsskærmsgrænseflade
The unit features a 9.7-inch HD touchscreen with a resolution of 1024*600. Navigate through menus and applications by tapping, swiping, and pinching gestures, similar to a smartphone or tablet.
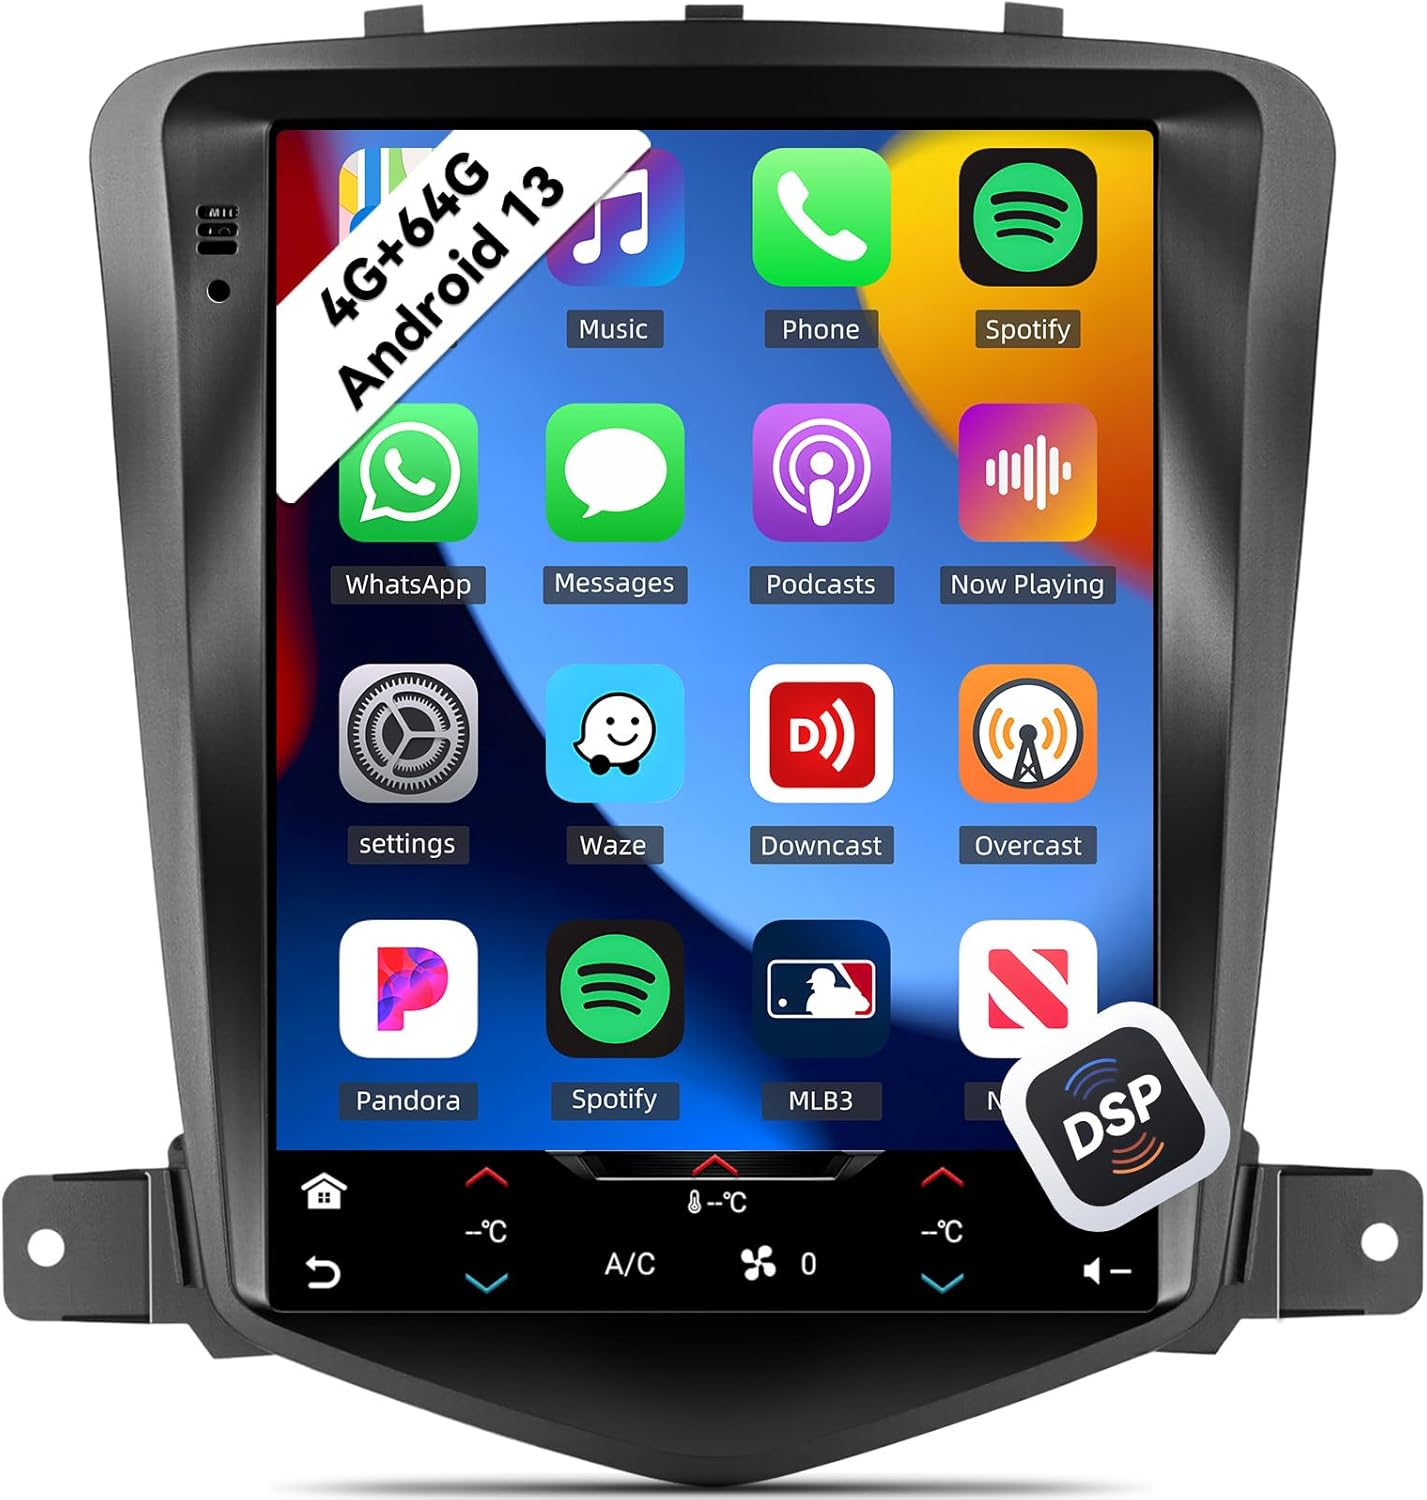
Image 5.1: The main interface of the UNITOPSCI A4196H1MI2 unit, displaying a grid of application icons for music, phone, Spotify, messages, and other functions.
5.3. Android 13-system
The stereo operates on the Android 13 operating system, featuring a quad-core processor, 4GB RAM, and 64GB ROM. This configuration provides a responsive user experience and ample storage for apps and media.

Image 5.2: A visual representation of the Android 13 system's core components, highlighting the 4-core CPU, 4GB RAM, and 64GB ROM for enhanced performance.
5.4. Trådløs CarPlay og Android Auto
The unit supports both wireless Apple CarPlay and Android Auto. Connect your compatible smartphone wirelessly to access navigation, music, calls, and messages directly on the stereo's display.
- Til CarPlay: Ensure Wi-Fi and Bluetooth are enabled on your iPhone. Follow the on-screen prompts to pair.
- Til Android Auto: Ensure Wi-Fi and Bluetooth are enabled on your Android phone. Open the Android Auto app on your phone and follow the pairing instructions.
5.5. Spejllink
Mirror Link allows you to display your smartphone's screen directly onto the car stereo. This feature is compatible with most Android and iOS phones, excluding some Samsung models.
- Access the Mirror Link application on the stereo.
- Follow the instructions to connect your phone via USB or Wi-Fi.

Image 5.3: The car stereo display demonstrating the integration of CarPlay, Android Auto, and Mirror Link functionalities, allowing seamless smartphone connectivity.
5.6. Bluetooth 5.0
The built-in Bluetooth 5.0 module enables hands-free calling and wireless audio streaming. An external microphone is included for clear voice transmission.
- Parring: Go to the Bluetooth settings on the stereo and your phone. Søg efter available devices and select the stereo's name to pair.
- Håndfri opkald: Once paired, you can make and receive calls directly from the stereo interface. The phonebook can be automatically downloaded.
- Lydstreaming: Play music from your phone through the car's speakers wirelessly.

Image 5.4: The stereo's display showing the Bluetooth 5.0 interface for hands-free calling and music playback, along with the Digital DSP processor's 32-band equalizer.
5.7. FM/RDS-radio
Access local radio stations with the integrated FM/RDS tuner. You can save up to 18 preset stations.
- Navigate to the Radio application.
- Brug scanningsfunktionen til at finde stationer eller stil manuelt ind på en frekvens.
- Tryk og hold en forudindstillet knap nede for at gemme den aktuelle station.
5.8. GPS-navigation og WiFi
The unit supports GPS, GLONASS, and Beidou navigation systems. You can use pre-installed offline maps or connect to Wi-Fi/hotspot for online navigation apps like Google Maps or Waze.
- Offlinekort: Access the navigation app and select your desired region.
- Onlinekort: Connect the unit to a Wi-Fi network or your phone's hotspot via the Wi-Fi settings. Then, open your preferred online navigation application.

Image 5.5: The stereo's capabilities for built-in Wi-Fi, allowing access to various online applications, and GPS navigation, supporting both online and offline maps.
5.9. DSP 32-Band EQ
Customize your audio experience with the Digital Sound Processor (DSP) and its 32-band equalizer. This allows for precise tuning of sound frequencies, time correction, and speed-compensated volume.
- Få adgang til EQ-indstillingerne fra hovedmenuen eller lydindstillingerne.
- Adjust individual frequency bands to match your audio preferences.
- Explore preset equalizer modes or create custom profiles.
5.10. Split Screen-funktionalitet
Funktionen til delt skærm giver dig mulighed for at køre to applikationer samtidigt på den 9.7-tommer store skærm, f.eks. navigation og musikafspilning.
- Åbn den første applikation.
- Long-press the recent apps button or swipe from the bottom (depending on Android version) to activate split-screen mode.
- Vælg den anden applikation, der skal vises ved siden af den første.

Image 5.6: The 9.7-inch HD screen showcasing its wide viewing angle and the split-screen feature, allowing two applications to be viewred samtidig.
5.11. Ratbetjening (SWC)
The unit supports steering wheel controls, allowing you to manage volume, tracks, and calls without taking your hands off the wheel. This functionality is enabled via the Canbus box.
- Få adgang til indstillingerne for ratbetjening i enhedens menu.
- Follow the on-screen instructions to program each button on your steering wheel to the desired function.
5.12. Bakkamera
The included AHD backup camera provides a clear view of the area behind your vehicle when reversing. The display automatically switches to the camera feed when the reverse gear is engaged.
- Ensure the backup camera is correctly installed and wired to the reverse light circuit.
- When shifting into reverse, the camera feed will appear on the screen.

Image 5.7: The AHD backup camera module and its clear display on the car stereo screen, alongside an illustration of the steering wheel control interface for programming functions.
6. Vedligeholdelse
- Rengøring af skærm: Brug en blød, fnugfri klud til forsigtigt at tørre berøringsskærmen af. Ved genstridige pletter, tør let afampRengør kluden med vand eller et skærmsikkert rengøringsmiddel. Undgå skrappe kemikalier.
- Softwareopdateringer: Tjek regelmæssigt for softwareopdateringer fra producenten for at sikre optimal ydeevne og adgang til nye funktioner.
- Generel pleje: Hold enheden fri for støv og snavs. Sørg for tilstrækkelig ventilation omkring enheden for at forhindre overophedning.
7. Fejlfinding
7.1. Ingen strøm
- Tjek sikringer: Inspect the vehicle's fuse box and the unit's inline fuse for any blown fuses.
- Ledningsføring: Ensure the power cable is securely connected and has proper voltage.
- Tænding: Kontroller, at køretøjets tænding er tændt.
7.2. Ingen lyd
- Bind: Check if the volume is turned up and not muted.
- Højttalerforbindelser: Ensure all speaker wires are correctly connected to the unit and not shorted.
- Lydkilde: Verify the correct audio source (e.g., FM, Bluetooth, CarPlay) is selected.
7.3. GPS Not Working
- Antenne: Sørg for, at GPS-antennen er korrekt tilsluttet og monteret på et sted med frit lys. view af himlen.
- signal: Allow time for the unit to acquire a GPS signal, especially after initial installation or in areas with poor reception.
- Kort: Verify that maps are installed or that the unit is connected to Wi-Fi for online navigation.
7.4. Problemer med CarPlay/Android Auto-forbindelse
- Bluetooth/Wi-Fi: Ensure Bluetooth and Wi-Fi are enabled on both the stereo and your smartphone.
- Kompatibilitet: Confirm your phone model and operating system version are compatible.
- USB-kabel: If using wired connection, try a different, high-quality USB cable.
7.5. Bakkameraet vises ikke
- Ledningsføring: Check the camera's power and video signal connections. Ensure the trigger wire is correctly connected to the reverse light circuit.
- Indstillinger: Verify that the camera input is enabled in the stereo's settings.
8. Specifikationer
| Feature | Specifikation |
|---|---|
| Modelnummer | A4196H1MI2 |
| Operativsystem | Android 13 |
| Hukommelse (RAM) | 4 GB |
| Lager (ROM) | 64 GB |
| Skærmstørrelse | 9.7 tommer |
| Skærmopløsning | 1024*600 |
| Forbindelse | Bluetooth 5.0, Wi-Fi |
| Navigation | GPS/GLONASS/Beidou (North America, Worldwide maps) |
| Lydfunktioner | DSP 32-Band EQ, Stereo Output |
| Særlige funktioner | Wireless Apple CarPlay, Android Auto, Mirror Link, Split Screen, Backup Camera Input, Steering Wheel Control |
| Produktdimensioner | 2.55 cm L x 9.5 cm B x 9.74 cm H |
| Varens vægt | 3.3 pund |
9. Garanti og support
9.1. Producentens garanti
This UNITOPSCI A4196H1MI2 car stereo comes with a 1 års producentgaranti fra købsdatoen. Denne garanti dækker materiale- og fabrikationsfejl ved normal brug. Gem venligst din købsbevis i tilfælde af garantikrav.
9.2. Kundesupport
For technical assistance, troubleshooting, or warranty inquiries, please contact UNITOPSCI customer support. You can reach them via email at UNITOPSCI@126.com. Please provide your model number (A4196H1MI2) and a detailed description of your issue for efficient service.
Additional protection plans may be available for purchase from your retailer, offering extended coverage beyond the manufacturer's warranty.


