1. Introduktion
Thank you for choosing the Novodesk AZ5130 6-in-1 Automatic Vacuum Sealer Machine. This manual provides essential information for the safe and efficient operation, maintenance, and troubleshooting of your new appliance. Please read these instructions thoroughly before first use and retain them for future reference.

Image 1.1: The Novodesk AZ5130 Vacuum Sealer in operation, sealing food for preservation.
2. Vigtige sikkerhedsinstruktioner
Ved brug af elektriske apparater skal grundlæggende sikkerhedsforanstaltninger altid følges for at reducere risikoen for brand, elektrisk stød og personskade, herunder følgende:
- Læs alle instruktioner, før du bruger dette apparat.
- Do not operate the appliance with a damaged power cord or plug. If the cord or plug is damaged, contact customer support for assistance.
- Apparatet, netledningen eller stikket må ikke nedsænkes i vand eller andre væsker.
- Dette apparat er ikke beregnet til brug af personer (inklusive børn) med nedsatte fysiske, sensoriske eller mentale evner, eller mangel på erfaring og viden, medmindre de er blevet under opsyn eller instruktion i brugen af apparatet af en person, der er ansvarlig for deres sikkerhed. .
- Tæt opsyn er nødvendigt, når et apparat bruges af eller i nærheden af børn.
- Træk stikket ud af stikkontakten, når det ikke er i brug, og før rengøring. Lad det køle af, før du sætter dele på eller af, og før du rengør apparatet.
- Brug ikke tilbehør, der ikke er anbefalet af producenten.
- Må ikke bruges udendørs.
- Må ikke placeres på eller i nærheden af en varm gas- eller elektrisk brænder eller i en opvarmet ovn.
- Always ensure the lid is properly latched before operating.
- Use only vacuum sealer bags designed for vacuum sealing.
3. Pakkens indhold
Carefully unpack your Novodesk AZ5130 Vacuum Sealer and check that all items are present and in good condition. If any items are missing or damaged, please contact customer support.
- 1 x Novodesk AZ5130 Vacuum Sealer Machine
- 1 x strømkabel
- 1 x Vacuum Hose (for external vacuuming)
- 2 x Sealing Foam Gaskets (replacement)
- 6 x Pre-cut Vacuum Bags (3.9" x 7.8")
- 6 x Pre-cut Vacuum Bags (7.8" x 11.8")

Image 3.1: All components included in the Novodesk AZ5130 Vacuum Sealer package.
4. Produktet er slutview
Familiarize yourself with the various parts and functions of your vacuum sealer.

Image 4.1: Control panel and function buttons of the vacuum sealer.
Kontrolpanelets funktioner:
- Process Indicator Light: Illuminates to show operating status.
- Tør tilstand: For vacuum sealing dry foods like nuts and grains.
- Fugtig tilstand: For vacuum sealing foods with a small amount of liquid.
- Puls funktion: Allows manual control of the vacuum process, ideal for fragile foods.
- Seal Function: Seals bags without vacuuming.
- Stop-knap: Stopper den aktuelle handling.
Image 4.2: Internal components of the vacuum sealer.
Nøglekomponenter:
- Vakuumkammer: Area where air is removed from the bag.
- Silicone Strip: Helps create a tight seal.
- Tætningsliste: Heats to create the bag seal (4mm wide).
- Foam Seal Ring: Ensures proper vacuum.
- Cover Slaps: Prevents the vacuum bag from coming out of the vacuum chamber.
- External Sliding Cutter: Integrated cutter for custom bag sizes.
- External VAC Port: For connecting the vacuum hose to jars and containers.
5. Opsætning
Before first use, ensure the appliance is clean and dry. Place the vacuum sealer on a flat, stable surface.
Indledende opsætningstrin:
- Connect the power cord to the appliance and then to a suitable electrical outlet.
- Prepare your vacuum bag with food, ensuring the open end is clean and dry. Leave at least 2-3 inches of space between the food and the top of the bag.
6. Betjeningsvejledning
6.1. Basic Vacuum Sealing (Dry & Moist Modes)
Follow these steps for standard vacuum sealing of food bags:
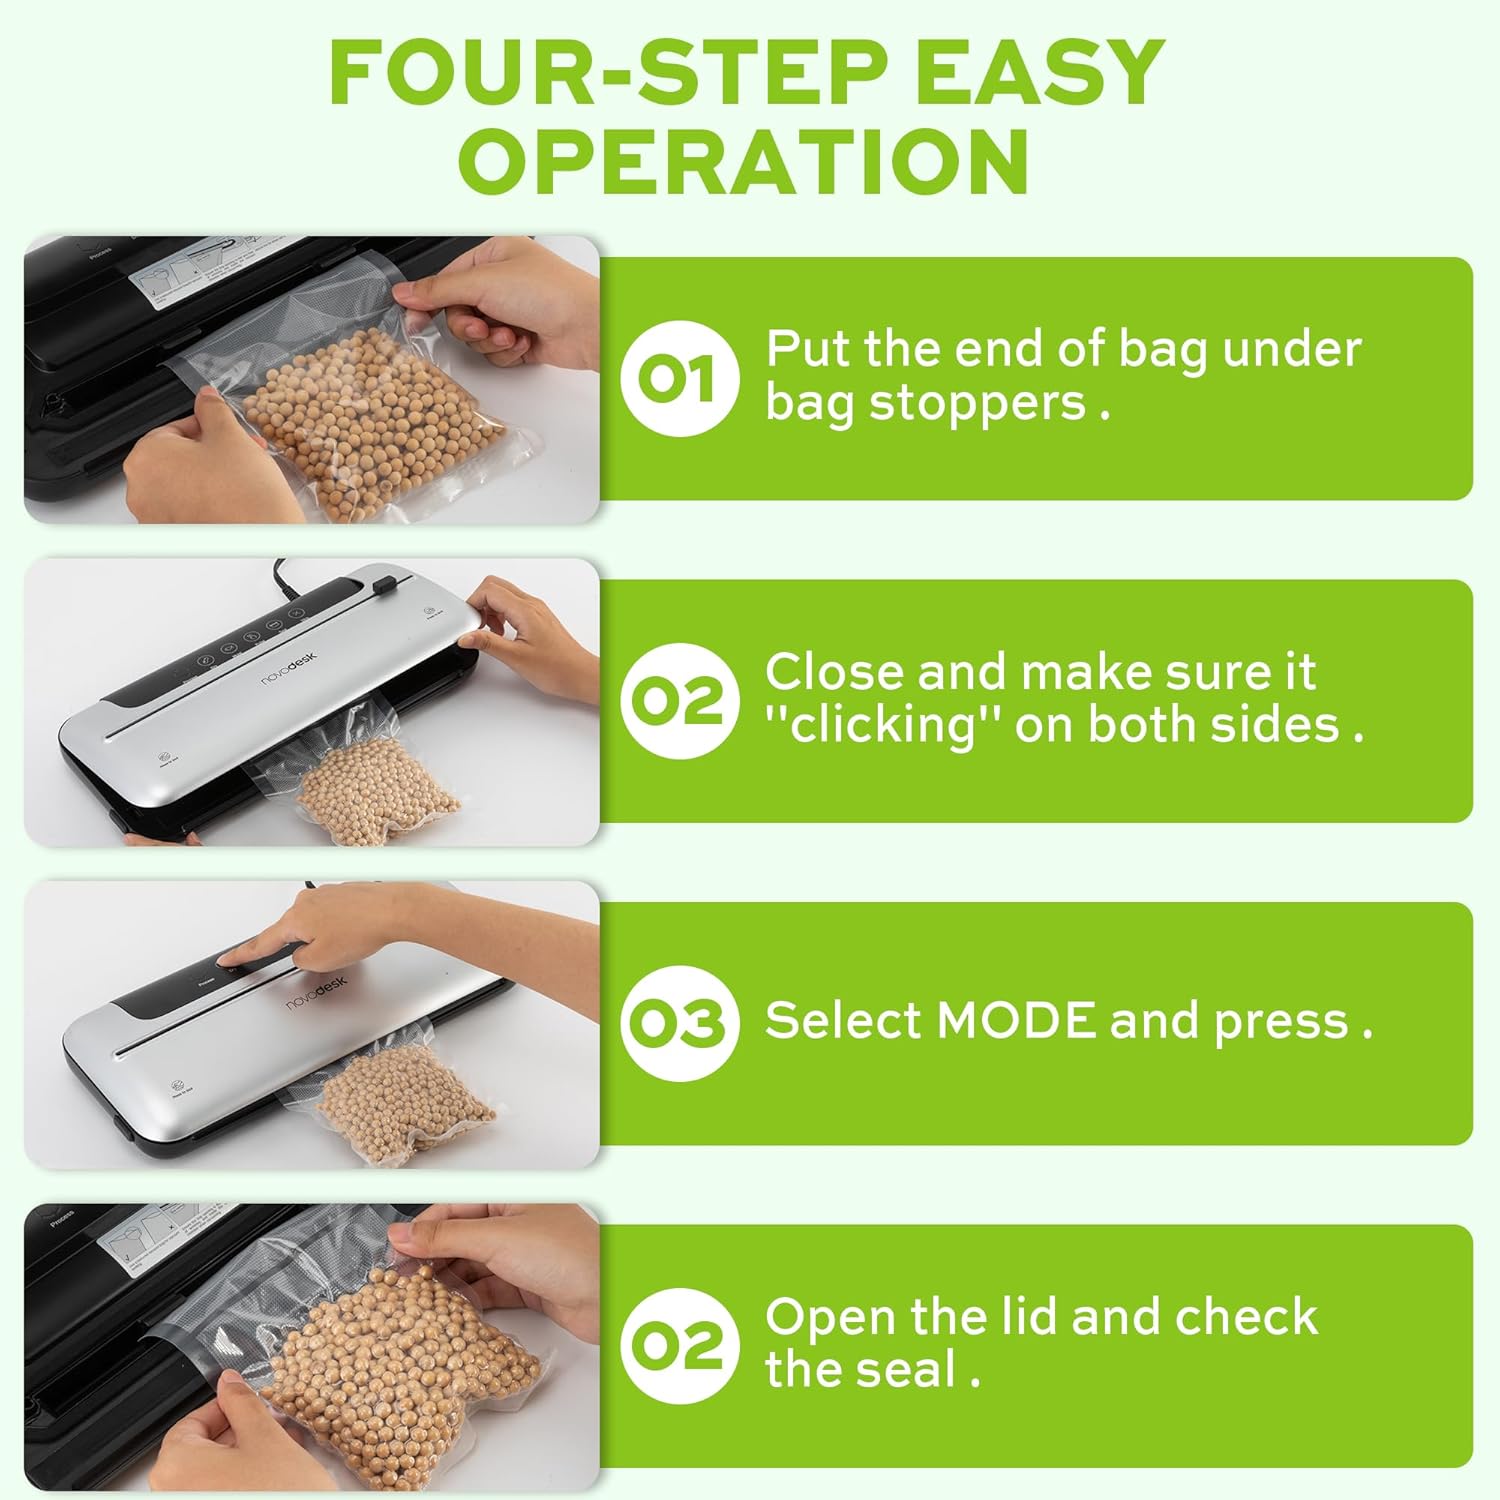
Image 6.1: Four-step easy operation for vacuum sealing.
- Forbered posen: Place the open end of the vacuum bag under the bag stoppers, ensuring it is flat and centered within the vacuum chamber.
- Luk låget: Firmly close the lid of the vacuum sealer. Press down on both sides until you hear a "clicking" sound, indicating that the lid is securely latched.
- Vælg tilstand: Choose the appropriate mode for your food:
- Tryk på Tørre button for dry foods.
- Tryk på Fugtig button for moist foods.
- Tjek forseglingen: Once the process is complete and the indicator light turns off, open the lid and remove the sealed bag. Inspect the seal to ensure it is airtight.
6.2. Pulse Function
The Pulse function provides manual control over the vacuum process, which is ideal for delicate or fragile foods that could be crushed by full vacuum pressure.
- Follow steps 1 and 2 from "6.1. Basic Vacuum Sealing".
- Tryk og hold på Puls button. The machine will begin to vacuum.
- Slip Puls button when the desired vacuum level is reached.
- Tryk på Forsegle button to seal the bag.
- Åbn låget og fjern den forseglede pose.
6.3. Seal Only Function
Use the Seal function to create a seal without vacuuming, useful for making custom-sized bags from a roll or resealing snack bags.
- Place the open end of the bag onto the sealing strip.
- Luk låget godt, indtil det klikker.
- Tryk på Forsegle button. The machine will heat and seal the bag.
- Once the sealing process is complete, open the lid and remove the sealed bag.
6.4. External Vacuum Function (for Jars/Containers)
Your vacuum sealer includes an external vacuum hose for use with compatible vacuum-sealable jars, containers, and wine stoppers.

Image 6.2: Using the external vacuum system with various containers.
- Prepare your vacuum-sealable jar or container with food. Ensure the lid is properly placed.
- Insert one end of the vacuum hose into the external VAC port on the vacuum sealer.
- Insert the other end of the vacuum hose into the port on your vacuum-sealable jar or container.
- Close the lid of the vacuum sealer (no bag needed inside).
- Tryk på External VAC button (if available, otherwise use Dry/Moist mode to activate vacuum pump). The machine will begin to remove air from the container.
- Once the vacuum process is complete, remove the hose. The container should now be sealed.
6.5. Using the External Sliding Cutter
The integrated sliding cutter allows you to create custom-sized bags from a roll of vacuum sealer material.
- Place the vacuum bag roll across the cutting area.
- Slide the cutter blade across the bag material to achieve the desired length.
7. Vedligeholdelse og rengøring
Regelmæssig rengøring og vedligeholdelse vil sikre din vakuumpakkers levetid og optimale ydeevne.
Rengøringsvejledning:
- Tag altid stikket ud af stikkontakten før rengøring.
- Tør maskinens ydre af med en blød, damp klæde. Brug ikke slibende rengøringsmidler eller opløsningsmidler.
- Clean the vacuum chamber and sealing strip area with a damp cloth. Ensure no food particles or liquids remain.
- The foam seal rings can be removed for cleaning if necessary. Wash with mild soap and water, rinse thoroughly, and allow to air dry completely before reinserting.
- Sørg for, at alle dele er helt tørre, før du opbevarer eller bruger apparatet igen.
Opbevaring:
Store the vacuum sealer in a clean, dry place. For best results, store with the lid unlatched to prevent compression of the foam seal rings, which can affect sealing performance over time.
8. Fejlfinding
Hvis du støder på problemer med din vakuumpakker, kan du se følgende almindelige problemer og løsninger:
| Problem | Mulig årsag | Løsning |
|---|---|---|
| Maskinen tænder ikke. | Ingen strømforsyning. | Check if the power cord is securely plugged into the outlet and the machine. Test the outlet with another appliance. |
| Maskinen støvsuger, men forsegler ikke. | Sealing strip or foam gasket is dirty/damaged. Bag is not positioned correctly. | Clean the sealing strip and foam gaskets. Ensure the bag is flat and centered over the sealing strip. Replace gaskets if damaged. |
| Machine seals but does not vacuum. | Lid not properly latched. Foam gaskets are dirty or worn. Bag has holes or is not suitable. | Ensure the lid is firmly closed and latched on both sides. Clean or replace foam gaskets. Use proper vacuum sealer bags and check for damage. |
| Vakuumet er svagt eller ujævnt. | Foam gaskets are dirty or worn. Too much liquid in the bag (for Dry mode). | Clean or replace foam gaskets. Use Moist mode for foods with liquid, or pre-freeze liquids. |
| Bag melts during sealing. | Sealing time too long (unlikely for automatic models). | Ensure you are using appropriate vacuum sealer bags. If issue persists, contact customer support. |
If the problem persists after attempting these solutions, please contact Novodesk customer support for further assistance.
9. Specifikationer
| Mærke | Novodesk |
| Modelnummer | AZ5130 |
| Strøm / Wattage | 120 watt |
| Voltage | 120V |
| Materiale | Acrylonitril Butadien Styren (ABS) |
| Varens vægt | 980 g (2.16 pund) |
| Farve | Sølvfarvet |
| Driftstilstand | Automatisk |
| Max sugekraft | 75KPa |
| Tætningsstrimmelbredde | 4 mm |
10. Garanti og support
Novodesk products are manufactured to high-quality standards. For information regarding warranty coverage, product support, or to purchase replacement parts, please refer to the warranty card included with your product or visit the official Novodesk website. If you have any questions or require assistance, please contact Novodesk customer service.

