Indledning
This manual provides essential instructions for the safe and efficient operation of your Beautiful by Drew Barrymore Programmable Single-Serve Coffee Maker with Integrated Grinder, Model 19332. Please read all instructions carefully before first use and retain this manual for future reference.
Vigtige sikkerhedsoplysninger
Ved brug af elektriske apparater skal grundlæggende sikkerhedsforanstaltninger altid følges for at reducere risikoen for brand, elektrisk stød og/eller personskade, herunder følgende:
- Læs alle instruktioner.
- Rør ikke ved varme overflader. Brug håndtag eller knopper.
- For at beskytte mod elektrisk stød må ledning, stik eller kaffemaskine ikke nedsænkes i vand eller anden væske.
- Tæt opsyn er nødvendigt, når et apparat bruges af eller i nærheden af børn.
- Træk stikket ud af stikkontakten, når det ikke er i brug, og før rengøring. Lad det køle af, før du sætter dele på eller af, og før du rengør apparatet.
- Betjen ikke noget apparat med en beskadiget ledning eller stik, eller efter at apparatet ikke fungerer korrekt eller er blevet beskadiget på nogen måde.
- Brug af tilbehør, der ikke er anbefalet af apparatets producent, kan resultere i brand, elektrisk stød eller personskade.
- Må ikke bruges udendørs.
- Lad ikke ledningen hænge ud over kanten af bordet eller bordpladen eller røre ved varme overflader.
- Må ikke placeres på eller i nærheden af en varm gas- eller elektrisk brænder eller i en opvarmet ovn.
- Sæt altid stikket i apparatet først, og sæt derefter ledningen i stikkontakten. For at afbryde forbindelsen skal du slukke for en vilkårlig knap og derefter tage stikket ud af stikkontakten.
- Brug ikke apparatet til andet end tilsigtet brug.
- Der kan opstå skoldning, hvis låget fjernes under bryggecyklussen.
Pakkens indhold
Bekræft, at alle nedenstående varer er inkluderet i din pakke:
- Beautiful by Drew Barrymore Single-Serve Coffee Maker with Integrated Grinder
- 2-in-1 Cleaning Brush with Measuring Scoop
- Charcoal Filter and Holder
- Genanvendeligt kaffefilter
- Instruktionsmanual (dette dokument)
Produkt overview
Familiarize yourself with the components of your coffee maker.

Figur 1: Forside view of the Beautiful by Drew Barrymore Single-Serve Coffee Maker, showing the control panel, brew spout, and drip tray.

Figur 2: Øverst view of the coffee maker with the lid open, revealing the integrated burr grinder and bean hopper. The hopper can hold enough beans for up to 16 cups of coffee.

Figure 3: Illustration of the reusable gold-tone coffee filter being placed into the brew basket. This filter eliminates the need for disposable paper filters or pods.
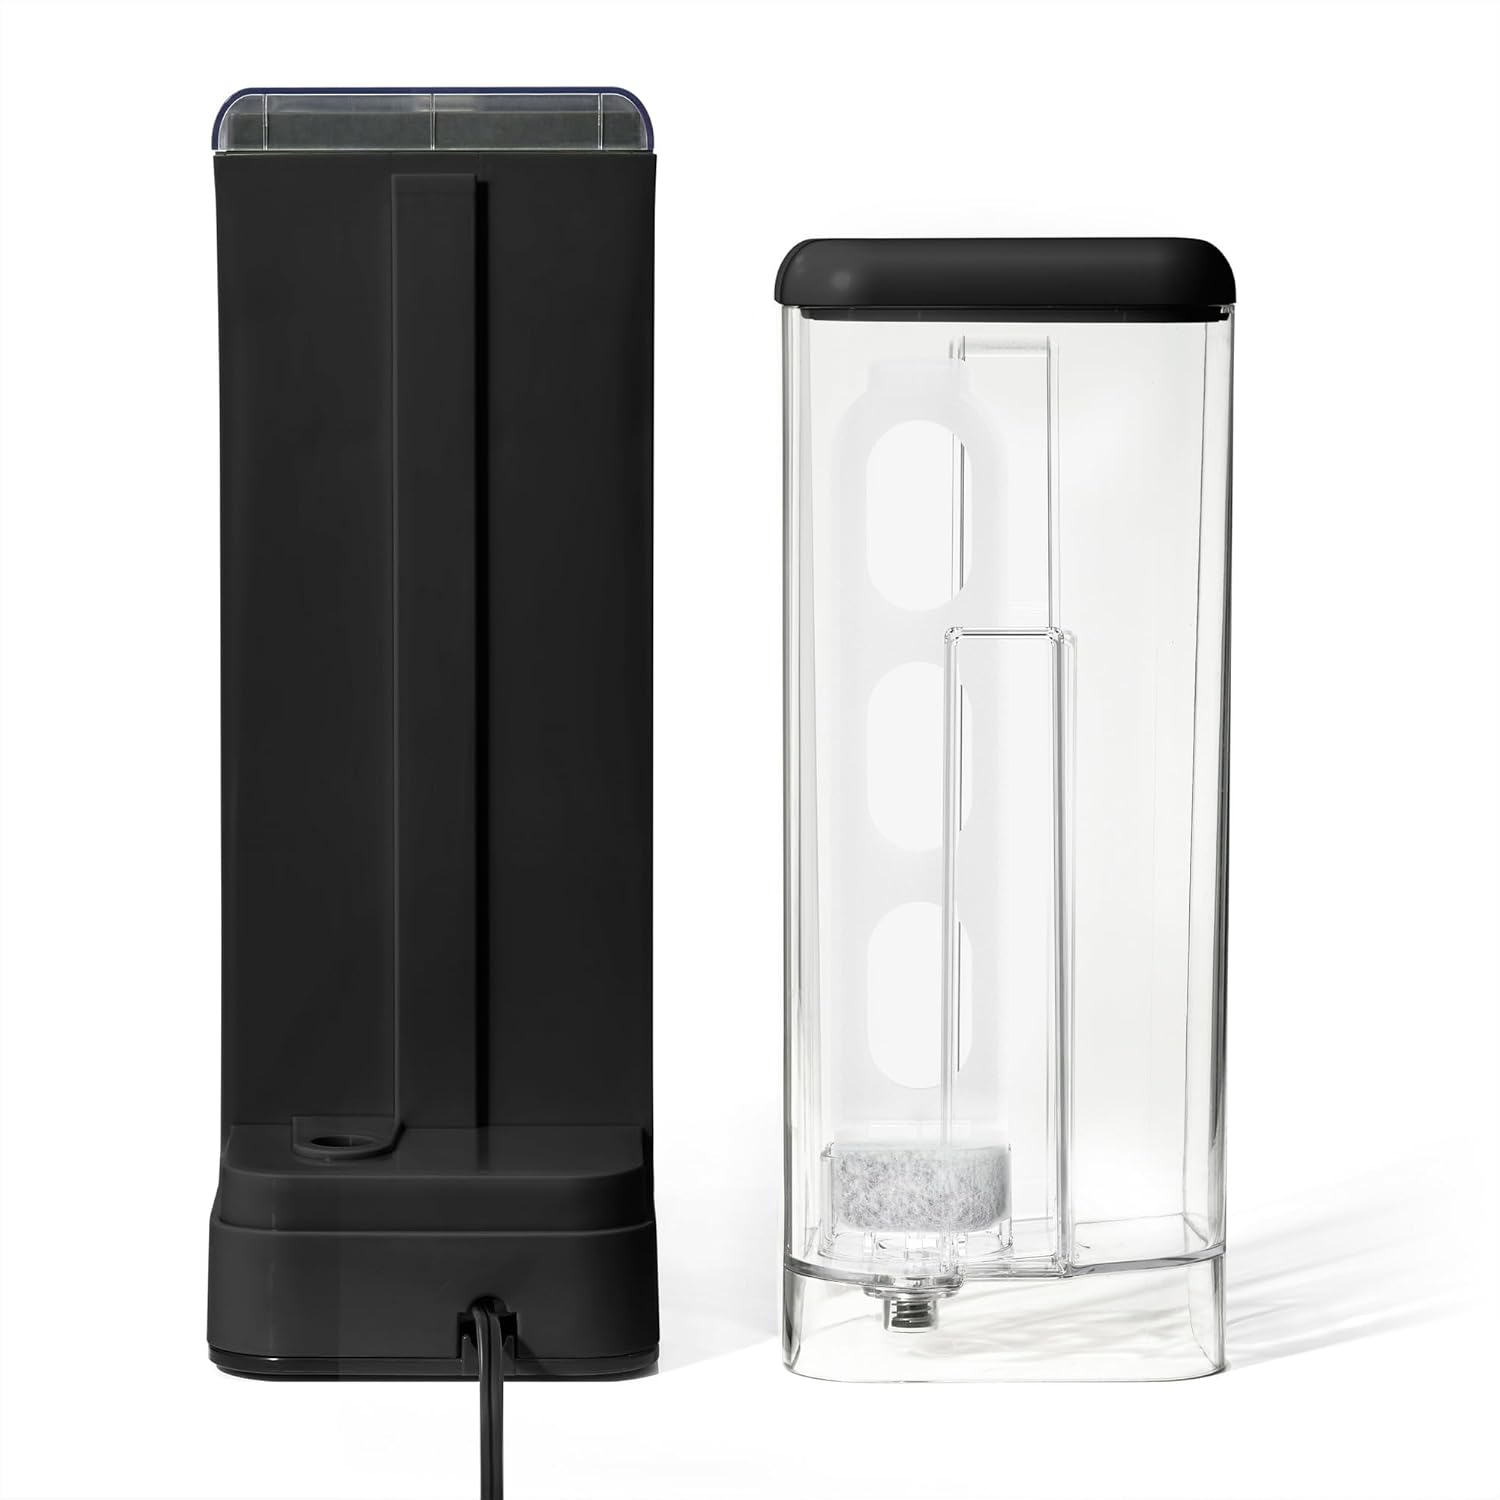
Figure 4: The detachable 14 oz water reservoir, shown with the charcoal filter and holder. The reservoir is designed for single-serve brewing.
Opsætning
Før første brug
- Unpack the coffee maker and all accessories. Remove any packaging materials and labels.
- Wash the reusable coffee filter, water reservoir, and drip tray in warm, soapy water. Rinse thoroughly and dry.
- Insert the charcoal filter into its holder, then place it into the water reservoir.
- Fyld vandbeholderen med frisk, koldt vand op til MAX-påfyldningslinjen.
- Perform a cleaning cycle:
- Ensure the reusable filter is empty and correctly seated.
- Placer et stort krus eller en beholder på drypbakken.
- Press the "Brew Size" button to select 14 oz.
- Press the "Brew On" button to start a water-only cycle.
- Discard the hot water. Repeat this process once more.
Placing the Coffee Maker
Place the coffee maker on a flat, stable, heat-resistant surface near a power outlet. Ensure there is adequate clearance around the unit for ventilation and access to the water reservoir and bean hopper.
Betjeningsvejledning
Brewing a Single Cup of Coffee
- Fyld vandbeholder: Remove the water reservoir and fill it with fresh, cold water to your desired brew size (6, 8, 10, or 14 oz). Reattach the reservoir securely.
- Tilsæt kaffebønner: Open the lid to the bean hopper. Add whole coffee beans. The integrated burr grinder will automatically grind the precise amount needed for your selected brew.
- Vælg brygstørrelse: Press the "Brew Size" button repeatedly to cycle through the available cup sizes (6, 8, 10, 14 oz).
- Adjust Brew Strength (Optional): Press the "Bold" button to select a stronger brew if desired. The indicator light will illuminate.
- Placer krus: Position your mug or travel cup on the drip tray. For taller travel mugs, the drip tray can be removed.
- Begynd at brygge: Press the "Brew On" button. The coffee maker will grind the beans, then begin the brewing process.
- Nyde: Once brewing is complete, carefully remove your mug. The coffee maker will automatically shut off.
Using the Programmable Auto-Start Timer
You can program your coffee maker to start brewing at a specific time.

Figure 5: The control panel displaying time and various function buttons, including "Delay Menu", "Hour", and "Minute" for setting the auto-start timer.
- Indstil aktuel tid: Press and hold the "Hour" button until the display flashes. Use "Hour" and "Minute" buttons to set the current time. Press "Delay Menu" to confirm.
- Forberedelse til brygning: Follow steps 1-5 from "Brewing a Single Cup of Coffee" (fill water, add beans, select brew size, adjust strength, place mug).
- Indstil forsinkelsestid: Press the "Delay Menu" button. The display will flash. Use "Hour" and "Minute" buttons to set your desired brew start time.
- Activate Delay Brew: Press "Delay Menu" again to confirm. The "Delay" indicator light will illuminate, and the coffee maker will start brewing at the set time.
Brewing "Over Ice" Coffee
This feature is designed to brew a concentrated coffee over ice for a refreshing iced beverage.

Figure 6: The coffee maker brewing a concentrated coffee directly over ice in a glass, utilizing Exact Xtract technology for enhanced flavor.
- Fyld vandbeholder: Fill the water reservoir with fresh, cold water according to the desired iced coffee volume.
- Tilsæt kaffebønner: Add whole coffee beans to the hopper.
- Forbered is: Fill your serving glass with ice cubes.
- Select "Over Ice": Press the "Over Ice" button. The indicator light will illuminate. The coffee maker will automatically adjust the brew settings for iced coffee.
- Begynd at brygge: Press the "Brew On" button.
- Tjene: Once brewing is complete, stir and enjoy your iced coffee.
Vedligeholdelse og rengøring
Regelmæssig rengøring sikrer optimal ydeevne og forlænger din kaffemaskines levetid.
Daglig rengøring
- Tag stikket ud: Tag altid stikket ud af kaffemaskinen før rengøring.
- Genanvendeligt filter: Remove the reusable filter, discard used coffee grounds, and rinse thoroughly under running water. Use the cleaning brush if necessary.
- Drypbakke: Remove and empty the drip tray. Wash with warm, soapy water and rinse.
- Vandreservoir: Skyl vandbeholderen med frisk vand.
- Ydre: Tør ydersiden af kaffemaskinen af med adamp klæde. Brug ikke slibende rengøringsmidler eller skuresvampe.
Rengøring af kværn
Periodically clean the integrated burr grinder to prevent clogs and maintain grind consistency.
- Ensure the coffee maker is unplugged and cooled.
- Fjern eventuelle resterende kaffebønner fra beholderen.
- Use the provided 2-in-1 cleaning brush to gently brush away any coffee grounds from the burrs and the grinder chute.
- Wipe the inside of the bean hopper with a dry cloth.
Afkalkning
Mineralaflejringer fra vand kan ophobes over tid og påvirke ydeevnen. Afkalk din kaffemaskine hver 2.-3. måned, eller oftere, hvis du har hårdt vand.
- Prepare a descaling solution: Mix 1 part white vinegar with 2 parts water, or use a commercial descaling solution according to its instructions.
- Fyld vandbeholderen med afkalkningsopløsningen.
- Læg et stort krus på drypbakken.
- Run a brew cycle without coffee grounds.
- Efter cyklussen skal kaffemaskinen stå i 30 minutter med opløsningen indeni.
- Kør endnu en bryggecyklus for at tømme beholderen.
- Rinse thoroughly by running 2-3 cycles with fresh, clean water.
Fejlfinding
Se dette afsnit for almindelige problemer og deres løsninger.
| Problem | Mulig årsag | Løsning |
|---|---|---|
| Kaffen brygger ikke. | No water in reservoir; unit not plugged in; brew cycle not initiated. | Fill reservoir; ensure power cord is securely plugged in; press "Brew On" button. |
| Svag kaffe. | Insufficient coffee beans; incorrect brew strength selected; descaling needed. | Add more beans; select "Bold" brew strength; descale the unit. |
| Kværnen virker ikke. | No beans in hopper; grinder clogged; unit not powered. | Add beans; clean grinder burrs with brush; ensure power. |
| Kaffen flyder over. | Mug too small; brew basket clogged. | Use a larger mug; clean the reusable filter and brew basket. |
| "Clean" indicator light is on. | Indicates descaling is recommended. | Udfør en afkalkningscyklus som beskrevet i afsnittet Vedligeholdelse. |
Specifikationer
- Modelnavn: RP19332
- Varemodelnummer: 19332
- Mærke: Smuk af Drew Barrymore
- Farve: Sort sesam
- Produktdimensioner: 12.95" D x 12.14" B x 5.11" H
- Varens vægt: 7.73 pund
- Vandbeholderkapacitet: 14 oz
- Særlige funktioner: Brew Strength Control, Built-In Conical Burr Grinder, Programmable Auto-Start Timer, Reusable Coffee Filter, Single-Serve Design (6, 8, 10, or 14 oz mugs)
- Inkluderede komponenter: 2-in-1 cleaning brush with measuring scoop, charcoal filter, and holder
Garanti og support
For warranty information or technical support, please refer to the warranty card included with your product or contact the manufacturer's customer service. Keep your purchase receipt as proof of purchase.


