1. Introduktion
This manual provides essential instructions for setting up, operating, and maintaining your CONSUMER CELLULAR Iris Connect smartphone. The Iris Connect is designed for reliable performance, featuring a 6.5-inch display, 32GB of storage, and running on Android 13. Please read this manual thoroughly to ensure proper use and to maximize your device's capabilities.
2. Hvad er der i æsken
Upon unboxing your CONSUMER CELLULAR Iris Connect, verify that all the following items are included:
- CONSUMER CELLULAR Iris Connect Smartphone
- USB kabel
- Hurtig startvejledning
3. Enhed overview
Familiarize yourself with the physical components of your Iris Connect smartphone.

Figur 3.1: Forside og bagside view of the Iris Connect smartphone, highlighting its sleek design and camera placement.

Figur 3.2: Front view of the Iris Connect, showcasing the 6.5-inch display and front-facing camera.
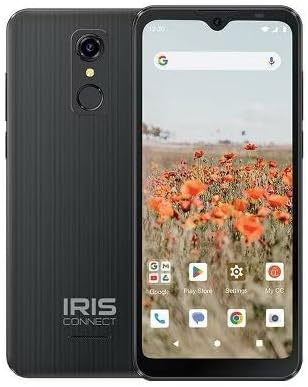
Figur 3.3: Tilbage view of the Iris Connect, showing the main camera, flash, and fingerprint sensor.
Nøglekomponenter:
- 6.5-tommer skærm: High Definition+ screen for clear visuals.
- Frontkamera (8 MP): Placeret øverst på skærmen til selfies og videoopkald.
- Main Camera (13MP): Located on the rear, for high-resolution photos and videos.
- Fingeraftryksscanner: Integrated on the rear for secure unlocking.
- Power knap: Typically on the right side, used to turn the device on/off or wake/sleep the screen.
- Lydstyrkeknapper: Adjacent to the power button, for adjusting audio levels.
- USB-C-port: Nederst, til opladning og dataoverførsel.
- 3.5 mm lydstik: Til tilslutning af hovedtelefoner.
4. Opsætning
4.1. Isætning af SIM-kort og MicroSD-kort
- Find SIM-kortbakken på siden af din enhed.
- Insert the SIM ejector tool (not included, use a thin paperclip) into the small hole next to the tray and press gently until the tray pops out.
- Placer dit/dine Nano-SIM-kort i de dertil beregnede stik med de gyldne kontakter nedad.
- If desired, insert a microSD card (up to 256GB) into its dedicated slot for expanded storage.
- Sæt forsigtigt bakken tilbage i enheden, indtil den klikker på plads.
4.2. Guide til første opstart og opsætning
- Tryk og hold på Power knap indtil skærmen lyser.
- Følg instruktionerne på skærmen for at vælge dit sprog, oprette forbindelse til et Wi-Fi-netværk og konfigurere din Google-konto.
- You may be prompted to transfer data from an old device or set up security features like the fingerprint scanner.
4.3. Opladning af enheden
Before first use, it is recommended to fully charge your device. The Iris Connect features a 3500 mAh battery with an approximate charging time of 2.5 hours.
- Connect the USB cable to the USB-C port at the bottom of your phone.
- Connect the other end of the USB cable to a compatible power adapter (not included) and plug it into a wall outlet.
- Opladningsindikatoren vises på skærmen.
5. Betjeningsvejledning
5.1. Grundlæggende navigation
- Røre: Tryk på et ikon for at åbne en app eller vælge et element.
- Stryg: Træk fingeren hen over skærmen for at rulle eller navigere mellem skærme.
- At klemme: Brug to fingre til at zoome ind eller ud på billeder og web sider.
- Startskærm: Det centrale knudepunkt for dine apps og widgets.
- App Skuffe: Stryg op fra startskærmen for at få adgang til alle installerede apps.
5.2. Foretage opkald
- Tryk på Telefon icon on your home screen or app drawer.
- Indtast telefonnummeret ved hjælp af opkaldstastaturet, eller vælg en kontakt fra din adressebog.
- Tryk på Ring knappen for at starte opkaldet.
5.3. Afsendelse af beskeder
- Åbn Beskeder app.
- Tryk på Start chat or Ny besked ikon.
- Indtast modtagerens nummer, eller vælg fra kontakter, og skriv derefter din besked.
- Tryk på Sende knap.
5.4. Tilslutning til Wi-Fi
- Gå til Indstillinger > Netværk og internet > Internettet.
- Slå Wi-Fi til/fra On.
- Vælg dit ønskede Wi-Fi-netværk fra listen, og indtast adgangskoden, hvis du bliver bedt om det.
5.5. Bluetooth-parring
- Gå til Indstillinger > Tilsluttede enheder > Forbindelsespræferencer > Bluetooth.
- Slå Bluetooth til/fra On.
- Vælge Par ny enhed and choose your desired device from the list. Follow any on-screen prompts to complete pairing.
5.6. Kamerabrug
The Iris Connect features a 13MP main camera and an 8MP front-facing camera.
- Åbn Kamera app.
- Tryk på Lukker knappen for at tage et billede.
- Switch between photo and video modes, or front and rear cameras, using the on-screen icons.
5.7. Fingeraftryksscanner
To set up the fingerprint scanner for secure unlocking:
- Gå til Indstillinger > Sikkerhed og privatliv > Lås enheden op > Fingeraftryk.
- Follow the on-screen instructions to register your fingerprint(s).
6. Vedligeholdelse
6.1. Rengøring af enheden
To keep your device clean and functional:
- Brug en blød, fnugfri klud til at tørre skærmen og kabinettet af.
- Undgå at bruge skrappe kemikalier, slibende rengøringsmidler eller aerosolspray.
- Sørg for, at portene er fri for støv og snavs.
6.2. Batteripleje
To optimize your battery life (up to 26 hours of use):
- Undgå ekstreme temperaturer.
- Do not leave the device charging for extended periods after it's full.
- Adjust screen brightness and close unused apps to conserve power.
6.3. Softwareopdateringer
Regularly check for software updates to ensure your device has the latest features and security patches:
- Gå til Indstillinger > System > Systemopdatering.
- Følg instruktionerne på skærmen for at downloade og installere alle tilgængelige opdateringer.
7. Fejlfinding
This section addresses common issues you might encounter with your Iris Connect smartphone.
- Enheden tænder ikke: Sørg for, at batteriet er opladet. Tilslut opladeren, og vent et par minutter, før du forsøger at tænde igen.
- Intet netværkssignal: Check if your SIM card is correctly inserted. Verify that Airplane Mode is off (swipe down from the top of the screen to check quick settings). Contact your service provider if the issue persists.
- Apps der går ned eller fryser: Try restarting the app. If the issue continues, restart the phone. You may also clear the app's cache or data via Indstillinger > Apps > [Appnavn] > Lagring og cache.
- Langsom ydeevne: Close unused apps, clear cache, or consider uninstalling rarely used applications to free up storage.
- Unable to connect to Wi-Fi/Bluetooth: Ensure Wi-Fi/Bluetooth is enabled in settings. Try forgetting the network/device and reconnecting. Restart your phone and the router/Bluetooth device.
- Forgot screen lock password/pattern: If you have a Google account linked, you might be able to reset it. Otherwise, a factory reset may be necessary (this will erase all data).
For more complex issues, please refer to the official CONSUMER CELLULAR support resources or contact their customer service.
8. Specifikationer
Detailed technical specifications for the CONSUMER CELLULAR Iris Connect smartphone (Model: SH4650).
| Feature | Specifikation |
|---|---|
| Modelnavn | Iris Connect |
| Modelnummer | SH4650 |
| Operativsystem | Android 13.0 |
| Skærmstørrelse | 6.5 tommer |
| Skærmopløsning | 1440 x 810 |
| CPU model | Snapdragon 710 |
| CPU hastighed | 2 GHz |
| Installeret RAM-hukommelsesstørrelse | 3 GB |
| Intern opbevaring | 32 GB |
| Udvidelig opbevaring | Op til 256 GB via microSD |
| Hovedkamera | 13 MP |
| Forreste kamera | 8 MP |
| Batterikapacitet | 3500 mioamp Timer |
| Batteristyrke | 3600 (likely Wh or similar unit, as mAh is 3500) |
| Opladningstid | 2.5 timer |
| Forbindelse | 4G LTE, Bluetooth, Wi-Fi |
| Særlige funktioner | Dual Camera, Expandable Storage, Fingerprint Scanner, Long Battery Life |
| Lydstik | 3.5 millimeter |
| Dimensioner | 8 x 6 x 3 tommer |
| Varens vægt | 6.5 ounce |
9. Garanti og support
For information regarding your product's warranty, please refer to the warranty card included with your purchase or visit the official CONSUMER CELLULAR website. For technical assistance, troubleshooting beyond this manual, or customer service inquiries, please contact CONSUMER CELLULAR support directly.
CONSUMER CELLULAR Official Webwebsted: www.consumercellular.com


