1. Introduktion
This manual provides detailed instructions for the safe and effective operation of your HTVRONT H17 Phone Case Heat Press Machine. The H17 utilizes advanced intelligent temperature control and vacuum heat press technology to deliver vibrant, bubble-free transfers for custom phone cases, badges, coasters, and other sublimation-coated items. Please read all instructions carefully before use.
2. Hvad er der i æsken
Upon unboxing your HTVRONT H17 Heat Press Machine, verify that all the following components are included:
- HTVRONT H17 Phone Case Heat Press Machine (x1)
- Phone Case Fixture Set (x1) - Includes various filler blocks, lens pads, and R-corners for different phone models.
- Badge Fixture Set (x1)
- Sublimation Film (A4) (x5)
- Heat-resistant Gloves (x1 pair)
- Sublimation Badges (58 mm) (x3)
- Tweezers (x1)
- Heat-resistant Tape (x1 roll)
- Brugervejledning (x1)

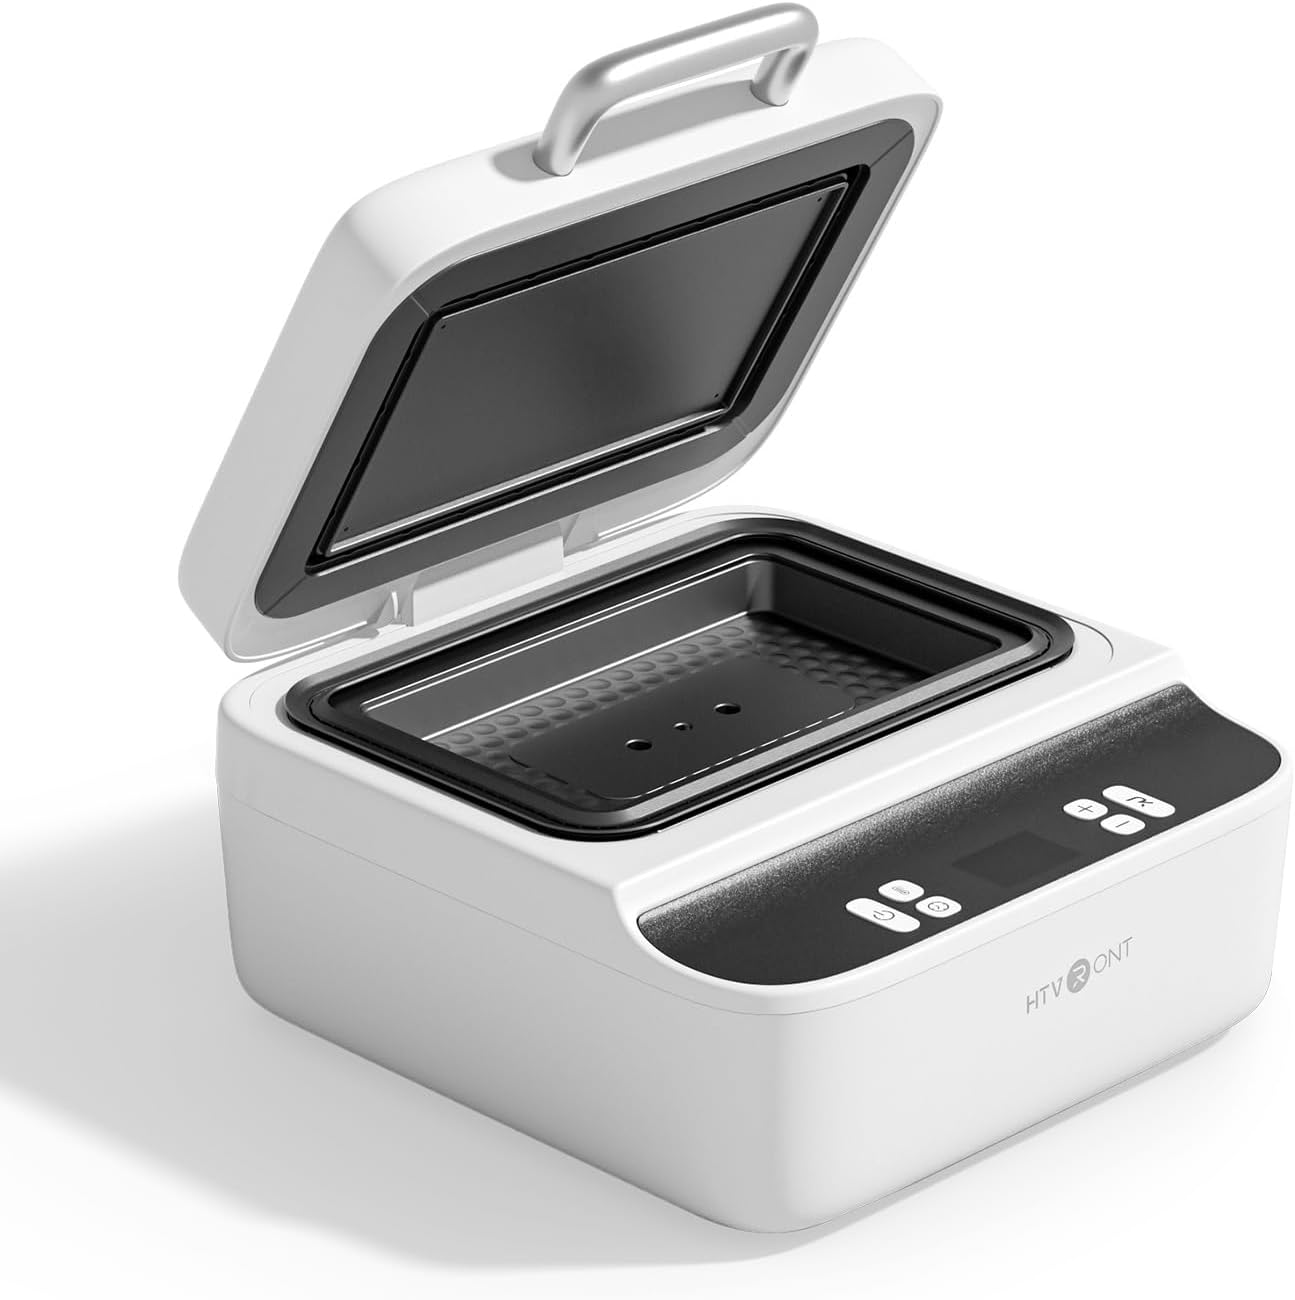
Figure 2.1: HTVRONT H17 Heat Press Machine and all included accessories.
3. Opsætning
Before operating the machine, ensure it is placed on a stable, heat-resistant surface and connected to a suitable power outlet.
3.1. Software Installation and Design Preparation
The HTVRONT H17 is supported by the LOKLIK IdeaStudio software, which includes a mobile model library and AI-powered design tools. This software allows you to adjust pattern size/position, perform mirror processing, and output sublimation-ready files.
- Download and install LOKLIK IdeaStudio from the official HTVRONT webwebsted.
- Open the software and navigate to 'Canvas Settings'.
- Select 'Phone Case Heat Press' as your device.
- Choose your specific phone model or the template for the item you wish to customize (e.g., badge, coaster).
- Upload your desired image or design.
- Resize and reposition the image to fit the template. Ensure the design completely covers the green frame.
- If your design contains text, remember to flip it horizontally before printing to ensure it appears correctly on the final product.
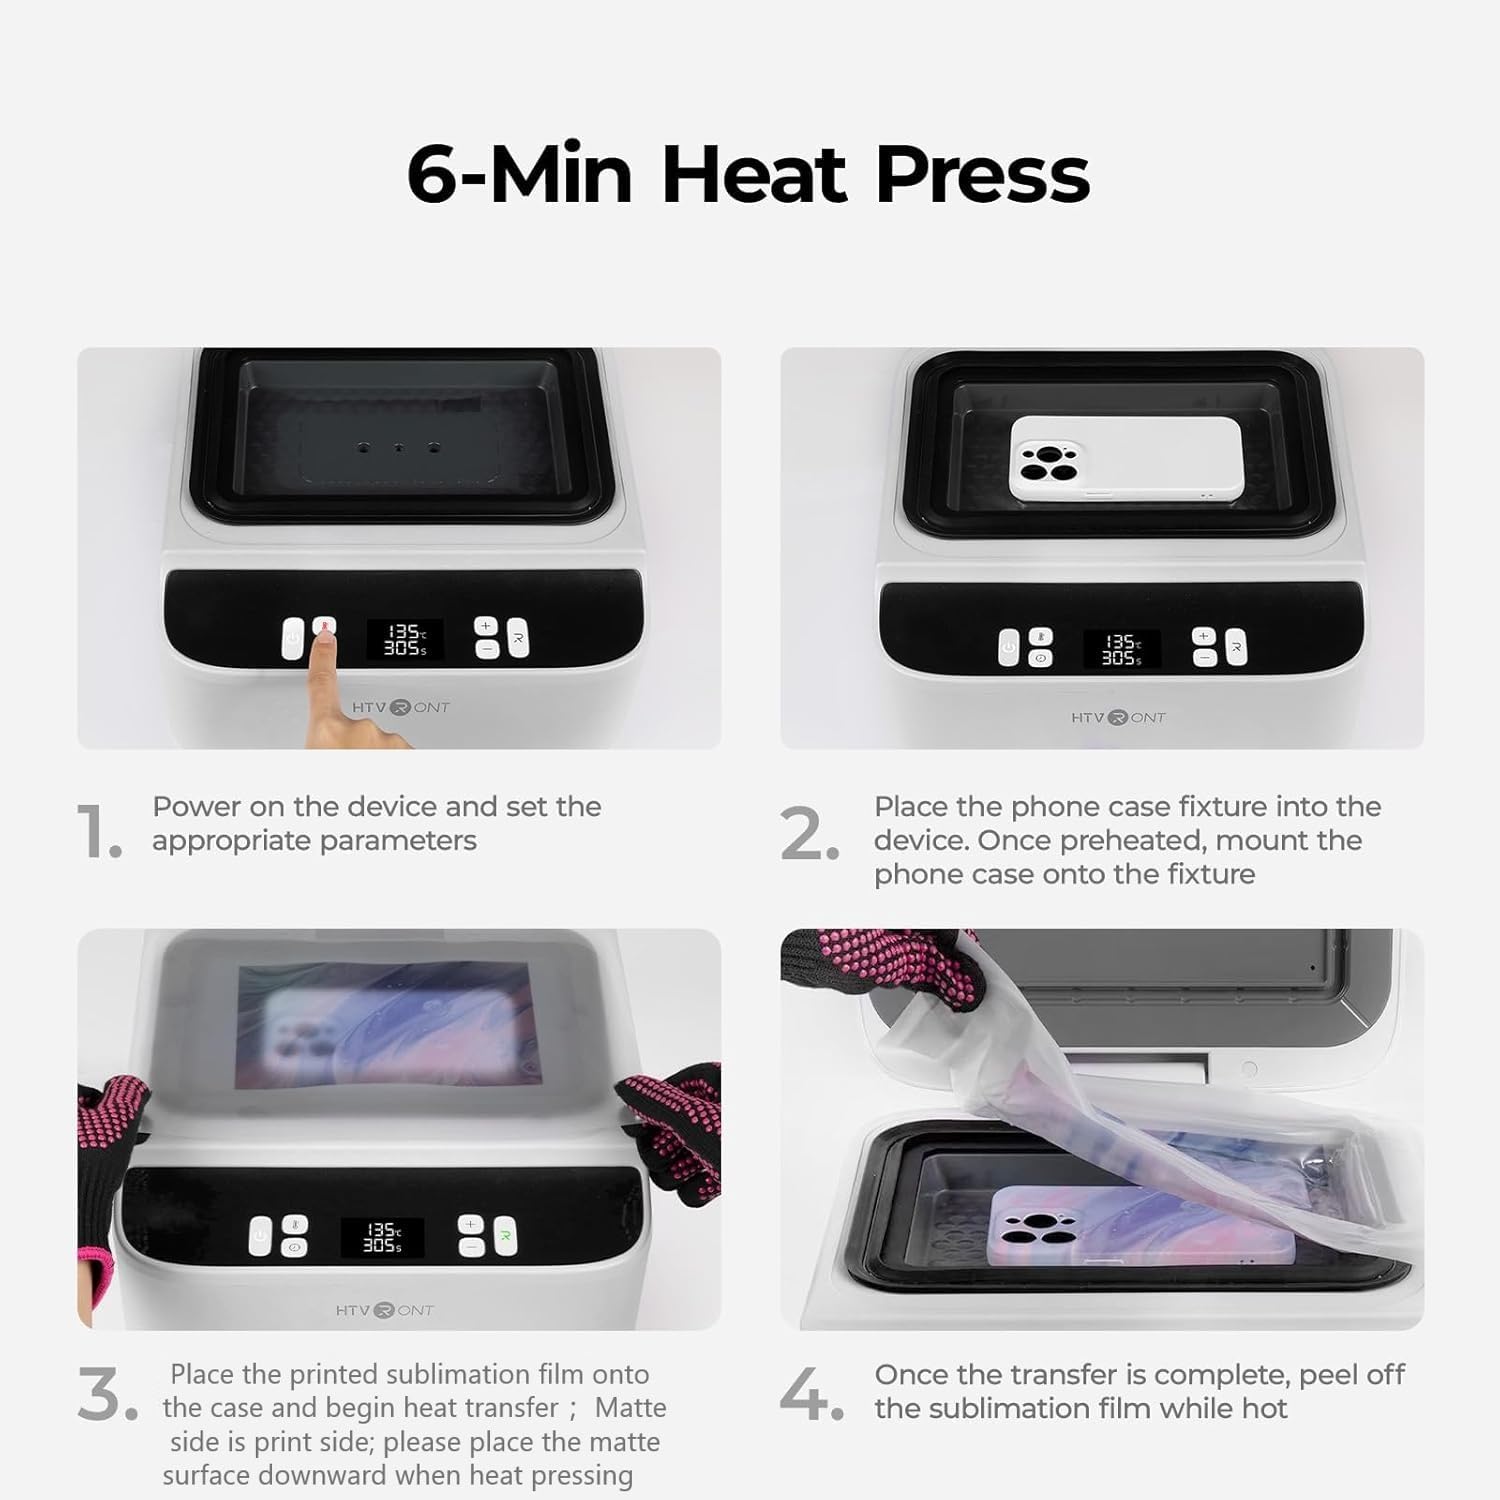
Figure 3.1: LOKLIK IdeaStudio software for design preparation.
3.2. Sublimation Film Preparation
The HTVRONT H17 uses sublimation film for transfer. The matte side of the film is the printing side.
- Insert the sublimation film into your inkjet printer, ensuring the matte side is correctly oriented for printing.
- For best results, choose high-quality glossy paper settings and set the print quality to high in your printer settings. If your printer does not offer this option, select 'Transparency' or 'Thick Paper'.
- Print your design onto the sublimation film.
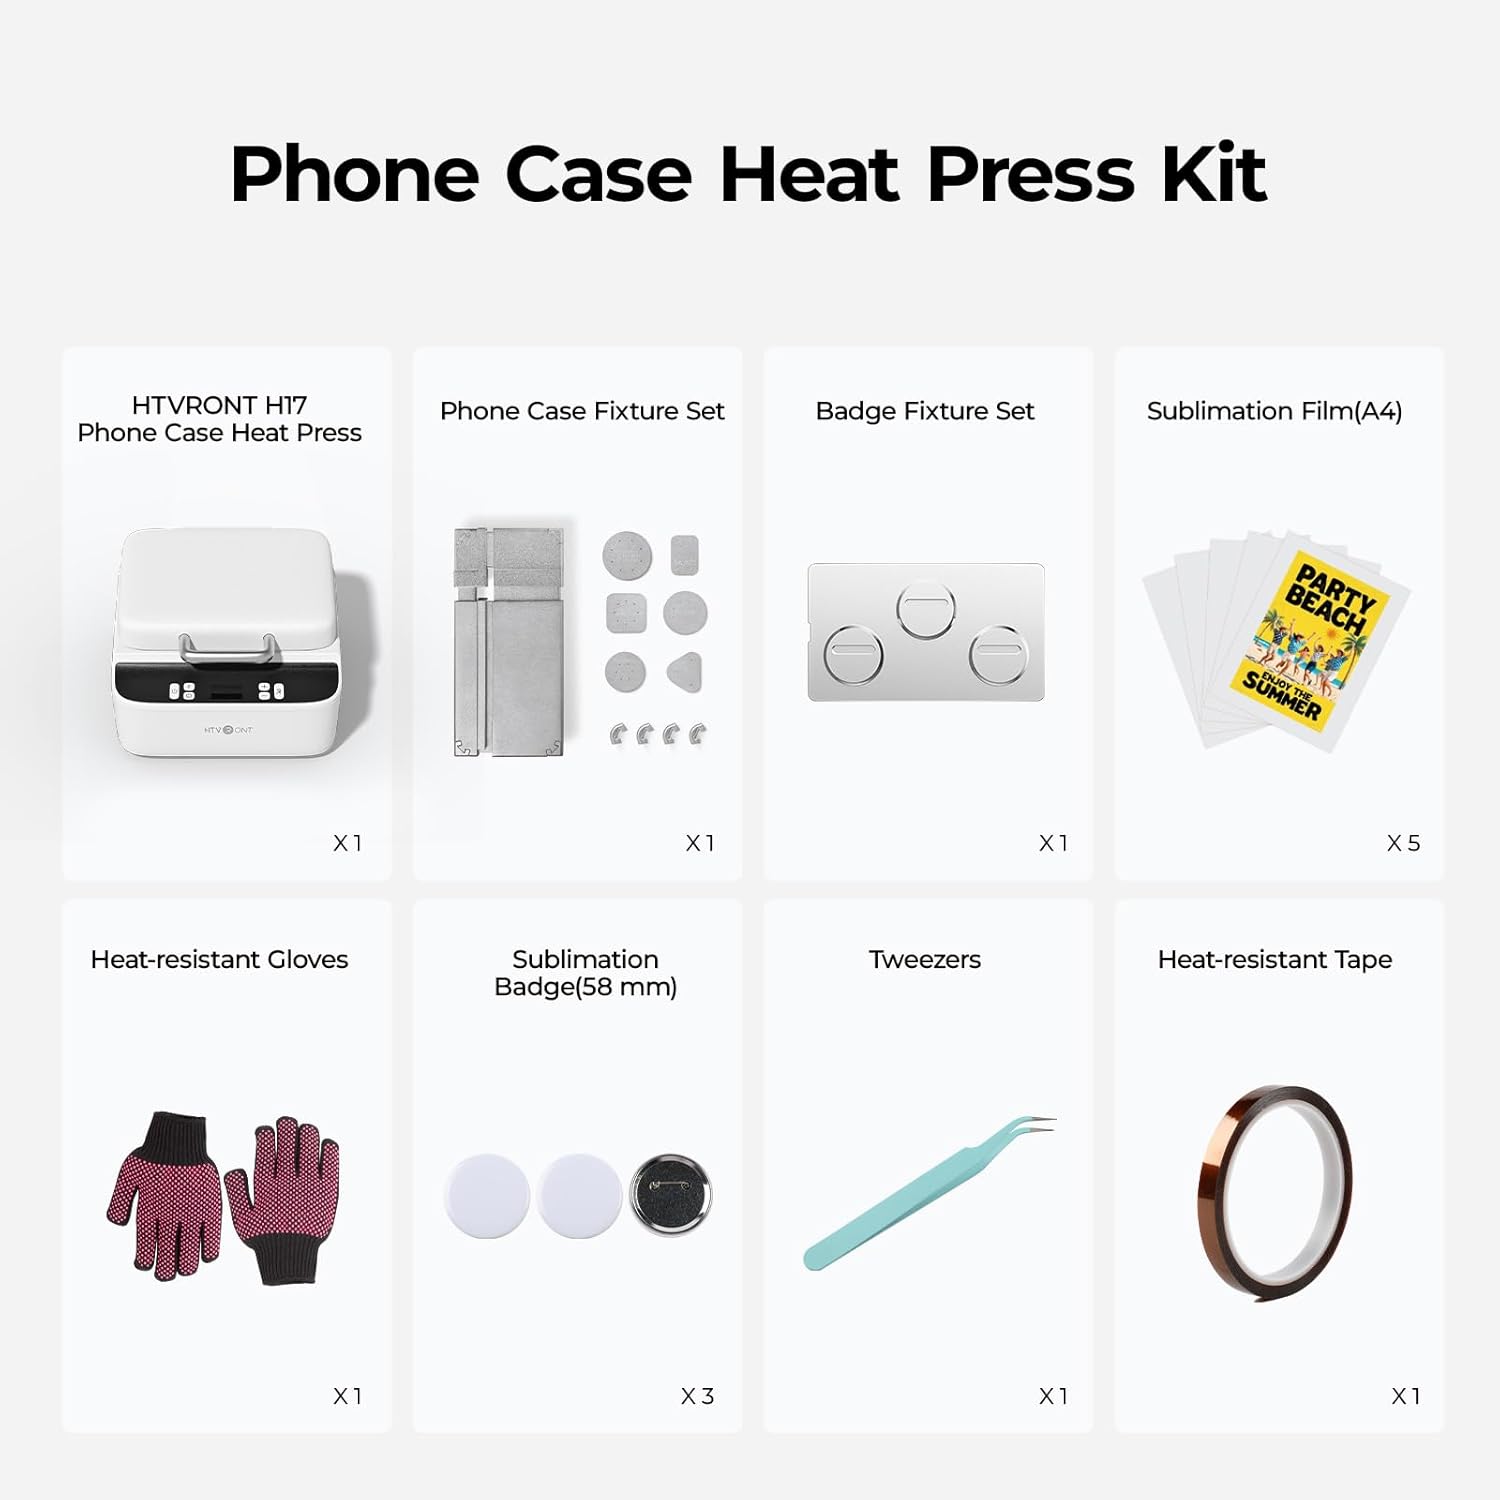
Figure 3.2: Printing a design onto sublimation film.
Video 3.1: Instructions on how to properly use sublimation film, including printing tips.
4. Betjeningsvejledning
Always wear heat-resistant gloves during the entire operation to prevent burns.
4.1. Power On and Temperature/Time Settings
- Plug in the machine. The Power button will flash white.
- Tryk på Power-knappen for at tænde for maskinen.
- Press the Temperature button to set the desired temperature for both upper and lower heat plates. Use the '+' and '-' buttons to adjust.
- Press the Time button to set the desired pressing duration. Use the '+' and '-' buttons to adjust.
Recommended Settings for Phone Cases (TPU/PC):
- Upper Heat Plate Temp: 135°C / 275°F
- Lower Heat Plate Temp: 135°C / 275°F
- Preheat Time: 2-10 seconds
- Transfer Time: 300-350 seconds
- Peeling Method: Hot Peel
Recommended Settings for Badges (Metal):
- Upper Heat Plate Temp: 140°C / 285°F
- Lower Heat Plate Temp: 140°C / 285°F
- Preheat Time: 2-10 seconds
- Transfer Time: 330 seconds
- Peeling Method: Hot Peel
Recommended Settings for Coasters (Leather):
- Upper Heat Plate Temp: 135°C / 275°F
- Lower Heat Plate Temp: 125°C / 255°F
- Preheat Time: 2-10 seconds
- Transfer Time: 300 seconds
- Peeling Method: Hot Peel
4.2. Customizing Phone Cases
- Based on your phone model, select the appropriate R-corners, filler blocks, and lens pad from the Phone Case Fixture Set. The filler blocks help fill gaps, support the case, and improve heat transfer.
- Install the selected R-corners onto the phone case fixture.
- Place the phone case fixture into the heat press chamber.
- Position the filler blocks on the fixture according to your phone model.
- Close the lid and preheat the fixture for 5 minutes. During this time, you can place your printed sublimation film on top of the closed lid to dry it, which helps ensure better results.
- While the fixture is preheating, attach the proper lens pad to the inside of your phone case using heat-resistant tape. Ensure the tape does not cover any vent holes.
- Once preheating is complete, open the lid and firmly press the phone case onto the fixture, starting from the lower-left corner. This compresses the fixture for easier handling.
- Place the printed sublimation film over the phone case, with the matte (printed) side facing down onto the case. Ensure it lays flat.
- Close the lid and press the Start button (usually indicated by 'R' or a play icon) to begin the vacuum sealing and heat transfer process.
- Once the countdown ends and the indicator light turns green, open the lid and carefully peel off the sublimation film while it's still hot.
- Remove the custom phone case from the fixture.
Figure 4.1: User preparing to use the HTVRONT H17 Heat Press.
Video 4.1: Step-by-step guide on how to make an Android phone case using the HTVRONT H17.
Video 4.2: Demonstration of using the HTVRONT H17 Phone Case Heat Press Machine.
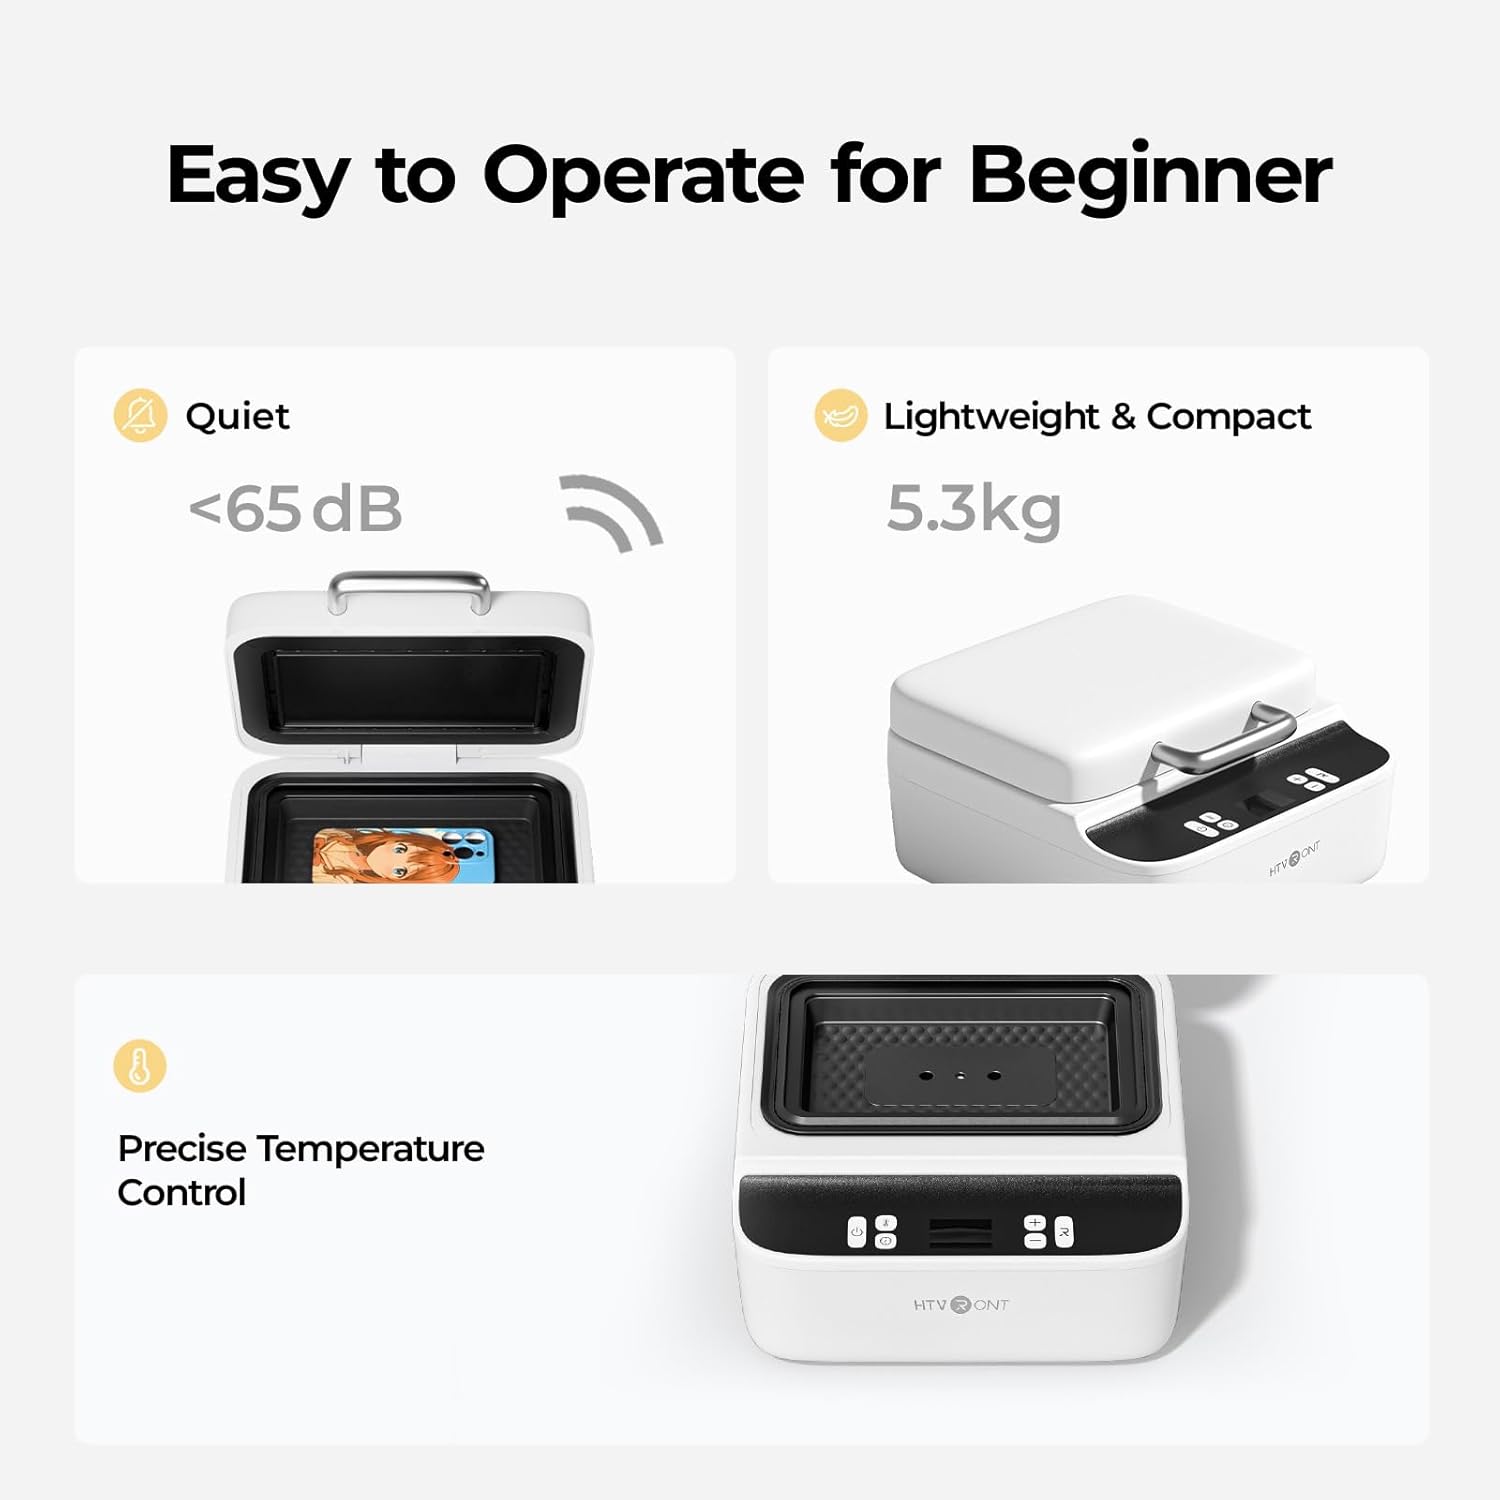
Figure 4.2: A finished custom phone case.
4.3. Customizing Badges, Coasters, and Other Items
The HTVRONT H17 is versatile and can be used for various sublimation-coated items. Simply swap out the fixture to match the substrate you are using.
- Select the appropriate fixture (e.g., Badge Fixture Set, Base Plate for coasters/keychains).
- Place the fixture and the item into the heat press.
- Adjust temperature and time settings according to the material (refer to Section 4.1 for examples).
- Place the printed sublimation film over the item, matte side down.
- Close the lid and press the Start button.
- Once complete, remove the film and the customized item.
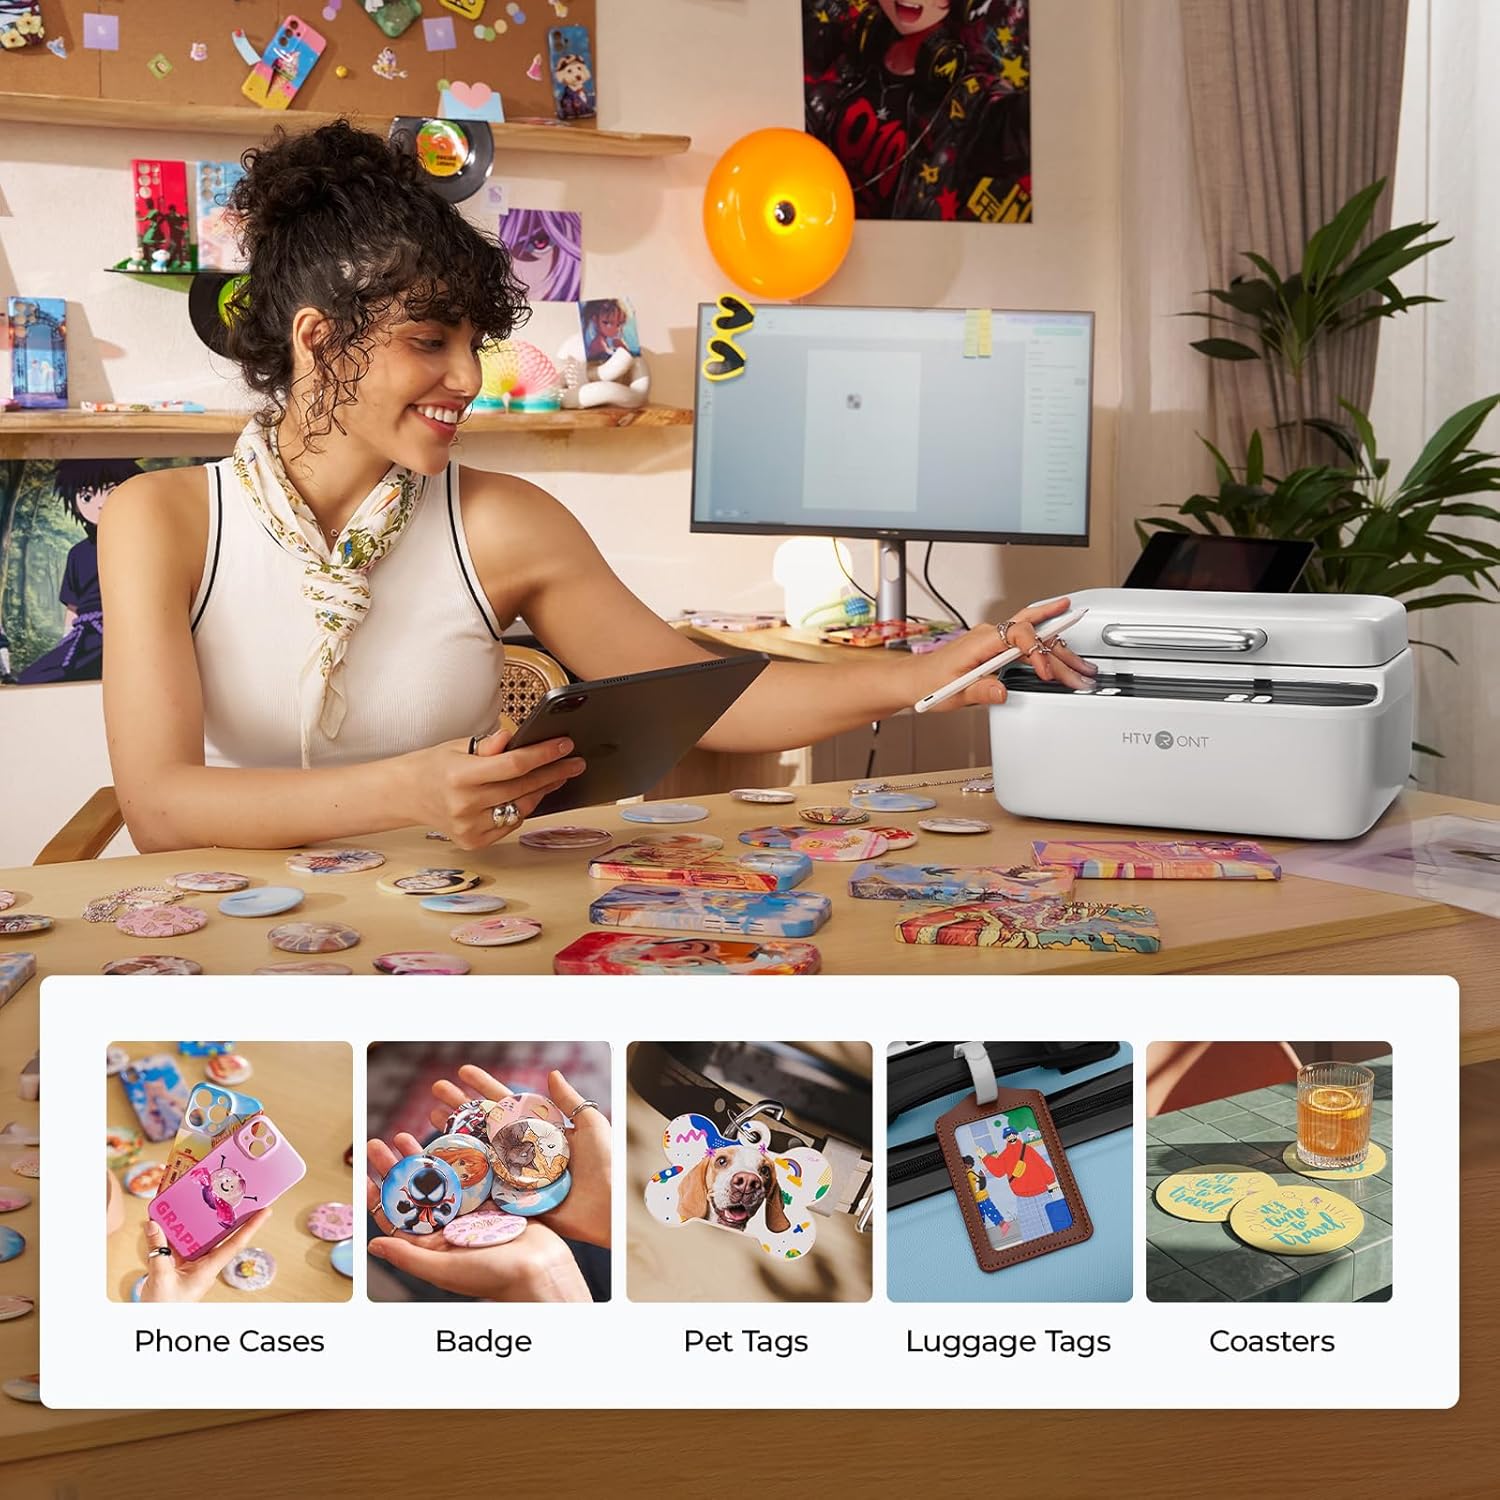
Figur 4.3: Eksamples of custom sublimated items including phone cases, badges, and coasters.
5. Vedligeholdelse
5.1. Sublimation Film Storage
Proper storage of sublimation film is crucial for optimal transfer results:
- Always store unused film in a sealed bag to prevent moisture absorption.
- After printing and drying, use the film immediately. If not, seal it to prevent moisture from affecting your transfer results.
- It is recommended to use printed film within 4 hours for optimal performance.
5.2. Generel rengøring
Ensure the machine is unplugged and cooled before cleaning. Wipe surfaces with a soft, dry cloth. Do not use abrasive cleaners or solvents.
6. Fejlfinding
6.1. Color Differences in Transfers
Color differences can occur due to various factors, primarily related to your printer model, ink, and the type of phone case. Here's how to address them:
- Printerkalibrering: Try calibrating your printer's colors and cleaning the print head.
- Case Type: Glossy phone cases generally yield more vivid results than matte ones. Choose the case type that best suits your desired outcome.
- Adjusting Printer Ink Output: Access your printer's color correction settings.
- If the result is yellowish, reduce yellow by 5-25 points.
- If the result is bluish, reduce cyan by 5-25 points.
- If the result is reddish, reduce magenta by 5-25 points.
- If the result is greenish, reduce both yellow and cyan by 5-25 points.
- If the result is purplish, reduce cyan and magenta by 5-20 points each, and increase yellow by 5-20 points.
- If the overall transfer is too dark, lower saturation and then increase brightness and contrast.
- If the overall transfer is too pale or dull, lower brightness and increase saturation.
- Temperature Adjustment for Glossy Cases: For glossy cases, you can try lowering the pressing temperature by 10°C. However, it is not recommended to shorten the pressing time.
Figur 6.1: Eksample of color differences in transfers.
Video 6.1: Detailed instructions on how to fix color differences in transfers.
6.2. Printer Jams with Sublimation Film
If your printer jams when feeding the sublimation film, it's usually due to one of two reasons:
- The film is transparent, so the printer's optical sensor may fail to detect it.
- The smooth surface of the film provides less friction, making it harder for the printer to feed the sheet properly.
To fix this:
- Place a small sticker (such as the auxiliary label paper included) on the bottom edge of the transparent film to help with sensor recognition.
- If you run out of stickers, you can use heat-resistant tape or masking tape.
- If the issue persists, attach a regular A4 sheet of paper to the back of the film to improve feeding friction and help the sensor detect it better.
7. Specifikationer
| Feature | Specifikation |
|---|---|
| Mærke | HTVRONT |
| Modelnummer | H17 (RY-SJKJ-0646-US) |
| Produktdimensioner | 12 cm L x 13 cm B x 7 cm H |
| Varens vægt | 7.05 kilo (15.51 pund) |
| Øverste temperaturvurdering | 180 grader Celsius |
8. Garanti og support
HTVRONT is committed to providing excellent after-sales service. If you have any questions or encounter issues with your HTVRONT H17 Phone Case Heat Press Machine, please contact customer support for assistance.


