1. Produktet er slutview
This manual provides comprehensive instructions for the installation, operation, and maintenance of your MICTUNING 12 Pods RGB LED Rock Lights and P1B 12 Gang Switch Panel. This system is designed to enhance your vehicle's lighting and control capabilities.

Image 1.1: MICTUNING 12 Pods RGB LED Rock Lights and P1B 12 Gang Switch Panel. The image displays the P1B 12-gang switch panel at the top, featuring various illuminated switch icons, and below it, twelve RGB LED rock light pods arranged in two rows.
2. Pakkens indhold
Verify that all components listed below are present in your package before proceeding with installation.

Billede 2.1: Detaljeret view of the MICTUNING P1B Switch Panel and Rock Lights package contents. The image shows an exploded view of all included items, clearly labeled with numbers for identification.
- 1x 8 Gang Switch Panel (P1B)
- 1x Circuit Control Box
- 5x monteringsbeslag
- 140x Switch Labels
- 1 x skruetrækker
- 1x Screws Set
- 8x Kabelbindere
- 1x brugermanual
- 1x Fuse Holder with Wire
- 5x mærkeklistermærker
- 1x pakkeboks
- 12x RGB LED Rock Light Pods (not explicitly listed in image but implied by product title)
- Wiring Harness for Rock Lights (not explicitly listed in image but implied by product title)
3. Opsætning og installation
3.1. Rock Light Installation
The MICTUNING RGB LED Rock Lights are designed for durability and performance. They feature a sturdy aluminum housing and are IP68 waterproof, ensuring reliable operation in various weather conditions.

Image 3.1: Close-up of an MICTUNING rock light pod, highlighting its IP68 waterproof rating, sturdy aluminum housing, and an inline safety protection fuse on the wiring.
- Vælg monteringssteder: Select suitable, flat surfaces on your vehicle for each rock light pod. Ensure the locations allow for optimal light spread and are protected from direct impact.
- Secure Pods: Use the provided screws to securely mount each rock light pod. Ensure a tight fit to prevent vibration and movement.
- Rute ledninger: Carefully route the wiring from each pod to the central control box. Avoid sharp edges, moving parts, and heat sources. Use cable ties to secure wiring.
- Tilslut til kontrolboks: Connect the rock light wiring harness to the designated ports on the RGB control box. Ensure all connections are secure.
3.2. P1B Switch Panel Installation
The P1B switch panel offers flexible mounting options to suit your vehicle's interior. The control box should be mounted in a secure, dry location, typically under the hood.
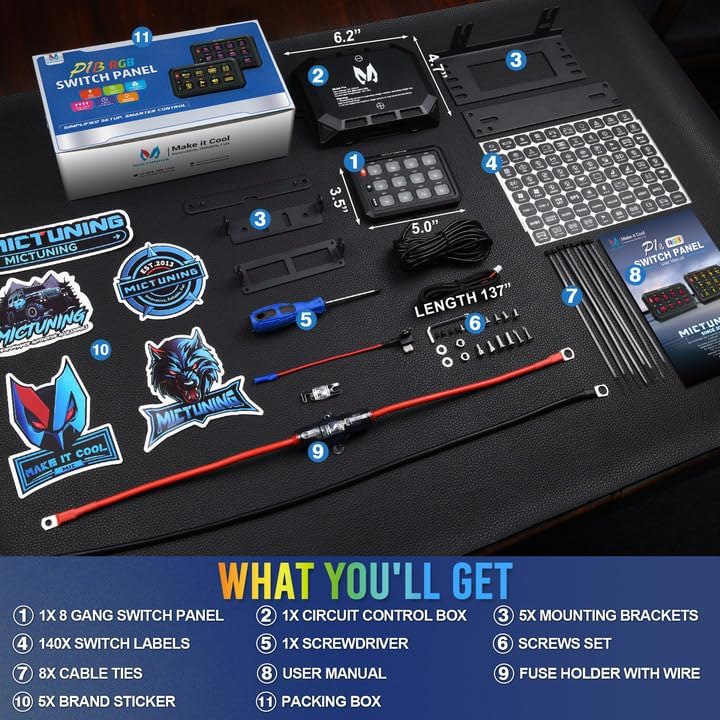
Image 3.2: Illustration of the two-way mounting options for the MICTUNING P1B switch panel. It shows the panel mounted on a dashboard and on a center console, as well as the control box mounted under the hood.
- Mount Switch Panel: Choose a convenient location within your vehicle's cabin. Use the provided mounting brackets and screws to secure the switch panel. Ensure it is easily accessible and does not obstruct driving.
- Monter kontrolboks: Select a dry, secure location for the circuit control box, such as in the engine bay. Ensure it is away from excessive heat and moisture. Secure it using appropriate fasteners.
- Tilslut ledninger: Connect the main power and ground wires from the control box to your vehicle's battery. Connect the communication cable between the switch panel and the control box.
- Tilslut tilbehør: Connect your desired accessories (e.g., rock lights, other auxiliary lights, horn) to the output terminals on the control box. Refer to the wiring diagram in the included user manual for specific connections.
- Anvend etiketter: Use the provided 140 switch labels to customize the icons on your switch panel according to the connected accessories.
4. Betjeningsvejledning
4.1. P1B Switch Panel Functions
The P1B switch panel features three silicone function buttons for easy control and customization of your connected accessories and the panel's display.

Image 4.1: Diagram illustrating the customization options of the MICTUNING P1B switch panel, showing 8 RGB color options and 5 levels of backlight brightness, including a backlight off function.
- ON/OFF Switch with Memory Function: This button controls the power to the panel and connected accessories. It retains the last setting when powered off and on.
- Knap til justering af lysstyrke: Press this button to cycle through 5 levels of backlight brightness (100%, 75%, 50%, 25%, 10%) and a backlight off function.
- RGB Color Button: Press this button to cycle through 8 different RGB backlight colors for the switch panel.
4.2. Kontroltilstande
Each switch on the P1B panel can operate in one of four distinct control modes, indicated by the color of the switch's illumination. These modes allow for versatile control of various accessories.
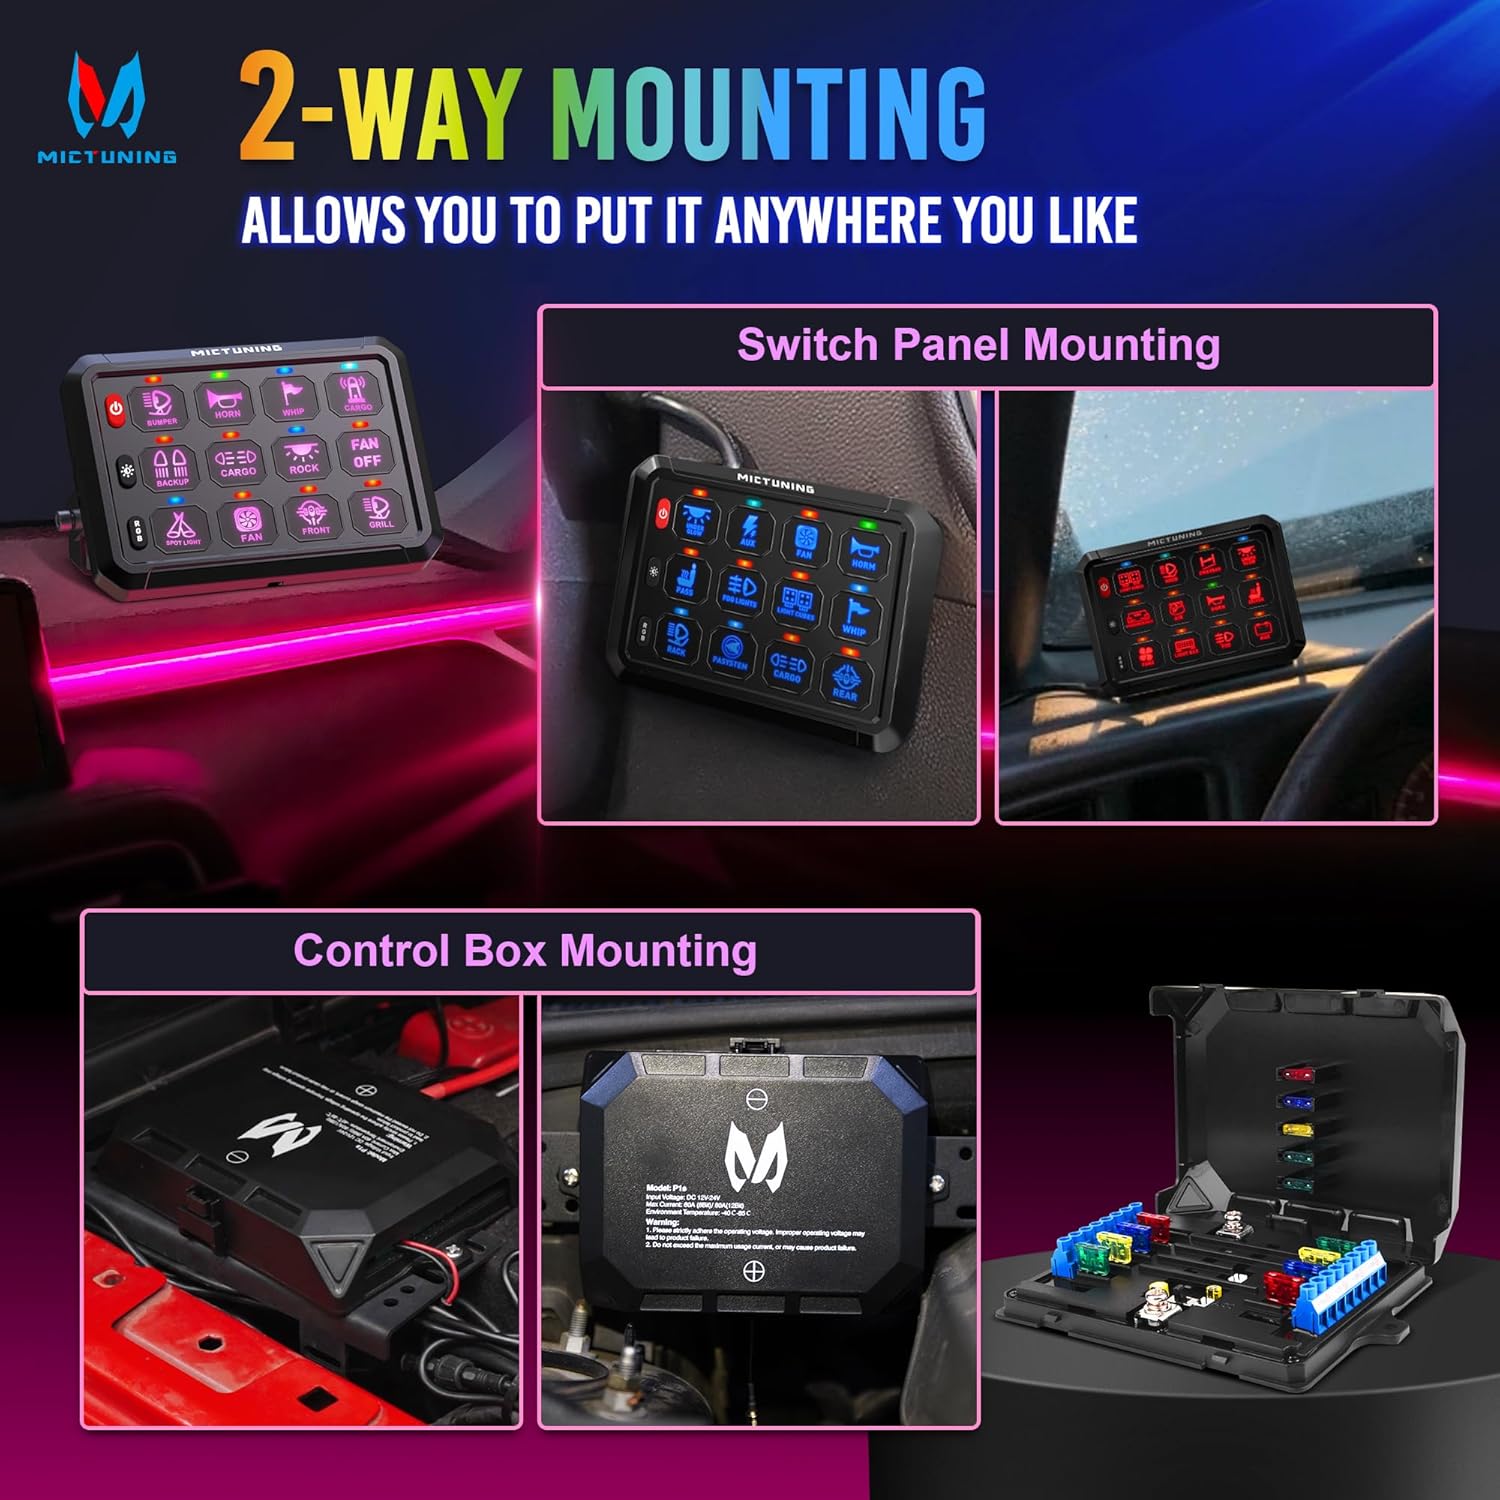
Image 4.2: Visual representation of the four control modes available on the MICTUNING P1B switch panel: Red for Toggle, Green for Momentary, Blue for Flash, and Cyan for Strobe, each depicted with an exampansøgningen.
- Red - Toggle Mode: Provides constant power. Press once to turn on, press again to turn off. Ideal for constant lights like fog lights or rock lights.
- Green - Momentary Mode: Power is supplied only while the button is pressed and held. Releases power when the button is released. Suitable for applications like horns or momentary ignition power.
- Blue - Flash Light Mode: The connected accessory will flash at a lower speed. Can be used for turn signals or warning lights.
- Cyan - Pulsed Strobe Mode: The connected accessory will strobe rapidly. Useful for emergency lights or warning lights.
4.3. RGB Rock Light Control
The RGB LED Rock Lights are controlled via a dedicated Bluetooth application on your smartphone. This allows for dynamic color changes and effects.
- Bluetooth-parring: Ensure your smartphone's Bluetooth is enabled. Open the MICTUNING app and follow the on-screen instructions to pair with the rock light control box.
- App funktioner: The app provides various functions including color selection, brightness adjustment, dynamic modes (e.g., flashing, fading), and music synchronization.
5. Vedligeholdelse
Regular maintenance ensures the longevity and optimal performance of your MICTUNING lighting system.
- Rensning: Periodically clean the rock light pods and switch panel with a soft, damp klud. Undgå slibende rengøringsmidler eller opløsningsmidler, der kan beskadige overfladerne.
- Ledningsinspektion: Annually inspect all wiring connections for corrosion, fraying, or loose terminals. Secure any loose connections and replace damaged wiring.
- Monteringssikkerhed: Check the mounting of both the rock light pods and the switch panel to ensure they remain securely fastened. Tighten any loose screws.
- Sikringskontrol: If a rock light pod or accessory stops working, check the inline fuse for the rock lights and the fuses within the control box. Replace blown fuses with ones of the correct ampslette.
6. Fejlfinding
Se følgende almindelige problemer og løsninger, før du kontakter kundesupport.
- Rock Lights Not Turning On:
- Check power connections to the RGB control box.
- Verify the inline fuse for the rock lights.
- Ensure the Bluetooth app is connected and the lights are commanded to be on.
- Switch Panel Not Responding:
- Check the main power and ground connections to the control box.
- Ensure the communication cable between the switch panel and control box is securely connected.
- Kontroller køretøjets batterivolumentage er tilstrækkeligt.
- Problemer med Bluetooth-forbindelse:
- Ensure the rock light control box is powered on.
- Restart your smartphone's Bluetooth and the MICTUNING app.
- Move closer to the control box to ensure a strong signal.
- Incorrect Switch Mode:
- Refer to Section 4.2 to understand the different control modes and their corresponding colors. Adjust the mode as needed for your accessory.
7. Produktspecifikationer
Key technical specifications for the MICTUNING 12 Pods RGB LED Rock Lights and P1B 12 Gang Switch Panel.

Image 7.1: Comparison table highlighting the specifications of MICTUNING rock lights versus generic alternatives, focusing on rated power, measured power, lumen output, LED chip type, and light purity.
| Feature | Specifikation |
|---|---|
| Produktnavn | 12 Pods RGB LED Rock Lights with P1B 12 Gang Switch Panel |
| Mærke | MICTUNING |
| Model | P1B |
| Rock Light Type | RGB LED |
| Rated Power (per pod) | 4 W/pod |
| Measured Power (per pod) | 3 W/pod |
| Lumen Output (per pod) | 180 lm/pod |
| Total Lumen Output (12 pods) | 2160 lm/12 pods |
| Vandtæt vurdering | IP68 |
| Materiale til hus | Sturdy Aluminum |
| Switch Panel Channels | 12 Gang |
| Switch Panel Control Modes | 4 (Toggle, Momentary, Flash, Strobe) |
| Switch Panel Backlight | RGB, 5-level brightness, Backlight Off |
| Rock Light Control | Bluetooth app |
8. Garantioplysninger
MICTUNING products are manufactured to high-quality standards. For specific warranty details, including coverage period and terms, please refer to the warranty card included with your product or visit the official MICTUNING webwebsted. Gem din købskvittering som købsbevis i tilfælde af garantikrav.
9. Kundesupport
If you encounter any issues that cannot be resolved using the troubleshooting guide, or if you require further assistance, please contact MICTUNING customer support through their official website or the contact information provided in your product packaging. When contacting support, please have your product model (P1B) and purchase details ready.


