1. Introduktion
The OMBAR N1 is a high-performance rear view mirror dash camera system designed to enhance driving safety and provide comprehensive video recording. It features dual cameras for front 4K and rear 2.5K recording, advanced driver-assistance systems (ADAS), blind spot detection (BSD), lane change assist (LCA), GPS tracking, parking monitoring, and Wi-Fi connectivity for easy file ledelse.

Image 1.1: OMBAR N1 Mirror Dash Cam and companion mobile application interface.
2. Pakkens indhold
Kontroller venligst, at alle nedenstående varer er inkluderet i din pakke. Hvis der mangler eller er beskadigede varer, bedes du kontakte kundesupport.

Image 2.1: All components included in the OMBAR N1 Mirror Dash Cam package.
- 1 x OMBAR N1 4K Mirror Dash Cam
- 1 x 2.5K bakkamera med skruer og selvklæbende montering
- 1 x 12ft Type-C Power Cable with Car Charger
- 1 x 20 fod bagkamerakabel
- 1 x ekstern GPS-antenne
- 1 x 64 GB MicroSD-kort
- 1 x Anti-Glare Protective Film
- 1 x OMBAR User Manual
- 5 x kabelklip
- 4 x stropper
- 1 x Pry Tool
- 1 x Cleaning Wipes
3. Opsætning og installation
3.1. Montering af Dash Cam
- Attach to Rear View Spejl: Secure the N1 Mirror Dash Cam over your existing rear view mirror using the provided straps. Ensure it is firmly attached and centered for optimal viewing.
- Adjust Front Camera Lens: The front camera lens can be adjusted to capture the desired field of view.
3.2. Montering af bakkameraet
- Vælg monteringssted: Install the rear camera on the rear windshield or near the license plate. Ensure the view er uhindret.
- Tilslut bakkamerakabel: Route the 20ft rear camera cable from the main dash cam unit to the rear camera. Connect the cable securely.
- Juster bakkameraet View: The rear camera display can be adjusted for mirror flip and vertical flip settings to match your installation orientation.

Image 3.1: Adjustable rear camera display options for mirror and vertical flipping.
3.3. Tilslutning af strøm og GPS
- Indsæt MicroSD-kort: Insert the provided 64GB MicroSD card into the designated slot on the dash cam.
- Tilslut GPS-antenne: Plug the external GPS antenna into the dash cam and mount it on the dashboard or windshield where it has a clear view af himlen.
- Strømtilslutning: Connect the Type-C power cable to the dash cam and plug the car charger into your vehicle's 12V power outlet.
3.4. Applying Anti-Glare Protective Film
The anti-glare protective film helps minimize reflections and enhances contrast for improved visibility. Carefully apply the film to the dash cam screen, ensuring no air bubbles.

Image 3.2: The anti-glare protective film reduces reflections and improves screen clarity.
4. Betjeningsvejledning
4.1. Grundlæggende betjening
- Tænd/sluk: The dash cam will automatically power on and begin recording when the vehicle starts, and power off when the ignition is turned off.
- Skærmvisning: The 12-inch IPS display provides a wide field of view. Brightness, lens angle, and field of view can be adjusted via the touchscreen interface.

Image 4.1: Adjustable screen settings for optimal viewoplevelse.
4.2. Optagelsestilstande
- Loop-optagelse: The dash cam records video in segments (1, 3, or 5 minutes). When the MicroSD card is full, the oldest unlocked recordings are automatically overwritten.
- Nødoptagelse: In case of a collision, the built-in G-sensor automatically locks the current video segment to prevent it from being overwritten. This can also be triggered manually or via voice command.

Image 4.2: Emergency recording methods ensure critical footage er gemt.
4.3. Parkeringsmonitor
The 24-hour parking monitor provides surveillance when your vehicle is parked. This feature requires a hardwire kit (sold separately, ASIN: B0DQK1QW7ZM) for continuous power.

Image 4.3: The 24-hour parking monitor provides security for your vehicle.
4.4. Stemmekontrol
The dash cam supports various voice commands for hands-free operation. Examples include "Take photo," "Start recording," "Turn on WiFi," "Turn off display," and "Show rear camera."

Image 4.4: Voice control allows for hands-free operation of the dash cam.
4.5. Wi-Fi og app-styring
Connect the dash cam to your smartphone via 5.8GHz Wi-Fi using the OMBAR app. This allows for live viewing, downloading, and sharing of recorded footage. The Wi-Fi range is approximately 25ft (about 1.5 parking spaces) and does not support remote live view.

Image 4.5: The OMBAR app facilitates video management via 5.8GHz Wi-Fi.
5. Avancerede funktioner
5.1. ADAS (Advanced Driver Assistance System)
The ADAS feature provides real-time alerts to help prevent accidents. This includes:
- Advarsel om fremadrettet kollision: Alerts when approaching a vehicle too quickly.
- Advarsel om vognbaneskift: Notifies if the vehicle drifts out of its lane.
- Advarsel om fodgængerkollision: Detects pedestrians in the vehicle's path.
- Forward Vehicle Start Warning: Alerts when traffic ahead begins to move.
- Close Range Warning: Warns of objects in close proximity.
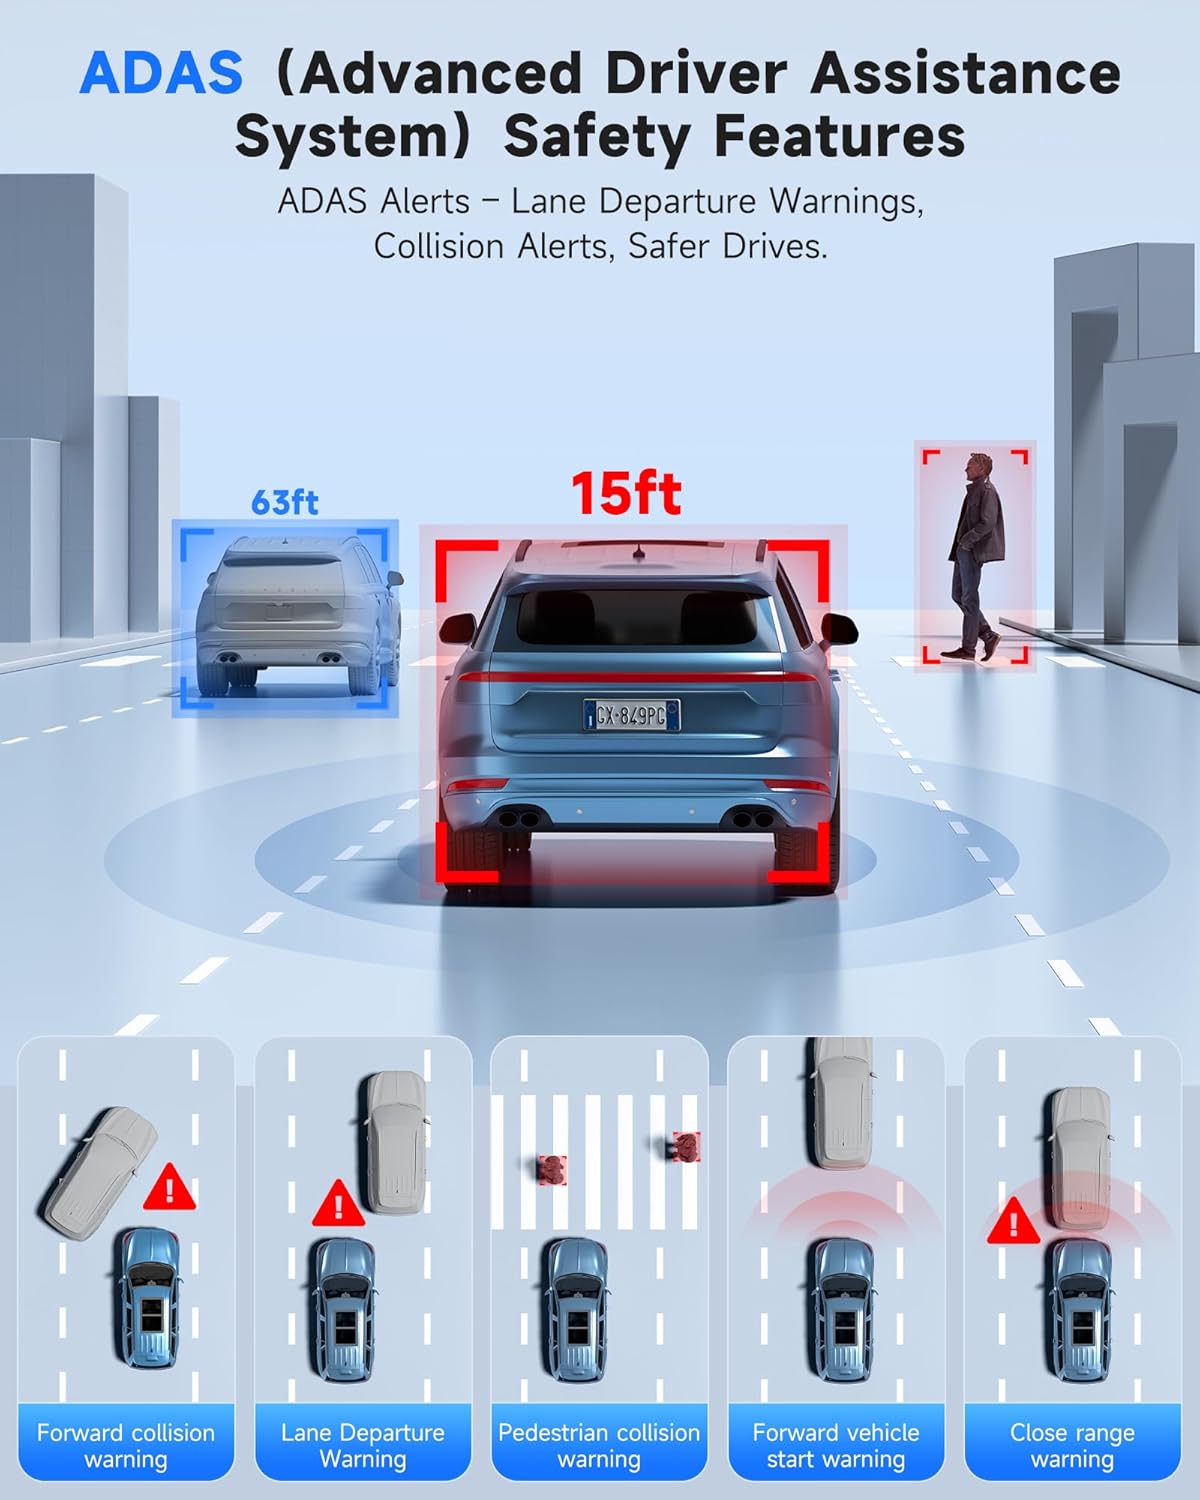
Image 5.1: ADAS provides multiple safety alerts for a safer driving experience.
5.2. BSD (Blind Spot Detection) & LCA (Lane Change Assist)
These features provide 360° protection by monitoring your vehicle's sides and rear for approaching vehicles.
- Blind Spot Detection: Alerts to vehicles in your blind spots.
- Lane Change Assist: Warns if a lane change is unsafe due to approaching vehicles.

Image 5.2: BSD and LCA provide warnings for vehicles in blind spots and during lane changes.
5.3. Built-in GPS & Route Tracking
The integrated GPS module records your driving route, speed, and location data, which can be reviewed via the OMBAR app or dedicated PC software.

Image 5.3: GPS tracking records route and speed data for review.
5.4. Nattesyn
Advanced HDR technology and sensor capabilities ensure clear video recording even in low-light conditions, capturing details like license plates at night.

Image 5.4: Night vision capabilities provide clear footage i omgivelser med svagt lys.
6. Vedligeholdelse
- Rensning: Use a soft, dry cloth to clean the dash cam screen and lenses. Avoid abrasive cleaners.
- MicroSD-kortpleje: Format the MicroSD card regularly (e.g., once a month) to ensure optimal performance and prevent data corruption. Use only high-quality MicroSD cards.
- Firmwareopdateringer: Check the OMBAR website or app periodically for firmware updates to ensure your dash cam has the latest features and improvements.
7. Fejlfinding
| Problem | Mulig årsag | Løsning |
|---|---|---|
| Dashcam'et tænder ikke. | Ingen strømforsyning; defekt kabel. | Check power cable connection to car charger and dash cam. Ensure car's 12V outlet is functional. |
| Optagelsen stopper eller fryser. | MicroSD card full or corrupted; low-quality MicroSD card. | Format the MicroSD card. Replace with a high-speed, high-endurance MicroSD card if issues persist. |
| GPS-signal blev ikke fundet. | GPS-antennen er blokeret eller frakoblet. | Ensure GPS antenna is mounted with a clear view of the sky and securely connected. |
| Problemer med Wi-Fi-forbindelse. | Incorrect password; out of range. | Verify Wi-Fi password. Ensure device is within 25ft of the dash cam. |
| Screen is too dark/bright. | Brightness settings. | Adjust screen brightness via the touchscreen settings. |
8. Specifikationer
| Feature | Detalje |
|---|---|
| Modelnavn | N1 |
| Forreste kameraopløsning | 4K (3840x2160) @ 30fps |
| Bagkameraopløsning | 2.5K (2560x1440) @ 30fps |
| Vise | 12 tommer IPS touchskærm |
| Forbindelse | 5.8GHz Wi-Fi, USB, Memory SD Card |
| Særlige funktioner | Built-In WiFi, Built-In GPS, G-Sensor, ADAS, Blind Spot Detection, Lane Change Assist, Parking Monitor, Reverse Assist, Touch Screen, App Control, Voice Control, Loop Recording, Built-In Microphone, Built-In Speaker, Built-In Supercapacitor, HDR, Night Vision |
| Opbevaring | Supports MicroSD card (64GB included) |
| Driftstemperatur | -20°F til 176°F (-28°C til 80°C) |
| Produktdimensioner | 0.1 x 0.5 x 0.5 tommer |
| Varens vægt | 2.38 pund |
| Monteringstype | Bagview Spejlmontering |
| Type køretøjstjeneste | Bus, Bil, Minivan, Lastbil |

Image 8.1: The dash cam is designed for reliable operation in extreme temperatures.
9. Garanti og support
- Garanti: The OMBAR N1 Mirror Dash Cam comes with a 1-year manufacturer's warranty.
- Returpolitik: A 30-day return policy is applicable from the date of purchase.
- Kundesupport: For technical assistance or warranty claims, please contact OMBAR customer support at support@ombars.com. Support is typically available within 24 hours.


