1. Introduktion
Thank you for choosing the Allsmartlife 50-inch Flush Mount Ceiling Fan with Lights. This manual provides essential information for the safe installation, operation, and maintenance of your new ceiling fan. Please read these instructions thoroughly before beginning installation and retain them for future reference.
Vigtige sikkerhedsoplysninger
- Always disconnect power at the main fuse box or circuit breaker before installation or servicing.
- Al ledningsføring skal være i overensstemmelse med nationale og lokale el-forskrifter. Hvis du ikke er bekendt med ledningsføring, skal du kontakte en kvalificeret elektriker.
- Sørg for, at installationsstedet kan bære ventilatorens vægt (ca. 13.5 pund).
- Brug ikke ventilatoren med beskadigede vinger eller kabinet.
- Keep hands, clothing, and other objects away from the fan blades when the fan is in operation.

Figure 1: Allsmartlife 50-inch Flush Mount Ceiling Fan with Remote Control

Figure 2: Ceiling Fan in a Bedroom Setting
2. Pakkens indhold
Bekræft, at alle komponenterne nedenfor er inkluderet i din pakke. Hvis der mangler eller er beskadigede dele, bedes du kontakte kundesupport.
- Loftventilator motorhus
- Ventilatorblade (5)
- Integreret LED-lyssæt
- Fjernbetjening
- Vægbeslag til fjernbetjening
- Monteringsudstyr (skruer, trådmøtrikker osv.)
- Instruktionsmanual

Figure 3: Fan Dimensions and Blade Options
3. Installationsvejledning
Your Allsmartlife ceiling fan comes with pre-assembled parts to simplify installation. For detailed visual instructions, search for installation videos using the model number DY1172X on Google.
Generelle installationstrin:
- Strømafbrydelse: Før start skal du sørge for, at strømforsyningen til installationsområdet er afbrudt ved afbryderen.
- Montering af monteringsbeslag: Secure the mounting bracket to the ceiling junction box. Ensure the junction box is adequately supported for the fan's weight.
- Ledningsføring: Connect the fan's electrical wires to the household wiring according to the provided wiring diagram in the full manual. Use appropriate wire nuts.
- Ventilatorsamling: Fastgør ventilatormotorhuset til monteringsbeslaget.
- Klingefastgørelse: Securely attach the five fan blades to the motor housing.
- Installation af lyssæt: Connect and install the integrated LED light kit.
- Strømgendannelse: Når installationen er færdig, og alle forbindelser er sikre, skal strømmen genoprettes ved afbryderen.

Figure 4: Aerodynamic Blade Design and Canopy Features
4. Betjeningsvejledning
Your ceiling fan is controlled by the included remote control. Ensure the remote has fresh batteries installed.
Fjernbetjeningsfunktioner:
- Ventilator TIL/FRA: Tænder eller slukker for blæseren.
- Ventilatorhastighed (1-6): Justerer ventilatorhastigheden fra 1 (lavest) til 6 (højest).
- Lys ON/OFF: Controls the integrated LED light independently.
- Color Temperature (3CCT): Cycles through 3000K (Warm White), 4000K (Natural White), and 6500K (Daylight White).
- Justering af lysstyrke: Increases or decreases light brightness from 10% to 100%.
- Sove mode: Activates a patented mode that varies fan frequency to simulate natural wind.
- Frem/tilbage: Ændrer bladets rotationsretning til sæsonbestemt brug.
- Timer (1T/3T/6T): Indstiller ventilatoren til at slukke automatisk efter 1, 3 eller 6 timer.

Figure 5: Remote Control Functionality Overview
Seasonal Operation (Forward/Reverse):
- Sommertilstand (nedadgående luftstrøm): Press the reverse button to set blades to rotate counter-clockwise, creating a downward breeze for cooling.
- Vintertilstand (opadgående luftstrøm): Press the reverse button again to set blades to rotate clockwise, drawing warm air up and distributing it evenly without creating a direct draft.

Figure 6: Summer and Winter Airflow Modes
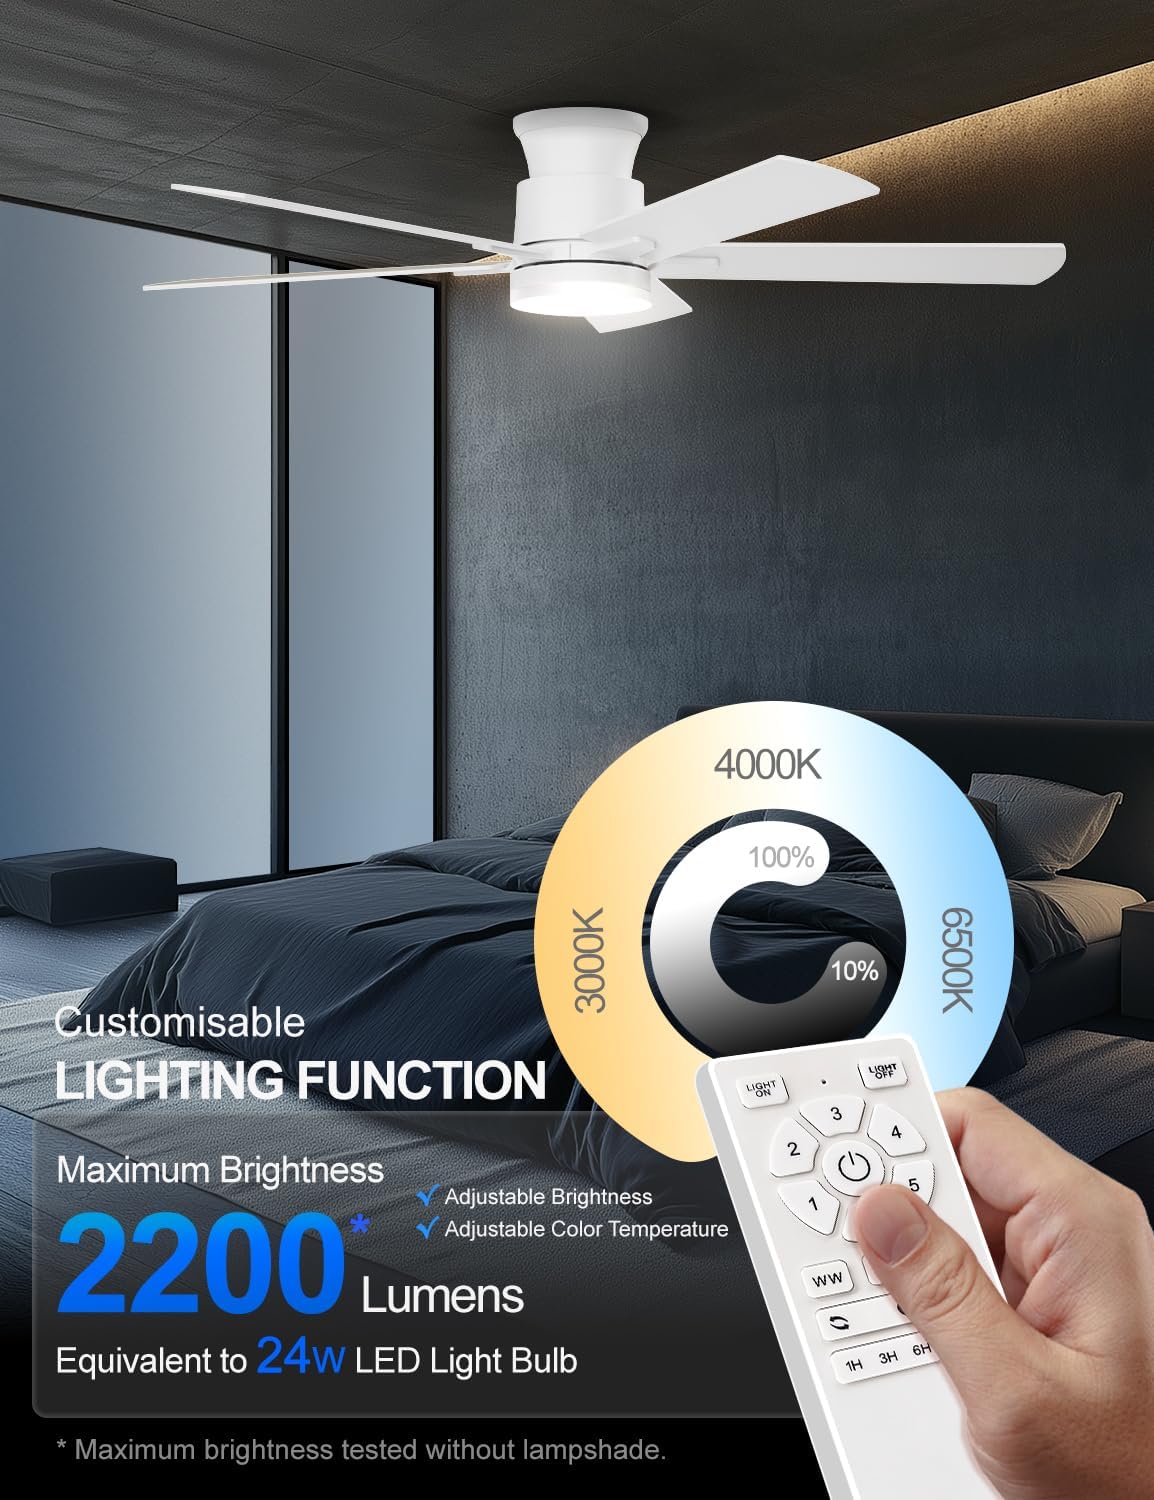
Figure 7: Customizable Lighting Functions
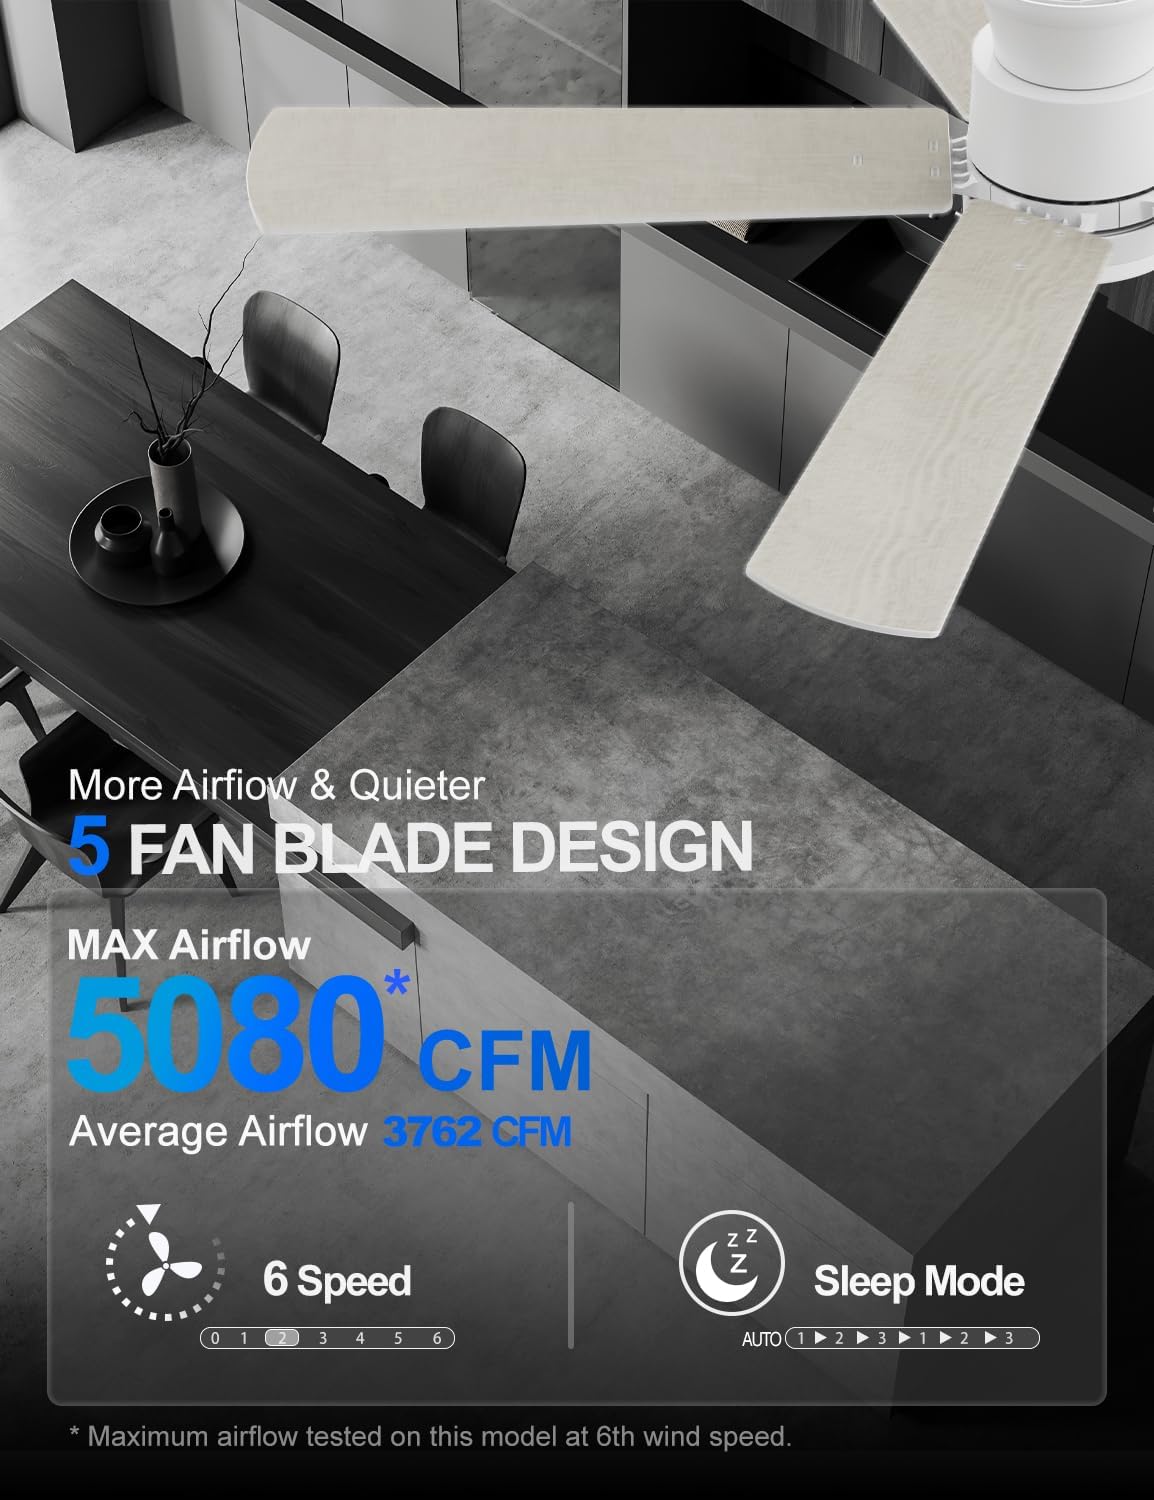
Figure 8: Airflow and Sleep Mode Features
5. Vedligeholdelse
Regelmæssig vedligeholdelse sikrer optimal ydeevne og forlænger levetiden på din loftsventilator.
- Rensning: Rengør ventilatorbladene og motorhuset regelmæssigt med en blød klud.amp klæde. Brug ikke slibende rengøringsmidler eller opløsningsmidler.
- Bladinspektion: Check fan blades for any cracks or damage. Replace damaged blades immediately.
- Tæthedskontrol: Ensure all screws and connections are tight at least once a year.
- Lyskilde: The integrated LED light source is designed for long-term use and typically does not require replacement.
6. Fejlfinding
Hvis du støder på problemer med din ventilator, kan du se følgende almindelige problemer og løsninger:
| Problem | Mulig årsag | Løsning |
|---|---|---|
| Ventilator starter ikke | Ingen strømforsyning Løse ledningsforbindelser Fjernbetjeningens batteri er dødt | Kontroller afbryder/sikring Kontroller, at alle ledningsforbindelser er sikre Udskift fjernbetjeningens batterier |
| Lys virker ikke | Light switch off Løs ledningsforbindelse Fjernbetjeningens batteri er dødt | Ensure light is turned on via remote Check light kit wiring Udskift fjernbetjeningens batterier |
| Blæseren slingrer | Løse knivskruer Ubalancerede klinger Løst monteringsbeslag | Spænd alle knivskruer Ensure blades are evenly weighted and installed Check mounting bracket for secure installation |
| Fjernbetjeningen reagerer ikke | Batteri dødt Fjernbetjening ikke parret (hvis relevant) Forhindring mellem fjernbetjening og modtager | Udskift batterierne Refer to pairing instructions in the full manual Sørg for frit udsyn |
7. Produktspecifikationer
| Feature | Detalje |
|---|---|
| Mærke | Allsmartlife |
| Modelnavn | 1172X |
| Størrelse | 50 tommer |
| Farve | Frisk hvid |
| Produktdimensioner | 50" D x 50" B x 10.5" H |
| Varens vægt | 13.5 pund |
| Motortype | Børsteløs DC-motor |
| Antal blade | 5 |
| Blæserhastigheder | 6 |
| Luftmængde kapacitet | 3762 kubikfod pr. minut (CFM) |
| Lys type | Integreret LED |
| Lysstyrke | Up to 2200 lumens (10%-100% adjustable) |
| Farvetemperatur | 3000K (varm hvid), 4000K (naturlig hvid), 6500K (dagslyshvid) |
| Kontrolmetode | Fjernbetjening |
| Voltage | 120 volt |
| Wattage | 32 watt |
| Indendørs/Udendørs brug | Indoor, Outdoor (with specific humidity and rain exposure guidelines) |
| Certificering | ETL |

Figure 9: DC Brushless Motor Noise Comparison

Figure 10: Room Size Recommendation Guide

Figure 11: Guidelines for Outdoor Use
8. Garanti og support
Allsmartlife offers a lifetime of free replacement service for parts. If you require any assistance, have questions, or need to claim warranty service, please contact our customer support team. We are committed to providing prompt and effective solutions.
For further support, please refer to the contact information provided with your purchase or visit the official Allsmartlife webwebsted.
