1. Introduktion
Thank you for choosing the ROBOTIME DIY Miniature Baking Kitchen Dollhouse Kit. This kit provides a rewarding and creative experience, allowing you to construct a detailed miniature baking kitchen complete with furniture and LED lighting. This manual contains essential information for safe assembly and proper care of your model.
2. Sikkerhedsoplysninger
- Anbefalet alder: This kit is recommended for individuals aged 14 years and up. It contains small parts that may pose a choking hazard for younger children.
- Batterisikkerhed: The LED lighting requires 2 AAA batteries (not included). Ensure batteries are inserted with correct polarity (+/-). Do not mix old and new batteries, or different types of batteries. Remove batteries if the product is not used for an extended period.
- Handling Small Parts: Exercise caution when handling small components. Keep them away from pets and young children.
- Ventilation: Saml i et godt ventileret område.
3. Pakkens indhold
Before beginning assembly, please verify that all components listed below are present in your kit. Refer to the 'Package List' image for visual confirmation.
- Pre-cut wooden sheets for structural components and furniture.
- Various bags containing miniature accessories (e.g., kitchenware, food items, decorative elements).
- Paper cutouts and stickers for details and wall/floor coverings.
- LED-lyskomponenter og ledninger.
- Brugsanvisning.
- Tools for assembly (e.g., tweezers, double-sided tape).

Figur 3.1: Overview of the kit's package contents.
4. Monteringsvejledning
This kit features a snap-together design, minimizing the need for glue. The estimated assembly time is approximately 6 hours, but this may vary based on individual experience. Follow the detailed steps provided in the included instruction manual for precise assembly.
4.1. Forberedelse
- Unpack all components and organize them according to the numbering or categorization in the instruction manual.
- Sørg for at have et rent og godt oplyst arbejdsområde.
- Prepare 2 AAA batteries for the LED lighting (not included in the kit).
4.2. Trin-for-trin samling
Refer to the numbered diagrams and instructions in your kit's specific manual. Generally, assembly proceeds as follows:
- Begin with the main structural components of the house.
- Assemble individual furniture pieces and accessories.
- Apply decorative paper and stickers as indicated.
- Install the LED lighting system, ensuring all connections are secure before inserting batteries.
- Place furniture and accessories within the miniature kitchen as desired.

Figure 4.1: Assembly in progress, highlighting the detailed components.

Figur 4.2: Eksamples of the exquisite details found in the assembled kit.
5. Betjeningsvejledning
The primary operational feature of this miniature house kit is its LED lighting system.
- Once assembly is complete and the LED wiring is installed, insert 2 AAA batteries into the designated battery compartment.
- Locate the power switch (refer to your specific manual for its exact position) and turn it on to illuminate the miniature kitchen.
6. Vedligeholdelse
To ensure the longevity and appearance of your ROBOTIME Miniature House Kit, follow these simple maintenance guidelines:
- Støvning: Regularly dust the model with a soft, dry brush or a microfiber cloth to prevent dust buildup in intricate areas.
- Rensning: Avoid using liquid cleaners or abrasive materials, as they may damage the delicate components and finishes.
- Opbevaring: Store the model in a stable, dry environment away from direct sunlight and extreme temperatures to prevent warping or fading.
- Håndtering: Handle the model with care, especially when moving it, to avoid dislodging or damaging small parts.
7. Fejlfinding
Hvis du støder på problemer under eller efter montering, kan du overveje følgende almindelige løsninger:
- Manglende eller beskadigede dele: If you find any parts are missing or damaged upon opening the kit, please contact ROBOTIME customer service immediately with details and photographic evidence if possible.
- LED-lys virker ikke:
- Check that the 2 AAA batteries are inserted correctly with the proper polarity.
- Ensure the batteries are new and fully charged.
- Verify that all wiring connections for the LED system are secure and properly connected as per the manual.
- Bekræft, at tænd/sluk-knappen er i 'ON'-positionen.
- Dele der ikke passer sammen: Double-check the part numbers and orientation against the instruction manual's diagrams. Ensure no excess material is obstructing the fit. Gentle pressure should be sufficient for snap-together parts.
8. Specifikationer
| Feature | Detalje |
|---|---|
| Produktdimensioner | 12.2 x 9.06 x 2.56 tommer |
| Varens vægt | 2.03 pund |
| Modelnummer | RBT-DG172 |
| Producent anbefalet alder | 14 år og opefter |
| Skala | 1:18 (approximate, inferred from product images) |
| Antal stykker | 359 (approximate, inferred from product images) |
| Samlingstid | Ca. 6 timer |
| Belysning | LED (requires 2 AAA batteries, not included) |
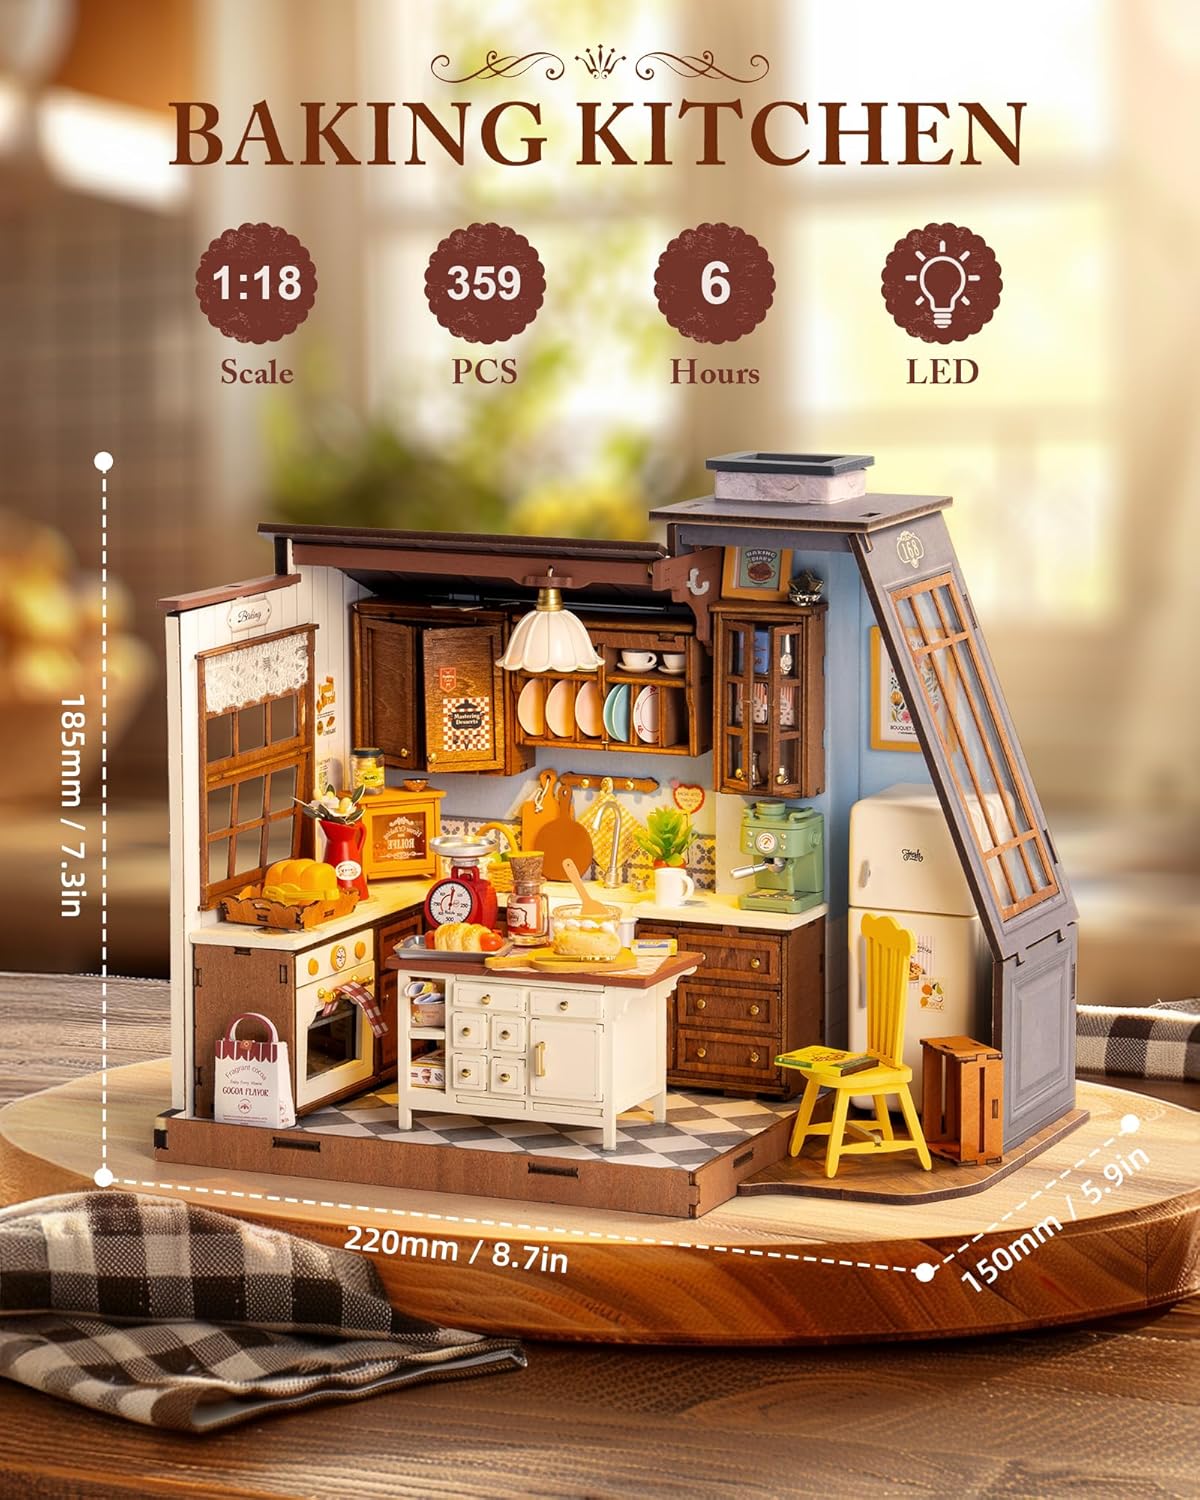
Figure 8.1: Key specifications and features of the Baking Kitchen kit.
9. Garanti og support
ROBOTIME is committed to providing high-quality products. If you encounter any issues with your DIY Miniature House Kit, including missing or defective parts, please contact ROBOTIME customer service for assistance. Please retain your proof of purchase for any warranty claims or support inquiries.
For further assistance, visit the official ROBOTIME store or contact their customer support channels as listed on the product packaging or official webwebsted.


