1. Introduktion
Thank you for choosing the ASD 12 Inch Smart RGBW Flush Mount Ceiling Light. This fixture combines a stylish minimalist design with efficient, versatile lighting solutions. Featuring multicolor RGBW capabilities, smart app control, and remote operation, it offers a wide range of lighting effects for your space. This manual provides essential information for safe installation, effective operation, and proper maintenance of your new lighting fixture.

Figure 1.1: ASD 12 Inch Smart RGBW Flush Mount Ceiling Light with accessories.
3. Pakkens indhold
Kontroller, at alle komponenter er til stede, før installationen påbegyndes:
- ASD 12 Inch Smart RGBW Flush Mount Ceiling Light Fixture (4 units)
- Fjernbetjening
- Monteringsudstyr (skruer, trådmøtrikker)
- Instruktionsmanual
4. Specifikationer
| Feature | Detalje |
|---|
| Mærke | ASD |
| Modelnavn | LOFT |
| Varenummer | A-LFM12D20SRGBW-N-4p |
| Farve | 12" | Nickel | RGBW |
| Materiale | Alloy Steel, Acrylic |
| Stil | Moderne |
| Produktdimensioner | 11.3 cm L x 11.3 cm B x 3.4 cm H |
| Specifikke anvendelser | Kun indendørs brug |
| Strømkilde | Hardwired |
| Lyskildetype | LED |
| Finish Type | Malet |
| Skærmmateriale | Plast |
| Voltage | 120 volt |
| Wattage | 20 watt |
| Monteringstype | flush Mount |
| Gennemsnitligt liv | 50,000 timer |
| Særlige funktioner | 1064/1220LM, Remote Control, RGBW, Smart App, CCT Adjustable 2700-6500K |

Figur 4.1: Produktdimensioner og nøglefunktioner.
5. Installation
Follow these steps to install your ASD Smart RGBW Flush Mount Ceiling Light:
- Forbered til installation: Turn off power at the circuit breaker before starting. Ensure the mounting surface is clean and stable.
- Fjern linsen: Gently remove the lens from the fixture by rotating it clockwise. This will expose the mounting holes and wiring connections.
- Monter armaturet: Attach the fixture's base to the electrical outlet box using the provided screws. Ensure it is securely fastened.
- Ledningsforbindelser: Connect the wires: Black to Black (Live), White to White (Neutral), and Ground to Ground. Secure all connections with wire nuts. Carefully tuck all wires back into the outlet box.
- Fastgør linsen: Once wiring is complete and secure, attach the lens by aligning it with the fixture and rotating it counter-clockwise until it locks into place.
- Gendan strøm: Tænd for strømmen igen ved afbryderen.
- Download ASD SMART App: For smart control features, download the "ASD SMART" application from your smartphone's app store. Scan the QR codes below or click the links to download.
Google Play Butik (Android)
Apple App Store (iOS) - Add Fixture to App: Follow the in-app instructions to add your new ceiling light to the ASD SMART app. This typically involves putting the light into pairing mode and connecting it to your Wi-Fi network.

Figure 5.1: Initial installation steps: removing the lens and wiring.
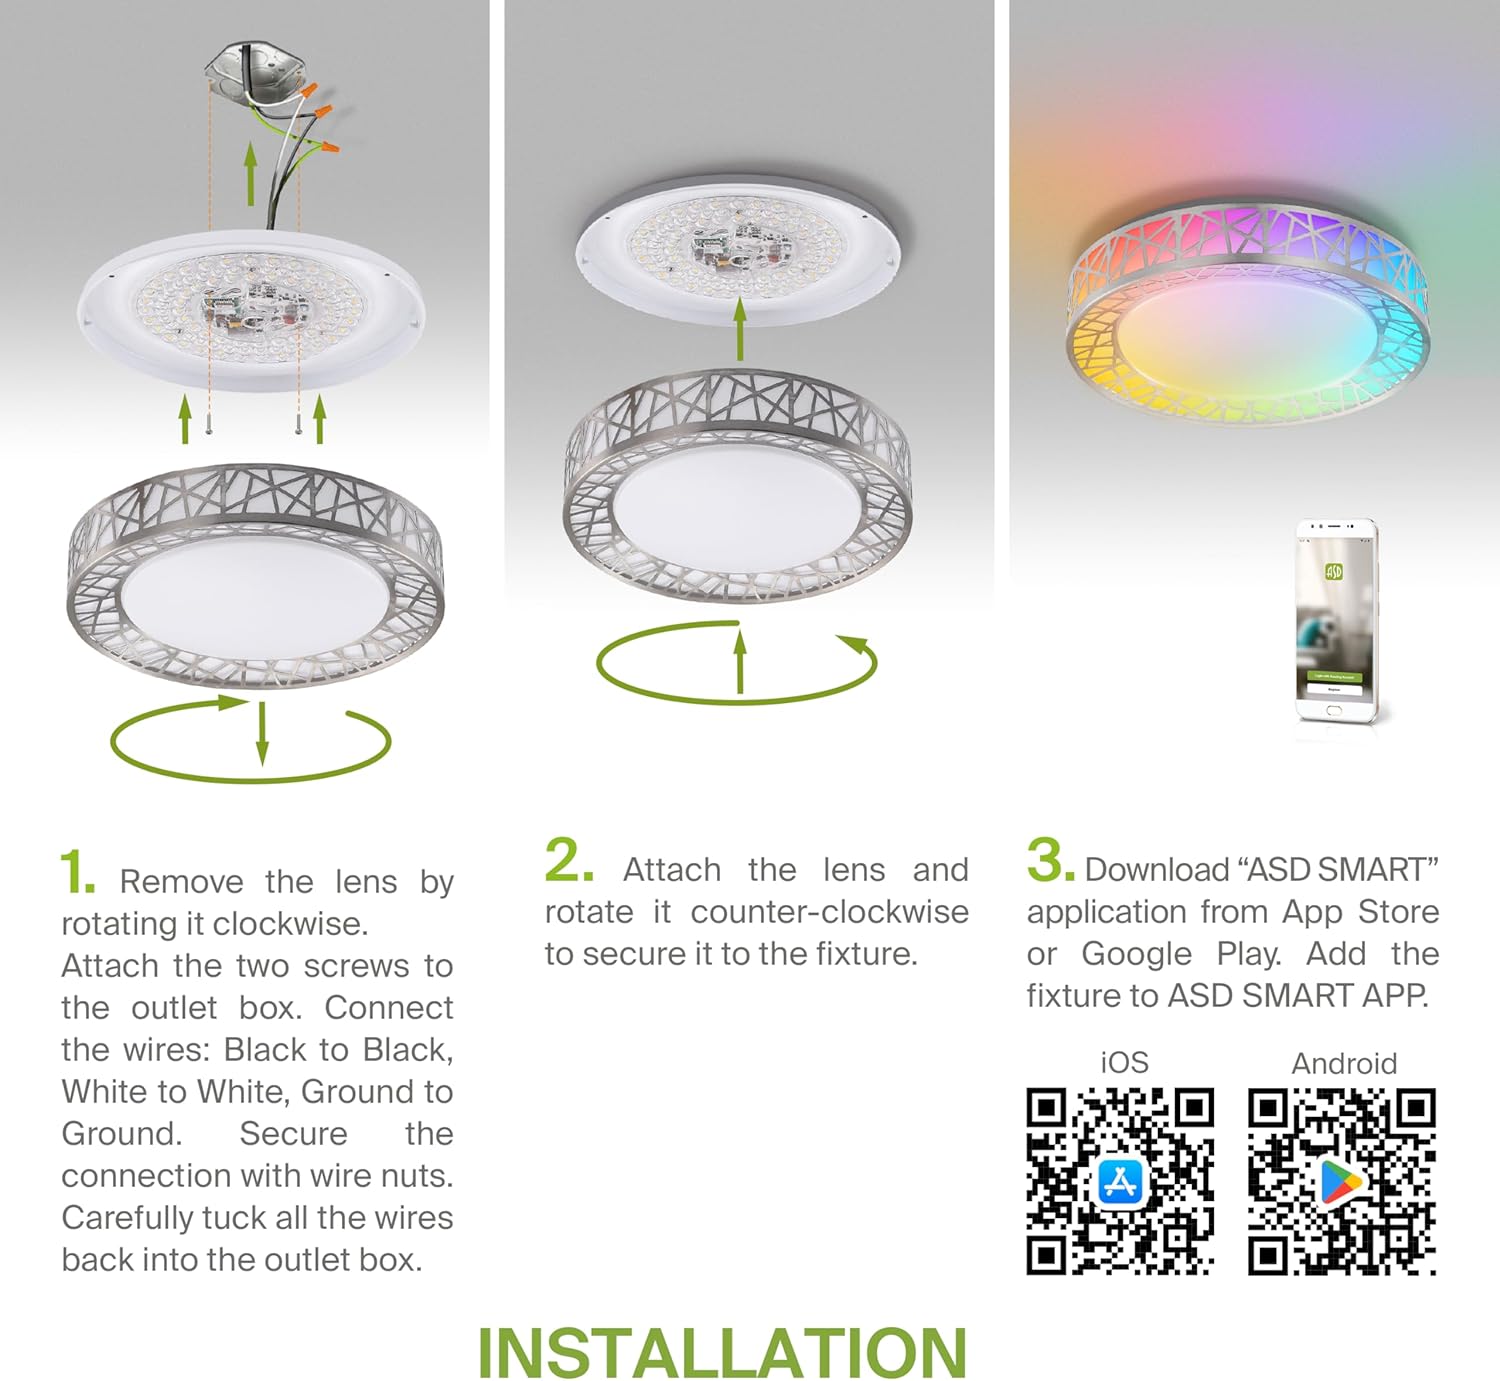
Figure 5.2: Complete installation overview including app download.
6. Betjeningsvejledning
Your ASD Smart RGBW Flush Mount Ceiling Light offers multiple control methods:
6.1 Fjernbetjening
Den medfølgende fjernbetjening muliggør grundlæggende funktioner:
- Til/fra: Power the light on or off.
- Dæmpning: Adjust brightness levels smoothly.
- CCT-justering: Change color temperature (e.g., from warm white to cool white).
- RGB-farvevalg: Cycle through or select specific RGB colors.
6.2 ASD SMART App Control
The ASD SMART app provides full control and advanced features:
- 16.7 millioner farver: Choose any color from the full RGBW spectrum.
- Smooth Dimming & CCT: Precisely adjust brightness and color temperature (2700K-6500K).
- Lighting Patterns: Select pre-set or custom lighting scenes and effects.
- Gruppering: Control multiple fixtures simultaneously.
- Planlægning: Set timers for lights to turn on/off or change settings automatically.

Figure 6.1: RGBW color capabilities.

Figure 6.2: Control via remote and smart app.

Figure 6.3: Seamless dimming functionality.
6.3 Stemmestyring (Alexa og Google Assistant)
The fixture is compatible with Amazon Alexa and Google Assistant for convenient voice commands:
- Ensure your ASD SMART app is linked to your Alexa or Google Home account.
- Use commands such as "Alexa, turn on the living room light" or "Hey Google, set the bedroom light to blue."

Figure 6.4: Compatibility with Alexa and Google Assistant.
7. Vedligeholdelse
To ensure the longevity and optimal performance of your ceiling light:
- Rensning: Disconnect power before cleaning. Wipe the fixture with a soft, dry cloth. Do not use abrasive cleaners or solvents.
- Udskiftning af pære: This fixture uses integrated LED technology and does not require bulb replacement.
8. Fejlfinding
Hvis du støder på problemer med din loftslampe, kan du se følgende almindelige problemer og løsninger:
| Problem | Mulig årsag | Løsning |
|---|
| Lyset tænder ikke | No power, loose wiring, faulty switch | Check circuit breaker. Ensure all wire connections are secure. Test the wall switch. |
| Fjernbetjening virker ikke | Dead battery, out of range, interference | Replace remote battery. Ensure you are within range. Remove any obstructions. |
| Appen kan ikke oprette forbindelse til lyset | Incorrect Wi-Fi password, light not in pairing mode, 5GHz Wi-Fi network | Verify Wi-Fi password. Reset light to pairing mode (refer to app instructions). Ensure you are on a 2.4GHz Wi-Fi network. |
| Stemmestyring svarer ikke | App not linked to voice assistant, incorrect device name | Check linking in ASD SMART app and voice assistant app. Verify device name in voice assistant app. |
9. Garanti og support
ASD tilbyder en 5 års begrænset garanti for this product, guaranteeing top quality and safety. The fixture is ETL certified, ensuring compliance with North American safety standards.
For technical support, warranty claims, or any questions not covered in this manual, please contact ASD customer service. Refer to the product packaging or the official ASD webwebsted for kontaktoplysninger.


