1. Introduktion
Thank you for choosing the BioloMix CG210 Conical Burr Coffee Grinder. This manual provides essential information for the safe operation, maintenance, and troubleshooting of your new appliance. Please read it thoroughly before first use and retain it for future reference.

Image 1.1: The BioloMix CG210 Conical Burr Coffee Grinder with its various components and accessories, including the bean hopper, control panel, portafilter holder, and cleaning brush.
2. Sikkerhedsinstruktioner
For at sikre sikker drift skal du altid følge disse grundlæggende sikkerhedsforanstaltninger:
- Læs alle instruktioner før brug af apparatet.
- Apparatet, netledningen eller stikket må ikke nedsænkes i vand eller andre væsker.
- Tæt opsyn er nødvendigt, når et apparat bruges af eller i nærheden af børn.
- Træk stikket ud af stikkontakten, når det ikke er i brug, før du samler eller adskiller dele og før rengøring.
- Undgå kontakt med bevægelige dele.
- Betjen ikke noget apparat med en beskadiget ledning eller stik, eller efter at apparatet ikke fungerer korrekt eller er blevet beskadiget på nogen måde.
- Brug af tilbehør, der ikke anbefales eller sælges af producenten, kan forårsage brand, elektrisk stød eller personskade.
- Må ikke bruges udendørs.
- Lad ikke ledningen hænge ud over kanten af bordet eller bordpladen eller røre ved varme overflader.
- Må ikke placeres på eller i nærheden af en varm gas- eller elektrisk brænder eller i en opvarmet ovn.
- Kontroller bønnebeholderen for fremmedlegemer før brug.
- Dette apparat er kun til husholdningsbrug.
3. Produktet er slutview
3.1 Komponenter
The BioloMix CG210 coffee grinder includes the following main components and accessories:
- Main Unit (Motor Base)
- Bønnebeholder med låg
- Conical Burrs (Upper and Lower)
- Kontrolpanel med LCD-skærm
- Slib Outlet
- Magnetic Dosing Cup (45g capacity)
- Portafilter Holders (51-53mm and 54-58mm)
- Rengøringsbørste
- Bellow Blower (for anti-clogging)

Billede 3.1: Overview of the BioloMix CG210 coffee grinder and its included accessories, such as the cleaning brush, bellow blower, portafilter holders, user manual, and magnetic dosing cup.
4. Opsætning
- Udpakning: Fjern forsigtigt alle komponenter fra emballagen. Gem emballagen til senere opbevaring eller transport.
- Rensning: Before first use, clean the bean hopper, lid, magnetic dosing cup, and portafilter holders with warm soapy water. Rinse thoroughly and dry completely. Use the cleaning brush to remove any dust from the burrs.
- Saml tragten: Place the bean hopper onto the main unit. Rotate it clockwise until it locks into place. Ensure it is securely seated.
- Fill Beans: Open the hopper lid and pour whole coffee beans into the hopper. Do not overfill. Close the lid securely.

Image 4.1: Illustration of filling coffee beans into the bean hopper and securing the lid.
- Tilslut strøm: Sæt netledningen i en jordet stikkontakt.
5. Betjeningsvejledning
5.1 Justering af kværnstørrelse
The BioloMix CG210 offers 48 precise grind settings, allowing you to customize the coarseness for various brewing methods. Rotate the bean hopper to adjust the grind size. Finer settings are suitable for espresso, while coarser settings are for French Press or drip coffee.
- Indstillinger 0-12: Ideel til espresso.
- Indstillinger 12-28: Velegnet til drypkaffe og pour over.
- Indstillinger 28-48: Anbefales til French Press.

Image 5.1: Visual guide to the 48 grind settings, indicating appropriate ranges for French Press, Drip Pour Over, and Espresso.

Image 5.2: Demonstrates rotating the bean hopper to select the desired grind size.
5.2 Brug af kontrolpanelet
The grinder features an intuitive LCD touch screen display for easy operation.

Image 5.3: The easy-touch display showing options for cup selection (2-12 cups), time adjustment (1-40 seconds), and start/pause buttons.
- Udvalg af kop: Press the "Cup" icon to select the number of cups (2-12). The grinder will automatically adjust the grinding time.
- Tidsvalg: Press the "Time" icon to manually set the grinding duration from 1 to 40 seconds in 0.5-second increments using the '+' and '-' buttons.
- Start / Pause: Press the "Play/Pause" button to start or pause the grinding process.

Image 5.4: Illustrates the final step of selecting grind parameters and initiating the grinding process.
5.3 Grinding Methods
Kværnen understøtter to metoder til opsamling af formalet kaffe:
- Magnetic Dosing Cup: Place the magnetic dosing cup under the grind outlet. This cup has a 58mm diameter mouth for easy transfer to a portafilter.
- Direct to Portafilter: Attach the appropriate portafilter holder (51-53mm or 54-58mm) to the grinder. Insert your portafilter into the holder.

Image 5.5: Shows the two grinding methods: into the 45g magnetic anti-static cup and directly into a 51/58mm espresso portafilter.
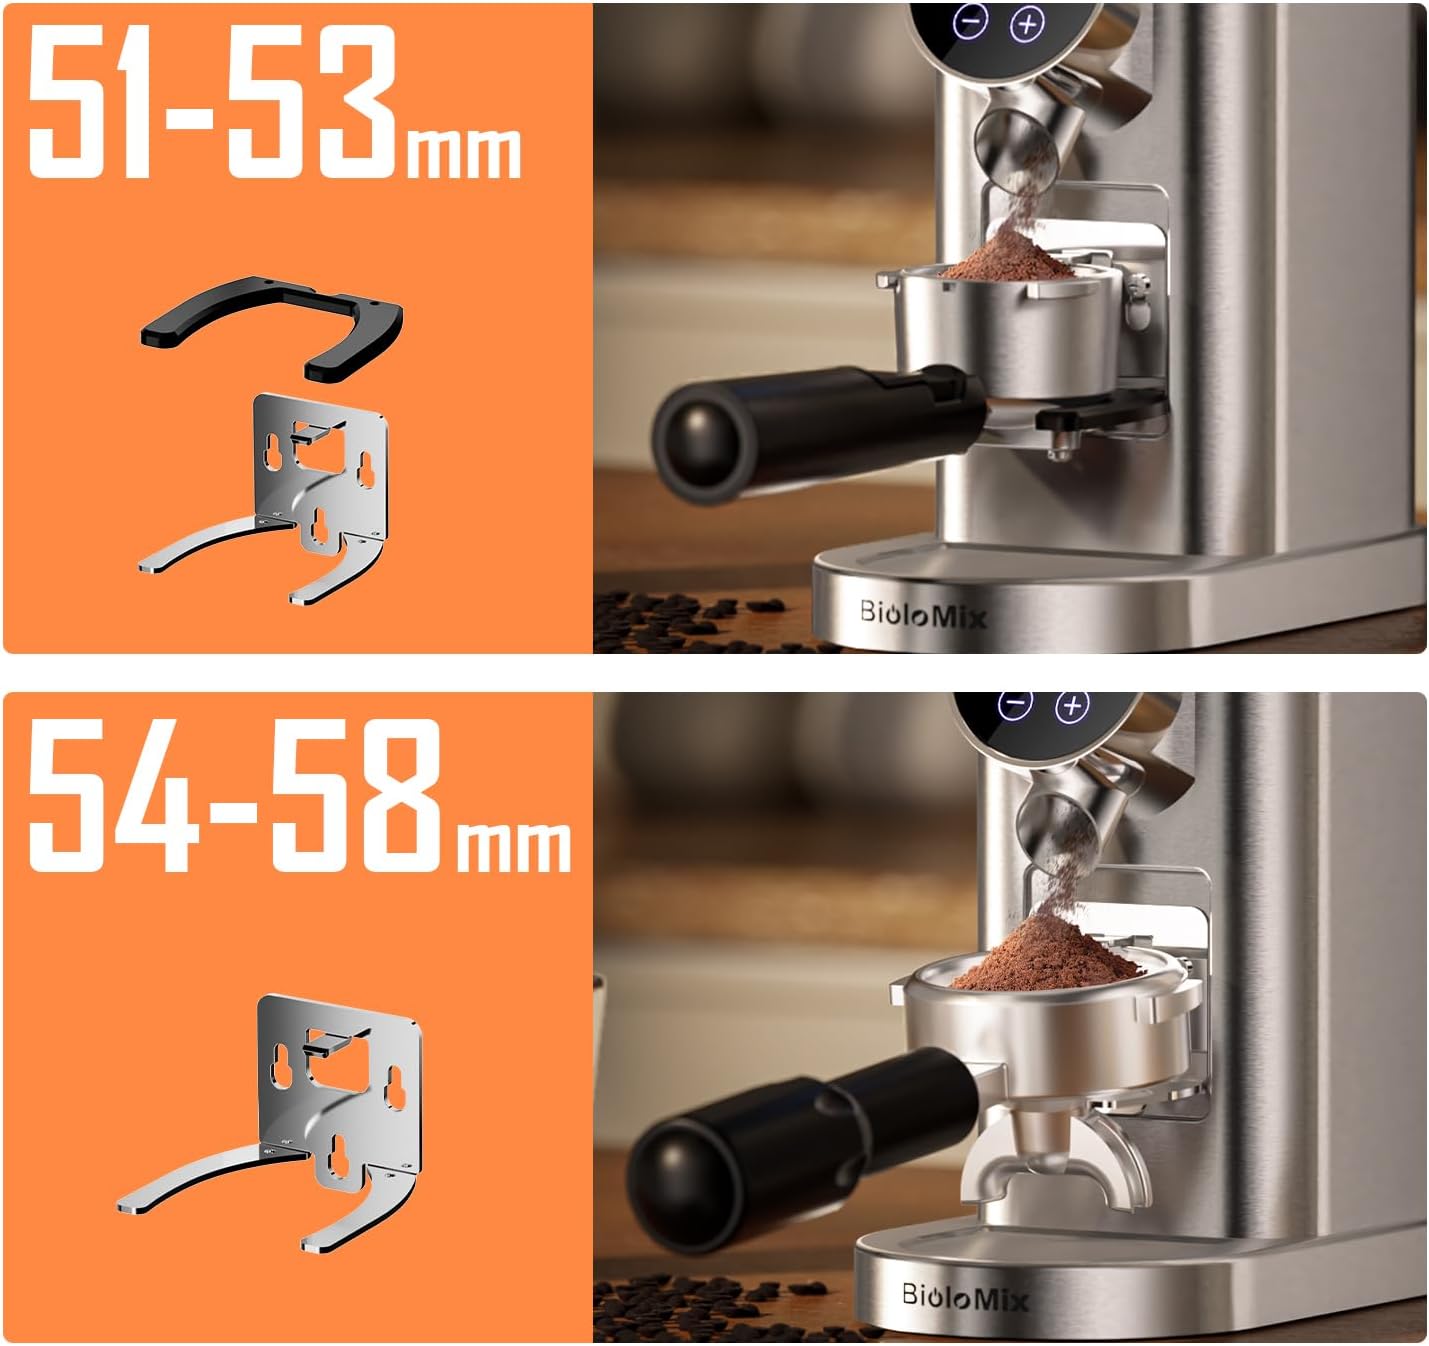
Image 5.6: Illustrates the two sizes of portafilter holders provided for compatibility with various portafilters.

Image 5.7: Depicts the choice between using the magnetic anti-static cup or attaching a portafilter for grinding.
6. Rengøring og vedligeholdelse
Regelmæssig rengøring sikrer optimal ydeevne og forlænger levetiden på din kværn.
- Tag stikket ud: Tag altid kværnen ud af stikkontakten inden rengøring.
- Tom Beholder: Fjern eventuelle resterende kaffebønner fra beholderen.
- Fjern tragt: Rotate the bean hopper counter-clockwise to unlock and remove it.
- Rengør kværne: Use the provided cleaning brush to remove coffee grounds from the upper and lower conical burrs. The upper burr can be removed for deeper cleaning by lifting it out.

Billede 6.1: En detaljeret view of the conical burrs, highlighting their role in consistent grinding.

Image 6.2: Demonstrates the use of the internal cleaning brush to remove residual grounds from the burrs.
- Anti-Clogging Function (Bellow Blower): After grinding, place the bellow blower on top of the hopper and press down firmly. This action forces air through the grinding chamber to clear residual coffee powder, preventing clogs.

Image 6.3: The bellow blower mechanism for efficient cleaning of residual coffee grounds.
- Aftør udvendigt: Tør kværnen udvendigt af med adamp klud. Brug ikke slibende rengøringsmidler, og nedsænk ikke hovedenheden i vand.
- Rent tilbehør: Wash the bean hopper, lid, magnetic dosing cup, and portafilter holders with warm soapy water. Rinse and dry thoroughly.
7. Fejlfinding
| Problem | Mulig årsag | Løsning |
|---|---|---|
| Kværnen starter ikke. | Not plugged in; Hopper not correctly installed; Power outage. | Ensure the power cord is securely plugged in. Check if the bean hopper is locked into place. Verify power supply. |
| Coffee beans are not grinding. | No beans in hopper; Hopper not locked; Burrs clogged. | Add coffee beans. Ensure hopper is locked. Clean burrs using the brush and bellow blower. |
| Malingen er ujævn eller for grov/fin. | Incorrect grind setting; Burrs dirty or damaged. | Adjust the grind setting according to your brewing method. Clean the burrs thoroughly. If burrs are damaged, contact customer support. |
| Coffee grounds are static and messy. | Static electricity build-up. | The grinder features anti-static technology. Ensure the magnetic dosing cup is used correctly. Humidity can affect static; try grinding in a more humid environment if possible. |
| Grinder clogs frequently. | Residual coffee grounds; Oily beans. | Use the bellow blower after each use to clear residual grounds. Clean burrs regularly. For very oily beans, more frequent cleaning may be required. |
8. Specifikationer
- Model: CG210
- Mærke: Biolomix
- Farve: Sort
- Produktdimensioner: 7.8 cm L x 16 cm B x 9.4 cm H
- Varens vægt: 5.58 pund
- Slibeindstillinger: 48 Præcise indstillinger
- Timer: Digital, 1-40 seconds (0.5-second increments)
- Udvalg af kop: 2-12 kopper
- Burr Type: Conical Burr
- Særlige funktioner: Anti-Static Design, Anti-Clogging Function (Bellow Blower), LCD Screen Display
9. Garanti og support
Biolomix products are manufactured with quality and reliability in mind. For warranty information, technical support, or service inquiries, please refer to the warranty card included with your product or visit the official Biolomix website. Please have your model number (CG210) and purchase date available when contacting support.
Du kan besøge Biolomix-butik på Amazon for mere information og produkttilbud.


