1. Introduktion
Thank you for choosing the KEENSTAR 20Bar Espresso Machine, Model JH-C5210. This manual provides essential information for the safe and efficient operation, maintenance, and care of your new espresso machine. Please read these instructions thoroughly before first use and retain them for future reference.
2. Vigtige sikkerhedsinstruktioner
Ved brug af elektriske apparater skal grundlæggende sikkerhedsforanstaltninger altid følges for at reducere risikoen for brand, elektrisk stød og/eller personskade, herunder følgende:
- Læs alle instruktioner.
- Rør ikke ved varme overflader. Brug håndtag eller knopper.
- For at beskytte mod brand, elektrisk stød og personskade må ledning, stik eller apparat ikke nedsænkes i vand eller anden væske.
- Tæt opsyn er nødvendigt, når et apparat bruges af eller i nærheden af børn.
- Træk stikket ud af stikkontakten, når det ikke er i brug, og før rengøring. Lad det køle af, før du sætter dele på eller af, og før du rengør apparatet.
- Betjen ikke noget apparat med en beskadiget ledning eller stik, eller efter at apparatet ikke fungerer korrekt eller er blevet beskadiget på nogen måde.
- Brug af tilbehør, der ikke er anbefalet af apparatets producent, kan resultere i brand, elektrisk stød eller personskade.
- Må ikke bruges udendørs.
- Lad ikke ledningen hænge ud over kanten af bordet eller bordpladen eller røre ved varme overflader.
- Må ikke placeres på eller i nærheden af en varm gas- eller elektrisk brænder eller i en opvarmet ovn.
- Sæt altid stikket i apparatet først, og sæt derefter ledningen i stikkontakten. For at afbryde forbindelsen skal du slukke for en vilkårlig knap og derefter tage stikket ud af stikkontakten.
- Brug ikke apparatet til andet end tilsigtet brug.
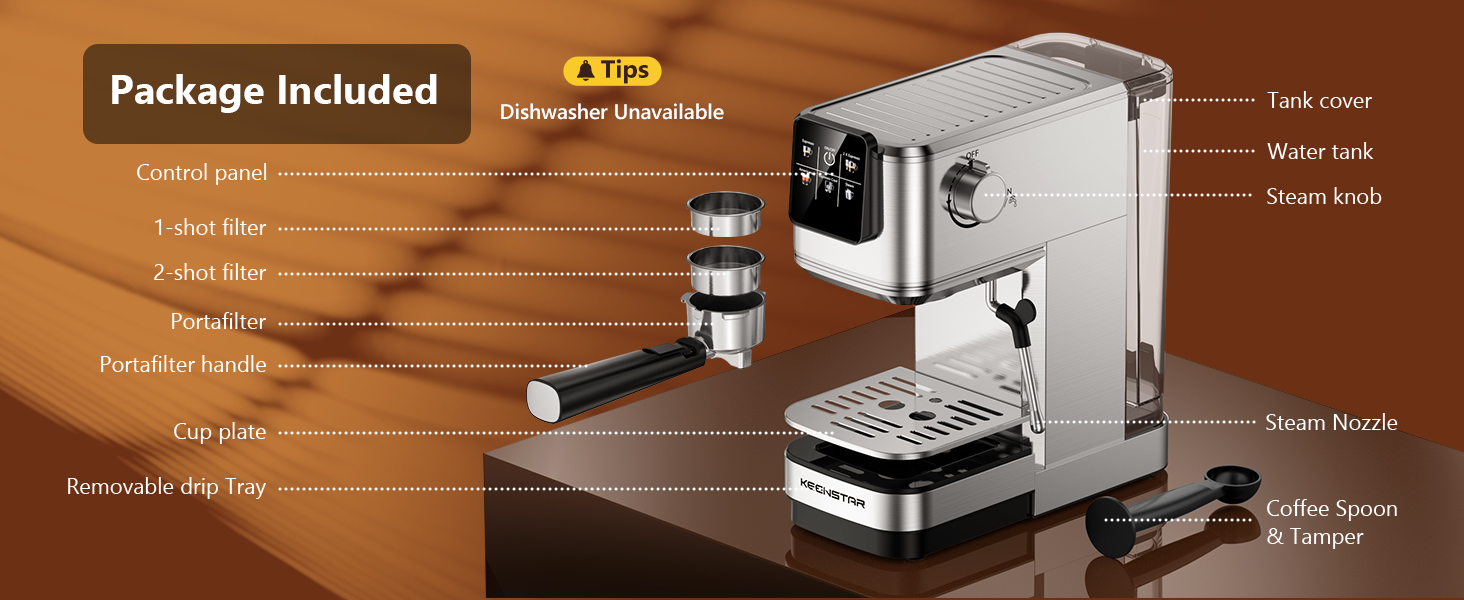
3. Produktkomponenter
Familiarize yourself with the parts of your KEENSTAR Espresso Machine:
- Control Panel (Touch Screen)
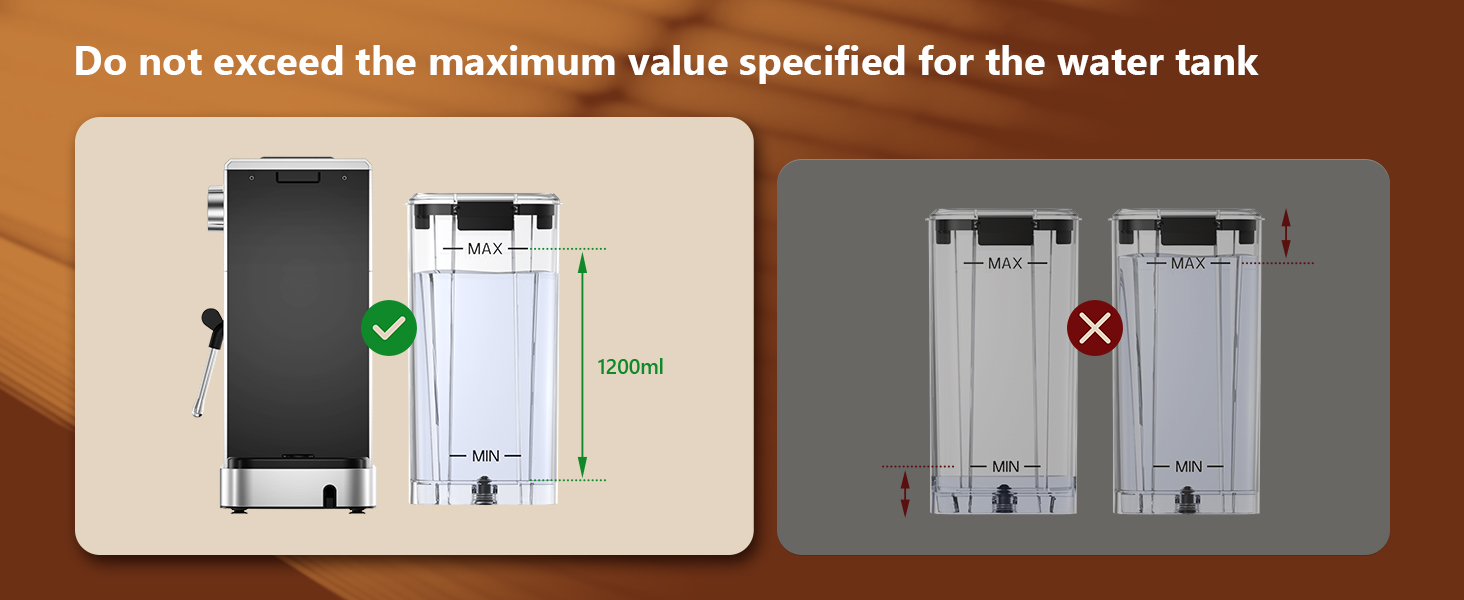
- Water Tank (40oz / 1200ml capacity)
- Dampknap
- Portafilterhåndtag
- 1-shot Filter Basket
- 2-shot Filter Basket
- Steam Wand / Nozzle
- Aftagelig drypbakke
- Cup Plate (Heated)
- Kaffeske og Tamper
4. Første opsætning og første brug
Før du bruger din espressomaskine for første gang, skal du følge disse trin:
- Pakker ud: Fjern forsigtigt al emballage, og sørg for, at alle komponenter er til stede.
- Ren: Vask vandtanken, portafilteret og filterkurvene med varmt sæbevand. Skyl grundigt og tør. Tør maskinens yderside af med en klud.amp klæde.
- Fyld vandtank: Fill the water tank with fresh, cold water up to the MAX line. Do not exceed the maximum fill level.
- Tænd: Sæt maskinen i en jordet stikkontakt.
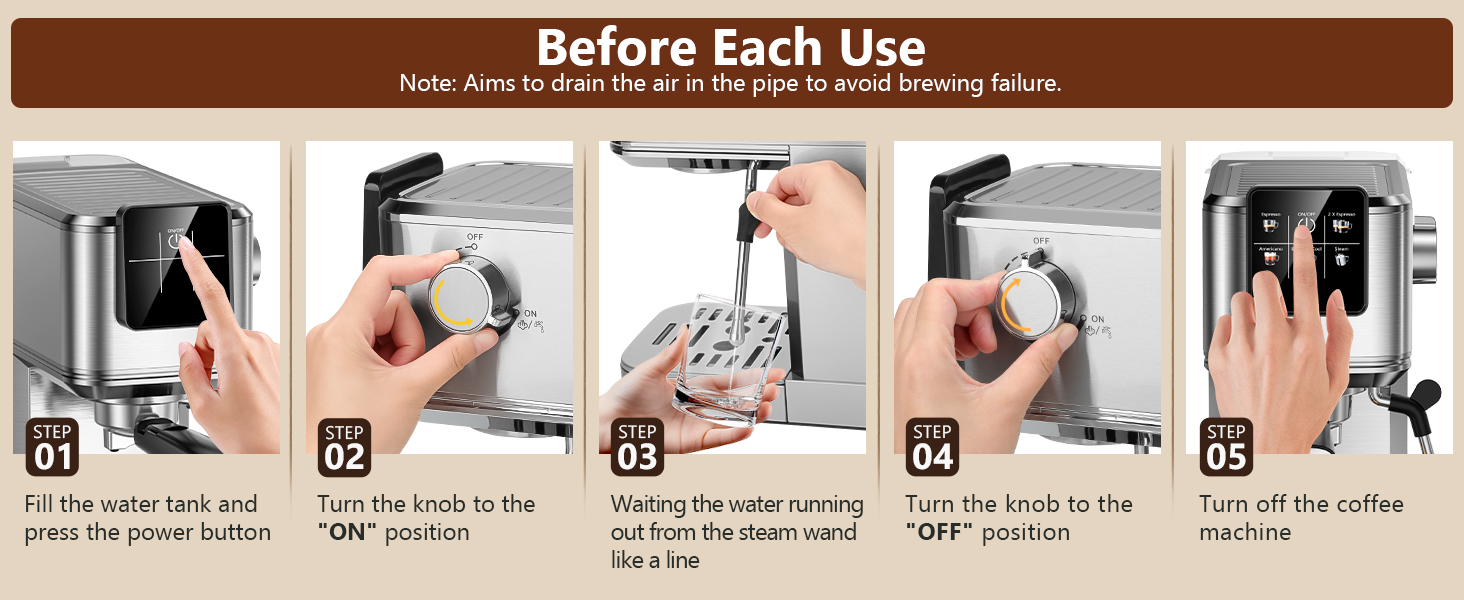
- Prime the Machine (Before Each Use): This step drains air from the internal pipes to prevent brewing failure.
- Tryk på tænd / sluk-knappen på kontrolpanelet.
- Turn the steam knob to the "ON" position.
- Wait for water to run out from the steam wand in a steady stream.
- Turn the steam knob to the "OFF" position.
- Sluk for kaffemaskinen.

5. Betjeningsvejledning
5.1 Brewing Espresso (Single or Double)
Ensure the steam knob is in the "OFF" position before brewing coffee.
- Tænd: Press the power button on the control panel. The indicator will blink, signifying preheating.
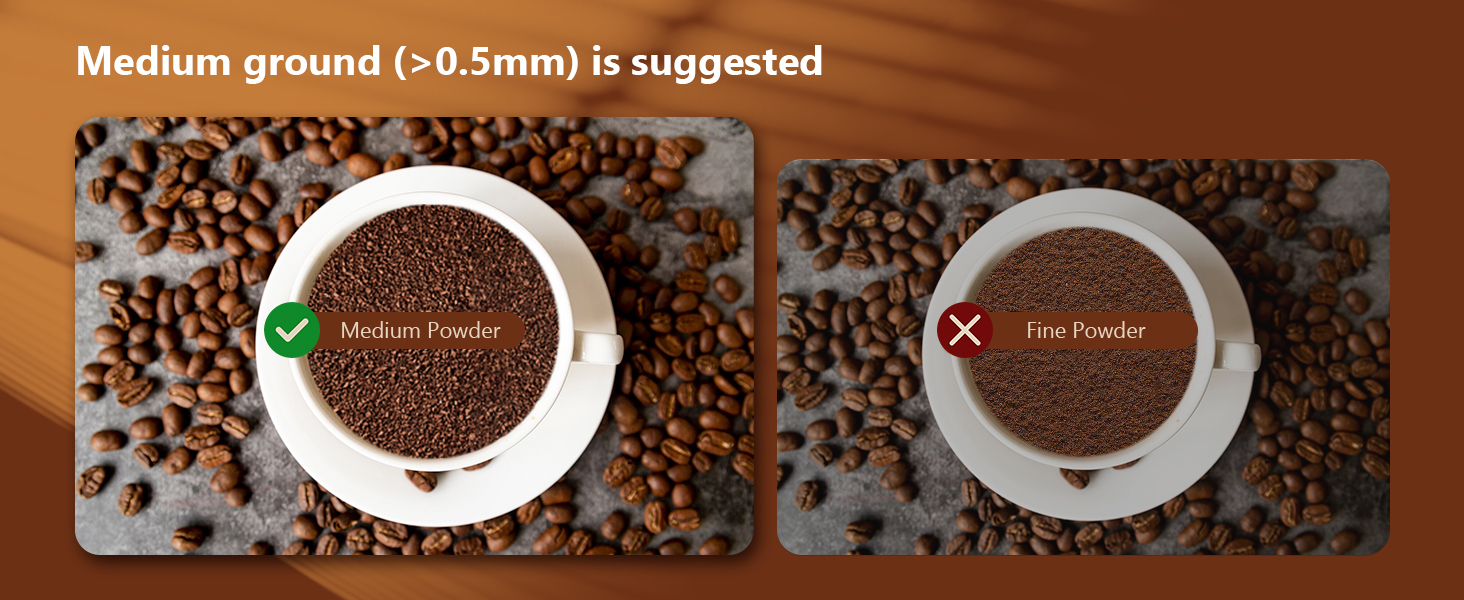
- Tilberedning af malet kaffe: Use medium ground coffee (>0.5mm). Load the appropriate filter basket (1-shot or 2-shot) with ground coffee (7g for single, 14g for double) and tamp it firmly with the coffee spoon/tampeh.
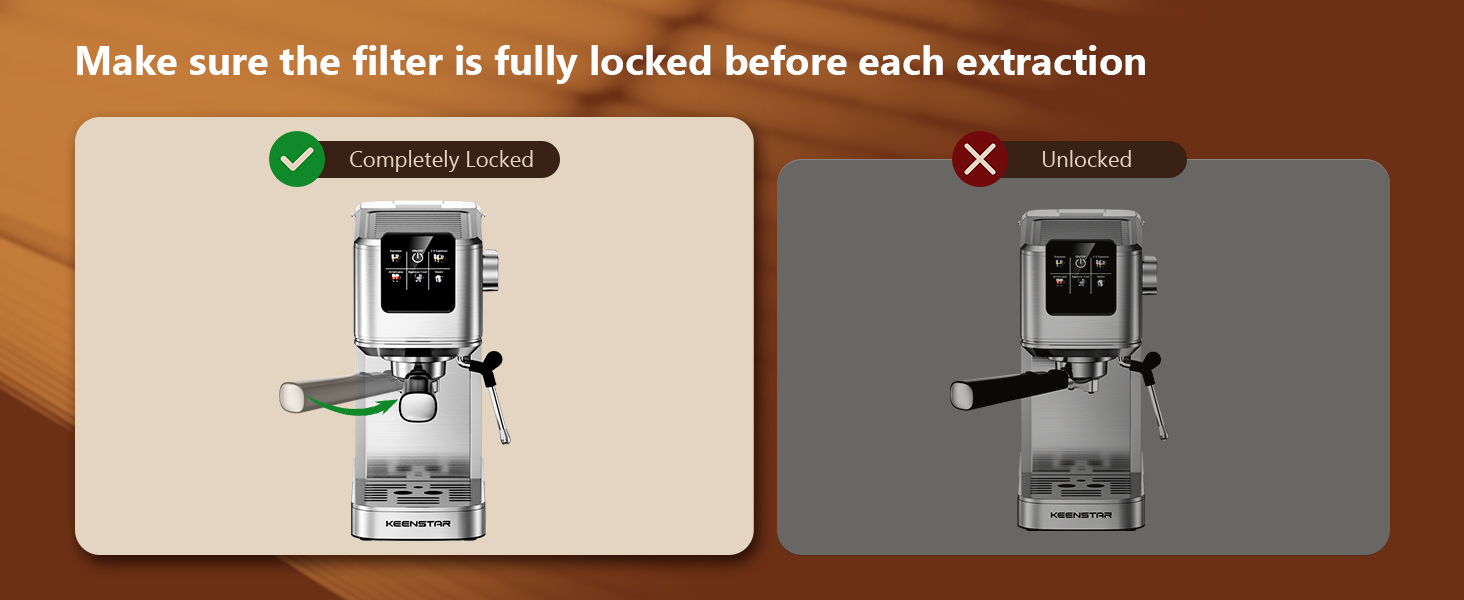
- Fastgør portafilter: Insert the portafilter into the group head and turn it firmly to the right until it is completely locked. Place a cup(s) on the drip tray.
- Forvarm: Wait for the indicator light to become steady, indicating the machine is preheated and ready to brew.
- Brygge: Select "Espresso" for a single shot or "2X Espresso" for a double shot on the touch screen. The machine will begin brewing.
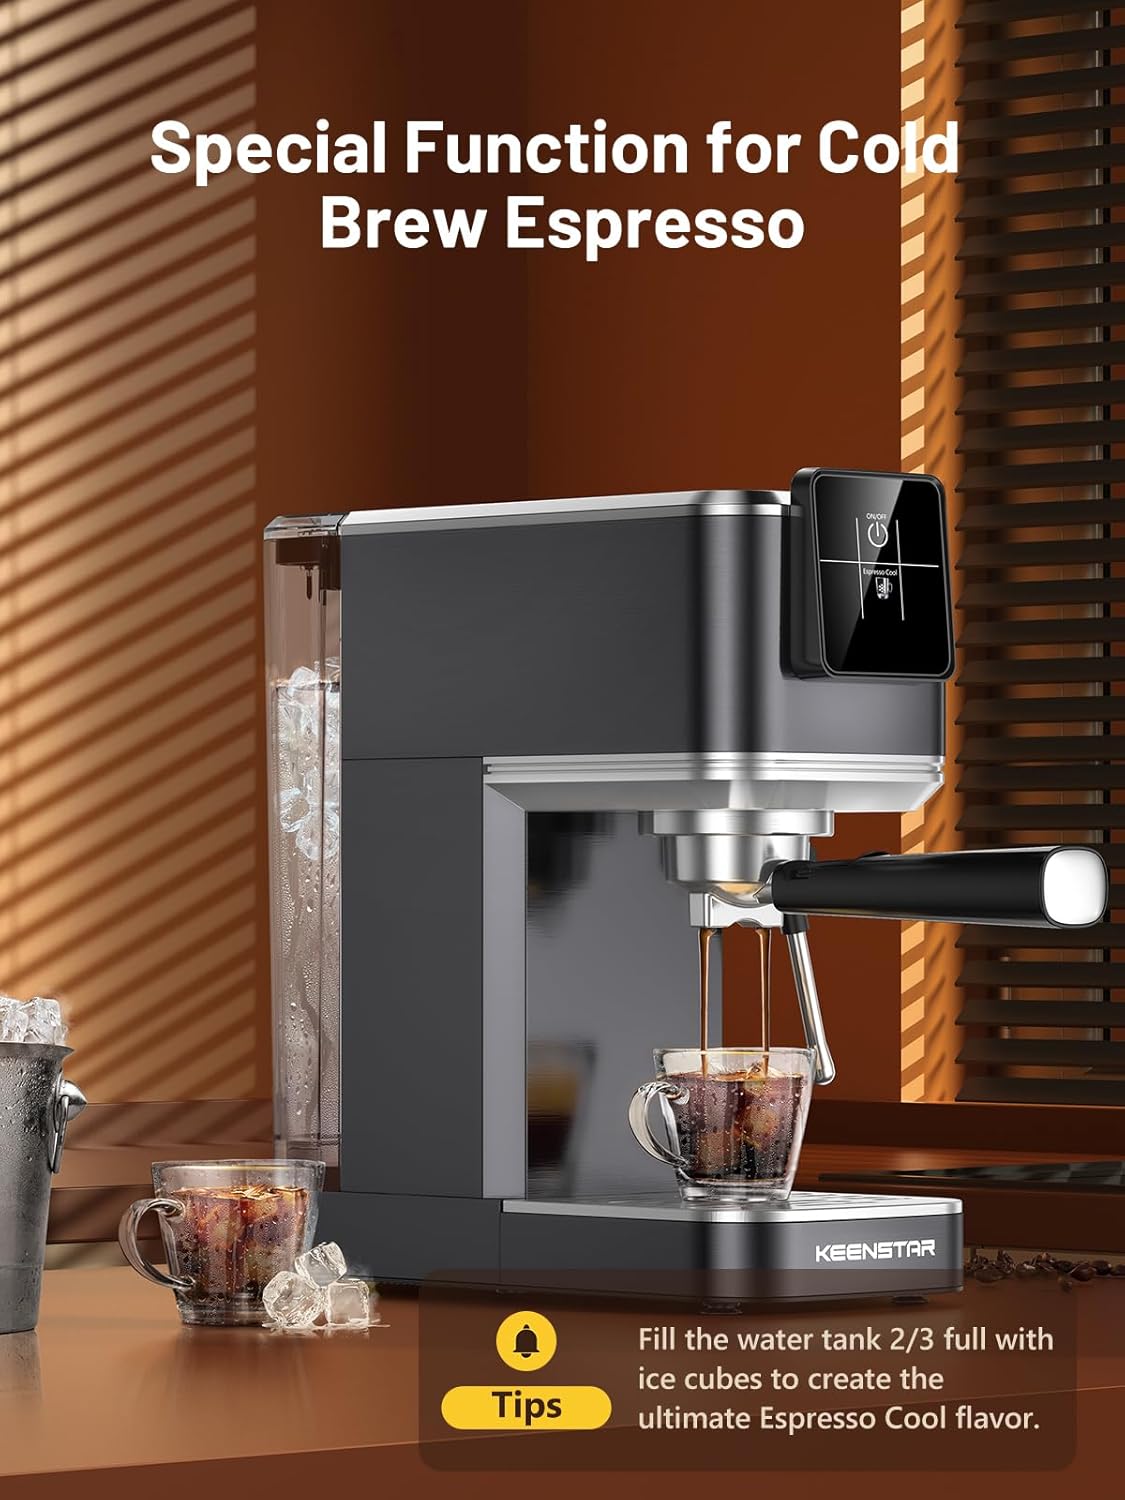
5.2 Making Cold Brew Espresso
The machine offers a rapid cold brew function:
- Forberede: Fill the water tank approximately 2/3 full with ice cubes.
- Brygge: Follow steps 1-3 from "5.1 Brewing Espresso".
- Select Cold Brew: On the touch screen, select "Espresso Cool". The machine will brew a cold espresso shot.
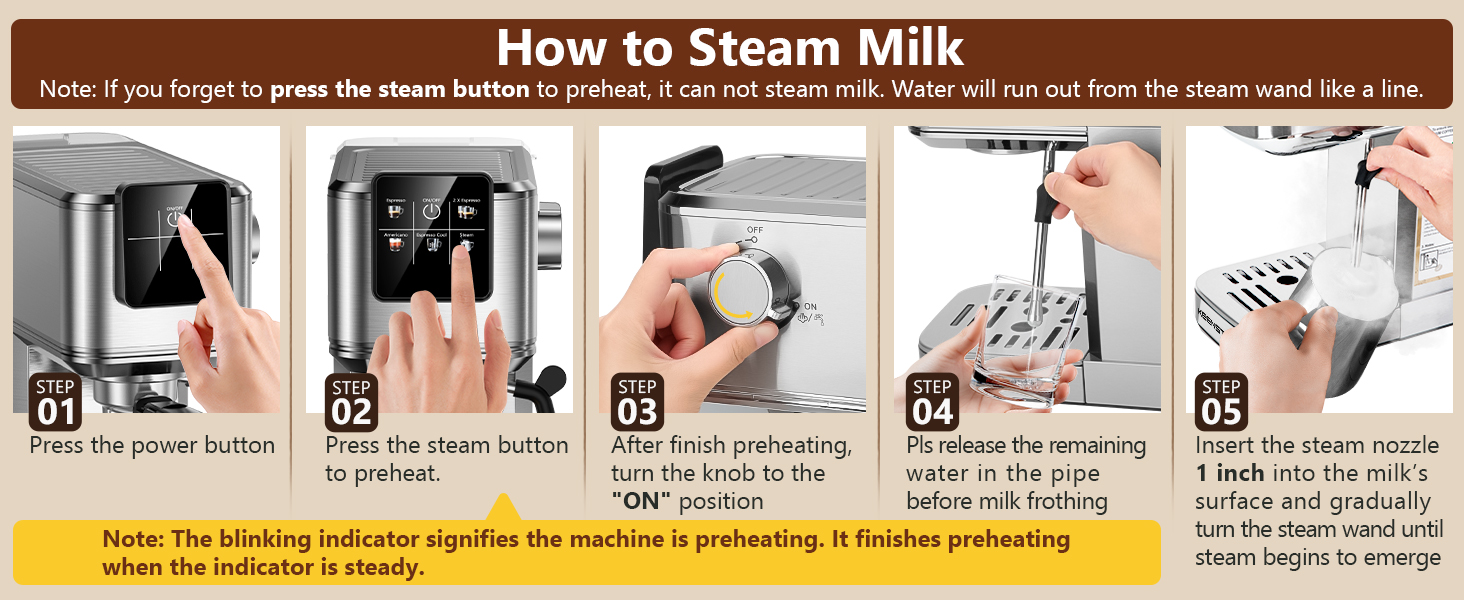
5.3 Skumning af mælk med dampdysen
To create creamy milk foam for lattes and cappuccinos:
- Tænd: Tryk på tænd/sluk-knappen.
- Preheat Steam: Press the "Steam" button on the touch screen to preheat the steam function. The indicator will blink during preheating.
- Rens damprør: After preheating is complete (indicator is steady), turn the steam knob to the "ON" position briefly to release any condensed water from the wand. Turn it OFF.
- Skummælk: Insert the steam nozzle approximately 1 inch into the surface of cold milk in a frothing pitcher. Gradually turn the steam knob to the "ON" position.
- Texture Milk: Move the pitcher up and down to create microfoam. Once desired texture is achieved, turn the steam knob to "OFF" and remove the pitcher.
- Rengør stav: Tør straks dampdysen af med en damppistol.amp cloth to prevent milk residue from drying. Briefly turn the steam knob ON again to clear any internal milk.

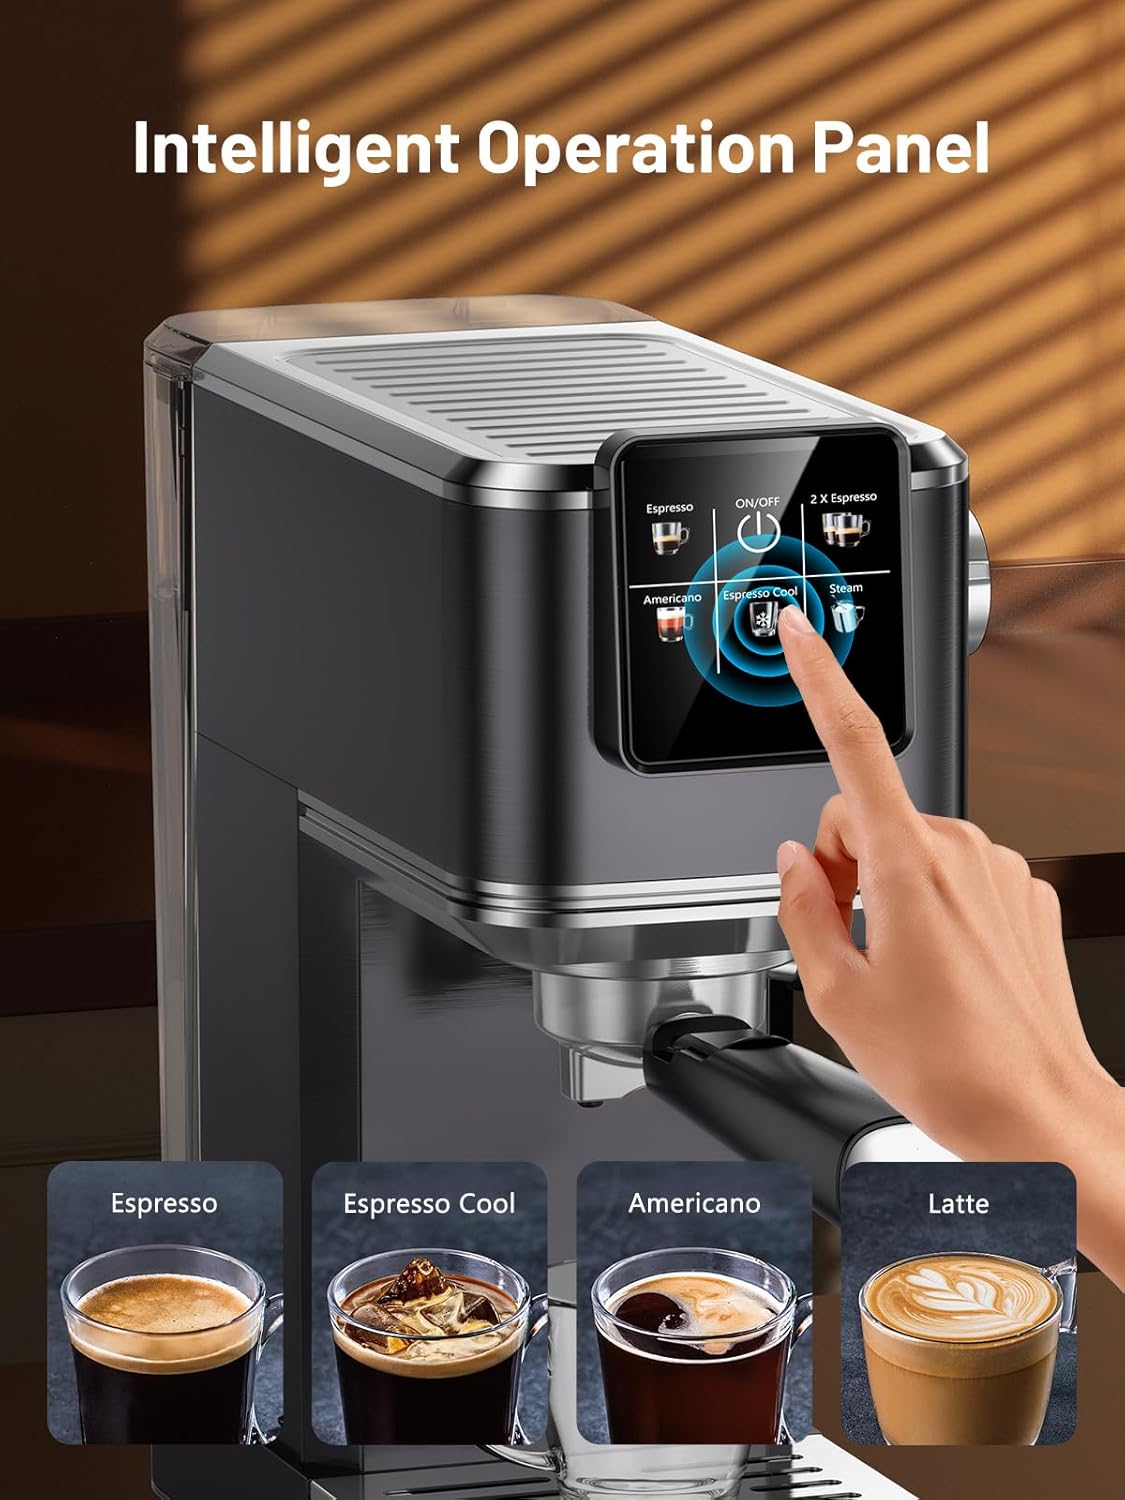
5.4 Betjening af berøringsskærm
The machine features an intuitive touch screen for various functions:
- Espresso: Brygger et enkelt shot espresso.
- 2X Espresso: Brygger et dobbelt shot espresso.
- Espresso Cool: Brews a cold espresso shot (requires ice in water tank).
- Americano: Brygger en americano.
- Damp: Aktiverer dampdysen til mælkeskumning.
- TIL/FRA: Tænder eller slukker maskinen.
6. Vedligeholdelse og rengøring
Regelmæssig rengøring sikrer optimal ydeevne og levetid for din espressomaskine.
6.1 Daglig rengøring
- Drypbakke: Empty and clean the removable drip tray after each use or when the indicator floats up.
- Portafilter og filterkurve: Remove spent coffee grounds and rinse the portafilter and filter baskets under warm water.
- Dampstang: As mentioned in section 5.3, wipe the steam wand immediately after frothing milk.
- Ydre: Tør maskinens ydre af med en blød, damp klæde. Brug ikke slibende rengøringsmidler eller skuresvampe.


6.2 Afkalkning
Med tiden kan der ophobes mineralaflejringer i maskinen, hvilket påvirker dens ydeevne. Afkalk din maskine hver 2.-3. måned, eller oftere, hvis du har hårdt vand.
- Forbered afkalkningsopløsning: Bland en afkalkningsopløsning i henhold til producentens anvisninger (eller brug en blanding af hvid eddike og vand i forholdet 1:1).
- Fyld vandtank: Hæld afkalkningsopløsningen i vandbeholderen.
- Kør løsning: Place a large container under the portafilter and steam wand. Run the descaling solution through the machine by performing several espresso cycles and activating the steam wand for a few minutes.
- Skylle: After the solution has run through, rinse the water tank thoroughly and fill it with fresh water. Run several cycles of fresh water through the machine to remove any residual descaling solution.
7. Fejlfinding
Hvis du støder på problemer med din espressomaskine, kan du se følgende almindelige problemer og løsninger:
| Problem | Mulig årsag | Løsning |
|---|---|---|
| Ingen kaffe udløber / Langsom flow |
|
|
| Water leaks from portafilter |
|
|
| No steam from wand / Weak steam |
|
|
| Kaffe er ikke varm nok |
|
|
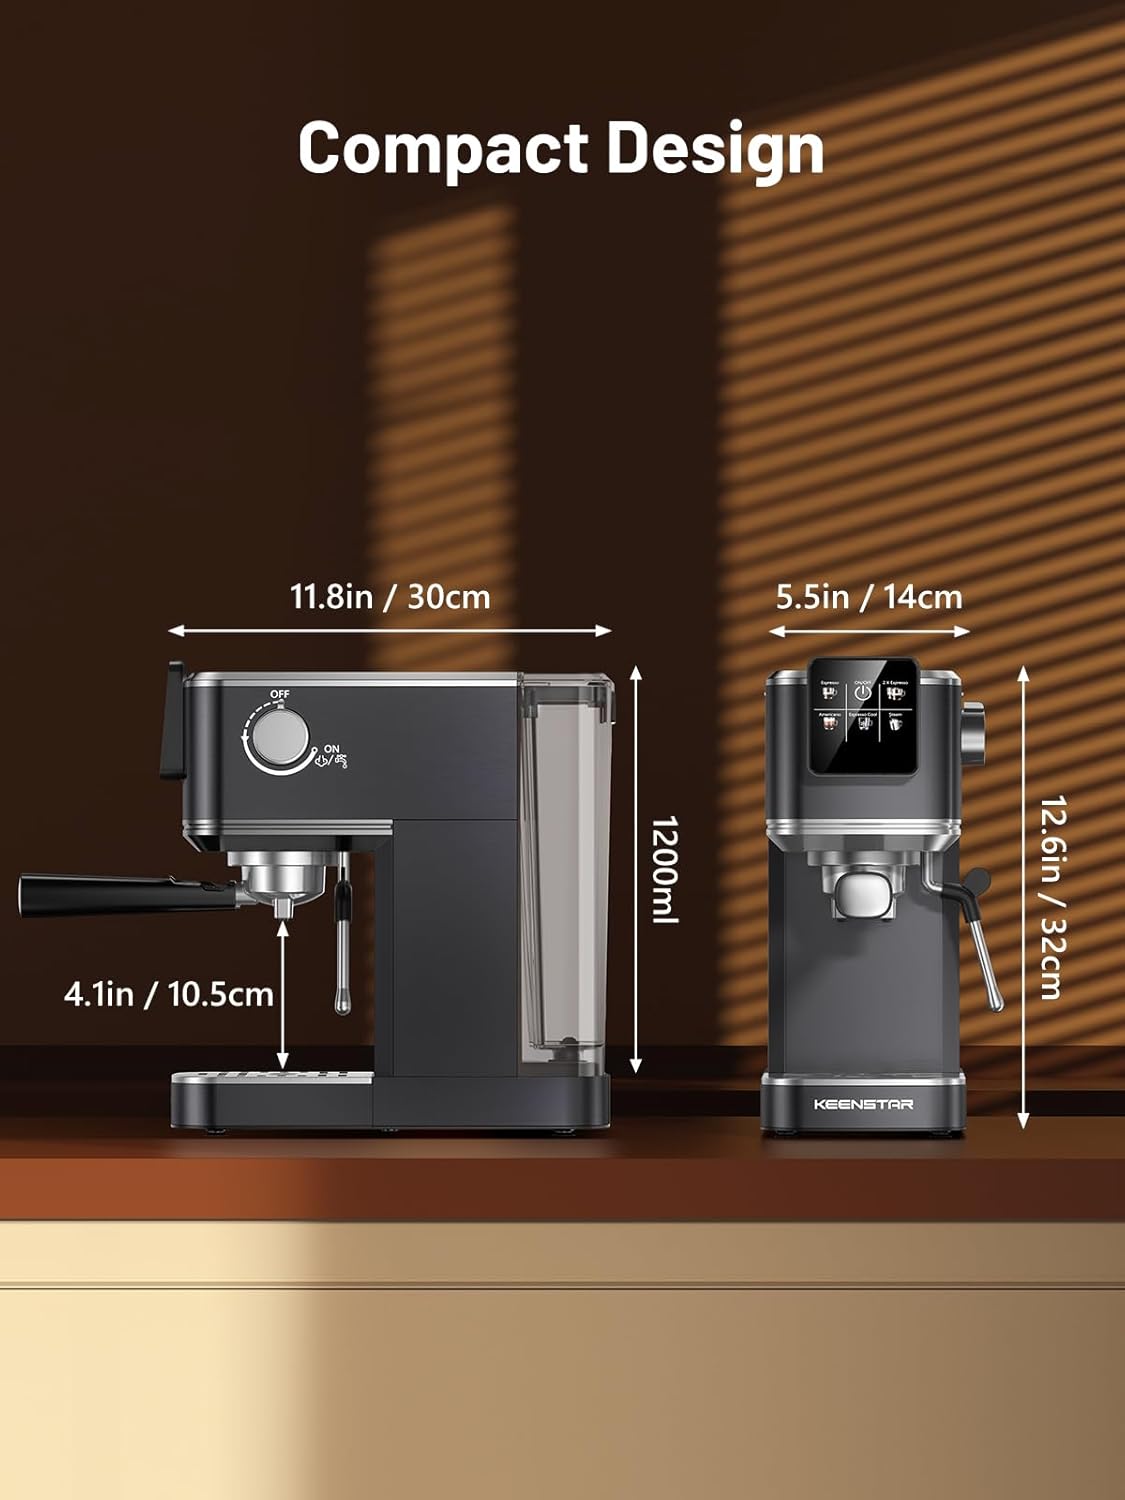
8. Produktspecifikationer
| Feature | Detalje |
|---|---|
| Mærke | KEENSTAR |
| Modelnavn | JH-C5210 |
| Tryksystem | 20 bar professionel pumpe |
| Magt | 1350W |
| Vandtankkapacitet | 40 oz (1200 ml) |
| Produktmål (D x B x H) | 30 cm D x 14 cm B x 32 cm H (11.8 cm D x 5.5 cm B x 12.6 cm H) |
| Varens vægt | 10 pund |
| Kaffe input type | Ground Coffee, Coffee Beans |
| Driftstilstand | Fully Automatic (for brewing functions) |
| Særlige funktioner | Rapid Cold Brew, Milk Frother Steam Wand, Touch Screen, Heated Cup Holder |
9. Garanti og support
KEENSTAR offers the following support for your product:
- 30-dages pengene-tilbage-garanti: Hvis du ikke er tilfreds med dit køb.
- 1 års gratis udskiftning: For manufacturing defects from the date of purchase.
- Lifetime After-Customer Service: For ongoing support and assistance.
For customer service inquiries, please refer to the contact information provided with your product packaging or visit the official KEENSTAR webwebsted.


