1. Introduktion
This manual provides essential information for the safe and effective use of your Magcubic HY300pro+ Mini Projector. Please read it thoroughly before operating the device and retain it for future reference.
The Magcubic HY300pro+ is a portable mini projector featuring 4K support, Android 11.0 operating system, WiFi6, and Bluetooth 5.4 connectivity. It is designed for versatile use in various environments, offering a flexible 180-degree rotation and an integrated 5W speaker.

Image 1.1: Magcubic HY300pro+ Mini Projector and Remote Control.
2. Hvad er der i æsken
Bekræft, at alle følgende varer er inkluderet i din pakke:
- Magcubic HY300pro+ Mini Projector
- Strømadapter
- Fjernbetjening
- Brugermanual
3. Produktet er slutview og funktioner
The HY300pro+ projector is designed for ease of use and portability, offering a range of features for an enhanced viewoplevelse.
Nøglefunktioner:
- Enhanced Clarity and Brightness: 8000 lumens and an 8000:1 contrast ratio for clear visuals.
- Integreret lyd: 5W SoundBase speaker for rich audio without external speakers.
- Versatile and Portable Design: Lightweight (0.4 kg) with 180-degree rotation for flexible placement.
- Intuitiv kontrol: Advanced Air Mouse remote control with voice command support.
- Skærmopløsning: Native 720p resolution with 4K support.
- Operativsystem: Android 11.0 (or later, as indicated by Android 14 in some visuals) for direct app access.
- Forbindelse: WiFi6 and Bluetooth 5.4 for seamless wireless connections.

Image 3.1: Key features of the HY300pro+ Projector.

Image 3.2: The compact and portable design of the projector.
4. Opsætning
4.1 Placering
The projector offers flexible placement options due to its 180-degree rotation capability. It can be used for ceiling mounting, tabletop projection, or tripod installation.
- Brug af bordplade: Placer projektoren på en stabil, flad overflade.
- Stativmontering: Secure the projector to a compatible tripod for adjustable height and angle.
- Loftmontering: Install the projector upside down on a ceiling mount (sold separately) for overhead projection.
For en optimal viewing experience, a projection distance of 1.6 meters is recommended for an 80-inch screen. Adjust the distance to achieve your desired screen size.

Image 4.1: Projector placement options and recommended distances.

Image 4.2: 180-degree rotation for flexible projection on walls or ceilings.
4.2 Strømtilslutning
- Tilslut strømadapteren til projektorens strømindgang.
- Sæt strømadapteren i en passende stikkontakt.
- Tryk på tænd/sluk-knappen på projektoren eller fjernbetjeningen for at tænde for enheden.
5. Betjening
5.1 Initial Power On and Android System
Upon first power-on, the projector will boot into its integrated Android operating system (Android 11.0 or later). You can navigate the interface using the provided remote control.

Image 5.1: Android 14 Integrated System Interface.
5.2 Using the Air Mouse Remote Control
The projector comes with an advanced Air Mouse remote control for precise navigation and control.
- Parring: Press and hold the two designated buttons on the remote (refer to remote diagram) to enter pairing mode.
- Bluetooth-indstillinger: Open the Bluetooth settings on the projector's interface.
- Forbinde: Select the remote control icon or the remote's name from the list of available devices to pair.
- Air Mouse funktion: Once paired, move your wrist to control the on-screen cursor.
The remote also supports voice commands for hands-free adjustments and content search.
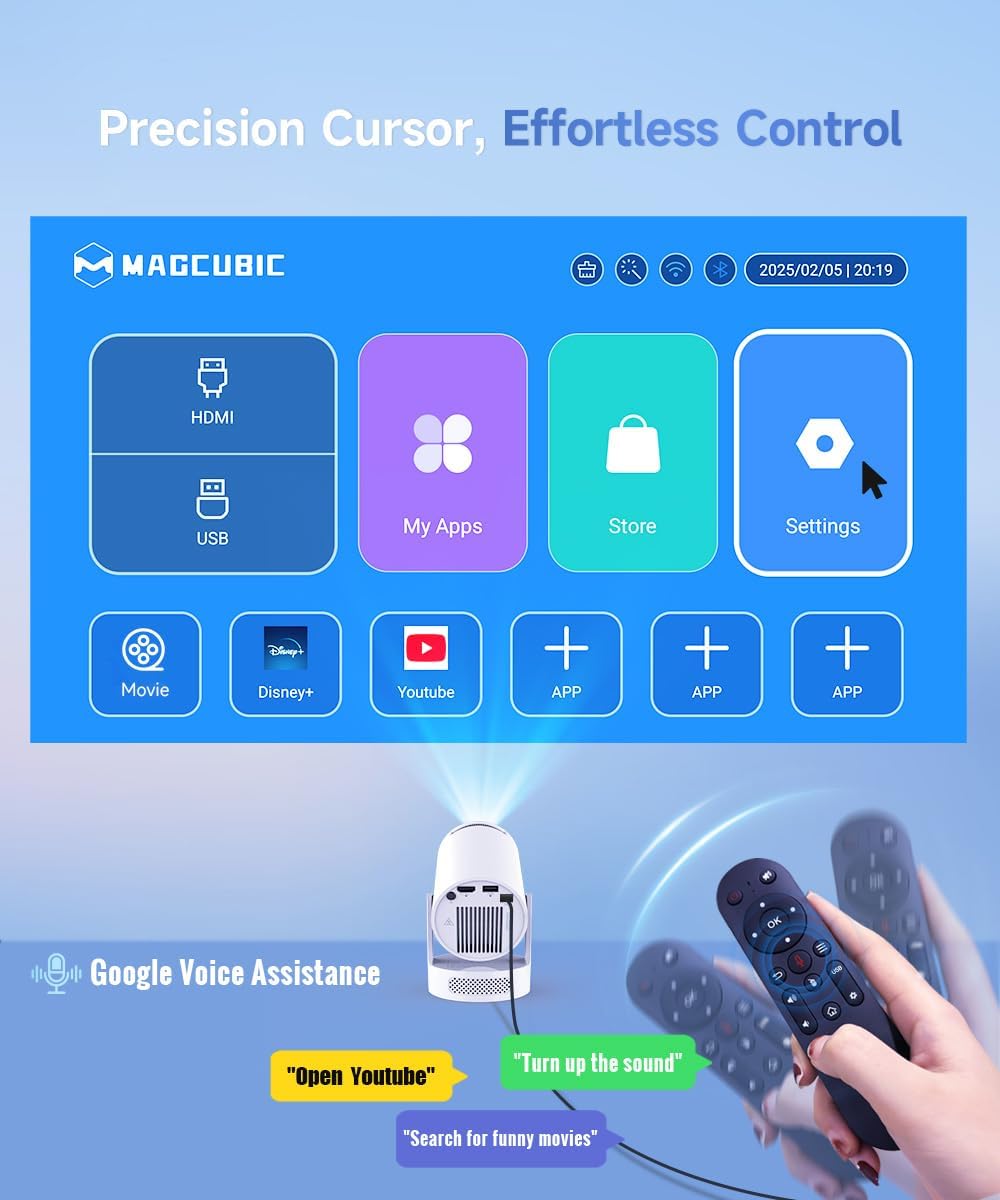
Image 5.2: Precision control with the Air Mouse remote and voice assistance.

Image 5.3: Instructions for using the Air Mouse remote control.
6. Forbindelse
6.1 Wireless Connectivity (WiFi6 & Bluetooth 5.4)
The projector supports both WiFi6 and Bluetooth 5.4 for high-speed and stable wireless connections.
- WiFi6: Opret forbindelse til dit hjemmenetværk for internetadgang og streaming.
- Bluetooth 5.4: Pair with external Bluetooth speakers or headphones for enhanced audio, or connect other Bluetooth devices.

Image 6.1: Wireless casting and WiFi6 performance.

Image 6.2: Wireless casting and wired connection options.
6.2 Kabelbaserede forbindelser
The projector includes ports for wired connections to various devices.
- HDMI: Connect gaming consoles, laptops, TV sticks, or other HDMI-enabled devices.
- USB: Connect USB drives for media playback or other compatible USB accessories.

Image 6.3: Versatile compatibility and easy connection ports.
7. Billedjustering
Achieve a clear and perfectly aligned image using the following adjustment features:
- Manuel fokus: Juster fokusringen på projektorlinsen, indtil billedet er skarpt.
- Auto Vertical Correction: The projector automatically corrects vertical keystone distortion.
- Manual 4P Keystone: For more precise adjustments, manually correct the four corners of the image.
- Zoom (80-100%): Juster billedstørrelsen uden at flytte projektoren.

Image 7.1: Easy tuning and perfect alignment features.

Image 7.2: Simple manual focus for a clear view.
8. Lyd
The Magcubic HY300pro+ features an integrated 5W SoundBase speaker, providing clear and rich audio directly from the projector.

Image 8.1: Crisp, clear, powerful 5W speaker.

Image 8.2: Integrated 5W speaker for immersive sound.
For an enhanced audio experience, you can connect external Bluetooth speakers or a sound system via the Bluetooth 5.4 connection.
9. Vedligeholdelse
Korrekt vedligeholdelse sikrer projektorens levetid og optimale ydeevne.
- Rengøring af linsen: Brug en blød, fnugfri klud, der er specielt designet til optiske linser. Brug ikke slibende rengøringsmidler eller opløsningsmidler.
- Rengøring af ydersiden: Tør projektorens yderside af med en blød, tør klud. Ved genstridigt snavs kan du bruge en let tør klud.amp en klud kan bruges, efterfulgt af en tør klud.
- Ventilation: Sørg for, at projektorens ventilationsåbninger er frie og uhindrede for at forhindre overophedning.
- Opbevaring: Når projektoren ikke er i brug i længere perioder, skal den opbevares køligt og tørt, væk fra direkte sollys og ekstreme temperaturer.
10. Fejlfinding
Hvis du støder på problemer med din projektor, kan du se følgende almindelige problemer og løsninger:
| Problem | Mulig årsag | Løsning |
|---|---|---|
| Intet billede eller sløret billede | Incorrect focus, wrong input source, projection distance too far/close. | Adjust manual focus. Verify input source. Adjust projection distance (1.6m for 80-inch screen). |
| Ingen lyd | Volume too low, external speaker not connected, audio output settings. | Increase volume. Check Bluetooth connection to external speakers. Verify audio output settings in Android. |
| Fjernbetjening virker ikke | Low battery, not paired, obstruction. | Replace batteries. Re-pair the remote control (see Section 5.2). Ensure no obstructions between remote and projector. |
| Problemer med Wi-Fi-forbindelse | Incorrect password, out of range, router issues. | Verify Wi-Fi password. Move projector closer to router. Restart router. |
| Projektor overophedning | Blocked ventilation, prolonged use in hot environment. | Ensure ventilation ports are clear. Operate in a well-ventilated area. Allow projector to cool down. |
For optimal performance, ensure your projector's firmware is up to date. Check the settings menu for software updates.
11. Specifikationer
| Feature | Detalje |
|---|---|
| Mærke | Magkubisk |
| Model | HY300Pro+ Android |
| Farve | Hvid |
| Produkttype | Bærbar projektor |
| Displayteknologi | LCD LED |
| Indfødt opløsning | 1280 x 720 pixel |
| Maksimal skærmopløsning | 3840 x 2160 pixels (4K-understøttelse) |
| Lysstyrke | 8000 lumen |
| Kontrastforhold | 8000:1 |
| Forbindelsesteknologi | Wi-Fi (WiFi6), Bluetooth (BT5.4), HDMI, USB |
| Særlige funktioner | Integrated Speaker, Lightweight, Portable, Built-in Wi-Fi, 180° Rotation |
| Integreret højttaler | 5W |
| Kompatible enheder | Smartphone, Game Console, Laptop/Tablet, TV Stick, USB Drive |
| Installationstype | Tripod Mount, Tabletop, Ceiling Mount |
| Pakkedimensioner | 24.4 x 18.2 x 13.2 cm |
| Varens vægt | 400 gram |
12. Garanti og support
Your Magcubic HY300pro+ Mini Projector comes with a manufacturer's warranty of 1 year.
Magcubic is committed to providing comprehensive customer support:
- Professionel service døgnet rundt: Assistance available around the clock.
- 30-dages returret eller ombytning: Policy for product satisfaction.
- Livsvarig teknisk support: Ongoing support for the lifespan of your product.
For support inquiries, please refer to the contact information provided in your product packaging or visit the official Magcubic webwebsted.

Image 12.1: Magcubic Customer Service Commitment.


