1. Introduktion
The Minisopuru DS802PRO iMac Hub is designed to expand the connectivity and storage capabilities of your iMac 24-inch (M1/M3/M4 models). This all-in-one docking station integrates essential ports and an M.2 SSD enclosure, providing a seamless and efficient workspace solution.
2. Produktfunktioner
- 4K@60Hz HDMI-udgang: Supports high-definition video output for multi-screen expansion, enhancing productivity.
- 2.5 GbE Ethernet: Provides a stable and fast wired network connection, 2.5 times faster than standard Gigabit Ethernet.
- Dedicated 7.5W USB-C Charging: Convenient front-facing USB-C port for charging peripherals.
- Relocated Audio Port: Easily accessible 3.5mm audio port on the side for headphones or speakers.
- M.2 SSD-kabinet: Supports M.2 NVMe or M.2 SATA SSDs (2230/2242/2260/2280) up to 4TB for expanded storage (SSD not included). Max 10Gbps transfer speed.
- Højhastigheds-USB-porte: Includes 2x USB-A 2.0 (Max 480Mbps), 1x USB-A Gen2 (Max 10Gbps), and 1x USB-C Gen2 (Max 10Gbps) for various peripherals.
- SD/TF-kortpladser: High-speed slots for convenient data transfer from SD and MicroSD cards.
- Alt-i-et design: Hidden bottom design integrates perfectly with the iMac stand, maintaining a clean desktop aesthetic. Features anti-slip pads for device safety.
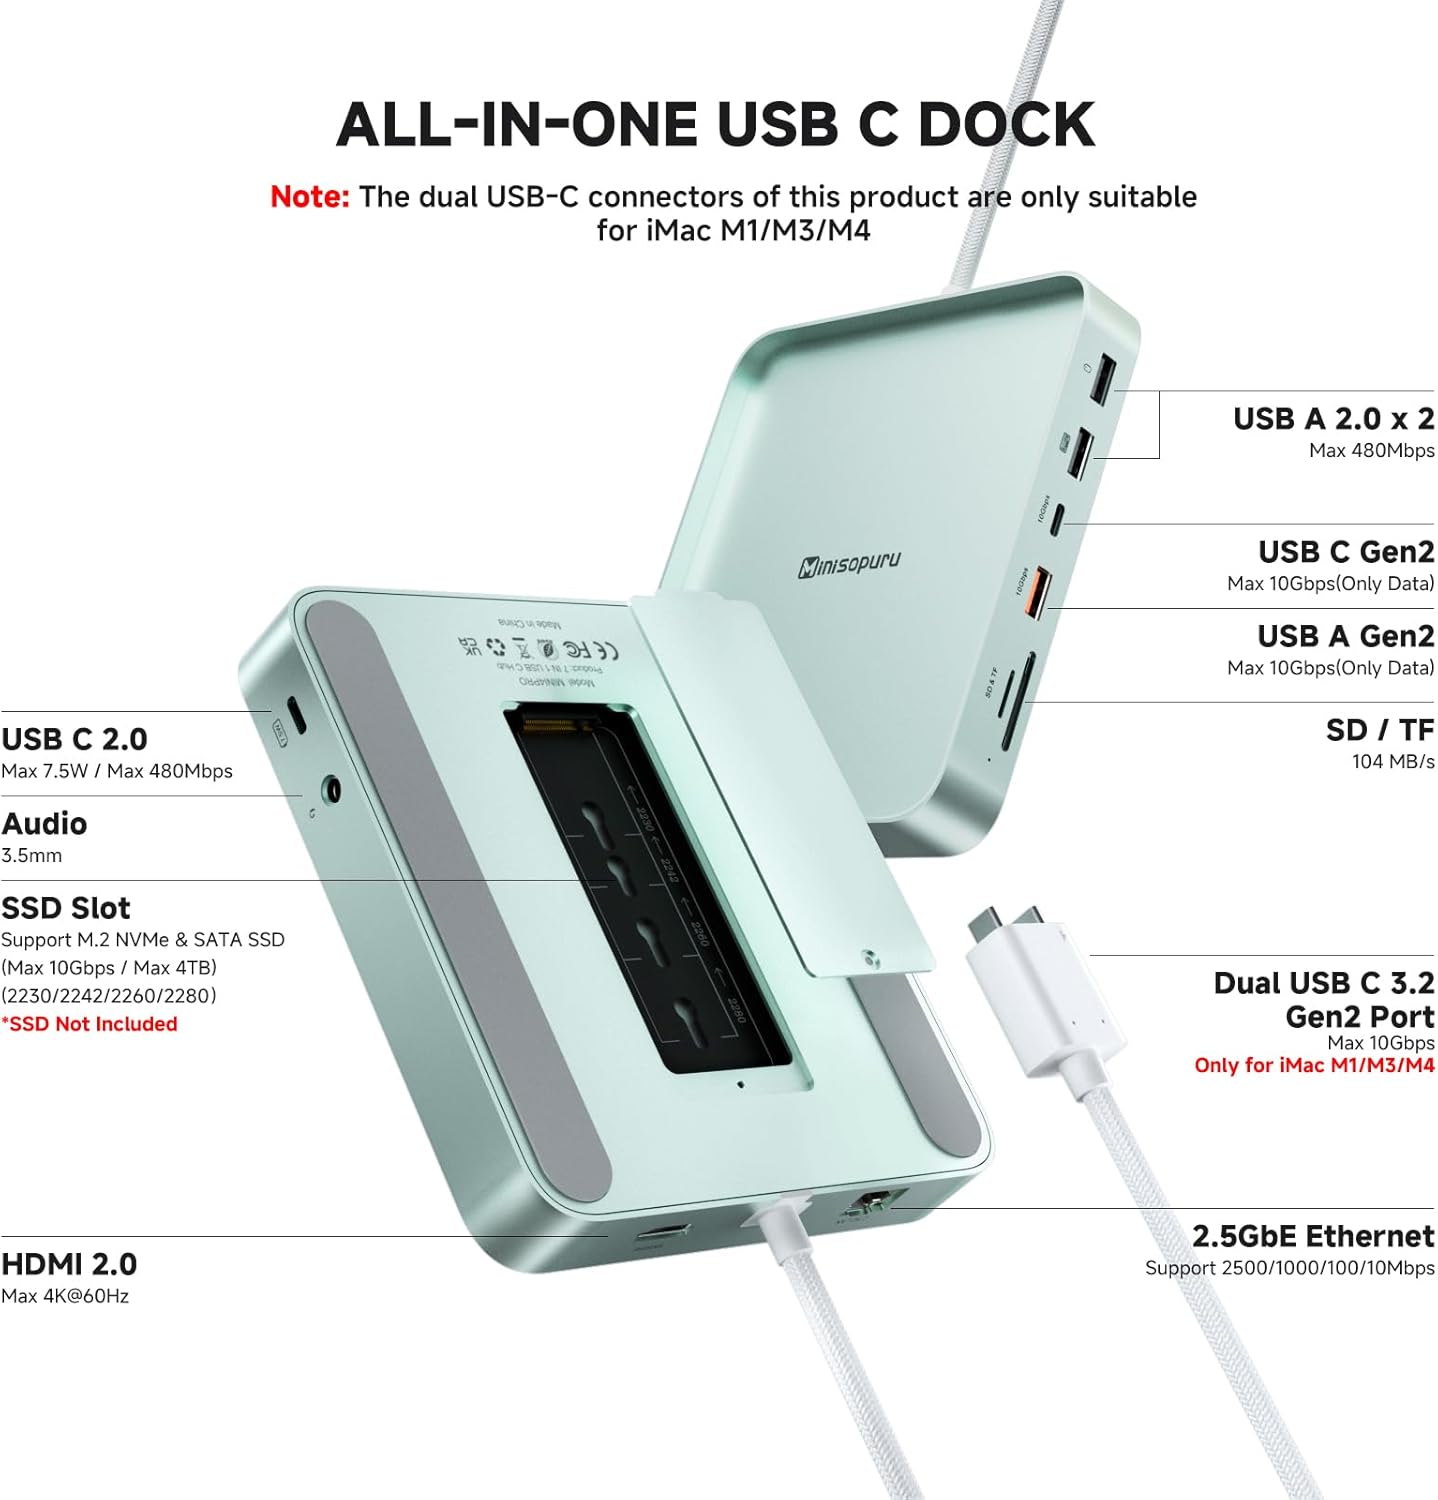
Figur 1: Overview of the Minisopuru DS802PRO iMac Hub and its various ports.

Figure 2: The hub supports 4K@60Hz HDMI output for enhanced multi-screen setups.
3. Pakkens indhold
- 1 x Minisopuru iMac Hub (DS802PRO)
- 1 x Cooling Pad
- 1 x brugermanual
- 1 x skruetrækker
- Screws for SSD installation
- Termisk ledende silikonepude
4. Opsætning og installation
4.1. Installation af M.2 SSD
- Remove the bottom plate of the hub by unscrewing the screw.
- Fix the nut onto the PCB slot.
- Insert the SSD card into the M.2 slot and fix it with screws.
- Apply the thermal conductive silicone pad onto the SSD.
- Finally, close the bottom plate and tighten the screws.
Video 1: Detailed guide on how to install an M.2 SSD into the Minisopuru DS802PRO hub.

Figure 3: Step-by-step diagram for M.2 SSD installation.
4.2. Connecting to iMac
- Place the Minisopuru DS802PRO hub directly under your iMac's stand.
- Connect the integrated USB-C cable from the hub to one of the Thunderbolt/USB-C ports on the back of your iMac. Ensure a secure connection.
- If your iMac (M1/M3) has four ports, connect at least one Thunderbolt port for optimal performance.
Video 2: Demonstration of connecting the Minisopuru DS802PRO hub to an iMac.

Figure 4: Recommended USB-C connection points for iMac models with four ports.
4.3. Formatting the SSD
After installing a new SSD, it needs to be formatted by your iMac to be recognized and usable. Follow these steps:
- Connect the hub to your iMac.
- When prompted, select 'Initialize' for the new disk.
- In Disk Utility, select the newly installed SSD.
- Choose 'Erase' and select a suitable format (e.g., APFS or Mac OS Extended (Journaled)) and scheme (e.g., GUID Partition Map).
- Rename the drive if desired (e.g., 'TM Backups').
- Confirm the erase process. Once complete, the SSD will be ready for use.
Video 3: Instructions on how to format an SSD for use with your iMac.
5. Betjeningsvejledning
5.1. Portbrug
The Minisopuru DS802PRO provides a variety of easily accessible ports on its front and sides:
- SD/TF-kortpladser: Insert your SD or MicroSD cards for quick data transfer.
- USB-A 2.0-porte: Connect standard USB devices like keyboards, mice, or older peripherals.
- USB-A Gen2 Port: For high-speed data transfer devices up to 10Gbps.
- USB-C Gen2 Port: For high-speed data transfer and 7.5W charging of compatible USB-C devices.
- HDMI 2.0 port: Connect an external monitor for 4K@60Hz video output.
- 2.5GbE Ethernet Port: Connect an Ethernet cable for a stable and fast internet connection.
- 3.5 mm lydport: Tilslut hovedtelefoner eller eksterne højttalere.
5.2. Display Modes (HDMI)
When connecting an external monitor via HDMI, you can configure your display settings on your iMac:
- MirrorMode: Duplicates your iMac's display on the external monitor.
- Udvid tilstand: Udvider dit skrivebord på tværs af begge skærme, hvilket giver mere arbejdsplads.
5.3. Selecting Audio Output
If you connect headphones or speakers to the hub's audio port, you may need to manually select it as the output device on your iMac:
- Go to System Settings (or System Preferences) on your iMac.
- Navigate to 'Sound' and then 'Output'.
- Select the connected audio device (e.g., 'USB Audio Device' or similar) from the list.
Video 4: Guide on how to select the correct audio output on your iMac when using the hub.
6. Specifikationer
| Feature | Detalje |
|---|---|
| Model | DS802PRO |
| Kompatibilitet | iMac 24-inch M1/M3/M4 (2021/2023/2024) |
| HDMI udgang | 4K@60Hz |
| Ethernet | 2.5GbE (2500/1000/100/10Mbps) |
| USB-C opladning | 7.5W (Dedicated port) |
| M.2 SSD-understøttelse | NVMe/SATA, Max 4TB, 10Gbps (2230/2242/2260/2280) |
| USB-A porte | 2x USB-A 2.0 (480Mbps), 1x USB-A Gen2 (10Gbps) |
| USB-C porte | 1x USB-C Gen2 (10Gbps) |
| Kortpladser | SD, TF (High-speed) |
| Audio Port | 3.5 mm |
| Dimensioner | 7.24 x 7.2 x 1.65 tommer |
| Vægt | 1.1 pund (ca. 375 g) |
| Kabellængde | 15.7 tommer |
7. Fejlfinding
- Enhed ikke genkendt: Ensure all USB-C connections between the hub and your iMac are secure. Try disconnecting and reconnecting the hub.
- SSD Not Appearing: Verify the M.2 SSD is correctly installed and securely fastened within the enclosure. Ensure the SSD has been properly formatted using Disk Utility (refer to Section 4.3).
- Display Issues (HDMI): Check the HDMI cable connection between the hub and your external monitor. Ensure your iMac's display settings are configured for the desired Mirror or Extend mode.
- Ingen lydoutput: Confirm that the audio device connected to the hub's 3.5mm port is selected as the output device in your iMac's Sound settings (refer to Section 5.3).
- Langsom dataoverførsel: Ensure you are using the appropriate USB 3.0/Gen2 ports for high-speed devices. Check that your cables are also rated for high-speed transfer.
8. Sikkerhed og pleje
- Opbevar enheden et tørt sted og væk fra direkte sollys.
- Undgå at udsætte enheden for ekstreme temperaturer eller fugt.
- Do not attempt to disassemble, modify, or repair the device yourself. This may void your warranty and cause damage.
- Rengør enheden med en blød, tør klud. Undgå at bruge skrappe kemikalier eller slibende materialer.
- The product has undergone 9 functional tests (High/Low Temperature, Temperature Cycle, Salt Spray, Swing, Plug-Unplug, Vibration, Drop, Overvoltage Charging Protection, Overcurrent Charging Protection) to ensure safety and durability.
9. Garanti og support
For warranty information, technical support, or any inquiries regarding your Minisopuru DS802PRO iMac Hub, please refer to the contact details provided in the original product packaging or visit the official Minisopuru webwebsted.

