Produkt overview
The MARS HYDRO 3x3 Grow Tent Kit is a complete indoor growing solution designed for efficient plant cultivation. This comprehensive system includes a high-quality grow tent, a powerful LED grow light, an efficient ventilation system, a plant humidifier, and various essential accessories to create an optimal growing environment.
Sættets komponenter:
- TS1000 LED Grow Light
- 32"x32"x63" Grow Tent (1680D High Reflective Mylar)
- 5L Plant Humidifier
- 4-inch 205 CFM Inline Fan with Speed Controller
- Kulfilter
- 25 fods kanal
- 6-tommer klipsventilator
- Dyrkeværelsesbriller
- Elastisk espalieret
- 2 stk. ventilationsdæksler
- 3 stk. rustfrit stålamps
- 4 stk. dyrkningsposer
- Timer
- Fugt termometer
- Beskæringsaks
- 2 stk. hjørnehylde
- 2 stk. rebhængere
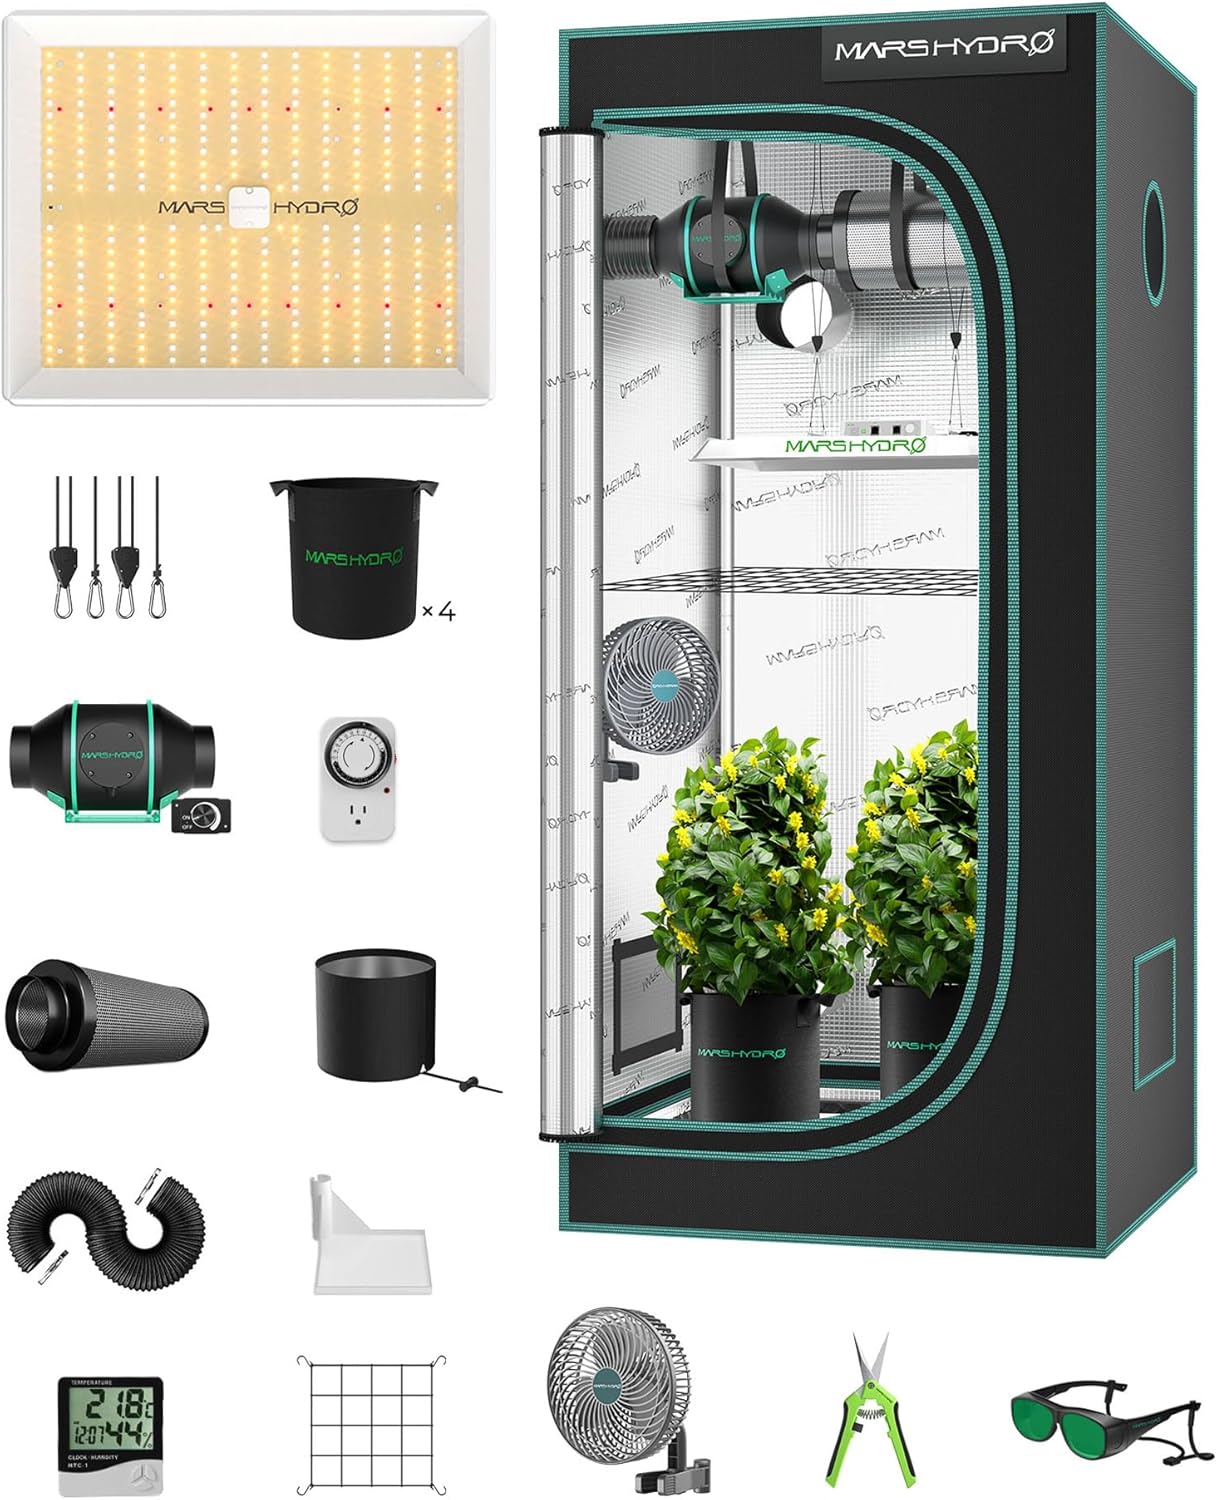
Figure 1: Complete MARS HYDRO 3x3 Grow Tent Kit showing all included components.
Opsætningsinstruktioner
Follow these steps to properly set up your MARS HYDRO Grow Tent Kit.
1. Montering af dyrkningstelt
- Saml rammen: Connect the metal poles according to the included diagram to form the base, sides, and roof of the tent frame. Ensure all connections are secure.
- Fastgør stoffet: Carefully pull the tent fabric over the assembled frame. Start from the bottom and work your way up, ensuring the zippers are aligned.
- Secure the Fabric: Zip up the tent completely. Ensure there are no gaps or light leaks.

Figur 2: Eksploderet view of the grow tent components, illustrating the frame and fabric.
2. LED Grow Light Installation (TS1000)
- Fastgør rebhængere: Securely attach the provided rope hangers to the top corners of the TS1000 LED grow light.
- Monter lyset: Hang the light inside the tent from the top crossbars using the rope hangers. Adjust the height as needed for your plants' growth stage.
- Tilslut strøm: Plug the power cord into the LED light and then into a grounded power outlet or timer.

Figure 3: The TS1000 LED grow light, ready for installation.
3. Opsætning af ventilationssystem
- Install Inline Fan: Hang the 4-inch inline fan inside the tent using the provided straps or hangers. Position it near an exhaust port.
- Connect Carbon Filter: Attach one end of the 25ft ducting to the carbon filter and the other end to the intake side of the inline fan. Use stainless clamps for at sikre forbindelser.
- Connect Exhaust Ducting: Attach another section of ducting to the exhaust side of the inline fan and route it out of the tent through an exhaust port.
- Connect Speed Controller: Plug the inline fan into the speed controller, and then plug the speed controller into a power outlet.

Figure 4: The 4-inch inline fan and carbon filter, essential for air purification and circulation.
4. Humidifier Setup
- Place Humidifier: Position the 5L plant humidifier on a stable, flat surface inside the grow tent, away from direct water splashes.
- Fyld vandtank: Remove the water tank, fill it with distilled or purified water, and place it back onto the base.
- Tilslut strøm: Sæt luftfugteren i en stikkontakt.

Figure 5: The 5L plant humidifier, showing its main unit, remote control, and mist output hose.
5. Accessory Placement
- Klipsventilator: Attach the 6-inch clip fan to a tent pole to provide air circulation within the canopy.
- Humidity Thermometer: Place the thermometer at plant level to monitor temperature and humidity.
- Grow Bags: Fill the grow bags with your preferred growing medium and place your plants inside.
- Espaliernet: Install the elastic trellis netting above your plants for support as they grow.
Betjeningsvejledning
Learn how to operate the various components of your grow tent kit for optimal performance.
1. Betjening af LED-vækstlys
- Tænd/sluk: Use the power switch on the light or connect it to a timer for automated cycles.
- Dæmpningsfunktion: The TS1000 features a dimming knob (0-100%) to adjust light intensity. Rotate the knob to increase or decrease brightness. This allows for energy saving and adaptation to different plant growth stages.

Figure 6: Detail of the TS1000 LED light's dimming knob and control ports.
2. Ventilation System Operation
- Juster blæserhastighed: Use the speed controller to adjust the inline fan's RPM from 0 to 100%. This controls the airflow (up to 205 CFM) and helps manage temperature and humidity.
- Luftstrømsstyring: Ensure proper air exchange to remove stale air, excess heat, and odors. The carbon filter effectively removes impurities.

Figur 7: Intern view of the inline fan, highlighting its efficient EC motor and low noise operation (26.8 dB).
3. Humidifier Operation
- Tænd/sluk: Press the power button on the humidifier or use the remote control.
- Adjust Humidity Levels: Use the control panel or remote to set desired humidity levels (35%-95%). The humidifier will automatically maintain this level.
- Tågeoutput: Select from 4 levels of mist output (155mL/h to 580mL/h) to achieve the ideal humidity.
- Timer funktion: Set the humidifier to operate for a specific duration (1-12 hours) using the timer function.

Figure 8: The humidifier's intuitive touch control panel and remote control for easy operation.

Figure 9: Visual representation of the four adjustable mist output levels of the humidifier.
Opretholdelse
Regular maintenance ensures the longevity and efficiency of your grow tent kit.
- Rengøring af dyrkningstelt: Periodically wipe down the interior mylar lining with a damp cloth to remove dust and debris. Ensure the tent is dry before zipping it up.
- LED lys rengøring: Gently wipe the LED board and reflector with a soft, dry cloth to remove any dust. Do not use liquid cleaners.
- Udskiftning af kulfilter: The carbon filter's effectiveness diminishes over time. Replace it every 6-12 months depending on usage and air quality.
- Rengøring af luftfugter: Clean the water tank and base regularly to prevent mineral buildup and mold growth. Refer to the humidifier's specific manual for detailed cleaning instructions. Refill with fresh, clean water as needed.
Fejlfinding
Her er løsninger på almindelige problemer, du kan støde på.
| Problem | Mulig årsag | Løsning |
|---|---|---|
| LED-lys tænder ikke | Loose power connection, faulty outlet, light switch off, timer issue. | Check all power connections. Test the outlet with another device. Ensure the light's power switch is on. Verify timer settings. |
| Ventilator kører ikke | Power disconnected, speed controller off/faulty, fan motor issue. | Ensure fan and speed controller are plugged in. Adjust speed controller. Check for obstructions in the fan blades. |
| Humidity Too Low/High | Humidifier settings incorrect, water tank empty, tent ventilation too high/low. | Adjust humidifier settings. Refill water tank. Adjust inline fan speed to control air exchange. |
| Ubehagelige lugte | Carbon filter saturated, insufficient ventilation. | Replace carbon filter. Increase inline fan speed to improve air exchange. |
Specifikationer
| Komponent | Specifikation |
|---|---|
| Dimensioner af dyrkningstelt | 32 cm L x 32 cm B x 63 cm H |
| Grow Tent Material (Inner) | 1680D Diamond Mylar (High Reflective) |
| Grow Tent Material (Outer) | Polyester |
| Materiale til vækstteltstel | Metal (0.8mm thickness) |
| LED Grow Light Model | TS1000 |
| LED Grow Light Wattage | 150W (with 354 LEDs) |
| Luftfugterkapacitet | 5 liter |
| Størrelse på indbygget ventilator | 4 tommer |
| Inline-ventilatorluftstrøm | 205 CFM |
| Inline Fan Noise Level | 26.8 dB |
Garanti og support
MARS HYDRO products typically come with a manufacturer's warranty. Please refer to the official MARS HYDRO website or the warranty card included with your purchase for specific warranty terms and conditions.
For technical support, troubleshooting assistance, or warranty claims, please contact MARS HYDRO customer service directly. Contact information can usually be found on their official webwebstedet eller på produktemballagen.
Webwebsted: www.mars-hydro.com (Please verify the most current contact information on their official site.)


