Indledning
This manual provides comprehensive instructions for the safe and efficient operation, maintenance, and troubleshooting of your KITCHENARM 19-in-1 HANDY Bread Machine, Model 851011. Please read this manual thoroughly before first use and retain it for future reference.

Figure 1: KITCHENARM 19-in-1 HANDY Bread Machine (Model 851011).
Pakkens indhold
Verify that all items are present and in good condition upon opening the package. If any items are missing or damaged, contact customer service.
- 1 x KITCHENARM Bread Machine (Model KA8510)
- 1 x User Manual & Recipe Book
- 2 x Kneading Paddles (one for use, one spare)
- 1 x Metal Hook for paddle removal
- 1 x US Three-Prong Plug (integrated)
- 1 x Non-Stick Bread Pan (2LB Vertical Pan)
- 2 x Cup-Spoon Sets (measuring cups and spoons)
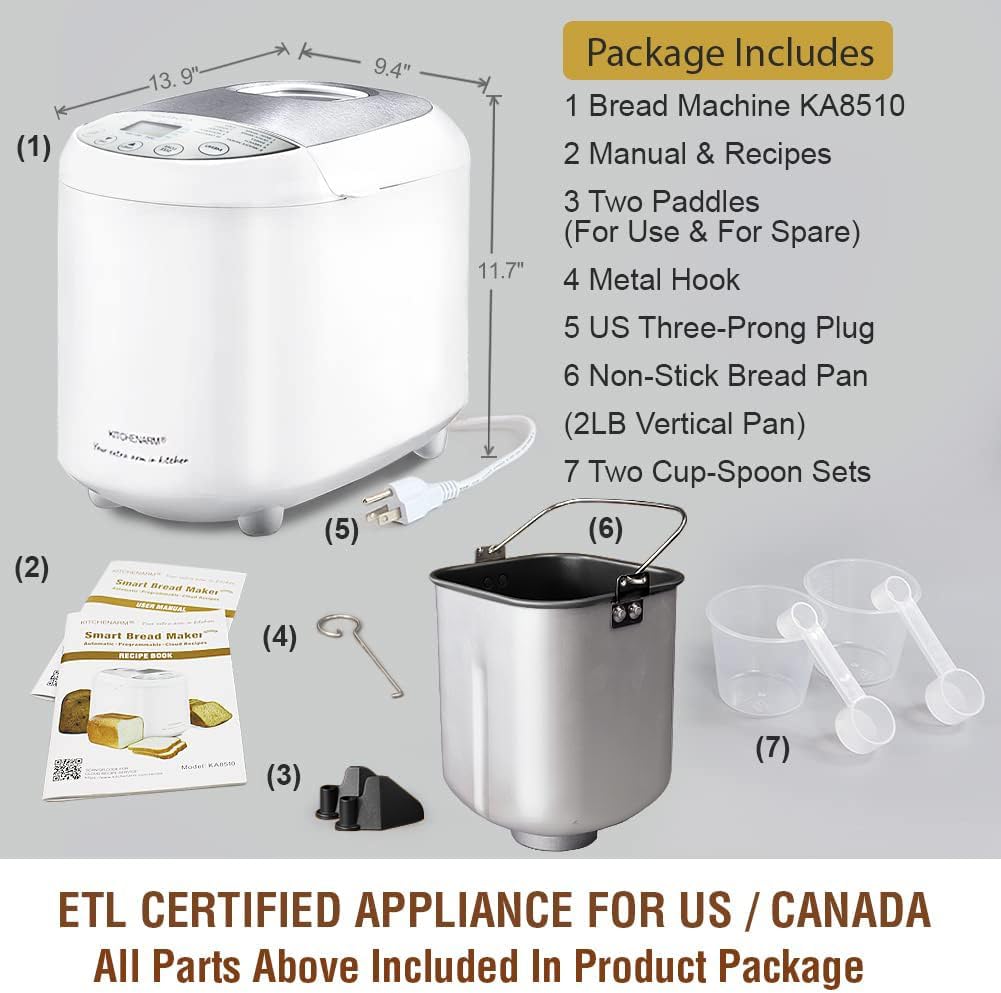
Figur 2: Medfølgende tilbehør og komponenter.
Vigtige sikkerhedsinstruktioner
Ved brug af elektriske apparater skal grundlæggende sikkerhedsforanstaltninger altid følges, herunder følgende:
- Læs alle instruktioner.
- Rør ikke ved varme overflader. Brug håndtag eller knopper.
- For at beskytte mod elektrisk stød må ledning, stik eller apparat ikke nedsænkes i vand eller anden væske.
- Tæt opsyn er nødvendigt, når et apparat bruges af eller i nærheden af børn.
- Træk stikket ud af stikkontakten, når det ikke er i brug, og før rengøring. Lad det køle af, før du sætter dele på eller af.
- Betjen ikke noget apparat med en beskadiget ledning eller stik, eller efter at apparatet ikke fungerer korrekt eller er blevet beskadiget på nogen måde. Returner apparatet til det nærmeste autoriserede serviceværksted for undersøgelse, reparation eller justering.
- Brug af tilbehør, der ikke er anbefalet af apparatets producent, kan forårsage skader.
- Må ikke bruges udendørs.
- Lad ikke ledningen hænge ud over kanten af bordet eller bordpladen eller røre ved varme overflader.
- Må ikke placeres på eller i nærheden af en varm gas- eller elektrisk brænder eller i en opvarmet ovn.
- Der skal udvises ekstrem forsigtighed ved flytning af et apparat, der indeholder varm olie eller andre varme væsker.
- For at afbryde forbindelsen skal du slukke for en hvilken som helst knap og derefter tage stikket ud af stikkontakten.
- Brug ikke apparatet til andet end tilsigtet brug.
- Dette apparat har et polariseret stik (det ene blad er bredere end det andet). For at reducere risikoen for elektrisk stød er dette stik beregnet til kun at passe i en polariseret stikkontakt på én måde. Hvis stikket ikke passer helt ind i stikkontakten, vend stikket om. Hvis det stadig ikke passer, skal du kontakte en kvalificeret elektriker. Forsøg ikke at ændre stikket på nogen måde.
GEM DISSE INSTRUKTIONER.
Opsætning og første brug
Before First Use: Initial Burn-Off
Before using your bread machine for the first time, it is recommended to perform an initial burn-off cycle to eliminate any manufacturing odors or residues. This process takes approximately 10 minutes.
- Remove all packaging materials and accessories from the bread machine.
- Wipe the interior and exterior of the machine with a damp cloth. Ensure the bread pan and kneading paddle are clean and dry.
- Place the empty bread pan with the kneading paddle inserted into the machine. Close the lid.
- Plug the bread machine into a grounded electrical outlet.
- Select a short baking program (e.g., "Bake" or "Home Made" with a short duration if customizable, or simply run an empty cycle for 10 minutes).
- Allow the machine to run for approximately 10 minutes. A slight odor or smoke may be present; this is normal.
- Unplug the machine and allow it to cool completely for at least 2 hours before proceeding with actual bread making.
Komponentidentifikation

Figure 3: Key components of the bread machine.
- Dampventiler: Release steam during baking. Do not block.
- Stor Viewing vindue: Allows observation of the bread-making process.
- Rustfrit stål låg: Holdbar og nem at rengøre.
- Kontrolpanel med LCD-skærm: For program selection, settings, and status display.
- Brødform: Non-stick pan where ingredients are mixed, kneaded, risen, and baked.
- Æltepaddel: Mixes and kneads the dough.
Betjeningsvejledning
Grundlæggende trin til brødbagning
Follow these general steps for most bread recipes. Refer to the included recipe book for specific ingredient quantities and program recommendations.
- Indsæt æltepaddel: Placer æltepadden på skaftet inde i brødformen.
- Tilføj ingredienser: Add ingredients to the bread pan in the order specified by your recipe (typically liquids first, then dry ingredients, with yeast added last, often in a small well on top of the flour).
- Placer brødformen: Sæt brødformen i brødmaskinen, og sørg for, at den klikker sikkert på plads. Luk låget.
- Vælg program: Plug in the machine. Use the "MENU" button to select the desired program (e.g., Basic White, French, Gluten Free).
- Vælg brødstørrelse og skorpefarve: Use the "LOAF SIZE" button to choose 1LB, 1.5LB, or 2LB. Use the "CRUST COLOR" button to select Light, Medium, or Dark.
- Start cyklus: Press the "START/STOP" button to begin the bread-making cycle. The machine will automatically mix, knead, rise, and bake.
- Fjern brød: Once the cycle is complete (indicated by a beep), unplug the machine. Carefully remove the hot bread pan using oven mitts. Invert the pan to release the bread onto a wire rack to cool. Use the metal hook to remove the kneading paddle from the loaf if it remains embedded.

Figure 4: Unique 1-Press Bread Making process.
Tilgængelige programmer
Your KITCHENARM bread machine features 19 pre-programmed menus, including 12 bread menus and 7 non-bread menus. Each program is optimized for specific recipes.
| Ingen. | Programnavn | Description / Typical Use |
|---|---|---|
| 1 | Basic hvid | Til hvidt og blandet brød. |
| 2 | Ekspres Hvid | Faster cycle for white bread. |
| 3 | Sød | Til brød med højt sukkerindhold. |
| 4 | fransk | For light breads with a crispy crust. |
| 5 | Glutenfri | Specielt til glutenfri opskrifter. |
| 6 | Fuld hvede | For whole wheat flour breads. |
| 7 | Mørk rug | For rye bread recipes. |
| 8 | Multikorn | Til brød med forskellige kornsorter. |
| 9 | SD Starter | For preparing sourdough starter. |
| 10 | Surdej | For baking sourdough bread. |
| 11 | Dej | Prepares dough for manual shaping and baking. |
| 12 | Keto | For low-carb, ketogenic bread recipes. |
| 13 | Hurtigt brød | For quick breads using baking powder/soda. |
| 14 | Kage | Til bagning af kager. |
| 15 | Marmelade | Til at lave hjemmelavet marmelade. |
| 16 | Yoghurt | Til tilberedning af yoghurt. |
| 17 | Ælte | Only performs kneading cycle. |
| 18 | Bage | Only performs baking cycle. |
| 19 | Home Made | Customizable program for advanced users. |
The machine supports 3 loaf sizes (1LB, 1.5LB, 2LB) and 3 crust colors (Dark, Medium, Light). It also features a 15-Hour Delay Timer and an ADD-NUTS Alarm for adding ingredients at the appropriate time.

Figur 5: Eksamples of items that can be prepared with the 19 programs.
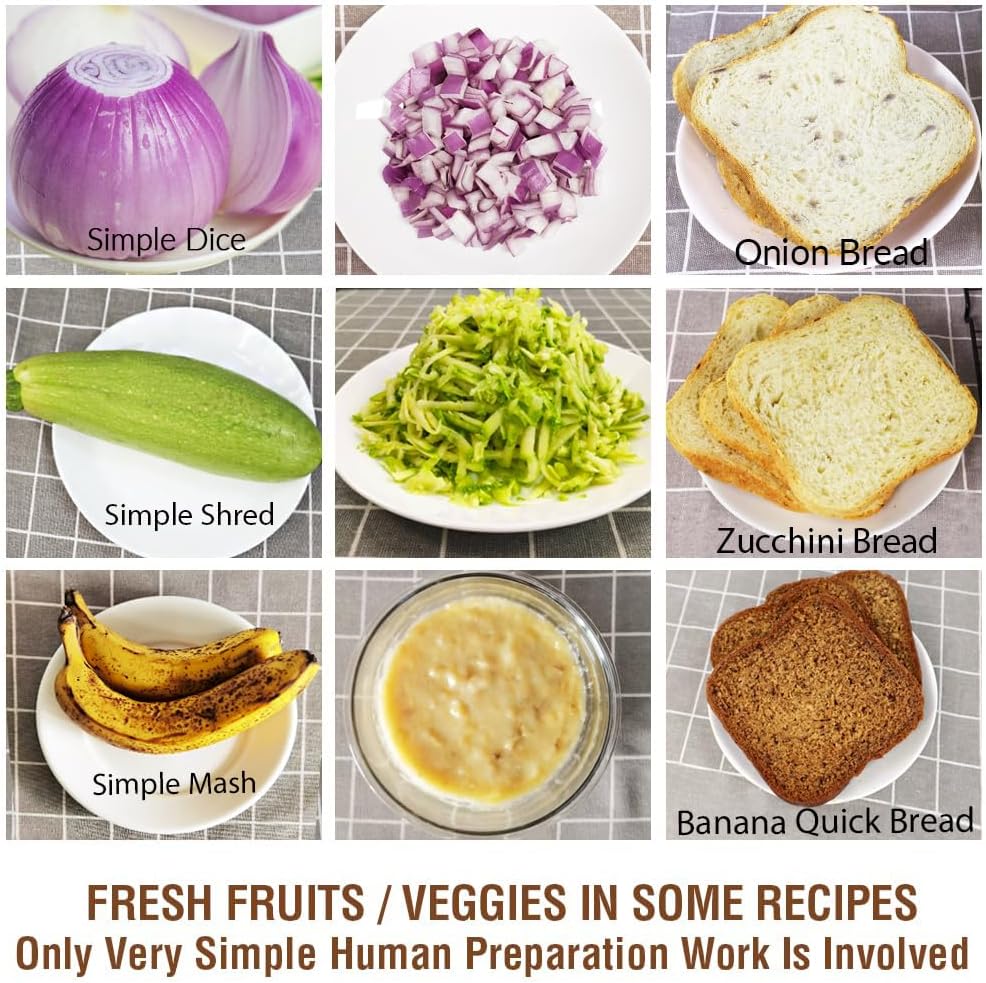
Figure 6: Preparation of fresh fruits and vegetables for recipes.
Pleje og vedligeholdelse
Rensning
Proper cleaning ensures the longevity and performance of your bread machine. Always unplug the machine and allow it to cool completely before cleaning.
- Brødform og æltepad: The non-stick bread pan and kneading paddle should be hand washed only with warm, soapy water. Do not use abrasive cleaners or metal scouring pads, as this can damage the non-stick coating. Rinse thoroughly and dry completely.
- Ydre: Wipe the exterior body and control panel with a soft, damp klud. Hovedenheden må ikke nedsænkes i vand eller andre væsker.
- Indre: Brug en blød, damp klud til at tørre bagekammerets inderside af. Fjern eventuelle krummer eller rester.
- Låg: The stainless steel lid can be wiped clean with a damp klud. Sørg for, at viewing window is clear.
Opbevaring
Store the bread machine in a cool, dry place when not in use. Ensure all components are clean and dry before storage.
Fejlfinding
Dette afsnit omhandler almindelige problemer, du kan støde på. Ved problemer, der ikke er nævnt her, bedes du kontakte kundeservice.
| Problem | Mulig årsag | Løsning |
|---|---|---|
| Brødet hæver ikke eller hæver for meget. | Incorrect yeast amount, expired yeast, incorrect water temperature, incorrect flour type, too much or too little liquid. | Ensure yeast is fresh and active. Use correct water temperature (lukewarm for active dry yeast). Measure ingredients precisely, preferably by weight. Refer to recipe book for correct flour type. |
| Brødet er for tæt eller tungt. | Too much flour, too little liquid, old yeast, incorrect program. | Reduce flour slightly or increase liquid. Check yeast freshness. Ensure correct program is selected for the recipe. |
| Brødet har et stort hul i bunden. | Kneading paddle left in bread during baking. | Some programs allow for removal of the kneading paddle before the final rise. Consult your recipe book or manual for specific program timings. Use the metal hook to remove the paddle after baking. |
| Machine does not start or respond. | Ikke tilsluttet, strømmen er slukkettage, pan not properly seated, lid not closed. | Ensure the machine is securely plugged into a working outlet. Check circuit breaker. Ensure bread pan is fully inserted and lid is closed. |
| Høj støj under drift. | Bread pan not seated correctly, foreign object in pan, machine on uneven surface. | Ensure bread pan is securely locked in place. Check for any foreign objects. Place machine on a stable, flat surface. |
Produktspecifikationer
- Mærke: KØKKENARM
- Modelnummer: 851011
- Farve: White Body - Stainless Steel Lid & Chamber
- Produktmål (D x B x H): 9.4 cm x 13.9 cm x 11.7 cm
- Varens vægt: 11.97 pund
- Wattage: 550 watt
- Antal programmer: 19
- Brødstørrelser: 1LB, 1.5LB, 2LB
- Skorpefarver: Lys, medium, mørk
- Forsinkelsestimer: Op til 15 timer
- Certificeringer: ETL Certified for US / Canada
- Fabrikant: Kitchenarm LLC
- Produktpleje: Hand Wash Only (for bread pan and paddle)
Garanti og kundesupport
KITCHENARM is committed to providing high-quality products and excellent customer service.
- Produktgaranti: This product comes with a 2-YEAR Product Warranty.
- Kundeservice: LIFETIME Customer Service is provided, including access to Cloud Recipes and Recipe Customization assistance.
- Udskiftningsdele: Original replacement parts are available.
For warranty claims, technical support, or to inquire about replacement parts, please contact Kitchenarm LLC customer service through their official channels. Refer to the contact information provided in your product registration or on the official KITCHENARM webwebsted.

Figure 7: KITCHENARM commitment to warranty and customer service.

