1. Introduktion
This manual provides essential instructions for the setup, operation, and maintenance of your TMY Projector. Please read this manual thoroughly before using the product to ensure proper functionality and to maximize your viewoplevelse. Gem denne vejledning til fremtidig reference.
2. Produktet er slutview
2.1 Pakkens indhold
Bekræft at alle varer er til stede i pakken:
- TMY Projector Unit
- Fjernbetjening
- HDMI kabel
- Strømledning
- Garantikort
2.2 Nøglefunktioner
- Netflix Officially Licensed: Access streaming services directly without external devices.
- 1080P-opløsning: Leverer klare og detaljerede billeder.
- Electric Focus & Auto Keystone: Automatic image adjustment for optimal clarity and shape.
- 270° drejelig stativ: Flexible projection angles, including ceiling projection.
- Upgraded WiFi 6 Connectivity: Ensures stable and fast wireless streaming.
- Dual-Mode Bluetooth 5.2: Connects to external speakers or functions as a standalone Bluetooth speaker.
- Flere tilslutningsmuligheder: HDMI, USB, Phone/PC mirroring.
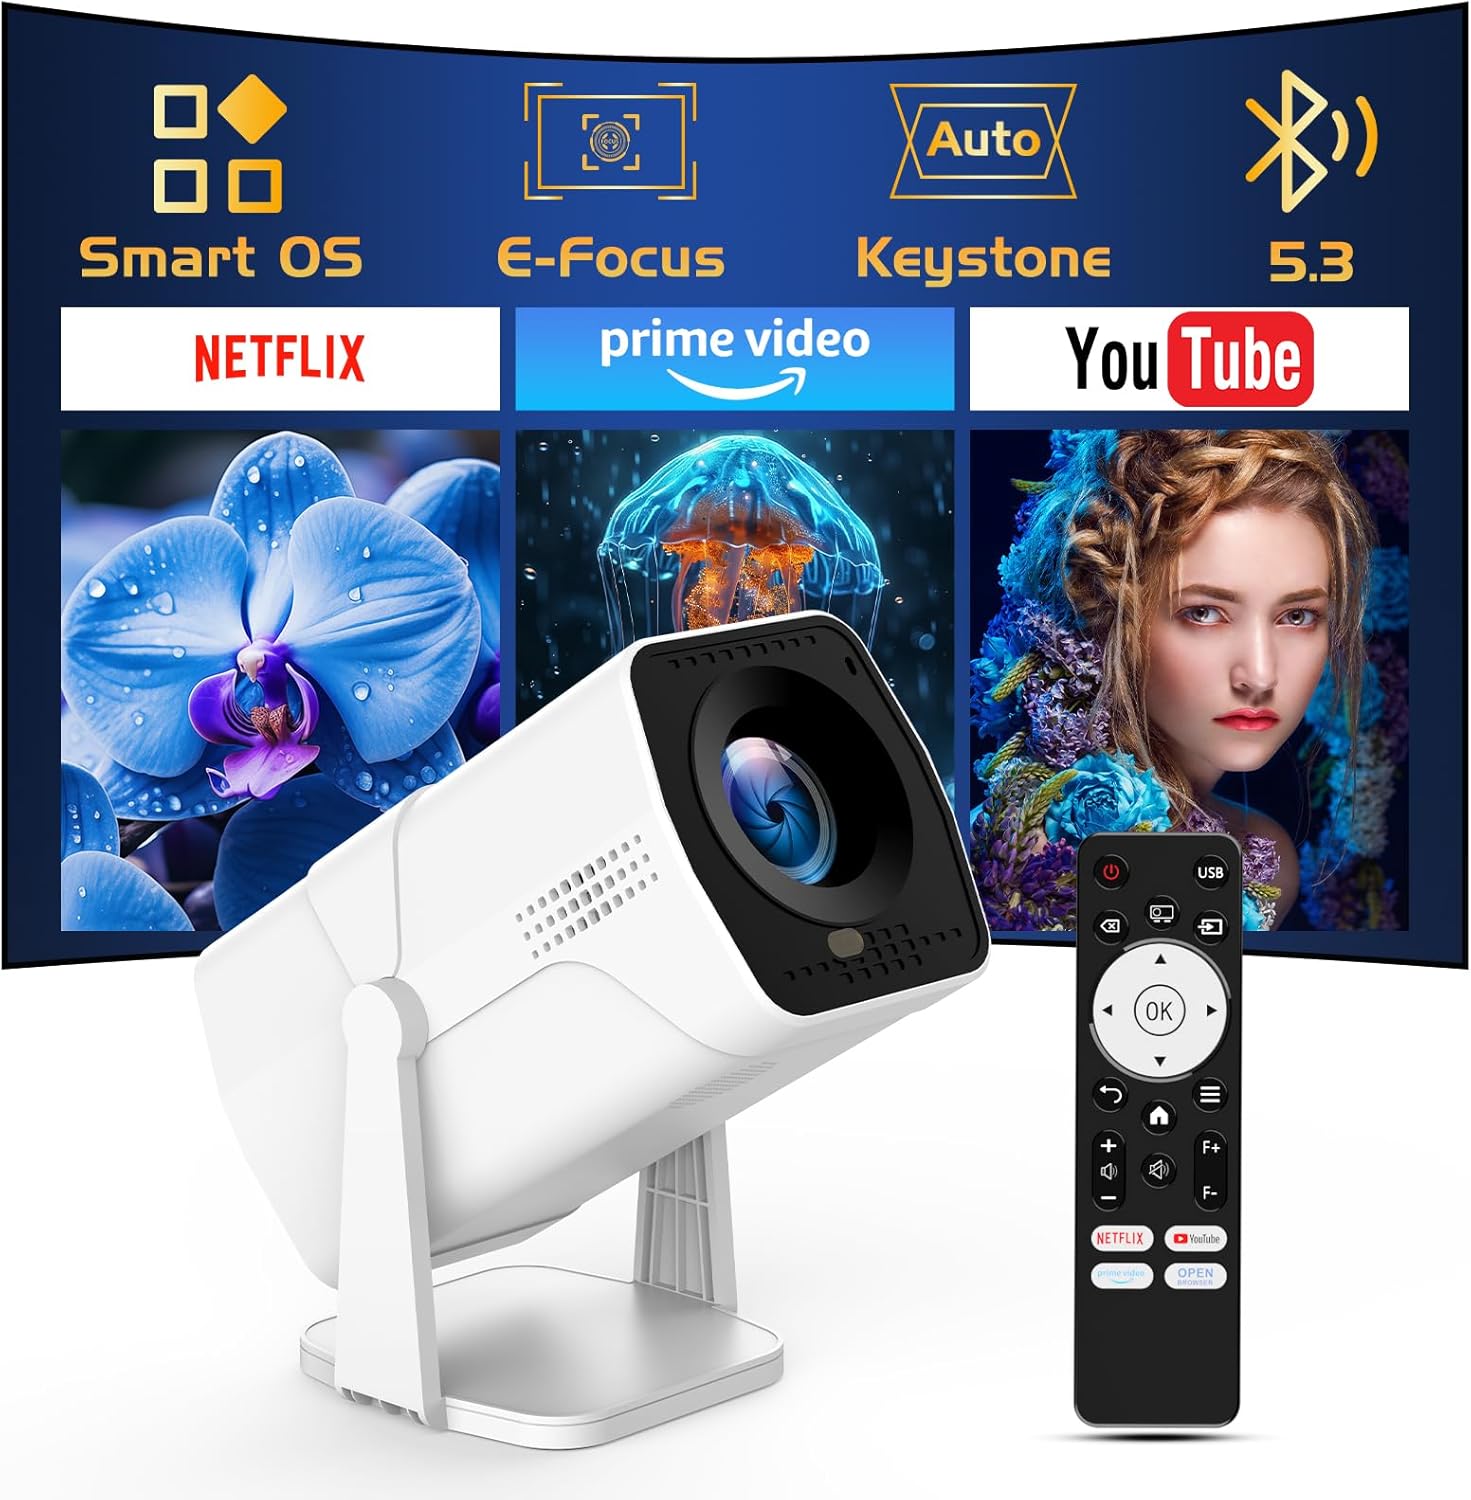
Image: The TMY Projector unit, its remote control, and a projected screen displaying logos for Smart OS, E-Focus, Auto Keystone, Bluetooth 5.3, Netflix, Prime Video, and YouTube.
3. Opsætning
3.1 Placering
Position the projector on a stable, flat surface. The 270° rotatable stand allows for versatile placement, including projecting onto walls or ceilings. Ensure adequate ventilation around the projector.

Image: A TMY Projector positioned on a bedside table, projecting an image onto the ceiling, demonstrating its 270° rotatable stand for multi-angle viewing.
3.2 Strømtilslutning
- Tilslut netledningen til projektorens strømindgang.
- Sæt den anden ende af netledningen i en almindelig stikkontakt.
3.3 Første opstart og fokusjustering
- Tryk på tænd/sluk-knappen på projektoren eller fjernbetjeningen for at tænde for enheden.
- Projektoren har Elektrisk fokus og Auto Keystone correction. The image will automatically adjust for clarity and a rectangular shape within approximately 2 seconds.
- If further adjustment is needed, use the remote control to fine-tune the focus.

Image: A TMY Projector projecting a vibrant image onto a screen, with an overlay illustrating the 'FOCUS' function and icons for Auto Keystone and 50%-100% Zoom.
3.4 Netværksforbindelse (WiFi)
The projector supports WiFi 6 for a fast and stable internet connection.
- Naviger til menuen 'Indstillinger' ved hjælp af fjernbetjeningen.
- Vælg 'Netværk' eller 'WiFi-indstillinger'.
- Choose your desired WiFi network from the list and enter the password.
- Bekræft forbindelsen.

Image: A TMY Projector wirelessly connected to a tablet, smartphone, and laptop, illustrating its WiFi 6 connectivity for faster streaming with no lagging.
3.5 Bluetooth-forbindelse
The projector features Dual-Mode Bluetooth 5.2 for audio connectivity.
- Projector Mode (Output): To connect to external Bluetooth speakers or soundbars: Navigate to 'Bluetooth Settings', enable Bluetooth, and pair with your audio device.
- Speaker Mode (Input): To use the projector's built-in speakers as a standalone Bluetooth speaker: Select 'Speaker Mode' in the Bluetooth settings. Your phone or other device can then connect to the projector to play audio.

Image: A TMY Projector illustrating its two-way Bluetooth 5.2 functionality, showing connections to a soundbar (Projector Mode) and a smartphone (Speaker Mode).
4. Betjening
4.1 Navigating the Smart OS
The projector runs on a smart TV operating system. Use the provided remote control to navigate menus, select applications, and control playback.

Image: The TMY Projector unit with a projected screen showing a grid of built-in smart OS applications, including Netflix, YouTube, Prime Video, TikTok, and others.
4.2 Accessing Built-in Apps
The projector comes with pre-installed and officially licensed applications such as Netflix, Prime Video, and YouTube. Access these directly from the home screen or through the 'App Store' for additional content.

Image: A TMY Projector projecting a screen filled with content from officially licensed apps like Netflix, Prime Video, and YouTube, with the remote control in the foreground.
4.3 Tilslutning af eksterne enheder
The projector offers multiple ports for connecting external devices:
- HDMI: Connect TV sticks, TV boxes, PCs/Laptops, or gaming consoles (e.g., PS).
- USB: Afspil medier files directly from USB drives or connect other USB accessories.
- Phone/PC Mirroring: Wirelessly mirror content from your smartphone or PC (refer to the on-screen instructions for specific mirroring protocols).
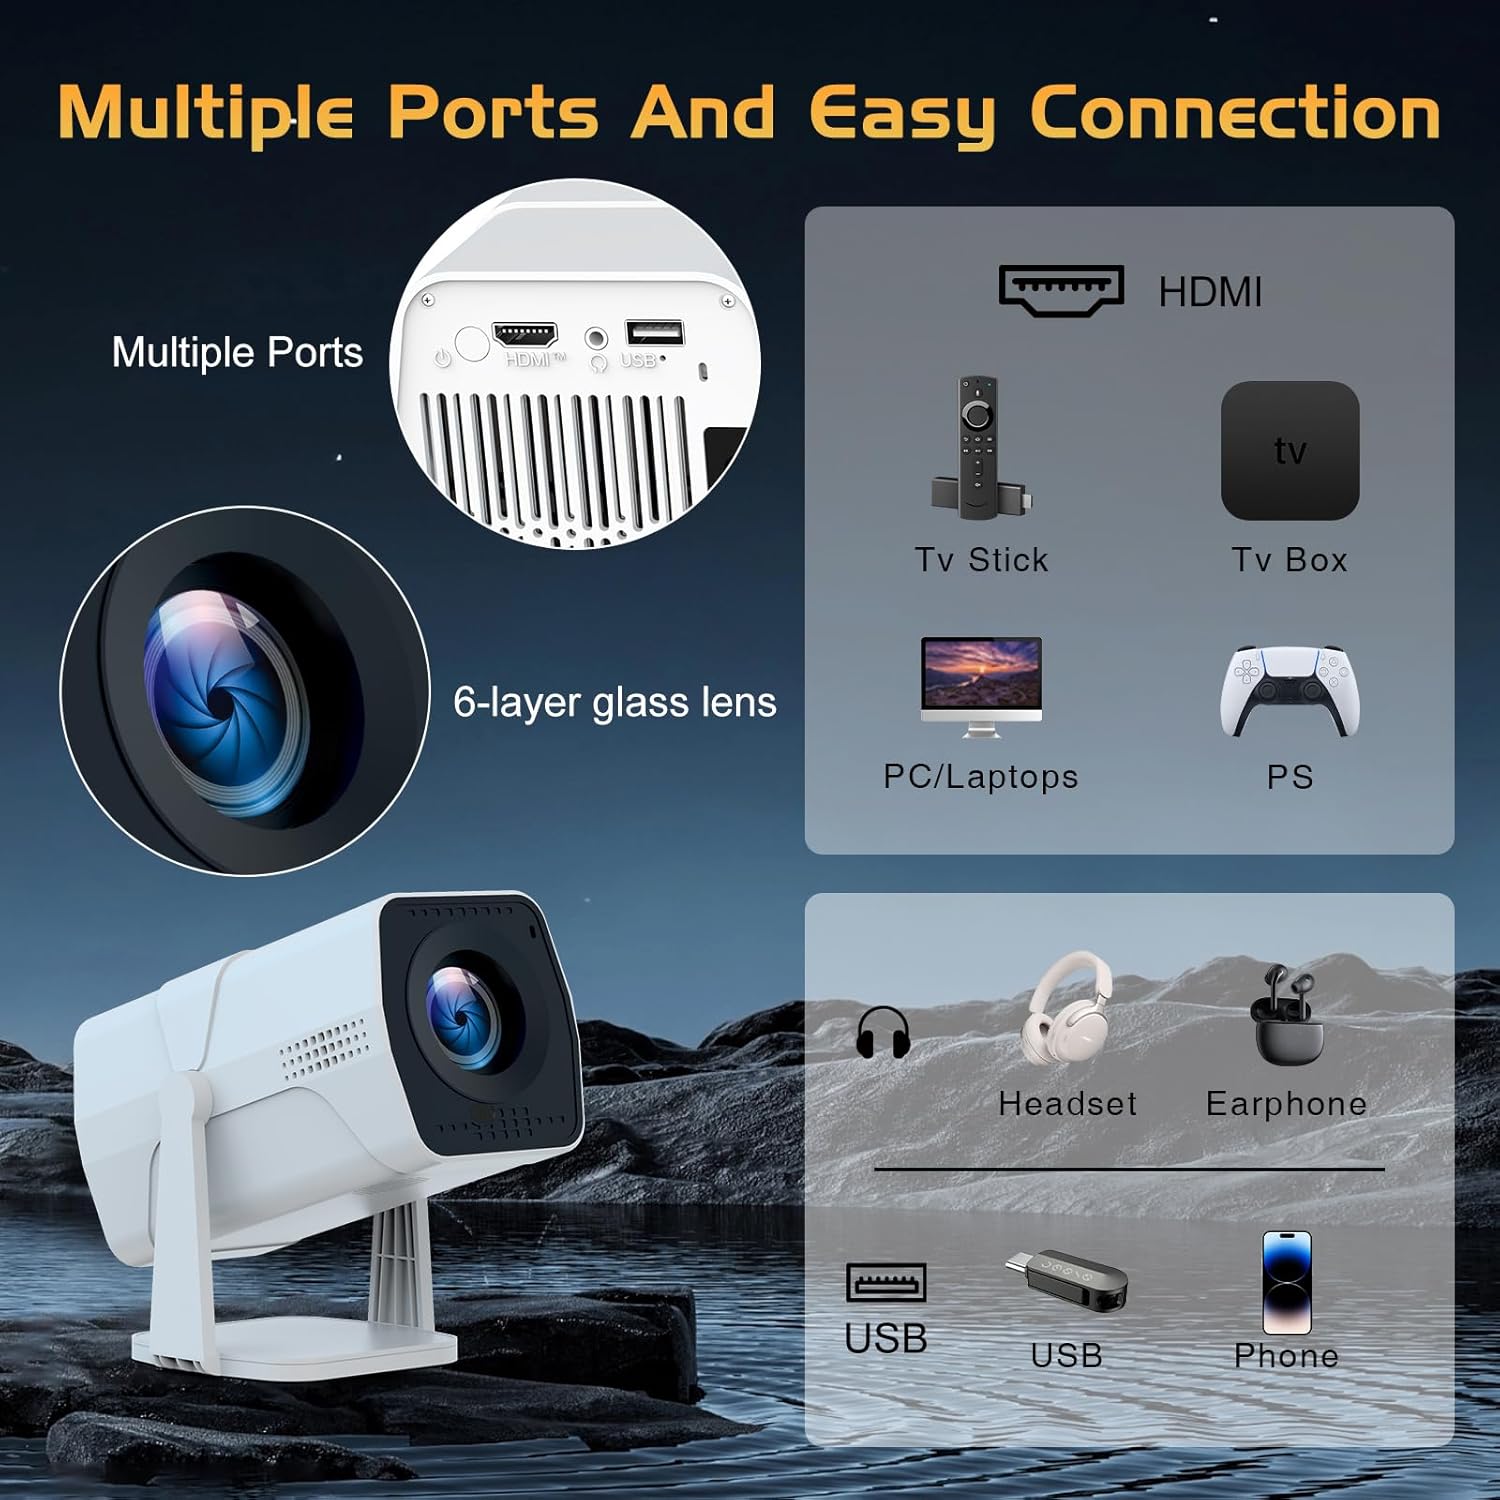
Image: A detailed diagram showing the multiple ports on the TMY Projector (HDMI, USB) and various connection possibilities, including TV sticks, PCs, gaming consoles, headsets, and phones.
4.4 Screen Zoom Function
The projector includes a 50%-100% zoom function, allowing you to adjust the screen size without moving the projector. This feature can be accessed via the remote control or settings menu.
5. Vedligeholdelse
To ensure the longevity and optimal performance of your TMY Projector, follow these maintenance guidelines:
- Rengøring af linsen: Brug en blød, fnugfri klud, der er specielt designet til optiske linser. Undgå slibende materialer eller barske kemikalier.
- Rengøring af ydersiden: Tør projektorens yderside af med en blød, tør klud. Brug ikke flydende rengøringsmidler direkte på enheden.
- Ventilation: Sørg for, at ventilationsåbningerne ikke er blokeret for at forhindre overophedning.
- Opbevaring: Når projektoren ikke er i brug i længere perioder, skal den opbevares køligt og tørt, væk fra direkte sollys og støv.
6. Fejlfinding
If you encounter issues with your TMY Projector, refer to the following common problems and solutions:
- Ingen strøm:
- Sørg for, at netledningen er korrekt tilsluttet både projektoren og en fungerende stikkontakt.
- Kontroller, om stikkontakten fungerer.
- Intet billede / Sløret billede:
- Verify the projector is powered on and the lens cap is removed.
- Allow the automatic focus and keystone correction to complete. If still blurry, manually adjust focus using the remote.
- Ensure the projection surface is suitable and the projector is within the recommended distance.
- If using an external source (HDMI), ensure the correct input source is selected.
- Ingen lyd:
- Kontroller lydstyrkeniveauet på projektoren og eventuelle tilsluttede eksterne lydenheder.
- Hvis du bruger Bluetooth-højttalere, skal du sørge for, at de er korrekt parret og tilsluttet.
- If using internal speakers, ensure external Bluetooth output is not selected.
- Fjernbetjeningen reagerer ikke:
- Ensure the batteries are correctly inserted and not depleted.
- Ret fjernbetjeningen direkte mod projektorens IR-modtager.
- Problemer med WiFi-forbindelse:
- Sørg for, at dit WiFi-netværk er aktivt og inden for rækkevidde.
- Dobbelttjek WiFi-adgangskoden.
- Restart the projector and your WiFi router.
- If the connection times out, try moving the projector closer to the router or reducing interference.
7. Specifikationer
| Feature | Specifikation |
|---|---|
| Mærke | TMY |
| Model | B0DRFF5KMF |
| Varens vægt | 2.79 pund |
| Produktdimensioner | 5.35 x 4.84 x 7.09 tommer |
| Farve | Hvid |
| Særlige funktioner | Speakers, Electric Focus, Auto Keystone, 270° Rotatable Stand |
| Forbindelsesteknologi | HDMI, USB, WiFi 6, Bluetooth 5.2 |
| Skærmopløsning | 1920 x 1080 (1080P Full HD) |
| Anbefalede anvendelser | Indendørs |

Image: A visual comparison showing the TMY Projector's 1080P Full HD image quality, emphasizing that it is recommended for use in dark environments for optimal viewing, contrasted with daytime or light-on conditions.
8. Garanti og support
TMY is committed to providing excellent customer service and product support.
- Garanti: Dette produkt leveres med 3 års garanti.
- Returpolitik: Enjoy a 30-day return period.
- Teknisk support: Lifetime after-sale service and technical support are available.
- Svartid: Expect a quick reply within 24 hours for support inquiries.
For yderligere hjælp, besøg venligst den officielle TMY Store on Amazon or contact customer support through the provided channels in your warranty card.


