1. Introduktion
Thank you for choosing the CAMECHO WiFi 3 Channel Dash Cam. This device is designed to provide comprehensive video surveillance for your vehicle, recording footage from the front, interior, and rear. This manual provides detailed instructions for installation, operation, and maintenance to ensure optimal performance and longevity of your dash cam.

Image 1.1: CAMECHO 3-channel dash cam with smartphone app view.
2. Produktet er slutview
2.1 Nøglefunktioner
- 3-kanals optagelse: Simultaneously monitors the front (150°), interior (120°), and rear (120°) of your vehicle.
- Høj opløsning: Front camera records at 1080P, interior and rear cameras at 480P, displayed on a 2-inch screen.
- Infrarødt nattesyn: Ensures clear recording in low-light conditions, with 4 infrared LED fill lights for the interior camera.
- Indbygget Wi-Fi: Connects to Android or iOS smartphones via a dedicated app for real-time preview, video playback, and download.
- Loop-optagelse: Continuously records and overwrites the oldest footage når hukommelseskortet er fyldt.
- G-sensor: Automatically detects collisions or bumps and locks the current video footage for at forhindre overskrivning.
- Eksponeringskompensation: Automatically adjusts light sensitivity for optimal image quality in varying light conditions.
- Nem installation: Compact design that does not obstruct driving view, with simplified rear camera setup.

Billede 2.1: Overview of dash cam features.
2.2 Hvad er der i æsken
- 1 x CAMECHO Dash Camera
- 1 x bag View Kamera
- 1 x strømkabel
- 1 x Extended Line (for rear camera)
- 1 x Skridsikker måtte
- 1 x brugermanual

Image 2.2: Product components and included accessories.
3. Opsætningsvejledning
3.1 Installation
- Mount the Dash Camera: Attach the main dash camera unit to your vehicle's windshield using the provided suction cup mount. Position it where it does not obstruct your view.
- Installer bakkamera: Connect the rear camera to the main unit using the extended line. The rear camera can be installed inside the vehicle's rear window or externally. No need to remove the reversing light for installation.
- Strømtilslutning: Connect the power cord to the dash cam and plug it into your vehicle's cigarette lighter socket. Route the cable neatly to avoid interference with driving.
- Indsæt hukommelseskort: Insert a compatible Micro SD card (not included) into the TF card slot on the dash cam. Ensure the card is inserted correctly.

Image 3.1: Dash cam installation diagram.
3.2 Indledende tænding
Once connected to power, the dash cam will automatically power on and begin recording when your vehicle starts. The 2-inch screen will display the live view fra kameraerne.
4. Betjeningsvejledning
4.1 Grundlæggende betjening
- Tænd/sluk: The device powers on/off with the vehicle ignition. You can manually power off by long-pressing the power button.
- Indspilning: Recording starts automatically when the device is powered on. A red indicator usually signifies active recording.
- Menu navigation: Use the menu buttons (refer to Image 2.2 for button layout) to navigate through settings and playback options on the 2-inch screen.
- Skærm til/fra: Short press the power button to turn the screen on or off while recording continues in the background.
4.2 WiFi- og app-forbindelse
The dash cam features built-in Wi-Fi for seamless connection to your smartphone via a dedicated application.
- Download appen: Scan the QR code in the user manual or search for the designated app (e.g., 'Viidure' as shown in images) on your Android or iOS app store.
- Enable WiFi: On the dash cam, navigate to the WiFi settings and enable it.
- Connect to Dash Cam WiFi: On your smartphone, go to WiFi settings and connect to the dash cam's WiFi network (e.g., 'CarDV-TL444af').
- Åbn app: Launch the app on your smartphone. It should automatically detect and connect to the dash cam.
- Funktioner: Within the app, you can preview foo i realtidtage, play back recorded videos, take photo snapshots, and download filedirekte til din telefon.

Image 4.1: WiFi connection and app control steps.
5. Avancerede funktioner
5.1 3-kanals optagelse
The dash cam simultaneously records from three perspectives: a 150° wide-angle front camera, a 120° interior camera, and a 120° rear camera. This provides comprehensive coverage for all driving scenarios.

Image 5.1: 3-Channel recording coverage.
5.2 Infrarødt nattesyn
Equipped with infrared technology, the dash cam ensures clear video capture even in low-light or complete darkness. The interior camera utilizes 4 infrared LED fill lights to illuminate the cabin effectively.
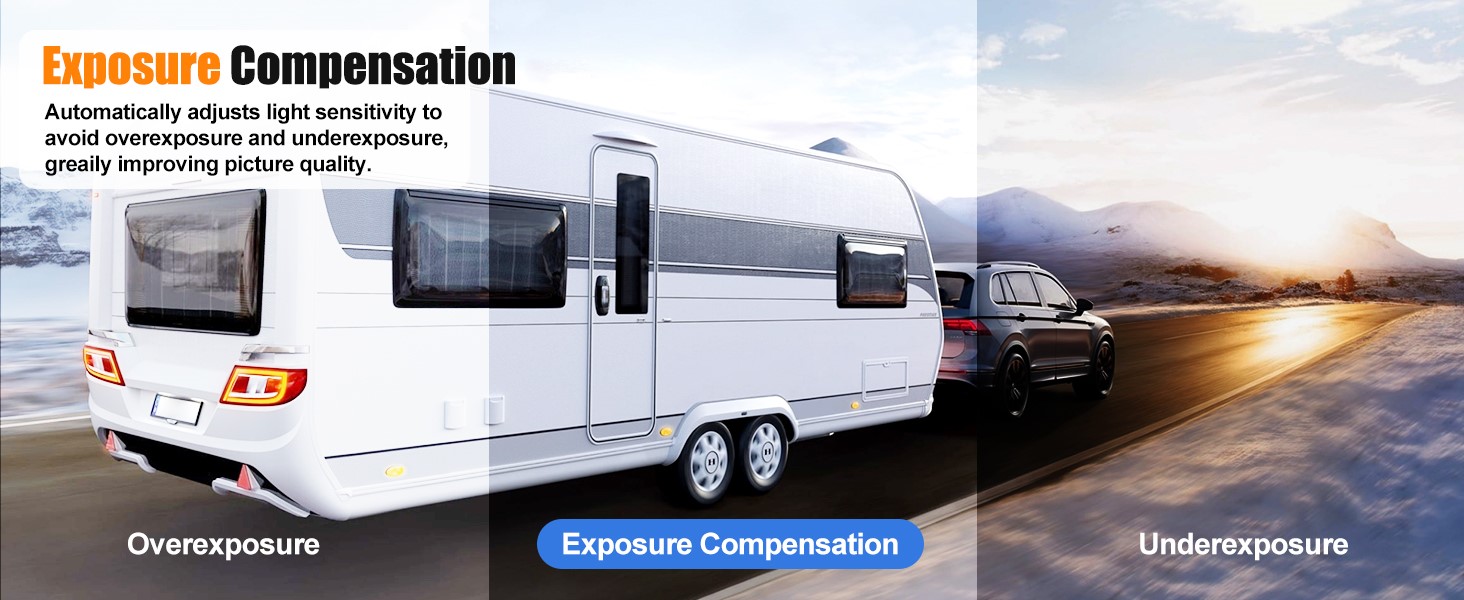
Image 5.2: Super Night Vision in action.
5.3 Loop-optagelse
The loop recording function ensures continuous recording by automatically overwriting the oldest unlocked video files when the memory card reaches its capacity. This eliminates the need for manual memory management.

Image 5.3: Loop Recording functionality.
5.4 G-sensor
The built-in G-Sensor detects sudden impacts or collisions. When triggered, it automatically locks the current video segment, preventing it from being overwritten by loop recording. This ensures critical event footage er bevaret.

Image 5.4: G-Sensor collision detection.
5.5 Eksponeringskompensation
The dash cam automatically adjusts its light sensitivity to prevent overexposure or underexposure, significantly improving picture quality in various lighting conditions, from bright daylight to dim environments.
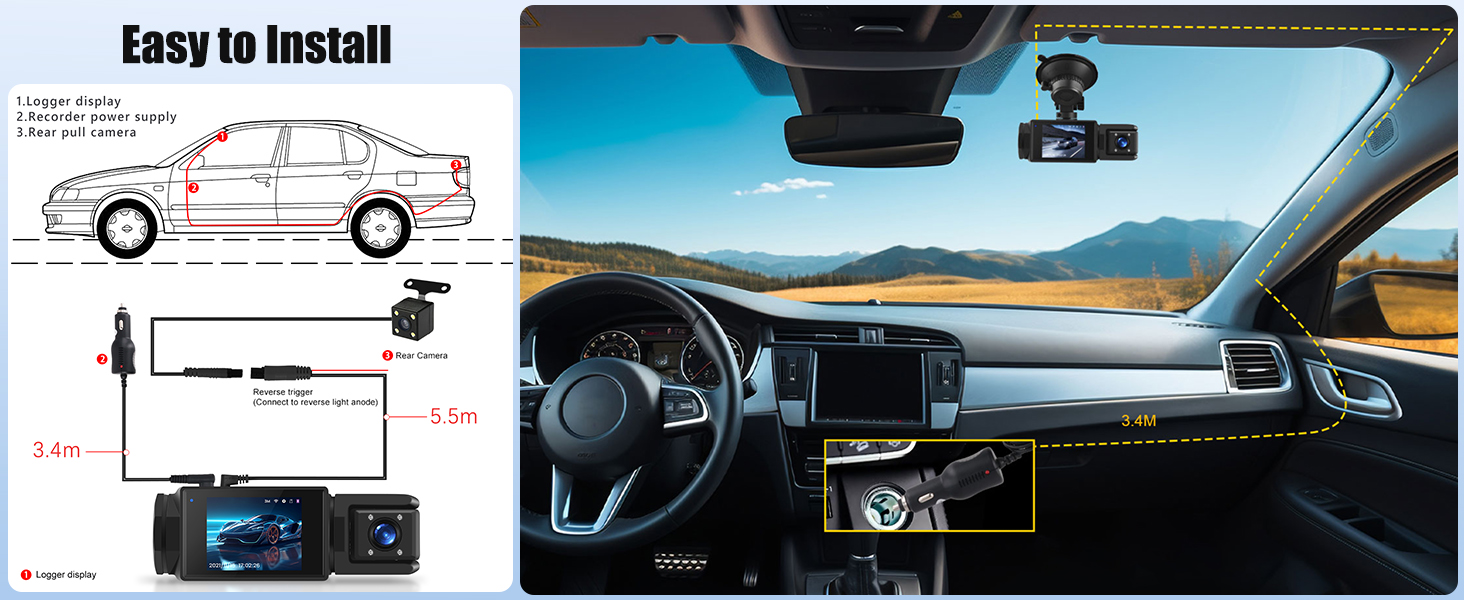
Image 5.5: Exposure Compensation feature.
5.6 Parkeringshjælp
When the rear camera is properly connected and configured, the dash cam can display parking auxiliary lines on the screen, assisting you in parking maneuvers.

Image 5.6: Parking Assistance display.
5.7 Rear Camera Durability
The rear camera is designed to withstand various environmental conditions, featuring waterproof, dustproof, sunproof, and fog-resistant properties for reliable performance.
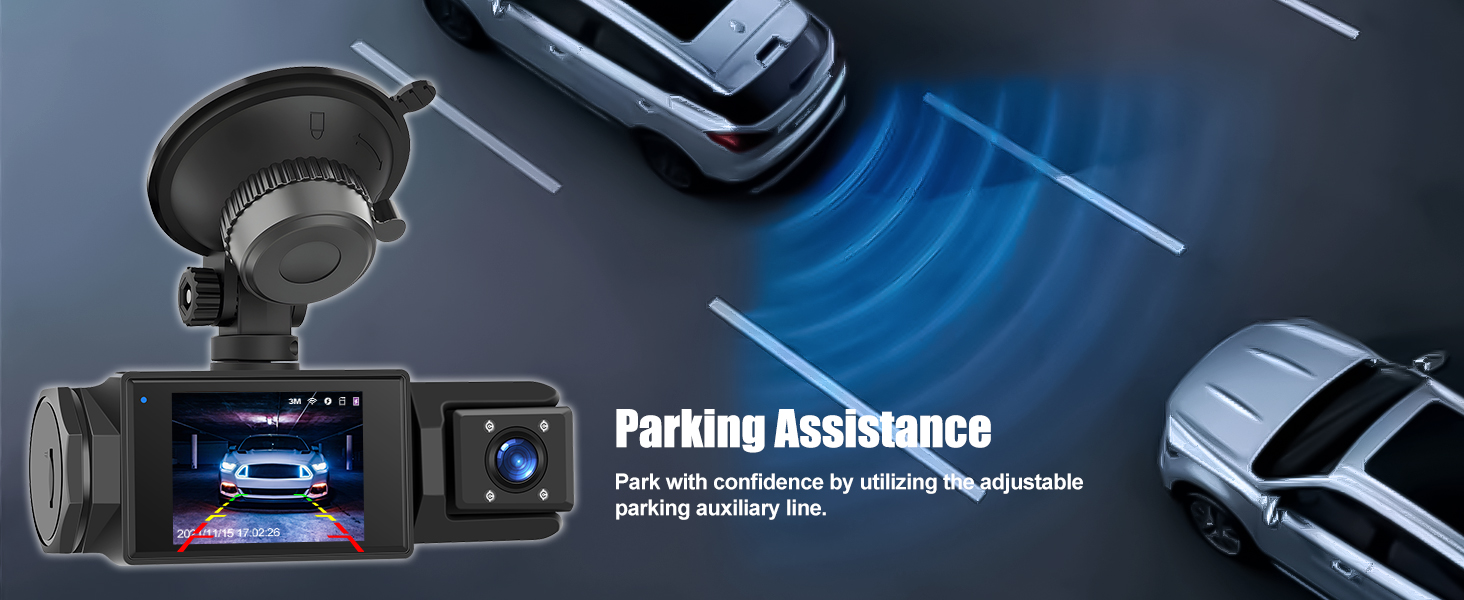
Image 5.7: Rear camera durability features.
6. Vedligeholdelse
- Rene linser: Rengør kameralinserne regelmæssigt med en blød, fnugfri klud for at sikre klar videokvalitet.
- Hukommelseskort: Format the Micro SD card periodically (e.g., once a month) to maintain optimal performance and prevent data corruption. Back up important footage før formatering.
- Firmwareopdateringer: Tjek producentens webwebstedet eller appen for at se, om der er tilgængelige firmwareopdateringer, der kan forbedre ydeevnen og tilføje nye funktioner.
- Opbevaringsbetingelser: Undgå at udsætte dashcam'et for ekstreme temperaturer i længere perioder.
7. Fejlfinding
- Dash Cam tænder ikke: Ensure the power cord is securely connected to both the dash cam and the vehicle's power outlet. Check the vehicle's power outlet for functionality.
- Optagelsesproblemer: Verify that a Micro SD card is inserted and properly formatted. If the card is full, loop recording should overwrite old files, but a faulty card can cause issues. Try a different, high-speed Micro SD card.
- Dårlig videokvalitet: Clean the camera lenses. Ensure the protective film has been removed from the lenses. Check settings for resolution and exposure compensation.
- Problemer med WiFi-forbindelse: Ensure WiFi is enabled on the dash cam and your smartphone. Try restarting both devices. Confirm you are connecting to the correct dash cam network.
- G-sensor for følsom/ikke følsom nok: Juster G-sensorens følsomhedsindstilling i dashcam-menuen.
8. Specifikationer
| Feature | Specifikation |
|---|---|
| Produktdimensioner | 1.7 x 4.4 x 1.6 tommer |
| Varens vægt | 7 ounce |
| Forbindelsesteknologi | Wi-Fi |
| Særlige funktioner | G-Sensor, Loop Recording |
| Videooptagelsesopløsning | 1080p (Forside) |
| Skærm | 2 tommer |
| Monteringstype | Forrudemontering |
| Kontrolmetode | Røre |
| Farve | Sort |
| Modelnavn | RM |
9. Garanti og support
For any questions, technical assistance, or warranty inquiries, please contact CAMECHO customer support.
E -mail til kundesupport: CAMECHOVIP@126.com

Image 9.1: CAMECHO Customer Support.


