1. Introduktion
Tak for købetasing the KOSUMOSU BL-330OR-2 Digital LED Alarm Clock. This manual provides essential information for the proper setup, operation, and maintenance of your device. Please read it thoroughly before use and retain it for future reference.
This digital clock features a clear 6.7-inch LED display, offering time, date, day of the week, and temperature readings. It includes dual alarm functions with snooze, and both automatic and manual brightness adjustment to suit various environments.

Billede 1.1: Forside view of the KOSUMOSU BL-330OR-2 Digital LED Alarm Clock.
2. Opsætning
2.1 Pakkens indhold
- KOSUMOSU BL-330OR-2 Digital LED Alarm Clock
- USB-strømkabel (1.5 meter)
- Brugermanual
Note: A 5V/1A AC adapter is required for operation and is not included in the package. Please use a compatible USB power adapter.
2.2 Strømtilslutning
- Connect the provided USB cable to the USB port on the back of the alarm clock.
- Plug the other end of the USB cable into a 5V/1A AC adapter (not included) or a powered USB port.
- The display will illuminate, indicating the clock is powered on.
The clock includes a button battery (CR2025) for time memory during power outages. This battery does not power the display or alarm functions; it only retains settings.
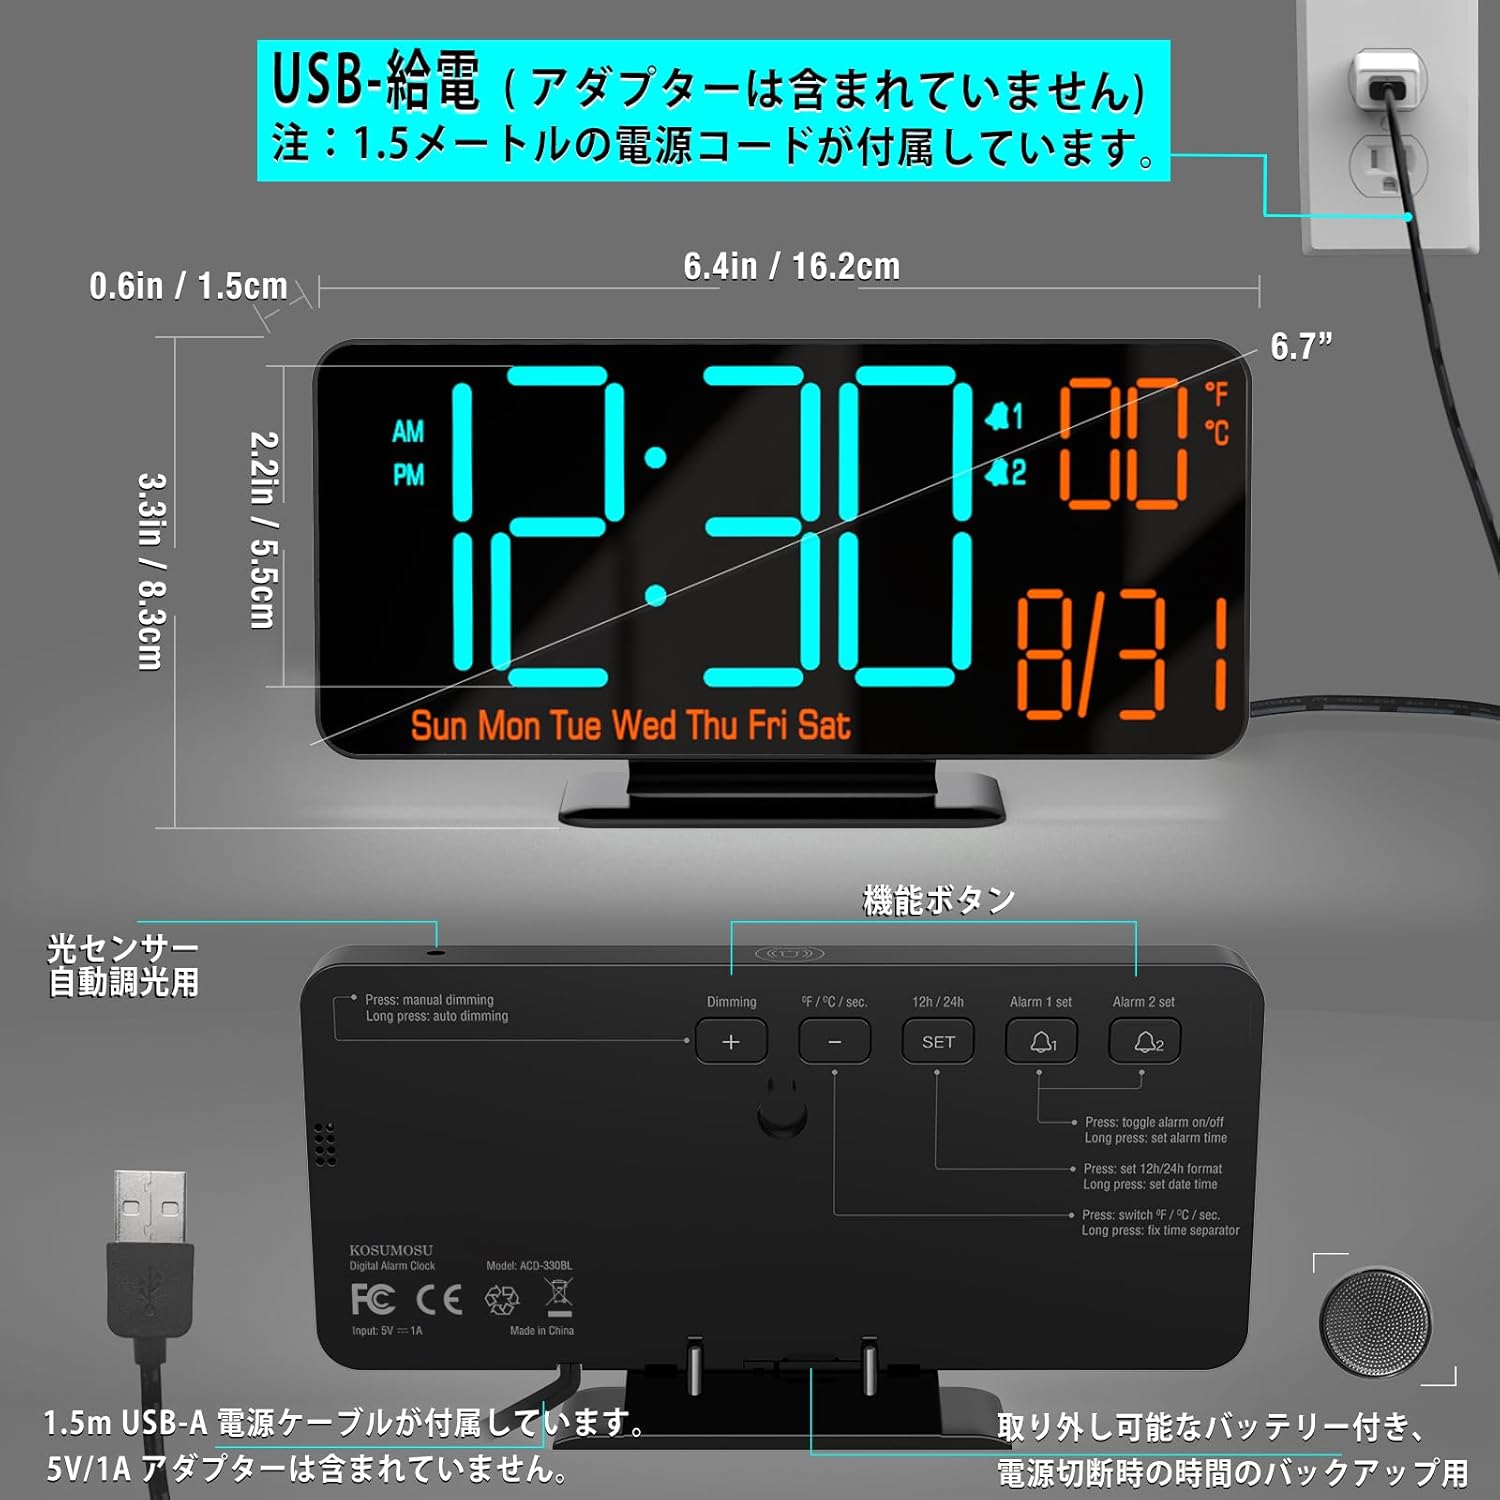
Image 2.1: Dimensions and USB power connection diagram.
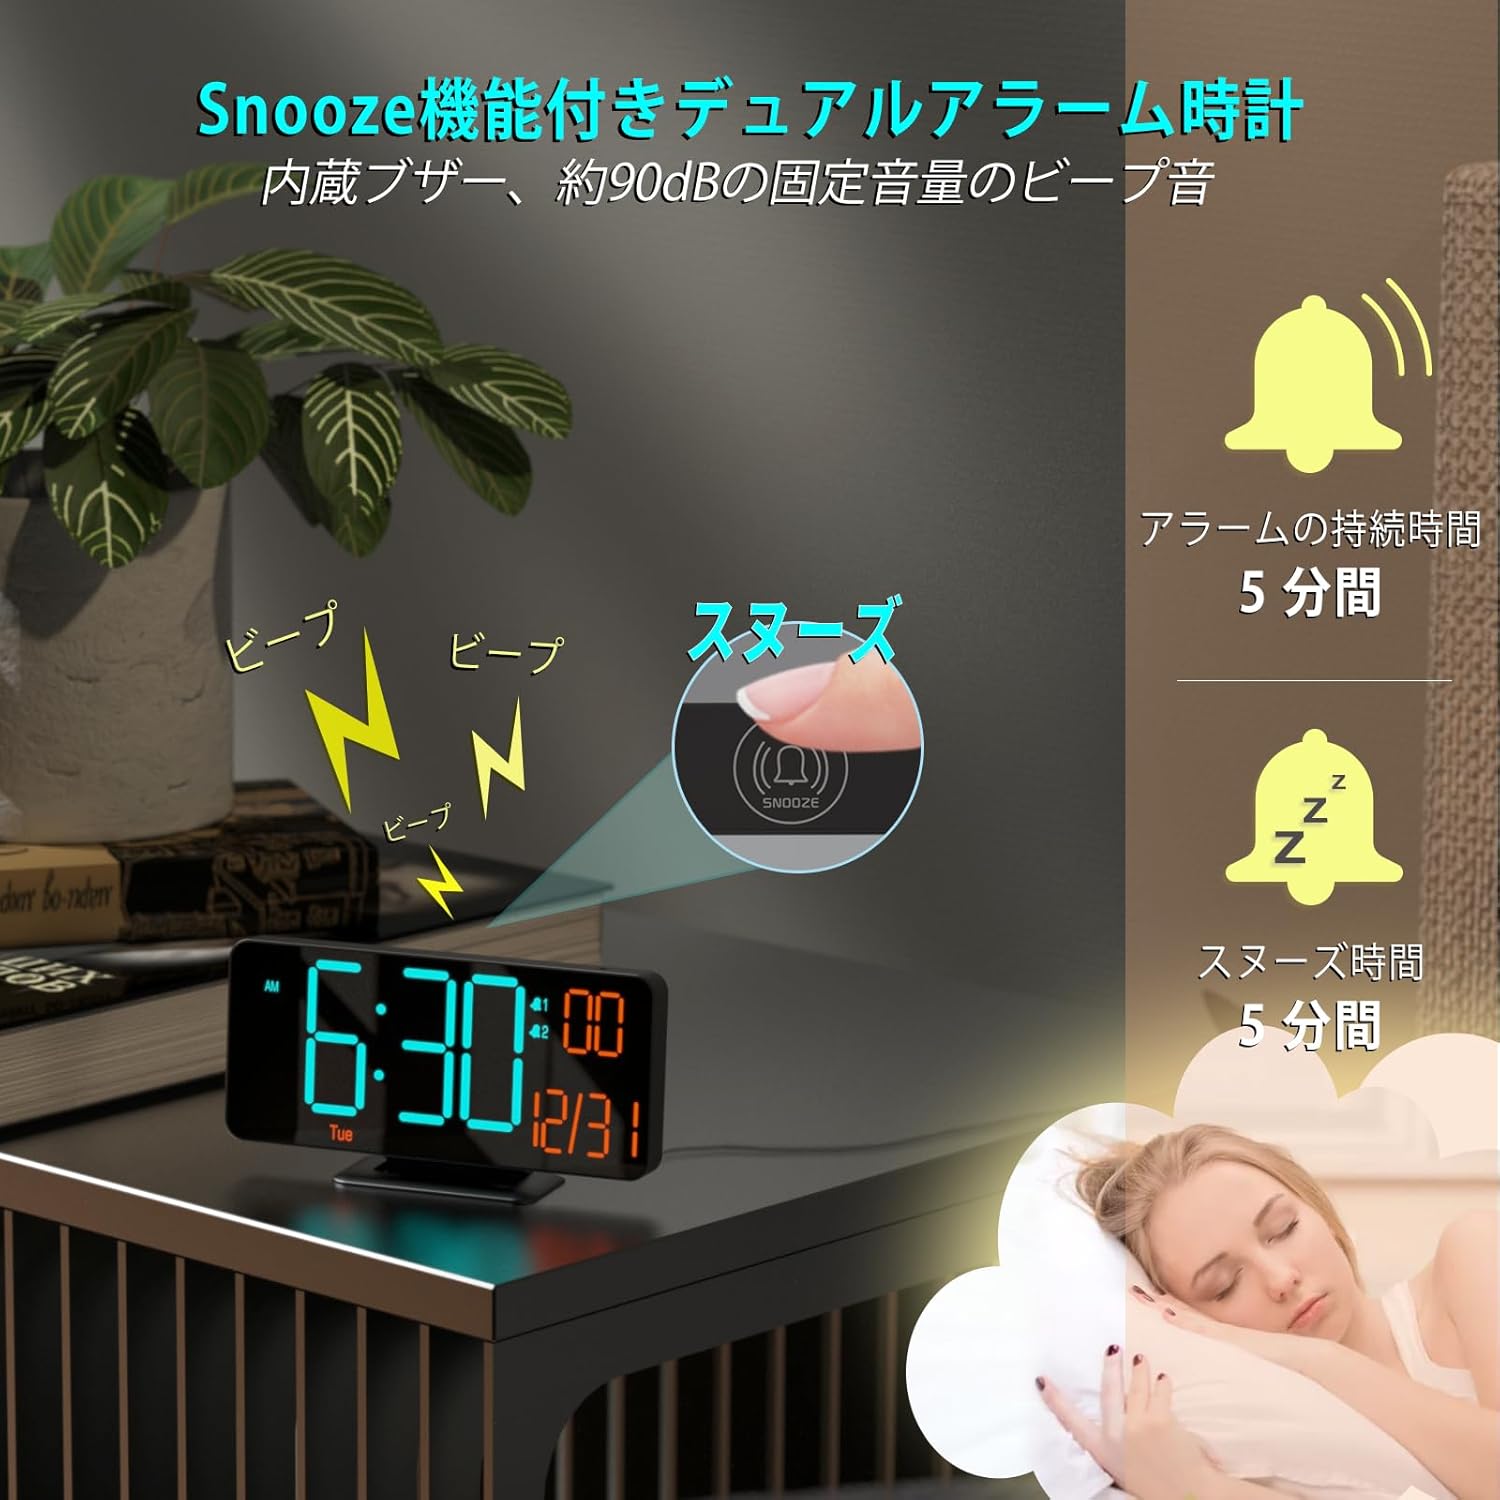
Image 2.2: Rear panel with function buttons and USB port.
2.3 Indledende indstillinger (tid, dato, temperaturenhed)
Refer to the buttons on the back of the clock (SET, +, -, ALARM 1 SET, ALARM 2 SET).
- Indstil tid: Tryk og hold på SÆT knappen for at gå ind i tidsindstillingstilstanden. Brug + og - knapperne for at justere timetallet, og tryk derefter på SÆT to confirm and move to minutes. Repeat for minutes.
- 12/24 timers format: I tidsindstillingstilstand skal du trykke på 12H/24H -knappen for at skifte mellem 12-timers (med AM/PM-indikator) og 24-timers formater.
- Indstil dato: Når du har indstillet tiden, skal du trykke på SÆT again to enter date setting mode. Adjust year, month, and day using + og -, tryk SÆT to confirm each. The day of the week will update automatically.
- Temperaturenhed: Tryk på °F/°C button to switch between Celsius and Fahrenheit display for temperature.
3. Betjening
3.1 Justering af lysstyrke
The clock offers both manual and automatic dimming features.
- Manuel dæmpning: Tryk på DÆMPNING button to cycle through three brightness levels (Low, Medium, High) or turn the LED display off.
- Automatisk dæmpning: The clock has a built-in light sensor. To activate automatic dimming, ensure manual dimming is not set to 'Off'. The clock will automatically adjust its brightness based on ambient light conditions.

Image 3.1: Display brightness options (manual and automatic).
3.2 Alarm Settings (Dual Alarms)
Uret understøtter to uafhængige alarmer (Alarm 1 og Alarm 2).
- Indstil alarmtid: Tryk og hold ALARM 1 SÆT or ALARM 2 SÆT to enter alarm time setting mode. Use + og - to adjust the hour, then press the respective ALARM SÆT button to confirm and move to minutes. Repeat for minutes.
- Enable/Disable Alarm: Tryk kort på ALARM 1 SÆT or ALARM 2 SÆT for at slå alarmen til eller fra. Et alarmikon vises på displayet, når den er aktiv.
- Alarmcyklus: The clock offers three alarm cycles: Weekdays, Weekends, and Everyday. While setting the alarm, press the ALARM SÆT button repeatedly after setting minutes to cycle through these options.
3.3 Snooze -funktion
Når en alarm lyder, skal du trykke på den store SLUM button on the top of the clock to activate the snooze function. The alarm will pause for 5 minutes and then sound again. To turn off the alarm completely, press any other button on the back of the clock.

Image 3.2: Snooze function activation.
3.4 Display Modes (Seconds/Temperature)
The clock can display seconds or temperature alongside the time and date. Press the SECONDS/TEMPERATURE button to switch between displaying seconds and temperature (°F/°C).

Image 3.3: Various display modes including seconds and temperature.
4. Vedligeholdelse
4.1 Rengøring
For at rengøre uret skal du forsigtigt tørre displayet af ogasing with a soft, dry cloth. Do not use abrasive cleaners, solvents, or spray directly onto the device, as this may damage the surface or internal components.
4.2 Batteribackup
The internal CR2025 button battery maintains time settings during power interruptions. If the clock is unplugged for an extended period, this battery may eventually deplete. To replace it, carefully open the battery compartment on the back of the unit and insert a new CR2025 battery, ensuring correct polarity.
5. Fejlfinding
| Problem | Mulig årsag | Løsning |
|---|---|---|
| Skærmen er tom | No power; LED display turned off manually. | Ensure USB cable is securely connected to a 5V/1A power source. Press the DÆMPNING button to check if the display was manually turned off. |
| Alarmen lyder ikke | Alarm is not enabled; alarm volume is too low. | Trykke ALARM 1 SÆT or ALARM 2 SÆT to ensure the alarm icon is displayed. Check alarm settings for correct time and cycle. |
| Tiden er unøjagtig | Initial setting error; prolonged power outage. | Re-set the time following section 2.3. If frequent time drift occurs, ensure a stable power supply. |
| Temperature reading is incorrect | Sensor calibration needed. | The manual does not specify temperature calibration. Ensure the clock is not placed near heat sources or in direct sunlight. |
6. Specifikationer
- Mærke: KOSUMOSU
- Model: BL-330OR-2
- Skærmtype: LED digital
- Skærmstørrelse: 6.7 tommer
- Farve: Orange LED - Black
- Materiale: Plast
- Dimensioner: 16.2 cm (bredde) x 8.3 cm (højde)
- Strømkilde: Corded Electric (USB 5V/1A, AC adapter not included)
- Battery Type (Backup): Lithium Metal (CR2025, included)
- Vægt: 170 gram
- Funktioner: LED Display, Alarm, Calendar Display, Temperature Display, Automatic Dimming
- Værelsestype: Kontor, køkken, soveværelse, stue, klasseværelse
7. Garanti og support
KOSUMOSU Technology provides a 2 års garanti for this product. If you encounter any quality issues or problems with usage, please contact our customer service immediately. We are committed to providing a replacement product or guiding you through setup and usage procedures.
For customer support, please refer to the contact information provided with your purchase or visit the official KOSUMOSU webwebsted.


