1. Vigtige sikkerhedsoplysninger
Please read this entire manual carefully before operating the treadmill. Keep this manual for future reference. Failure to follow these instructions could result in injury or damage to the product.
- Always place the treadmill on a solid, level surface.
- Hold børn og kæledyr væk fra løbebåndet under drift.
- Brug passende træningstøj og sportssko.
- Sørg for, at sikkerhedsnøglen er korrekt fastgjort til dit tøj, inden du starter.
- Brug ikke løbebåndet, hvis det er beskadiget eller ikke fungerer korrekt.
- The maximum user weight capacity for this treadmill is 320 lbs.
- Tag løbebåndets stik ud af stikkontakten, når det ikke er i brug, eller før rengøring/vedligeholdelse.
2. Inkluderede komponenter
Kontroller, at alle komponenter er til stede, før monteringen påbegyndes:
- Løbebåndets hovedramme
- Brugermanual
- Sikkerhedsnøgle
- Smøremiddel
- Tool Kit (includes Allen wrenches and screwdriver)
3. Opsætning og montering
The BORGUSI CTM5314 treadmill is 90% pre-assembled. Follow these steps for quick setup:
- Step 1: Unpack and Position
Open the carton and carefully remove all parts. Place the main frame on a level ground surface. - Step 2: Lock the Upright Frame
Secure the upright frame to the base frame using the provided bolts (70, 51) and lock washers (64). Use the 5# Allen wrench (12) to tighten. - Step 3: Pre-lock the Computer Bracket
First, connect the computer bottom wire with the computer top wire. Then, align the metal plate of the computer bracket with the upright frame hole and pre-lock it using bolts (51) and lock washers (64). - Step 4: Lock the Computer Bracket
Hold the computer bracket with one hand and fold it in the direction of the arrow. Fully secure the computer bracket onto the upright frame using the remaining bolts and the 5# Allen wrench. - Step 5: Lock the Rollers
Attach the rollers (23) to the main frame using the bolts (51) and lock washers (55, 67). Use the 5# Allen wrench (12). - Step 6: Secure the Back End Caps
Attach the back end caps (21, 22) to the main frame using the bolts (60) and the wrench with screwdriver (76). - Step 7: Secure the Bottom Covers
Secure the bottom covers (30, 36) onto the upright frame using the bolts (77) and the wrench with screwdriver (76). - Step 8: Secure the Bottle Cage
Secure the bottle cage onto the right upright frame using the bolts (77) and the wrench with screwdriver (76).
Video: BORGUSI CTM5314 Treadmills Installation Guide. This video demonstrates the step-by-step assembly process for the treadmill.

Image: The treadmill's elevated console design and folding capability for space-saving storage.
4. Betjeningsvejledning
Familiarize yourself with the treadmill's functions for an effective workout.
4.1 Grundlæggende betjening
- Tænd/sluk: Connect the power cord to a grounded outlet. Press the power button on the console to turn the treadmill on or off.
- Sikkerhedsnøgle: Always attach the safety key clip to your clothing before starting. The treadmill will not operate without the safety key in place. Pulling the safety key will immediately stop the treadmill in an emergency.
- Start/Stop: Press the 'START' button to begin your workout. The belt will start moving at a low speed. Press the 'STOP' button to gradually slow down and stop the belt.
4.2 Justering af hastighed og hældning
- Hastighedskontrol: Use the '+' and '-' buttons on the console or handrails to adjust the speed from 0.5 MPH to 10 MPH. Quick speed buttons (e.g., 3, 6, 9 MPH) are also available for instant changes.
- Automatisk hældning: Use the 'INCLINE +' and '-' buttons to adjust the incline from 0% to 15%. Quick incline buttons (e.g., 3%, 6%, 9%) are available for rapid changes.
4.3 Preset Programs and App Connectivity
- Forudindstillede programmer: The treadmill features 36 built-in preset programs (P1-P36), as well as unique L and U programs with 8 levels of intensity. Select a program using the 'PROGRAM' button and press 'START' to begin.
- Bluetooth app: Connect your device via Bluetooth to the treadmill to use compatible fitness apps such as KINOMAP, Zwift, and Fitshow. These apps allow for customized workouts, virtual routes, and tracking of your progress.
4.4 Overvågning af din træning
- LCD-skærm: The upgraded backlit LCD panel displays key metrics including Time, Speed, Distance, Calories Burned, Incline, and Heart Rate.
- Pulsmåler: Grip the heart rate sensors on the handrails to monitor your pulse during your workout.
Video: BORGUSI CTM5314 Auto Treadmill Overview. This video highlights the key features and operational aspects of the treadmill, including speed, incline, and program functions.
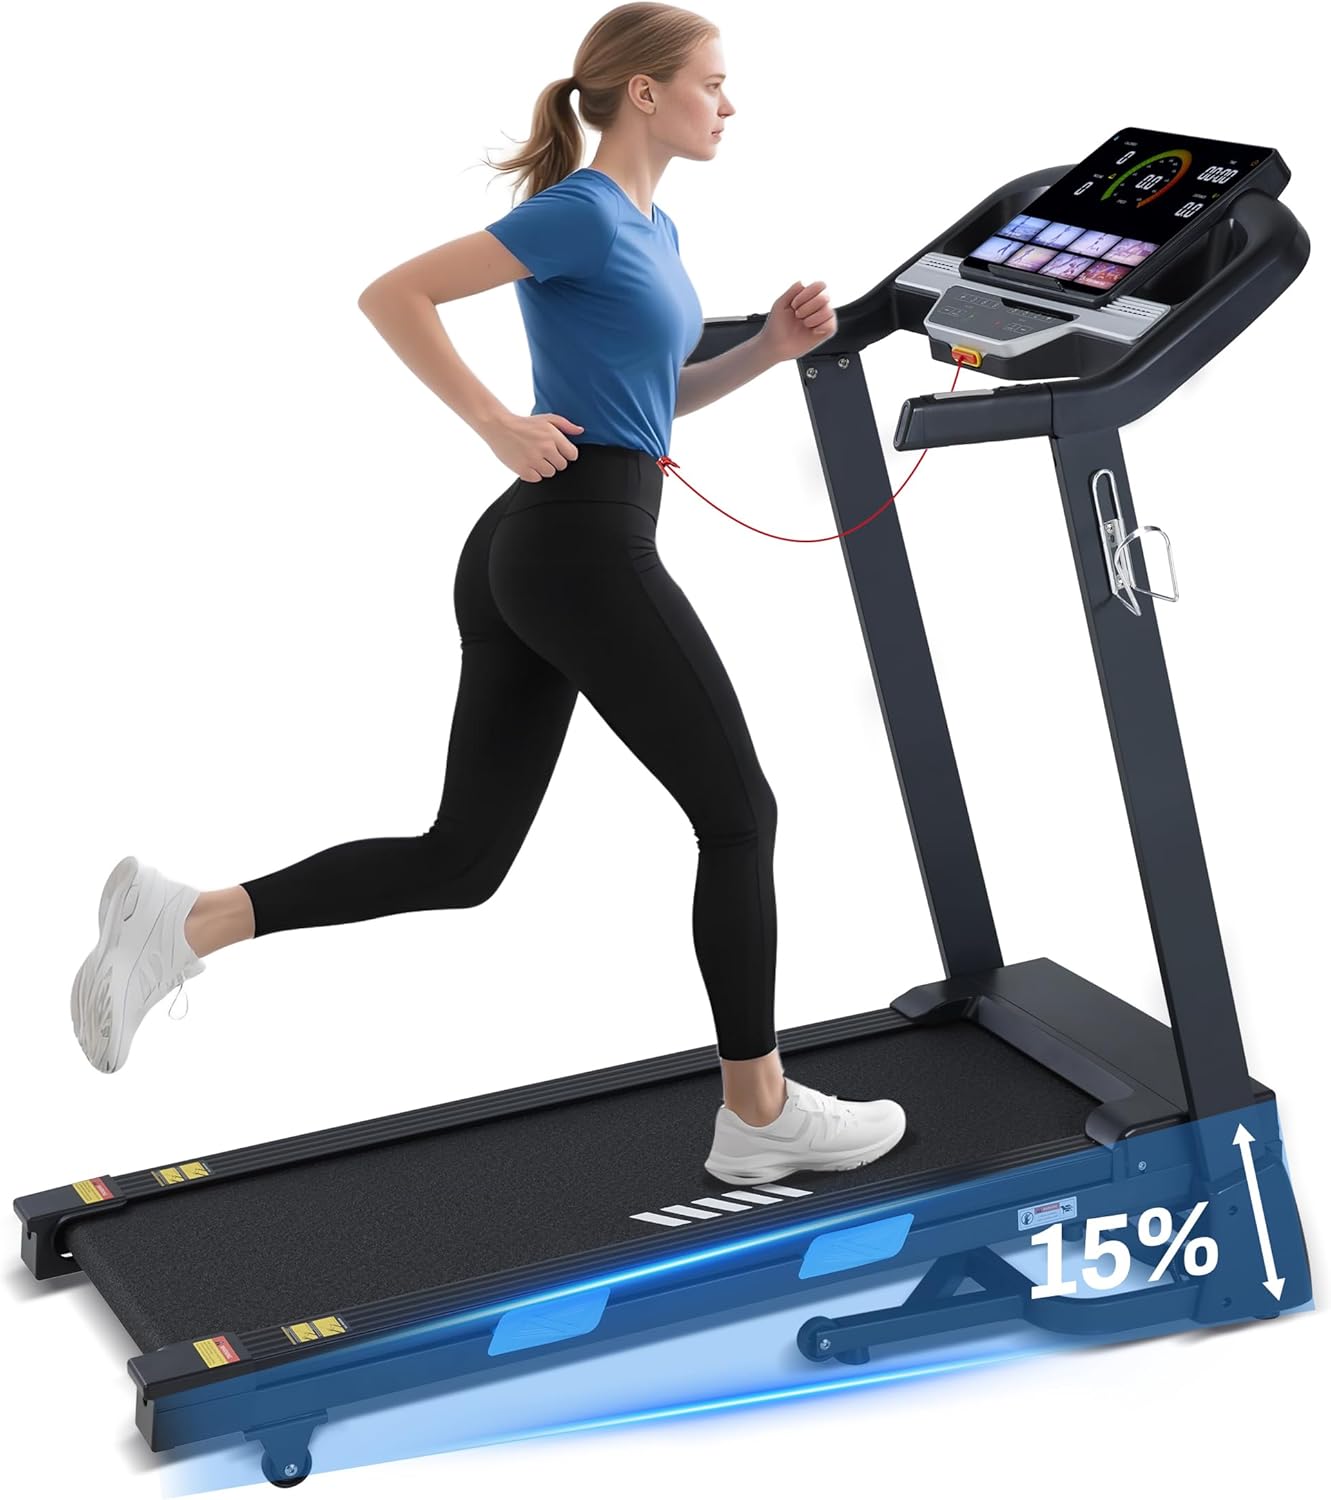
Image: The treadmill in use, showcasing its auto-incline capability.

Billede: Detaljeret view of the upgraded LCD display, providing real-time workout data.
5. Vedligeholdelse
Regelmæssig vedligeholdelse sikrer dit løbebånds levetid og optimale ydeevne.
- Rensning: Tør løbebåndets overflader af med enamp cloth after each use. Avoid using abrasive cleaners.
- Smøring: The running belt requires periodic lubrication to reduce friction. Refer to the specific instructions in the included lubricant packaging for frequency and application method.
- Bæltejustering: If the running belt becomes off-center or slips, refer to the detailed instructions in the full user manual for proper adjustment.
- Opbevaring: When not in use, the treadmill can be folded vertically to save space. Ensure it is securely locked in the folded position.
6. Fejlfinding
Dette afsnit omhandler almindelige problemer, du kan støde på med dit løbebånd.
| Problem | Mulig årsag | Løsning |
|---|---|---|
| Løbebåndet starter ikke | Netledningen er ikke sat i; Sikkerhedsnøglen er ikke på plads; Strømafbryderen er slukket. | Sørg for, at netledningen er sat ordentligt i; Sæt sikkerhedsnøglen helt i; Tænd for strømmen. |
| Løbebælte glider | Rem for løs; Utilstrækkelig smøring. | Adjust belt tension (refer to full manual); Apply lubricant as per instructions. |
| Error Code E01 (Driver communication failure) | Loose connection between upper and lower control boards. | Unplug the treadmill, check and re-connect all system wires. If the issue persists, contact customer support. |
| Usædvanlig lyd eller brændende lugt | Motor issue; Belt friction; Loose components. | Immediately stop the treadmill and unplug it. Check for any visible damage or loose parts. Do not operate and contact customer support. |
For issues not listed here or if solutions do not resolve the problem, please contact BORGUSI customer support.
7. Produktspecifikationer
| Specifikation | Detalje |
|---|---|
| Mærke | BORGUSI |
| Modelnavn | CTM5314 |
| Produktmål (D x B x H) | 55.3 cm x 26.2 cm x 52.1 cm |
| Foldet størrelse (D x B x H) | 33.1 cm x 26.2 cm x 52.2 cm |
| Varens vægt | 110 pund |
| Materiale | Legeret stål |
| Maksimal hastighed | 10 miles i timen |
| Minimum hastighed | 0.5 miles i timen |
| Maksimal hestekræfter | 3.5 HK |
| Maksimal hældningsprocenttage | 15 % |
| Maksimal vægtanbefaling | 320 pund |
| Løbefladedimensioner | 45.5 x 16.5 cm |
| Antal programmer | 36 Preset Programs (plus L and U programs) |
| Forbindelsesteknologi | Bluetooth (KINOMAP, Zwift, Fitshow App compatible) |
| Display Type | Upgraded LCD Panel |
| Stødabsorbering | 10+4 Silicone Shock Absorbers |

Image: Visual representation of the treadmill's robust 320 lbs weight capacity and 15% auto incline.

Image: The spacious running platform, measuring 45.5 inches in length and 16.5 inches in width.

Image: Illustration of the 10+4 silicone shock absorption system designed to reduce impact.
8. Garanti og support
Your BORGUSI CTM5314 Treadmill comes with a 1 Year Parts Protection Plan. This warranty covers manufacturing defects in materials and workmanship under normal use and service.
For warranty claims, technical support, or any questions regarding your product, please refer to the contact information provided in your product packaging or visit the official BORGUSI webwebsted.


