1. Introduktion
Thank you for choosing the AZIMOM 2-in-1 Twinkle Meteor Fiber Optic Starlight Headliner Kit. This innovative lighting system is designed to transform your car interior or home ceiling into a mesmerizing starry night sky with both twinkling stars and dynamic shooting meteor effects. Featuring advanced control options via a remote and a dedicated mobile application, this kit offers unparalleled customization and an immersive visual experience.
Please read this manual thoroughly before installation and operation to ensure proper use and to maximize the lifespan of your product.
2. Pakkens indhold
Pak forsigtigt kassen ud, og sørg for, at alle nedenstående varer er til stede og i god stand. Hvis der mangler eller er beskadigede varer, bedes du kontakte kundesupport.
- 1 x Meteor Twinkle Light Box (LED Light Engine)
- Fiber Optic Cables (for twinkle stars)
- 12pcs Shooting Star Fiber Cables
- 1 x 28-Key RF Remote Controller
- 1 x Power Adapter Cord
- 1 x Car Plug Adapter
- Monteringsskruer
- Instruktionsmanual
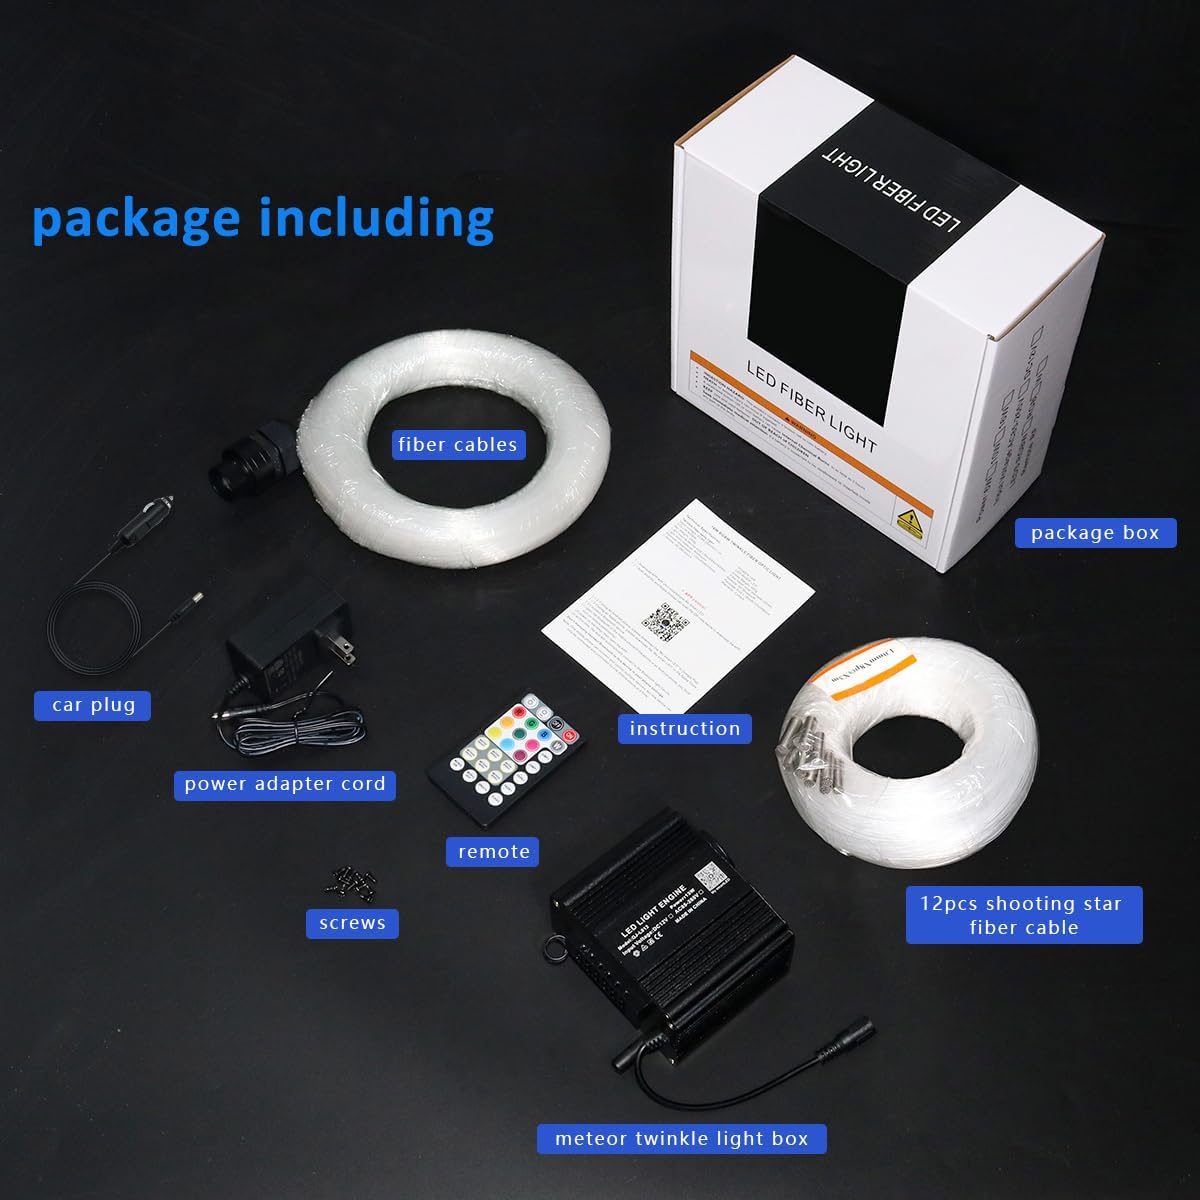
Billede: Alle komponenter er inkluderet i produktpakken.
3. Specifikationer
| Feature | Beskrivelse |
|---|---|
| Modelnummer | QJ-L012 |
| Lyskildetype | 2-IN-1 10W Starlight Box (Twinkle & Meteor) |
| Farve | Gray (Light Engine) |
| Materiale | Aluminium, plast |
| Strømkilde | Elektrisk med ledning |
| Voltage | 12 volt |
| Antal lyskilder | 2 (Twinkle port, Meteor port) |
| Produktdimensioner | 4.1"L x 3.4"W x 2.4"H (Light Engine) |
| Varens vægt | 2.2 pund |
| Fjernbetjenings batteri | 1 Lithium Metal batteri (medfølger) |

Image: Detailed dimensions of the light engine.
4. Opsætning og installation
Installation of the fiber optic starlight kit requires careful planning and execution. It is recommended to take your time to achieve the best results.
4.1 Planning the Layout
- Determine the desired pattern for your twinkling stars and shooting meteors on the ceiling or headliner.
- Consider the length of the fiber optic cables and the placement of the light engine. The light engine should be placed in a discreet location with access to power.
- For shooting star effects, plan the paths for the 12 shooting star fiber cables. Each meteor port on the light engine supports 15 individual shooting star cables, allowing for long lines, short lines, or other dynamic shapes like fireworks.
4.2 Installationstrin
- Forbered overfladen: If installing in a car, carefully remove the headliner. For home ceilings, ensure the surface is clean and accessible.
- Bore huller: Using an electric drill, create small holes in the ceiling or headliner according to your planned star pattern. The size of the holes should be just large enough to allow the fiber optic strands to pass through.
- Insert Fiber Optic Strands: Begin inserting the individual fiber optic strands through the drilled holes from the back side of the headliner/ceiling. For the twinkling stars, distribute the fibers evenly to create a dense star field.
- Connect Twinkle Fibers: Gather all the twinkle fiber optic strands and insert them into the 20mm diameter light port on one side of the light engine. Secure them in place, often with glue or a provided connector.
- Install Shooting Star Fibers: For the shooting star effect, insert the 12 shooting star fiber cables into the 12 LED meteor ports (5mm per port) on the other side of the light engine. Route these cables to create the desired meteor trails. Ensure one fiber from each loom is used for proper stepping of the shooting star effect.
- Secure Fibers: Once all fibers are in place, use glue or other securing methods to prevent them from slipping. Trim any excess fiber length on the visible side of the headliner/ceiling.
- Mount Light Engine: Securely mount the light engine in its chosen hidden location using the provided screws. Ensure it is well-ventilated.
- Tilslut strøm: Connect the power adapter cord to the light engine and then to either the car plug adapter (for car installation) or the standard power outlet (for home installation).

Image: Installation diagrams for various shooting star effects.

Image: Light engine showing twinkle and meteor outputs.
5. Betjening
Your AZIMOM Starlight Headliner Kit can be controlled using the included RF remote or the 'My SmartLED' mobile application via Bluetooth.
5.1 Remote Control (28-Key RF Remote)
The 28-key remote provides quick access to various lighting modes and settings.
- TIL/FRA: Tænd eller sluk for enheden.
- Statiske farver: Select from a range of preset static colors (e.g., Red, Green, Blue, White, etc.).
- Dynamiske tilstande: Choose from various dynamic effects such as Jump (RGB, seven color), Fade (RGB, seven color), Flash (seven color), and Breath (seven color).
- Justering af hastighed/lysstyrke: Increase or decrease the speed of dynamic modes or the brightness of static colors.
- Shooting Star Control: Buttons labeled 'METEOR ON/OFF', 'METEOR MODE', 'METEOR SPEED' control the shooting star effects.
- Stemmestyring: 'MUSIC ON' activates the sound-activated mode, where lights respond to music/sound. 'MUSIC OFF' deactivates it.

Image: Functions of the 28-key RF remote control.
5.2 APP Control ('My SmartLED' via Bluetooth)
For advanced customization and control, download the 'My SmartLED' app from your device's app store and connect via Bluetooth.
- Millions of Colors: Access a full color wheel to select from over 16 million colors.
- Dynamiske tilstande: Explore 20 kinds of dynamic modes, with adjustable speed and brightness.
- Shooting Star Modes: Choose from 20 kinds of pure white shooting star modes.
- Twinkle Speed: Adjust the twinkle effect with 4 different speed settings.
- Lydaktiveret tilstand: Utilize the 'Music Sync' or 'Mic Mode' to make the lights dance to the rhythm of your music. Adjust sound sensitivity within the app.
- Tilpasning: Create and save your own custom color combinations and lighting sequences.

Image: 'My SmartLED' app interface for Bluetooth control.

Billede: Overview of APP control features.
6. Vedligeholdelse
To ensure the longevity and optimal performance of your AZIMOM Starlight Headliner Kit, follow these simple maintenance guidelines:
- Rensning: Gently wipe the light engine and exposed fiber ends with a soft, dry cloth. Avoid using abrasive cleaners or solvents.
- Ventilation: Ensure the light engine has adequate ventilation to prevent overheating. Do not block any vents.
- Fiber Care: Avoid bending or kinking the fiber optic cables sharply, as this can damage the light transmission.
- Fjernbetjenings batteri: If the remote control's range or responsiveness decreases, replace the Lithium Metal battery (CR2025 or CR2032, as specified on the remote).
7. Fejlfinding
If you encounter any issues with your starlight kit, refer to the following common problems and solutions:
| Problem | Mulig årsag | Løsning |
|---|---|---|
| Ingen lysudgang | Power not connected; Light engine off; Remote battery dead; Loose fiber connection. | Check power connection; Press ON button on remote/app; Replace remote battery; Ensure fibers are securely inserted into ports. |
| Fjernbetjeningen svarer ikke | Remote battery dead; Obstruction between remote and light engine; Remote out of range. | Replace remote battery; Remove obstructions; Move closer to the light engine. |
| APP'en opretter ikke forbindelse via Bluetooth | Bluetooth off on device; App not paired; Light engine off. | Ensure Bluetooth is enabled; Restart app and light engine; Re-pair device in app settings. |
| Shooting star effect not working | Meteor mode off; Incorrect fiber connection for meteor. | Activate meteor mode via remote/app; Verify shooting star fibers are correctly inserted into the meteor ports. |
| Lys synkroniseres ikke med musikken | Sound-activated mode off; Microphone sensitivity too low. | Enable 'MUSIC ON' on remote or 'Music Sync/Mic Mode' in app; Adjust microphone sensitivity in the app. |
8. Garanti og support
AZIMOM products are designed for quality and durability. For specific warranty information and customer support, please refer to the warranty card included in your package or visit the official AZIMOM website. If you have any questions or require assistance, do not hesitate to contact our support team.
Kontaktoplysninger: Please refer to the contact details provided on the product packaging or the official AZIMOM webwebstedet for de mest opdaterede supportoplysninger.


