1. Introduktion
This manual provides essential instructions for the safe and efficient operation of your RadioShack Home Projector. Please read this manual thoroughly before using the device and retain it for future reference.
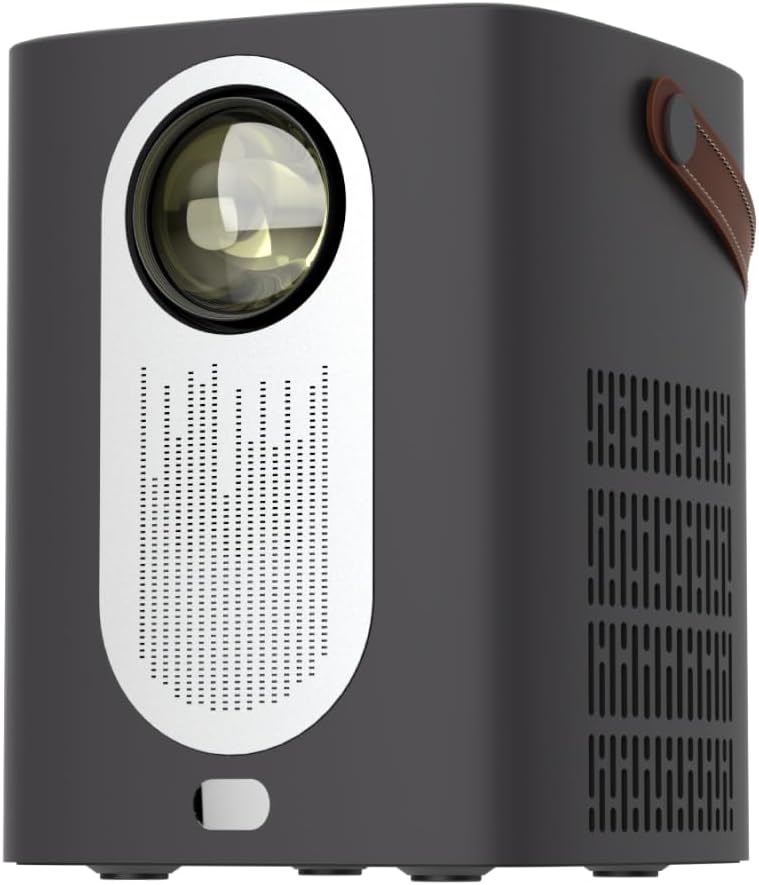
Billede 1.1: Forside view of the RadioShack Home Projector, showcasing its lens and speaker grille.
2. Pakkens indhold
Bekræft at alle varer er til stede i pakken:
- 1 x RadioShack Home Projector
- 1 x fjernbetjening
- 1 x strømkabel
- 1 x Brugermanual (dette dokument)

Image 2.1: Illustration of the package contents, including the projector, remote control, power cable, and user manual.
3. Produktet er slutview
3.1. Nøglefunktioner
- Skærm i høj opløsning: Supports full HD resolution for clear and detailed images.
- Bright and Long-Lasting: Features impressive brightness and a durable light source.
- Alsidig tilslutning: Includes Bluetooth, WiFi, Android Miracast, and iOS Cast for streaming.
- Forbedret Viewing: Digital focus and keystone correction for optimal image alignment.
- Kompakt og bærbar: Lightweight design with a handle for easy transport.
3.2. Porte og kontroller
Familiarize yourself with the projector's input/output ports and controls.

Billede 3.1: Bagside view of the projector showing USB input for media playback, AV input for DVD players, and HDMI input for various devices like video game consoles, streaming sticks, cell phones, tablets, and laptops.

Billede 3.2: Side view illustrating the compact dimensions (approximately 7 inches tall, 5.3 inches wide) and the integrated leather handle for portability.
4. Opsætningsvejledning
4.1. Første opstart
- Tilslut strømkablet til projektoren og en passende stikkontakt.
- Press the power button located on the top of the projector or on the remote control to turn on the device. The indicator light will illuminate.
- The RadioShack logo will appear on the projection surface, indicating successful power-on.
Video 4.1: A short demonstration showing the unboxing, connecting the power cable, powering on the projector, and the initial display of the RadioShack logo.
4.2. Placement and Focus
- Place the projector on a stable, flat surface, ensuring the lens is unobstructed.
- Adjust the distance from the projection surface (wall or screen) to achieve the desired image size.
- Use the digital focus adjustment (refer to the remote control or on-screen menu) to sharpen the image.
- Utilize keystone correction if the image appears trapezoidal, to achieve a rectangular projection.
5. Betjeningsvejledning
5.1. Tilslutning af enheder
Projektoren understøtter flere inputkilder:
- HDMI: Connect devices such as laptops, gaming consoles, streaming boxes, or Blu-ray players using an HDMI cable. Select HDMI as the input source from the projector's menu.
- USB: Insert a USB drive to play compatible video or audio files. Select USB as the input source.
- AV: Connect older devices like DVD players using an AV cable. Select AV as the input source.
- Bluetooth: Pair with Bluetooth audio devices for wireless sound output.
- WiFi / Casting: Connect to a Wi-Fi network to enable Android Miracast or iOS Cast for screen mirroring from compatible smartphones and tablets.

Image 5.1: A couple enjoying content projected by the RadioShack Home Projector, demonstrating its use in a home cinema setting.
5.2. Fjernbetjeningsfunktioner
Den medfølgende fjernbetjening muliggør praktisk betjening:
- Magt: Tænd/sluk for projektoren.
- Kilde: Select input sources (HDMI, USB, AV, etc.).
- Navigation: Arrow keys to navigate menus, OK button to confirm.
- Bind: Juster lydudgangsniveauet.
- Fokus/Keystone: Access digital focus and keystone correction settings.

Image 5.2: The RadioShack Home Projector placed on a table next to its remote control, ready for use.
6. Vedligeholdelse
- Rengøring af linsen: Brug en blød, fnugfri klud, der er specielt designet til optiske linser, til forsigtigt at tørre projektorlinsen af. Undgå slibende materialer eller barske kemikalier.
- Rengøring af ydersiden: Tør projektorens yderside af med en blød, tør klud. Brug ikke flydende rengøringsmidler direkte på enheden.
- Ventilation: Ensure the projector's ventilation openings are clear of dust and obstructions to prevent overheating.
- Opbevaring: Når projektoren ikke er i brug i længere perioder, skal den opbevares køligt og tørt, væk fra direkte sollys og ekstreme temperaturer.
7. Fejlfinding
| Problem | Mulig årsag | Løsning |
|---|---|---|
| Intet billede vises | Power cable disconnected; incorrect input source selected; lens cap on. | Check power connection; select correct input source (HDMI, USB, AV); remove lens cap. |
| Billedet er sløret | Fokus ikke justeret; projektoren er for tæt på/langt fra skærmen. | Adjust digital focus; reposition projector for optimal distance. |
| Ingen lyd | Volume too low; external audio device not connected/paired; incorrect audio output selected. | Increase volume; ensure Bluetooth device is paired or wired audio is connected; check audio output settings. |
| Fjernbetjening virker ikke | Batteries depleted; obstruction between remote and projector. | Replace remote control batteries; ensure clear line of sight to the projector's IR receiver. |
8. Specifikationer
- Mærke: RadioShack
- Model: Home Projector (ASIN: B0DP1GFG9L)
- Skærmopløsning: 1280 x 720 (Supports Full HD)
- Forbindelse teknologi: AV, HDMI, USB, Bluetooth, WiFi (Android Miracast, iOS Cast)
- Særlige funktioner: Portable, Digital Focus, Keystone Correction
- Anbefalet brug: Hjemmebiograf
- Produktdimensioner: 5.31 x 5.31 x 7.09 tommer
- Varens vægt: 3.91 pund

Image 8.1: The projector displaying content, highlighting its support for full HD resolution and high-quality sound.
9. Garanti og support
For warranty information and technical support, please refer to the official RadioShack webwebstedet eller kontakt deres kundeservice. Behold din købskvittering som købsbevis.
Online support: www.radioshack.com


