1. Introduktion
This manual provides comprehensive instructions for the OMAIC Voice Remote Control, Model AMZ4. It covers product features, setup procedures, operational guidelines, maintenance tips, and troubleshooting steps to ensure optimal performance and user experience. This remote is designed as a replacement for various Smart TV Stick, TV Cube, and Smart TV models, offering enhanced functionality and broad compatibility.

Figure 1: OMAIC Voice Remote Control and a compatible TV Stick. This image displays the sleek design of the remote control alongside a typical streaming device it is designed to operate.
2. Bred kompatibilitet
The OMAIC Voice Remote Control is engineered for extensive compatibility with a wide range of Smart TV devices and models. Refer to the lists below for specific compatible devices and remote models.
2.1. Compatible Smart TV Devices
- Smart TV Cube (1st / 2nd / 3rd Gen)
- Smart TV Stick 4K Max (1st / 2nd Gen)
- Smart TV Stick 4K (1st / 2nd Gen)
- Smart TV Stick (1st / 2nd / 3rd Gen)
- Smart TV Stick Lite
- Smart TV (3rd Gen, Pendant Design)
- Omni QLED Series Smart TVs
- Omni Series Smart TVs
- 2-Series Smart TVs
- 4-Series Smart TVs
- Smart TVs: LF711 / LF621U / LF421U / LF221U / C350 / A810U / A710U / M550 / V35 series
- Smart TVs: F30 / F20 / F50 / DF710 / DF711 / DF310 / DF510 / DF311 / DF620 series
- TVs PN450 / PN651 / PN851 / PN951 series
2.2. Applicable Remote Models
- Smart TV stick voice remote control (2nd Gen/3rd Gen/Lite/Lite 2nd Gen)
- TV voice remote control (NS-RCFNA-21, CT-95018, CT-RC1US-21, NS-RCFNA-19, CT-RC1US-19)
3. Nøglefunktioner
The OMAIC Voice Remote Control offers several enhanced features designed to improve your media consumption experience.
3.1. Upgraded Functions
- Two Customizable Buttons: Easily program your favorite applications and functions to these dedicated buttons for quick access.
- Hovedtelefonknap: A new dedicated button allows for quick pairing of wireless headphones, enabling private listening without disturbing others.

Figure 2: Customizable Buttons. This image illustrates the location of the two customizable buttons (labeled 1 and 2) on the remote control, which can be programmed for preferred apps or functions.

Figure 3: Headphone Button. This image shows the headphone button on the remote and a user enjoying private listening with wireless headphones connected to their TV.
3.2. Enhanced Voice Control
- Aktivér stemmekommandoer ved at trykke og holde nede Mikrofon knap (blue microphone icon).
- Speak clearly into the remote's microphone. ExampFølgende kommandoer inkluderer:
- "Find actionfilm"
- "Åbn Netflix"
- "Afspil [filmtitel]"
- "Gå til indstillinger"
- Release the Microphone Button when you finish speaking.
3.3. Four Shortcut Buttons
The remote includes four dedicated quick launch buttons for popular streaming services, providing one-key access to:
- NETFLIX
- Video (likely Prime Video)
- Disney (Disney+)
- Hulu
4. Opsætning og parring
Before using your OMAIC Voice Remote Control, it must be paired with your compatible TV Stick, TV Cube, or Smart TV. This process enables full functionality, including voice control.
4.1. Installation af batterier
- Find batterirummet på bagsiden af fjernbetjeningen.
- Skub batteridækslet op.
- Isæt to (2) AAA-batterier, og sørg for at polerne (+ og -) vender korrekt.
- Luk batteridækslet forsvarligt.
4.2. Parring af fjernbetjeningen
The pairing process may vary slightly depending on your specific TV Stick, TV Cube, or Smart TV model. Generally, follow these steps:
- Ensure your TV Stick/Cube/Smart TV is powered on and connected to your display.
- Place the OMAIC Voice Remote Control within 10 feet (3 meters) of your device.
- On your TV Stick/Cube/Smart TV, navigate to the Indstillinger menu. This is typically found on the home screen.
- Vælge Controllere og Bluetooth-enheder or a similar option (e.g., Fjernbetjeninger og Bluetooth-enheder, Tilføj ny fjernbetjening).
- Vælge Tilføj ny fjernbetjening or Tilføj fjernbetjening.
- The device will begin searching for new remotes.
- On the OMAIC Voice Remote Control, press and hold the Hjem button (usually a house icon) for approximately 10-20 seconds. The remote's indicator light may flash.
- Release the button when your device detects the remote. A confirmation message should appear on your screen.
- Følg eventuelle vejledninger på skærmen for at fuldføre parringen.
If pairing is unsuccessful, try replacing the batteries, moving closer to the device, or restarting your TV Stick/Cube/Smart TV and repeating the steps.
5. Betjeningsvejledning
Once paired, your OMAIC Voice Remote Control is ready for use. Below are instructions for its primary functions.
5.1. Grundlæggende navigation
- Retningstastatur (D-pad): Use the circular pad with Up, Down, Left, and Right arrows to navigate menus and select items.
- OK knap: Press the center "OK" button to confirm selections or play/pause content.
- Tilbage knap: The curved arrow button returns to the previous screen or menu.
- Hjemknappen: The house icon button returns you to the main home screen of your device.
- Menu-knap: The three-line icon button opens context-sensitive menus or options.
5.2. Brug af stemmestyring
- Tryk og hold på Mikrofon knap (blue microphone icon).
- Speak clearly into the remote's microphone. ExampFølgende kommandoer inkluderer:
- "Find actionfilm"
- "Åbn Netflix"
- "Afspil [filmtitel]"
- "Gå til indstillinger"
- Release the Microphone Button when you finish speaking.
5.3. Programming Customizable Buttons
The remote features two customizable buttons (labeled 1 and 2) that can be programmed to launch your favorite apps or functions.
- Navigate to the app or function you wish to assign to a customizable button.
- Press and hold the desired customizable button (1 or 2) for approximately 3-5 seconds until a confirmation appears on your screen, indicating the app/function has been assigned.
- To use the programmed button, simply press it once.
5.4. Pairing Wireless Headphones
The dedicated headphone button simplifies connecting wireless headphones for private listening.
- Ensure your wireless headphones are in pairing mode.
- Tryk på Hovedtelefonknap (headphone icon) on the remote control.
- Follow the on-screen instructions on your TV or streaming device to complete the pairing process with your headphones.
6. Vedligeholdelse
Proper care and maintenance will extend the lifespan of your OMAIC Voice Remote Control.
6.1. Rensning
- Brug en blød, tør klud til at tørre overfladen af fjernbetjeningen af.
- For genstridigt snavs, let dampRengør kluden med vand eller et mildt, ikke-slibende rengøringsmiddel. Spray ikke rengøringsmiddel direkte på fjernbetjeningen.
- Avoid using harsh chemicals, solvents, or abrasive cleaning materials, as these can damage the remote's finish or internal components.
6.2. Udskiftning af batteri
- Replace batteries when the remote's response becomes sluggish or if the indicator light does not illuminate during use.
- Udskift altid begge AAA-batterier med nye på samme tid.
- Bland ikke gamle og nye batterier eller forskellige typer batterier.
- Fjern batterierne, hvis fjernbetjeningen ikke skal bruges i længere tid, for at forhindre lækage.
7. Fejlfinding
If you encounter issues with your OMAIC Voice Remote Control, try the following solutions:
| Problem | Mulig årsag | Løsning |
|---|---|---|
| Fjernbetjeningen svarer ikke | Low or dead batteries; Remote not paired; Obstruction between remote and device. | Replace batteries. Re-pair the remote (refer to Section 4.2). Ensure clear line of sight to the device. |
| Stemmestyring virker ikke | Remote not paired for voice; Microphone button not held; Speaking too softly/loudly. | Ensure remote is fully paired (voice function activates after pairing). Press and hold the microphone button while speaking. Speak clearly at a normal volume. |
| Customizable buttons not working | Buttons not programmed; Incorrect programming. | Program the buttons as described in Section 5.3. Ensure you hold the button long enough for confirmation. |
| Hovedtelefoner parres ikke | Headphones not in pairing mode; Interference. | Ensure headphones are in pairing mode. Try moving closer to the device. Restart both the device and headphones. |
| Intermitterende forbindelse | Weak batteries; Interference from other devices; Distance from device. | Replace batteries. Reduce interference by moving other electronic devices. Stay within recommended operating range (approx. 10 feet). |
8. Specifikationer
Detailed technical specifications for the OMAIC Voice Remote Control, Model AMZ4.
| Feature | Detalje |
|---|---|
| Produktdimensioner | 6.2 x 1.49 x 0.59 tommer (15.7 x 3.8 x 1.5 cm) |
| Varens vægt | 1.76 ounce (50 gram) |
| Modelnummer | AMZ4 |
| Batterier påkrævet | 2 x AAA batterier (medfølger ikke) |
| Forbindelsesteknologi | Infrared (IR) and Bluetooth (for voice/advanced features) |
| Maks. antal understøttede enheder | 1 (dedicated to one paired device) |
| Kompatible enheder | Television, Smart TV Stick, Smart TV Cube |
| Særlige funktioner | Ergonomic design, No programming required (after pairing), Universal compatibility (within specified models), Voice Search, Customizable Buttons, Headphone Pairing Button |
| Fabrikant | OMAIC |
| Dato først tilgængelig | 8. november 2024 |
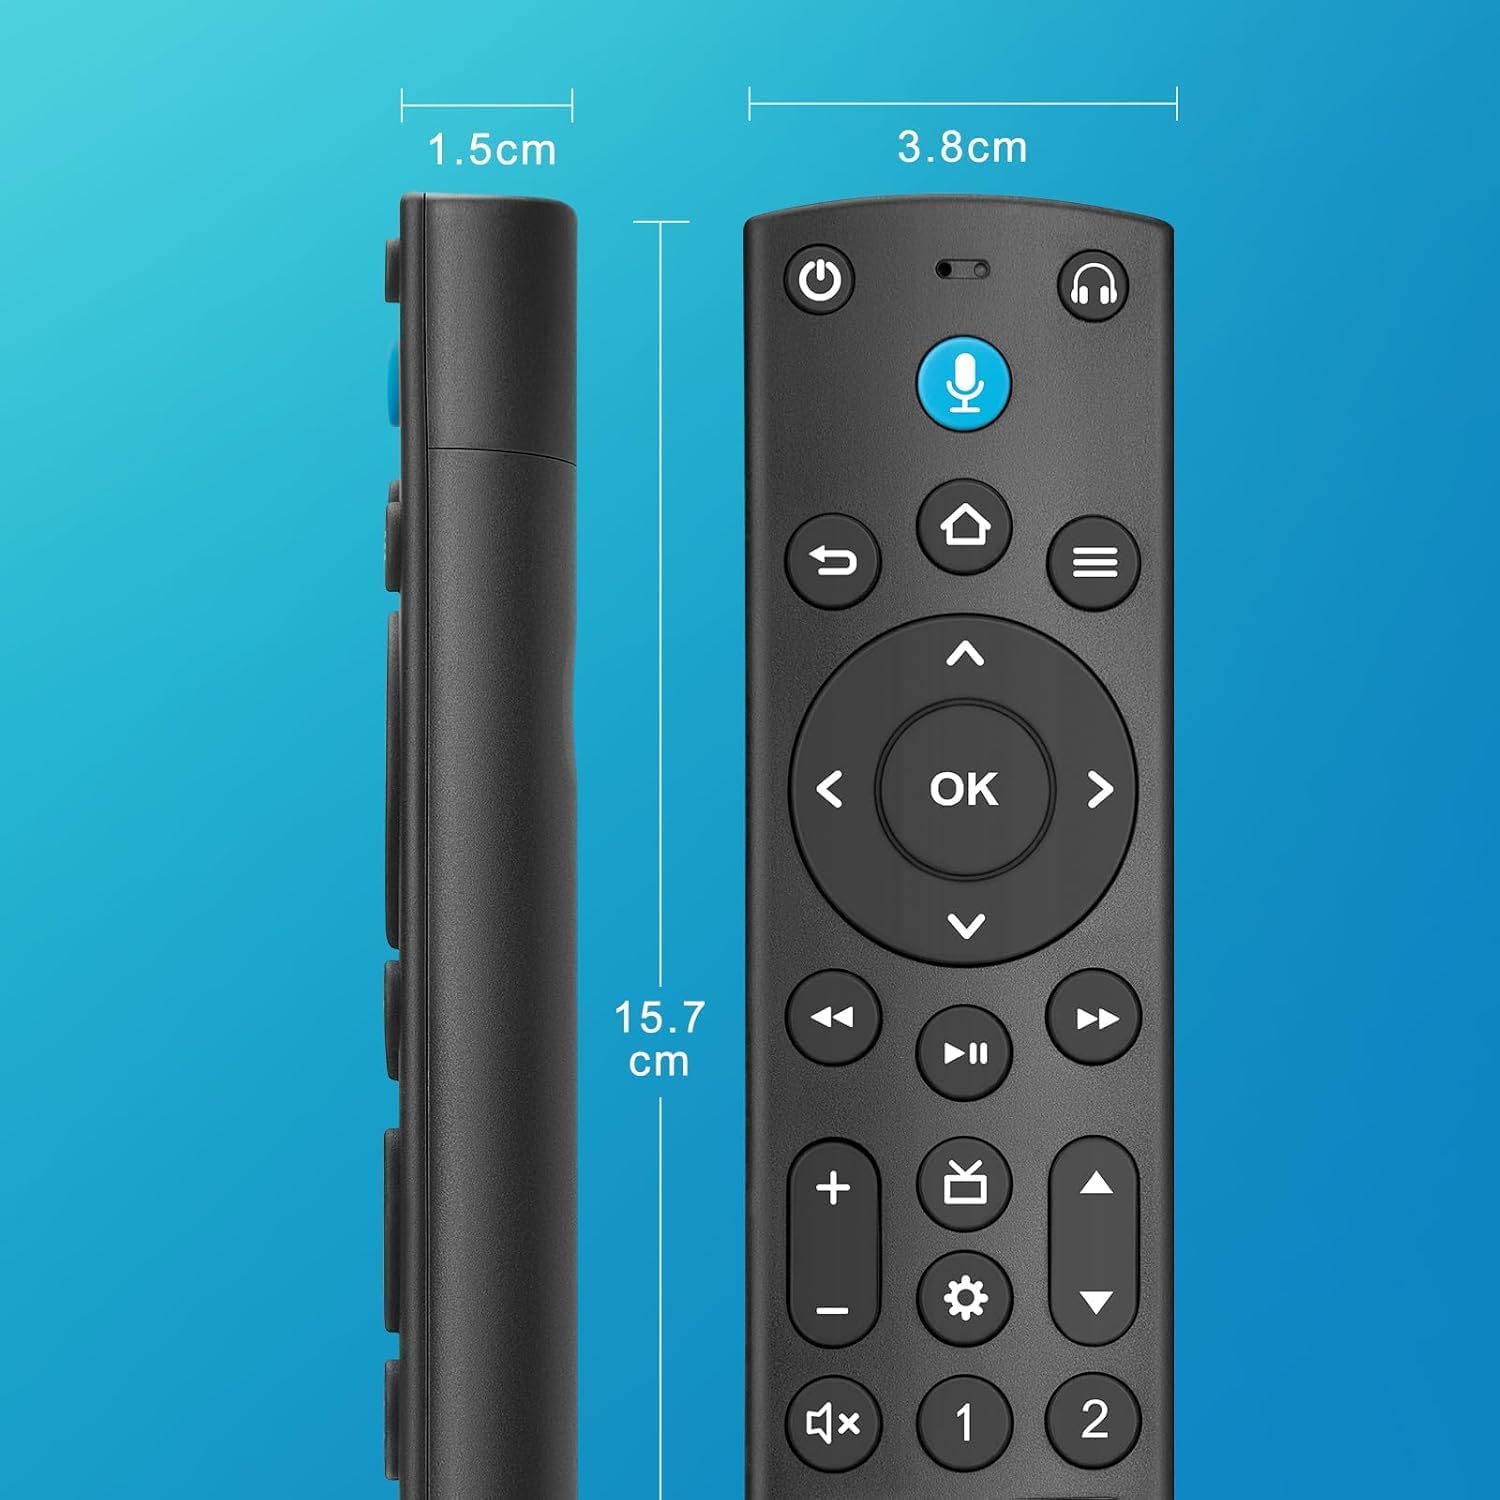
Figure 4: Remote Control Dimensions. This image provides a visual representation of the remote control's length, width, and thickness, with measurements in both inches and centimeters.
9. Kundesupport
For further assistance, technical support, or warranty inquiries regarding your OMAIC Voice Remote Control, please contact OMAIC customer service through the retailer's platform or visit the official OMAIC store page.
OMAIC Store: Visit OMAIC Store on Amazon
Please have your product model number (AMZ4) and purchase details ready when contacting support.