1. Introduktion
Thank you for choosing the Vormooi Digital Voice Recorder. This device is designed for high-quality audio recording, offering features such as ultra-long continuous recording, voice activation, and versatile input options. With its substantial 96GB memory capacity and advanced noise reduction technology, it is an ideal tool for lectures, interviews, meetings, and personal notes. This manual provides detailed instructions to help you set up, operate, and maintain your device for optimal performance.
2. Pakkens indhold
Markér venligst feltet for følgende elementer:
- 1 x Vormooi Digital Voice Recorder (32GB built-in memory)
- 1 x 64 GB TF-kort (forinstalleret eller separat)
- 1 x 3.5 mm ekstern mikrofon
- 1 x 3.5 mm line-in-kabel
- 1 x USB C-kabel
- 1 x brugermanual
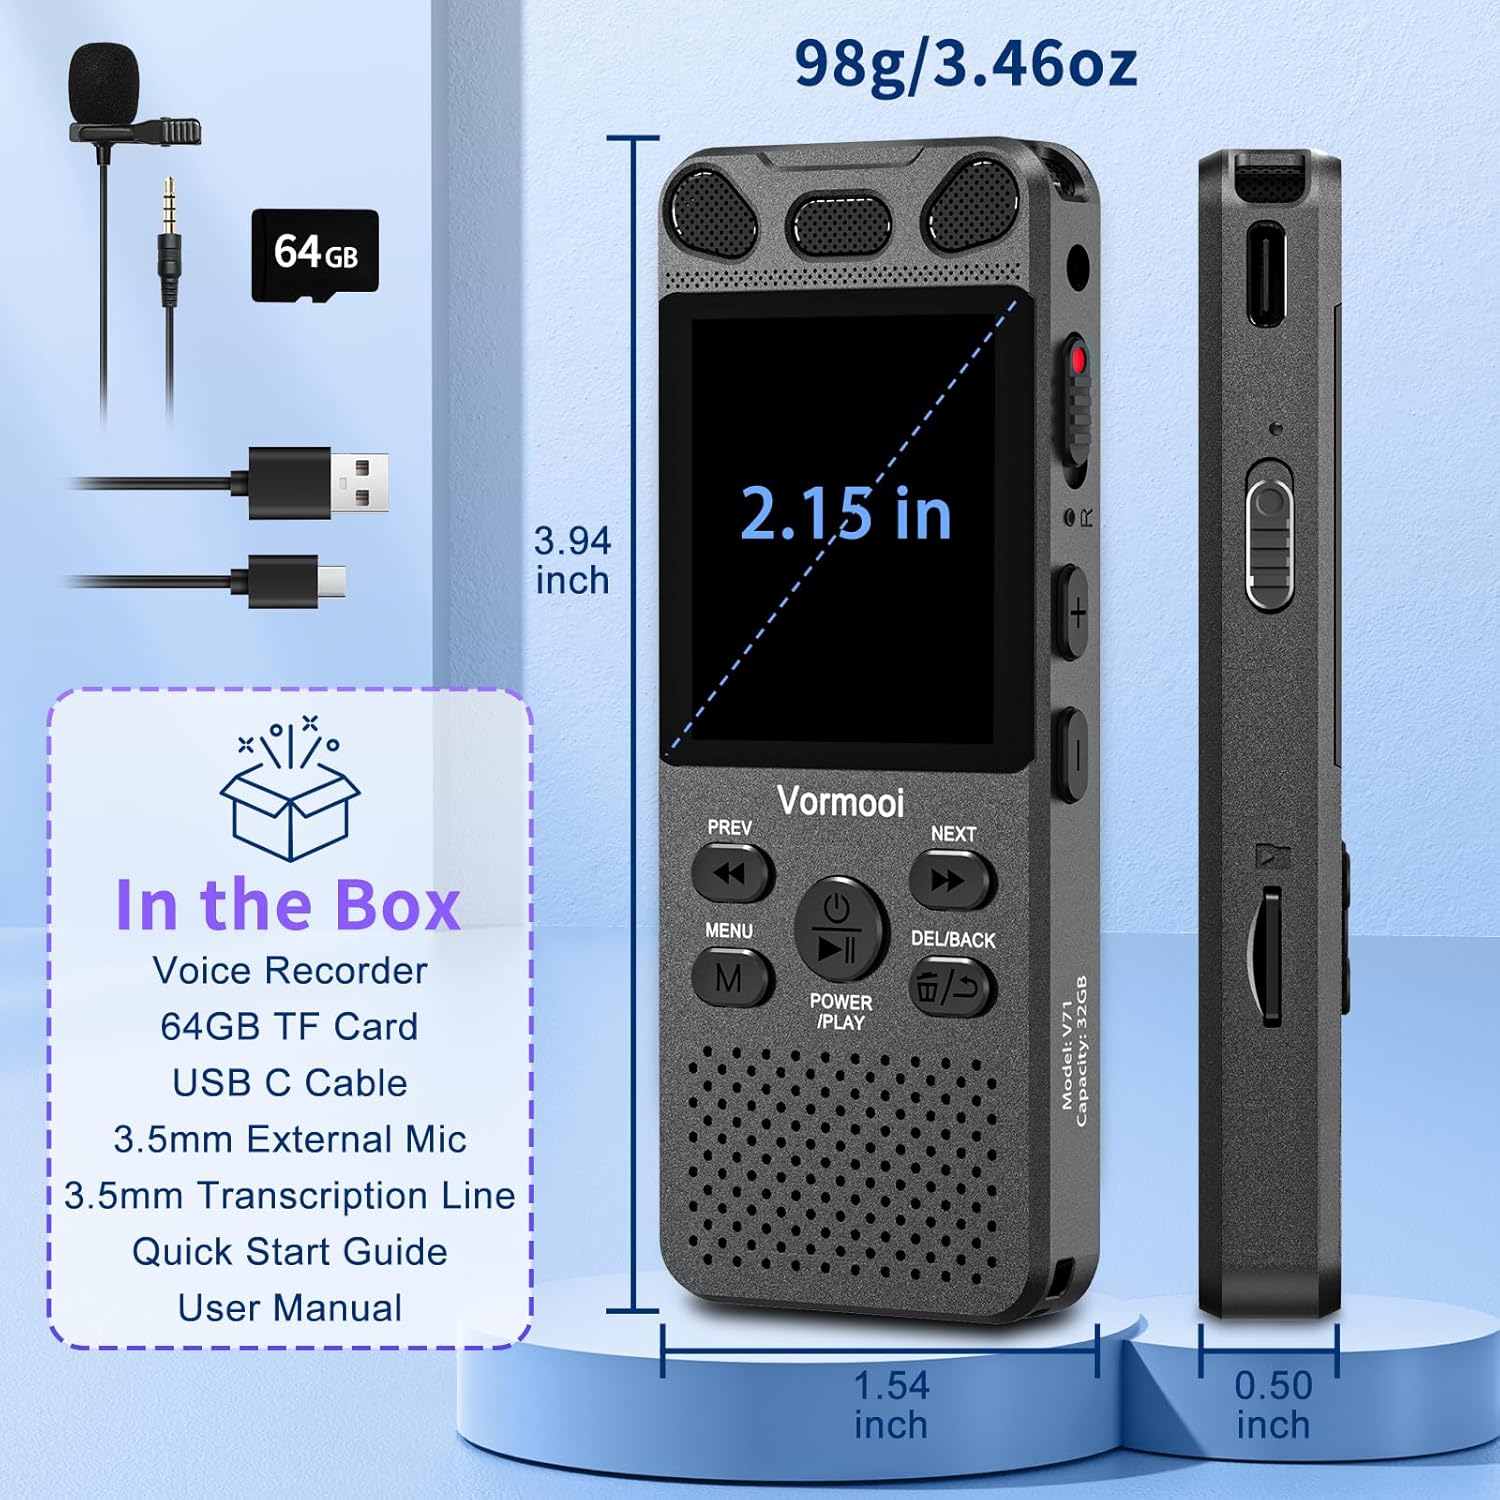
Image: The Vormooi Digital Voice Recorder and its included accessories, such as the external microphone, USB-C cable, and 64GB TF card.
3. Produktet er slutview
Familiarize yourself with the various parts and controls of your Vormooi Digital Voice Recorder.

Image: Labeled diagram of the Vormooi Digital Voice Recorder highlighting its USB C Port, Lock/Unlock switch, Previous Song/Fast Rewind button, TF-Card Slot, Menu button, Power/Play/Pause/OK button, 3.5mm Jack, Record/Save (REC) switch, Reset button, Volume +/- buttons, Next Song/Fast Forward button, and Back/Delete Files knap.
Nøglekomponenter:
- Skærm: 2.15-inch color screen for navigation and information display.
- Indbyggede mikrofoner: For omni-directional recording.
- Højttaler: For playback of recordings.
- REC-knap: Stryg op for at starte optagelsen, stryg ned for at gemme.
- LÅS -knap: Locks all buttons to prevent accidental operation during recording.
- USB-C-port: Til opladning og tilslutning til en computer.
- 3.5 mm jack: Til tilslutning af ekstern mikrofon eller hovedtelefoner.
- TF-kortslot: For inserting the 64GB TF card to expand memory.
4. Opsætning
4.1 Opladning af enheden
Before first use, fully charge the voice recorder.
- Tilslut det medfølgende USB-C-kabel til optagerens USB-C-port.
- Tilslut den anden ende af USB-C-kablet til en USB-strømadapter (medfølger ikke) eller en computers USB-port.
- The battery icon on the screen will indicate charging status. A full charge takes approximately 2 hours.
Note: A fully charged battery provides up to 110 hours of continuous recording.
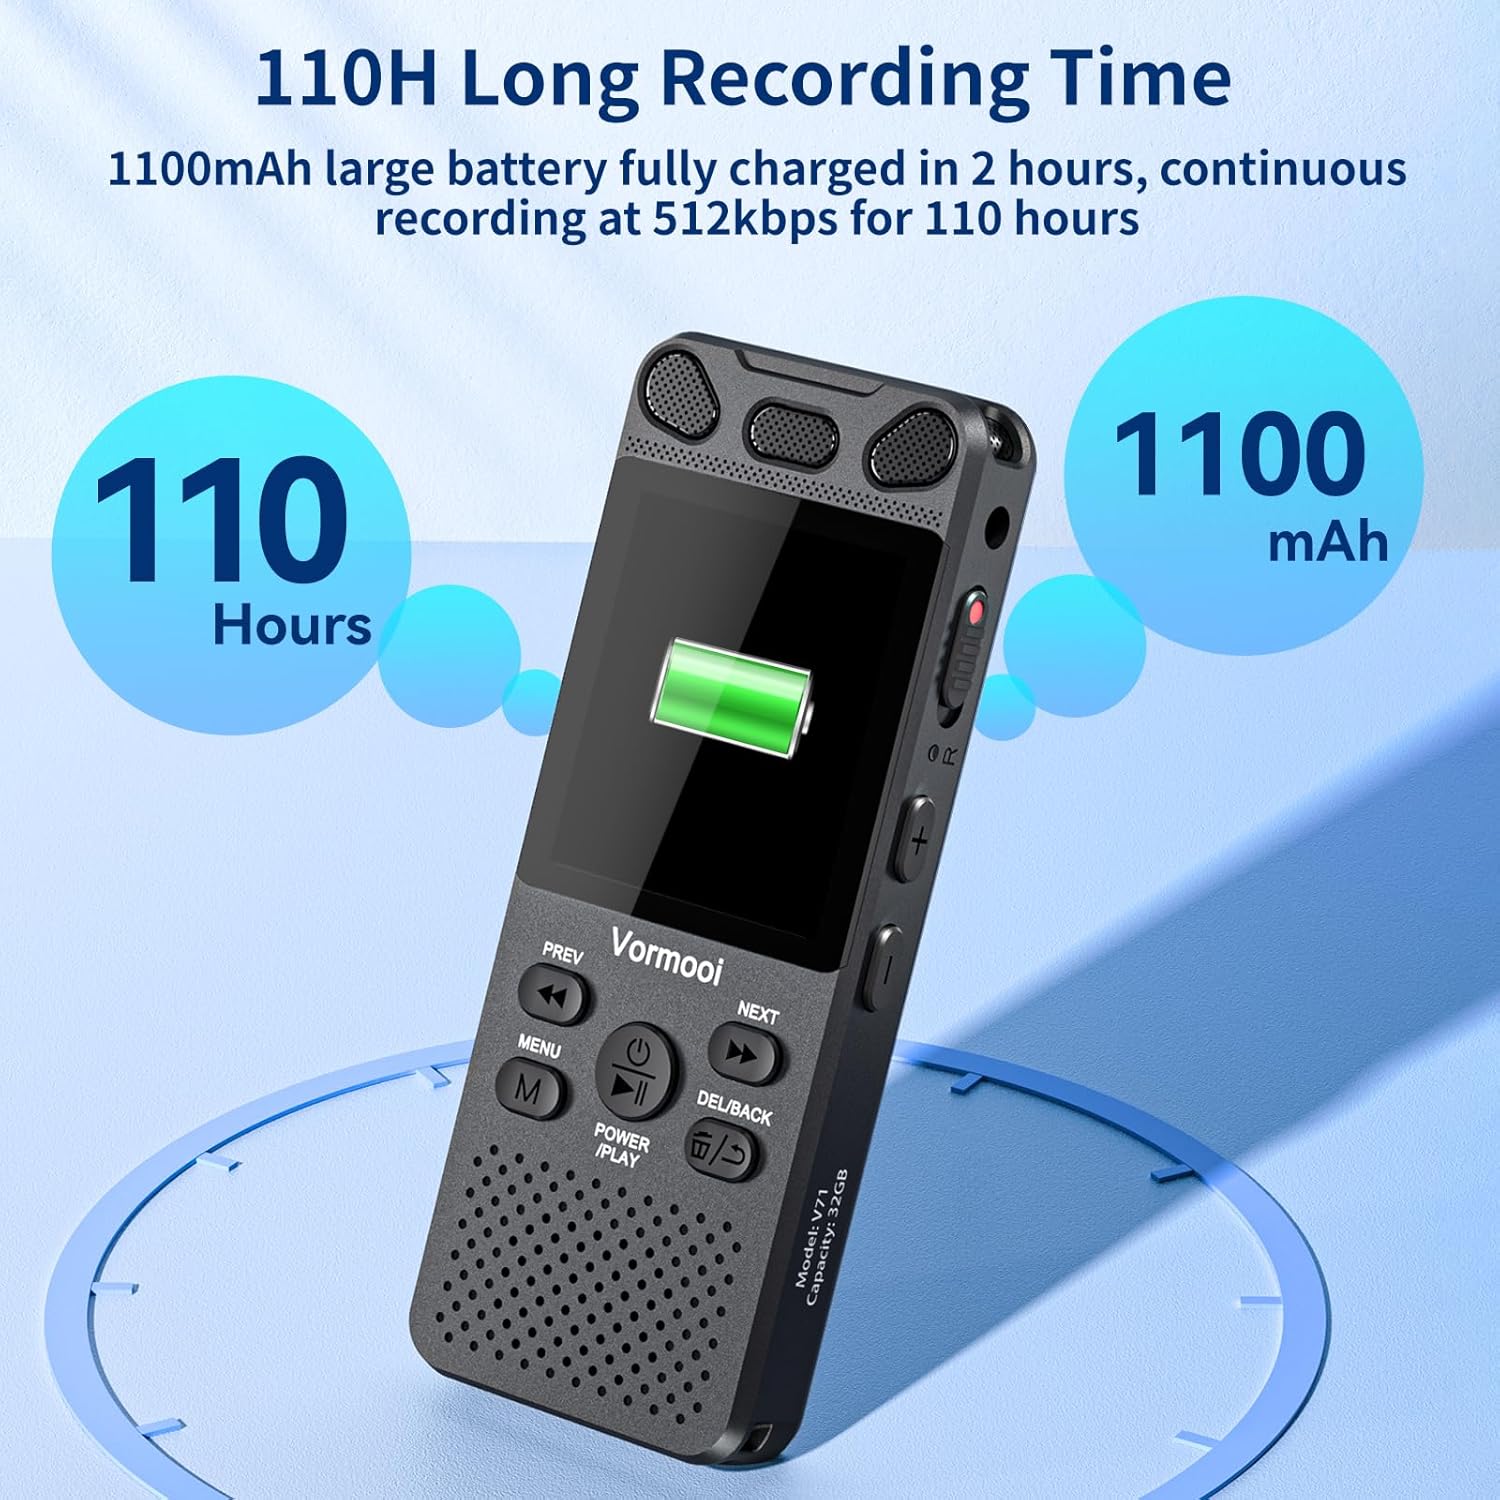
Image: The recorder's screen displaying battery status and highlighting its 110-hour long recording capability and 1100mAh battery.
4.2 Indsættelse af TF-kortet
The device comes with 32GB built-in memory and an additional 64GB TF card for expanded storage.
- Locate the TF-Card Slot on the side of the recorder.
- Gently insert the 64GB TF card into the slot until it clicks into place. Ensure the card is oriented correctly.
- For at fjerne det skal du forsigtigt skubbe kortet indad, indtil det springer ud.

Image: Visual representation of the recorder's 96GB storage, composed of 32GB internal memory and an expandable 64GB TF card, capable of storing over 7000 hours of 32kbps recordings.
4.3 Tænd/sluk
- Tænd: Tryk og hold på POWER/PLAY/PAUSE/OK button for a few seconds until the screen lights up.
- Sluk: Tryk og hold på POWER/PLAY/PAUSE/OK knappen, indtil skærmen slukker.
5. Betjeningsvejledning
5.1 Grundlæggende optagelse
The Vormooi recorder features a convenient one-touch recording function.
- To start recording, slide the REC switch upwards. The recording indicator will light up, and the screen will show recording in progress.
- To save the recording, slide the REC switch downwards. The recording will be saved automatically.

Image: The recorder's one-touch record/save switch, demonstrating its ease of use, alongside icons representing 1536K clear sound quality and an intelligent noise cancellation chip.
5.2 Afspilning
- From the main menu, navigate to "Recordings Library" or "Folders".
- Brug FORR og NÆSTE knapperne for at vælge den ønskede optagelse.
- Tryk på POWER/PLAY/PAUSE/OK knappen for at starte afspilning.
- Tryk på under afspilning POWER/PLAY/PAUSE/OK to pause/resume.
- Brug FORR og NÆSTE buttons for fast rewind/fast forward.
- Juster lydstyrken ved hjælp af Volumen +/- knapper.
5.3 Stemmeaktiveret optagelse (VAR)
The VAR function allows the recorder to start recording automatically when sound is detected and pause when silence occurs, saving memory space.
- Go to the "Settings" menu.
- Select "VAR Mode" or "Voice Activated".
- Choose your desired sensitivity level (e.g., Level 1-7, where 7 is most sensitive).
- Exit the menu. The recorder will now record only when sound is present.

Image: A composite image illustrating key functionalities: Voice Activated Recording, 110-hour battery life, password protection, A-B repeat for specific section playback, and variable speed playback.
5.4 External Microphone Recording
For more precise audio capture, especially in interviews, use the included external microphone.
- Plug the 3.5mm jack of the external microphone into the recorder's 3.5mm jack.
- Ensure the microphone is positioned correctly for optimal sound pickup.
- Proceed with recording as usual using the REC switch. The device will automatically switch to external microphone input.

Image: The Vormooi recorder connected to its external 3.5mm microphone, showing the setup for enhanced audio recording.
5.5 Line-in Recording (Transcription)
The line-in function allows you to record audio directly from other devices like cell phones, MP3 players, or computers.
- Connect one end of the 3.5mm Line-in Cable to the audio output of your external device (e.g., headphone jack of a phone).
- Connect the other end of the 3.5mm Line-in Cable to the recorder's 3.5mm jack.
- Start playback on your external device and then slide the REC switch upwards on the recorder to begin recording.

Image: Setup for line-in recording, showing the recorder connected to a smartphone via a 3.5mm cable, enabling direct audio capture from other devices.
5.6 Støjreduktion
The Vormooi recorder is equipped with an advanced noise reduction chip and adjustable noise reduction levels (7 levels).
- Gå til menuen "Indstillinger".
- Find the "Noise Reduction" or "DSP" option.
- Adjust the level to minimize environmental noise during recording. Higher levels provide more aggressive noise reduction.

Billede: En intern view highlighting the 2159 Intelligent Noise Reduction Chip (DSP) responsible for minimizing environmental noise and enhancing audio clarity.
5.7 Låseknap
To prevent accidental interruption or loss of recording due to unintentional button presses, use the LOCK button.
- Skub til LÅSE button (usually on the side) to the "locked" position. All buttons will become unresponsive.
- Slide it back to the "unlocked" position to regain control of the buttons.

Image: The lock switch on the side of the recorder, showing its "UP: Locked" and "DOWN: Unlock" positions, designed to prevent accidental button presses during recording.
5.8 Tilslutning til computer
You can transfer recordings to your Windows or macOS computer.
- Tilslut optageren til din computer med det medfølgende USB-C-kabel.
- Optageren vises som et flytbart diskdrev på din computer.
- You can then drag and drop audio files til og fra enheden.
6. Vedligeholdelse
- Rensning: Brug en blød, tør klud til at rengøre enheden. Brug ikke flydende rengøringsmidler eller opløsningsmidler.
- Opbevaring: Opbevar enheden et køligt, tørt sted væk fra direkte sollys og ekstreme temperaturer.
- Batteripleje: For at forlænge batteriets levetid, undgå at aflade batteriet helt ofte. Oplad det regelmæssigt, selvom det ikke er i brug i længere perioder.
- Data backup: Sikkerhedskopier regelmæssigt vigtige optagelser til din computer for at forhindre datatab.
7. Fejlfinding
| Problem | Mulig løsning |
|---|---|
| Enheden tænder ikke. |
|
| Kan ikke optage. |
|
| Dårlig optagekvalitet. |
|
| Enheden genkendes ikke af computeren. |
|
8. Specifikationer
| Feature | Detalje |
|---|---|
| Modelnummer | O1 |
| Hukommelseskapacitet | 96 GB (32GB Built-in + 64GB TF Card) |
| Optagelseskvalitet | Up to 1536Kbps HD |
| Batterilevetid | Up to 110 hours continuous recording |
| Skærmstørrelse | 2.15 tommer |
| Produktdimensioner | 1.54" D x 3.94" B x 4.96" H |
| Varens vægt | 5.3 ounce |
| Hovedtelefonstik | 3.5 millimeter |
| Understøttede formater | MP3 Audio, WAV (also FLAC, OGG, APE, WMA for playback, as per A+ content image) |
| Hardware-interface | USB Type C |
| Kompatible enheder | Windows/macOS-computer |
9. Kundesupport
For any questions, issues, or assistance with your Vormooi Digital Voice Recorder, please contact our support team.
- Supportsvar: Vormooi support team will promptly respond and solve the problem within 24 hours on weekdays.
- Please refer to the contact information provided on the product packaging or the official Vormooi webwebsted for de mest opdaterede supportkanaler.


