1. Introduktion
This manual provides comprehensive instructions for the setup, operation, maintenance, and troubleshooting of your AOC 24G4/P Gaming Monitor. Please read this manual thoroughly before using the product to ensure proper functionality and to maximize your gaming experience.

Figur 1.1: Forside view of the AOC 24G4/P Gaming Monitor, showcasing its sleek design and immersive display.
2. Opsætning
2.1 Udpakning og pakkeindhold
Fjern forsigtigt alle komponenter fra emballagen. Sørg for, at alle nedenstående dele er til stede:
- AOC 24G4/P Gaming Monitor
- Monitorstativ (base og hals)
- Strømkabel
- DisplayPort-kabel
- HDMI-kabel (kan variere afhængigt af region)
- Brugervejledning og garantibevis
2.2 Samling af skærm
- Placer skærmpanelet med forsiden nedad på en blød, ren overflade for at forhindre ridser.
- Attach the stand neck to the back of the monitor panel. Ensure it clicks securely into place or is fastened with screws if provided.
- Attach the stand base to the bottom of the stand neck. Tighten the thumb screw or screws to secure the base.

Figur 2.1: Sideprofile of the monitor, illustrating the attached stand and its ergonomic design.
2.3 Tilslutning af skærmen
Tilslut de nødvendige kabler til skærmen og din computer:
- Strømtilslutning: Tilslut strømkablet til skærmens strømindgang og derefter til en stikkontakt.
- Videoforbindelse: For optimal performance, use the DisplayPort cable to connect the monitor to your computer's graphics card. Alternatively, use an HDMI cable.
- Lydforbindelse (valgfrit): If using external speakers or headphones, connect them to the monitor's audio output jack.

Figur 2.2: Bagside view of the monitor, highlighting the various input ports including DisplayPort and HDMI.
3. Betjening af monitoren
3.1 Tænd/sluk
Press the power button located on the bottom right side of the monitor to turn it on or off. The power LED will indicate the monitor's status.
3.2 Navigation i OSD-menuen (On-Screen Display)
The OSD menu allows you to adjust various monitor settings. Use the joystick button located on the back of the monitor (typically near the power button) to navigate the menu:
- Tryk på joysticket: Opens the OSD menu or selects an option.
- Flyt joysticket op/ned: Navigerer gennem menupunkter.
- Flyt joysticket til venstre/højre: Justerer værdier eller skifter mellem undermenuer.
3.3 Nøglefunktioner og justeringer
Your AOC 24G4/P monitor is equipped with several features to enhance your viewspil- og spilleoplevelse:
- NVIDIA G-Sync Compatibility: This technology synchronizes the monitor's refresh rate with your GPU's frame rate, eliminating screen tearing and stuttering for a smoother gaming experience. Ensure your graphics card drivers are up to date and G-Sync is enabled in your NVIDIA control panel.
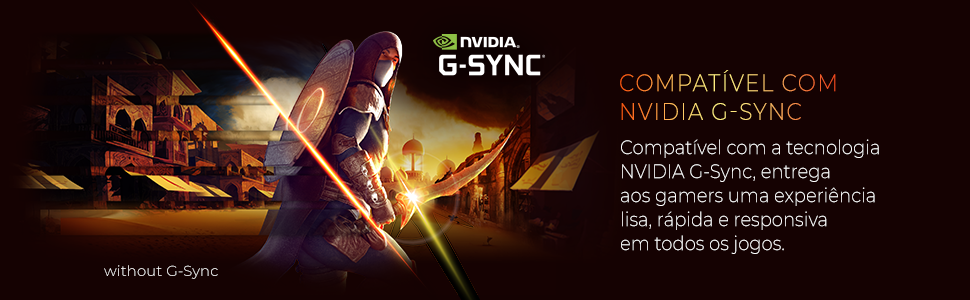
Figure 3.1: Visual representation of NVIDIA G-Sync compatibility, ensuring smooth gameplay.
- 180 Hz opdateringshastighed: Provides ultra-smooth motion and reduced input lag, crucial for fast-paced games. This high refresh rate allows for more frames per second, making gameplay feel more fluid.

Figure 3.2: Illustration of the difference between 60Hz and 180Hz refresh rates, highlighting enhanced motion clarity.
- 0.5 ms MPRT-svartid: Minimizes motion blur and ghosting, ensuring sharp images even during rapid movements. This ultra-fast response time is ideal for competitive gaming.

Figure 3.3: Comparison demonstrating the benefit of 0.5ms MPRT response time in reducing motion blur.
- IPS panel: Tilbyder bredt viewing angles and accurate color reproduction, providing consistent image quality from various perspectives. This is beneficial for both gaming and general use.
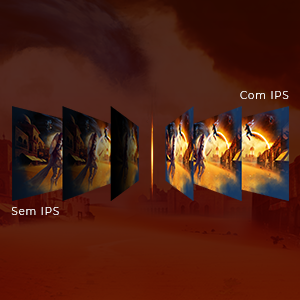
Figure 3.4: Diagram illustrating the superior viewing angles and color consistency of an IPS panel.
- HDR (High Dynamic Range): Enhances contrast and color depth, making bright areas brighter and dark areas darker for a more immersive visual experience. Enable HDR in your operating system display settings.

Figure 3.5: Visual comparison between SDR and HDR, demonstrating the expanded contrast and color of HDR.
- Ergonomiske justeringer: The monitor stand allows for height, tilt, swivel, and pivot adjustments to ensure optimal viewing comfort during long sessions.
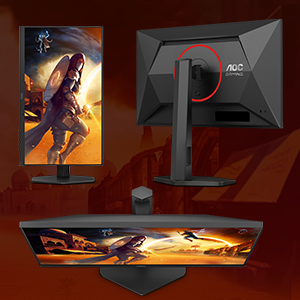
Figure 3.6: Illustration of the monitor's versatile ergonomic adjustments for personalized comfort.
- Lavt blåt lys tilstand: Reduces harmful blue light emissions to minimize eye strain during extended use. This mode can be activated through the OSD menu.
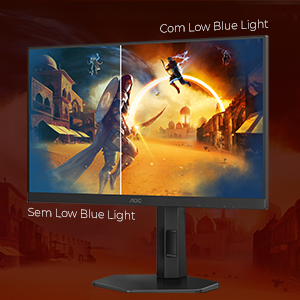
Figure 3.7: Comparison showing the visual difference with Low Blue Light mode enabled, reducing eye strain.
- Flimmerfri teknologi: Eliminates screen flickering, which can cause eye fatigue and discomfort, by using a smooth DC (Direct Current) backlight system.

Figure 3.8: Visual demonstrating the absence of flickering on a Flicker-Free monitor compared to a conventional one.
- Shadow Control: Adjusts the gamma levels in dark areas of the screen without affecting the bright areas, allowing you to see details in shadows more clearly. This feature is particularly useful in games with dark environments.

Figure 3.9: Illustration of Shadow Control enhancing visibility in dark game scenes.
4. Vedligeholdelse
Korrekt vedligeholdelse sikrer din skærms levetid og optimale ydeevne.
4.1 Rengøring af monitoren
- Tag altid stikket ud af stikkontakten før rengøring.
- Brug en blød, fnugfri klud lidt damprengøres med vand eller et ikke-slibende skærmrensemiddel.
- Sprøjt ikke væske direkte på skærmen eller skærmen casing.
- Undgå at bruge benzen, fortynder, ammoniakbaserede rengøringsmidler eller slibende rengøringsmidler.
4.2 Generel pleje
- Undgå at placere skærmen i direkte sollys eller i nærheden af varmekilder.
- Sørg for tilstrækkelig ventilation omkring skærmen.
- Bloker ikke ventilationsåbningerne.
- Undgå at placere tunge genstande på skærmen eller dens kabler.
5. Fejlfinding
If you encounter issues with your monitor, refer to the following table for common problems and solutions.
| Problem | Mulig årsag | Løsning |
|---|---|---|
| Intet billede på skærmen | Strømkabel ikke tilsluttet; Videokabel ikke tilsluttet; Forkert indgang valgt. | Ensure power and video cables are securely connected. Press the OSD joystick to select the correct input source (HDMI/DisplayPort). |
| Billedet er sløret eller forvrænget | Incorrect resolution; Graphics card driver issues. | Set the display resolution to 1920x1080. Update your graphics card drivers. |
| Farverne ser forkerte ud | Color settings in OSD; Graphics card settings. | Adjust color settings in the OSD menu. Calibrate colors through your operating system or graphics card control panel. |
| Monitor flickering | Refresh rate mismatch; Cable quality. | Ensure the refresh rate is set to 180Hz in your display settings. Try a different, higher-quality DisplayPort or HDMI cable. |
| No sound from monitor (if applicable) | Volume too low; Incorrect audio output selected. | Increase volume via OSD or computer. Ensure monitor is selected as the default audio output device in your operating system. |
6. Specifikationer
Key technical specifications for the AOC 24G4/P Gaming Monitor:
| Feature | Specifikation |
|---|---|
| Mærke | AOC |
| Modelnummer | 24G4/P |
| Skærmstørrelse | 23.8 tommer |
| Paneltype | IPS |
| Opløsning | 1920 x 1080 (FHD 1080p) |
| Opdateringshastighed | 180 Hz |
| Svartid | 0.5ms MPRT |
| Aspektforhold | 16:9 |
| Forbindelse | DisplayPort, HDMI |
| Ergonomi | Højdejustering, vipning, drejefunktion, pivot |
| Produktmål (LxBxH) | 20.76 x 54 x 49.36 cm |
| Produktets vægt | 6.9 kilo |
7. Garanti og support
For detailed warranty information, please refer to the warranty card included with your product or visit the official AOC website. Standard manufacturer warranties typically cover defects in materials and workmanship for a specified period.
Extended warranty options may be available for purchase, such as:
- 12-month extended warranty against failures and defects.
- 24-month extended warranty against failures and defects.
7.1 Kundesupport
If you require technical assistance or have questions not covered in this manual, please contact AOC customer support through their official website or the contact information provided in your product documentation. When contacting support, please have your monitor's model number (24G4/P) and serial number ready.


