1. Introduktion
This manual provides instructions for the installation, operation, and maintenance of your SOUNDKITS Single Din Touchscreen Radio. This device integrates modern infotainment features such as Apple CarPlay, Android Auto, Bluetooth connectivity, and a 6.5-inch IPS display into a standard single DIN form factor, suitable for upgrading classic vehicles.

Image: The SOUNDKITS Single Din Touchscreen Radio unit, featuring a 6.5-inch IPS display showing the Apple CarPlay interface, accompanied by its infrared remote control.
2. Sikkerhedsoplysninger
Read all instructions carefully before installation and operation. Failure to follow these instructions may result in injury or damage to the device or vehicle.
- Professionel installation anbefales: Due to the complexity of car audio systems, professional installation is advised.
- Strømkilde: Tilslut kun enheden til en 12V DC strømforsyning med negativ jord.
- Ledningsføring: Ensure all wiring is correctly connected to prevent short circuits and damage. Insulate all exposed wires.
- Kørselssikkerhed: Betjen ikke enheden på en måde, der distraherer dig fra kørslen. Prioritér altid trafiksikkerhed.
- Temperatur: Undgå at udsætte enheden for ekstreme temperaturer eller direkte sollys i længere perioder.
- Fugtighed: Keep the unit dry. Exposure to moisture can cause malfunction or electric shock.
3. Pakkens indhold
Bekræft at alle varer er til stede i pakken:
- Single Din CarPlay Stereo Unit
- Ledningsnet
- Monteringssæt
- IR fjernbetjening
- User Instruction Manual (this document)
4. Produktet er slutview
4.1 Front Panel Controls and Ports
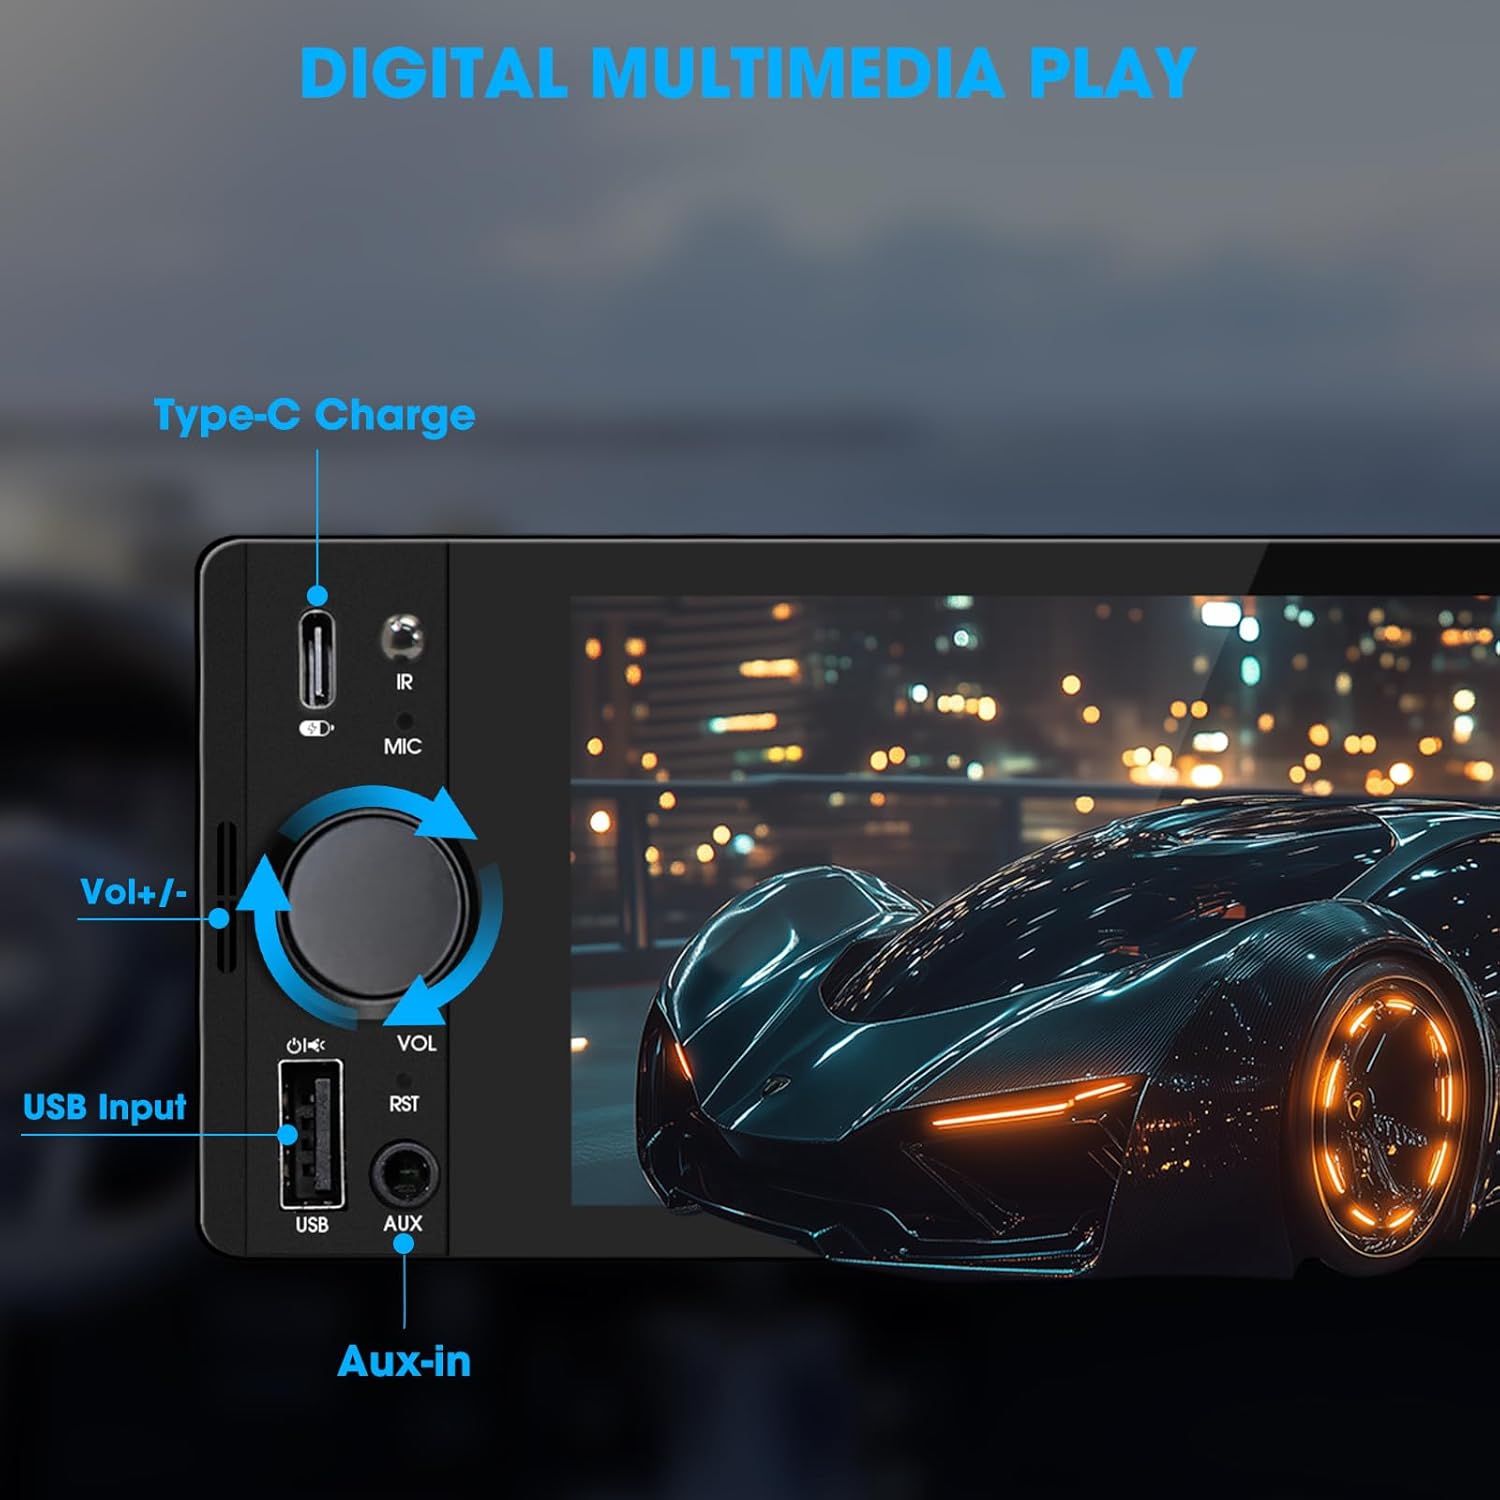
Image: Close-up of the radio's front panel, highlighting the Type-C charging port, IR receiver, microphone, volume knob, USB input, and AUX-in port.
- 6.5-tommer IPS-berøringsskærm: Main display for all functions and interfaces.
- Lydstyrkeknap (VOL): Rotate to adjust volume. Press to mute/unmute.
- USB-indgang: For media playback, CarPlay/Android Auto connection, and phone mirroring.
- AUX-indgang: 3.5mm audio input for external audio devices.
- Type-C ladeport: Provides 2.1A quick charging for compatible devices.
- Mikrofon (MIC): Indbygget mikrofon til håndfri opkald og stemmekommandoer.
- IR-modtager: Til fjernbetjening.
- Reset Button (RST): Small button to reset the unit (requires a thin object like a paperclip).
4.2 Bagpaneltilslutninger

Image: Diagram showing the rear connections of the radio, including the main wiring harness, RCA outputs, external microphone jack, and radio antenna input.
- Main Wiring Harness Connector: Connects to the vehicle's power, speaker, and control wires.
- RCA Audio Outputs (L-OUT, R-OUT): Til tilslutning af ekstern amplivførere.
- RCA Video Outputs (V-OUT1, V-OUT2): For connecting external monitors (e.g., headrest monitors).
- Bagview Camera Input (CAMIN): RCA-indgang til baghøjttalereview kamera.
- Eksternt mikrofonstik: For connecting an optional external microphone.
- Radio Antenna Input: Connects to the vehicle's AM/FM antenna.
5. Opsætning og installation
This section outlines the general steps for installing the SOUNDKITS Single Din Touchscreen Radio. Professional installation is recommended.
5.1 Tjekliste før installation
- Sørg for, at køretøjets batteri er frakoblet, før installationen påbegyndes.
- Confirm the vehicle has a standard single DIN slot.
- Gather necessary tools (wire strippers, crimpers, electrical tape, screwdriver).

Image: A visual comparison showing older car radios replaced by the modern SOUNDKITS Single Din Touchscreen Radio, demonstrating the aesthetic upgrade.
5.2 Ledningsforbindelser
Refer to the provided wiring harness diagram for specific connections. The harness uses universal ISO interface and wire color coding.
| Tråd farve | Fungere |
|---|---|
| Gul | Konstant 12V (batteri) |
| Rød | Accessory 12V (Ignition) |
| Sort | Jord (GND) |
| Blå | Antenne/AmpFjernbetjening til lifer |
| Orange | Illumination/Dimmer |
| Brun | Ratbetjening (SWC) |
| Grøn/Hvid | venstre baghøjttaler (+) |
| Grøn/sort | Venstre baghøjttaler (-) |
| Lilla / Hvid | Højre baghøjtaler (+) |
| Lilla/sort | Højre baghøjtaler (-) |
| Hvid / Hvid | Forreste venstre højttaler (+) |
| Hvid/sort | Venstre forreste højttaler (-) |
| Grå/Hvid | Højre forreste højttaler (+) |
| Grå/sort | Højre forreste højttaler (-) |
| Reverse (often Pink/Brown) | Reverse Gear Signal (for rearview kamera) |
Note: Always cross-reference with your vehicle's specific wiring diagram and the diagram provided with the product's harness. Incorrect wiring can cause damage.
5.3 Montering af enheden
- Secure the mounting sleeve into the vehicle's single DIN dash opening.
- Connect all necessary wiring harnesses, antenna, and any external accessories (e.g., rearview camera, external microphone).
- Carefully slide the head unit into the mounting sleeve until it locks into place.
- Tilslut køretøjets batteri igen.
- Test all functions before reassembling the dashboard trim.
6. Betjeningsvejledning
6.1 Grundlæggende betjening
- Tænd/sluk: The unit powers on with the vehicle's ignition. Press and hold the volume knob to turn off/on the display.
- Lydstyrkekontrol: Rotate the volume knob clockwise to increase volume, counter-clockwise to decrease. Press the knob to mute/unmute.
- Touchscreen interface: Navigate menus and select options by tapping or swiping on the 6.5-inch IPS touchscreen.
6.2 Bluetooth-forbindelse

Image: The radio's display showing a successful Bluetooth 5.3 connection to a smartphone, with music playback information visible.
- Fra hovedmenuen skal du vælge Bluetooth ikon.
- On your smartphone, search for available Bluetooth devices and select "SOUNDKITS" (or similar device name).
- Bekræft parringskoden på begge enheder, hvis du bliver bedt om det.
- Once connected, you can make hands-free calls and stream audio.
6.3 Apple CarPlay og Android Auto
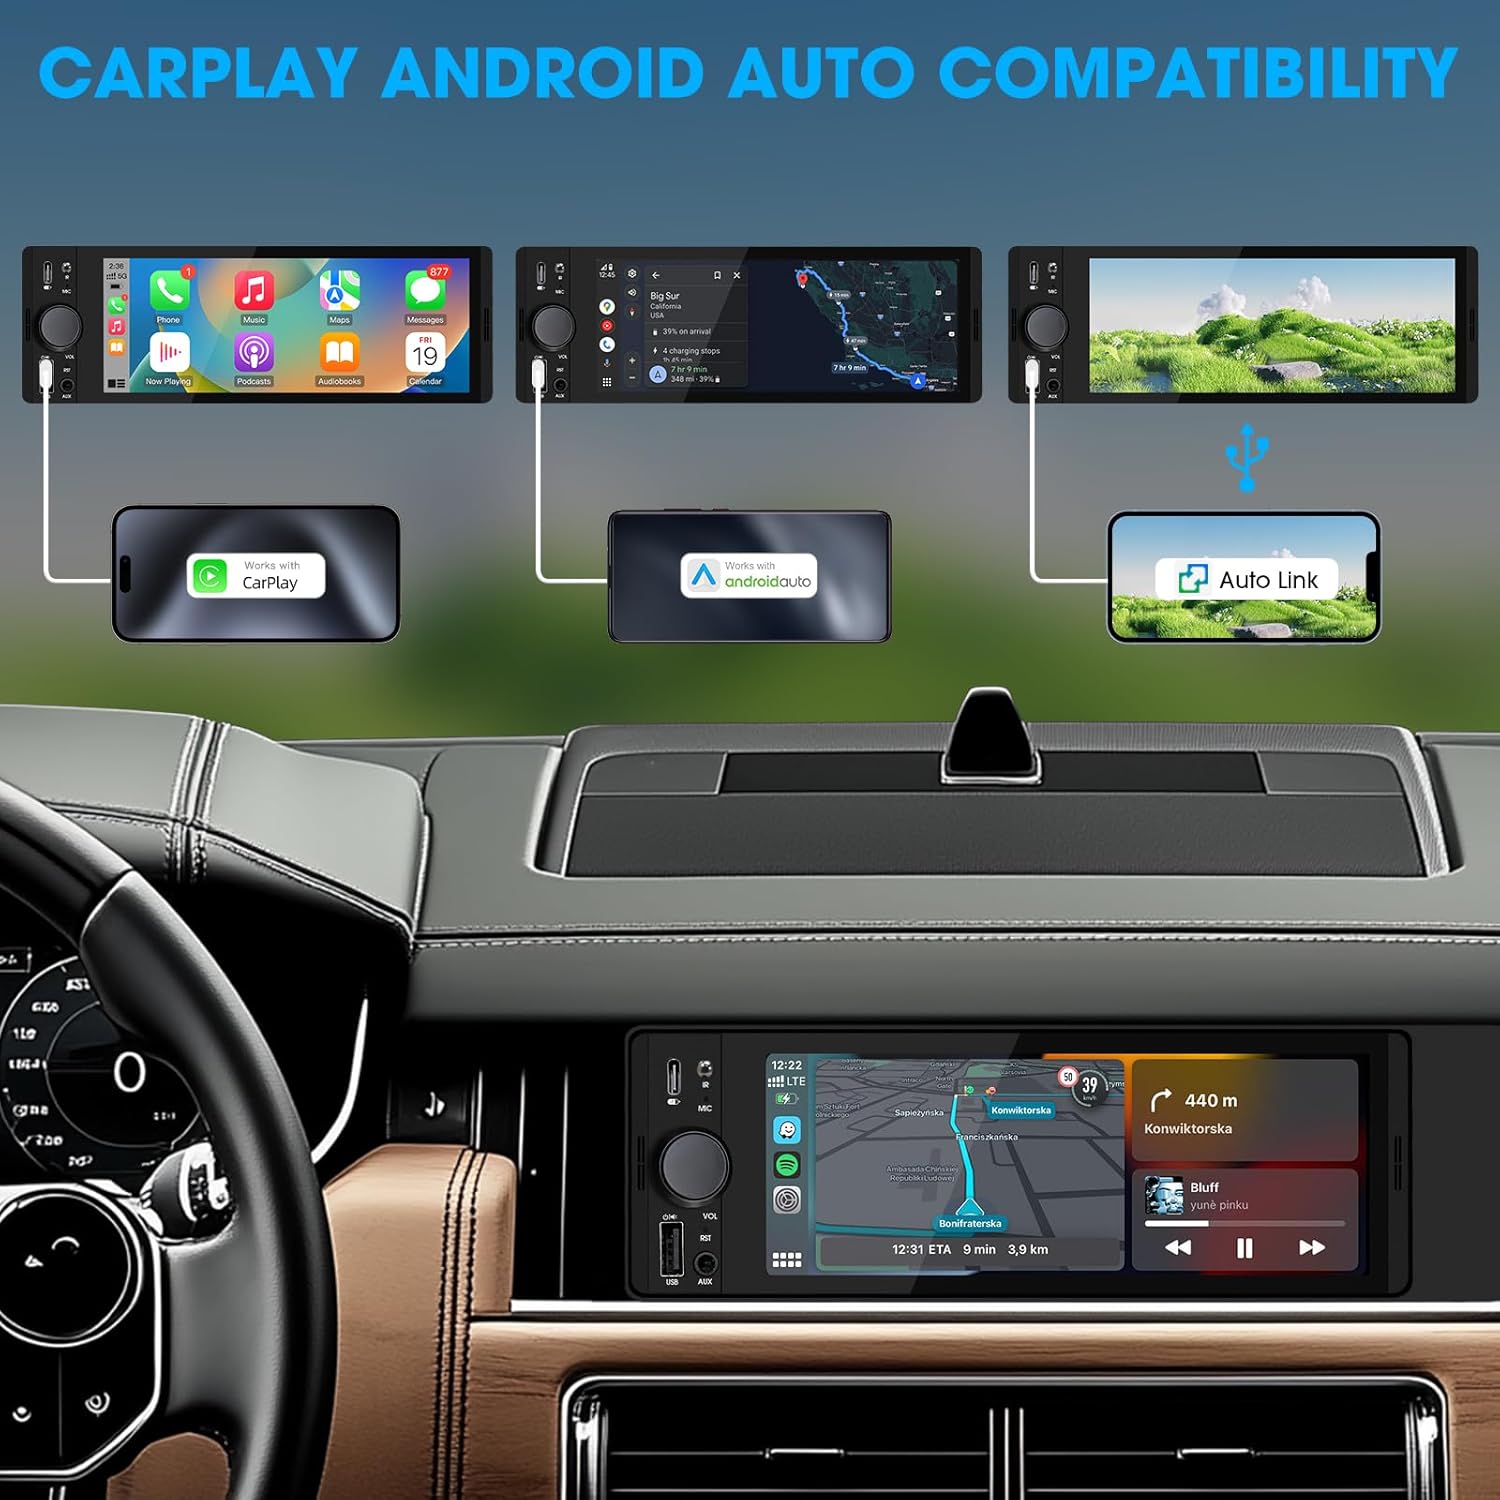
Image: An illustration demonstrating how to connect smartphones via USB for Apple CarPlay, Android Auto, and Auto Link functionality on the car stereo.
- Connect your iPhone (for CarPlay) or Android phone (for Android Auto) to the unit's USB port using a certified USB cable.
- The unit will automatically detect the connection and launch the respective interface.
- Follow any on-screen prompts on your phone or the unit to complete the setup.
- Access navigation, music, calls, and other compatible apps directly from the touchscreen.
6.4 USB Phone Mirroring
This feature allows you to display your smartphone's screen directly on the unit's display.
- Connect your smartphone to the unit's USB port.
- Select the "Phonelink" or "Mirrorlink" option from the main menu.
- Follow the on-screen instructions to establish the connection. This may require installing a specific app on your phone.
6.5 Radio (AM/FM)

Image: The radio interface displaying AM and FM frequency ranges and signal strength, indicating available stations.
- Fra hovedmenuen skal du vælge Radio ikon.
- Tryk på AM or FM to switch bands.
- Brug Søge buttons to automatically search for stations.
- Tap and hold a preset number to save the current station.
6.6 Media Playback (USB, AUX)
- USB: Insert a USB drive into the USB port. The unit will automatically detect and play compatible audio/video files. Navigere files using the on-screen interface.
- AUX: Connect an external audio device to the 3.5mm AUX-in port using an audio cable. Select the AUX source from the main menu.
6.7 Stemmekontrol

Image: A driver interacting with the car stereo using voice commands for Siri and Google Assistant, demonstrating hands-free operation.
When connected via CarPlay or Android Auto, you can activate your phone's voice assistant (Siri or Google Assistant) by pressing the voice control button on the unit (if available) or by using the voice command phrase (e.g., "Hey Siri" or "Ok Google").
6.8 Ratbetjening (SWC)
Image: The steering wheel control configuration screen on the radio, showing options to program various buttons for functions like volume, track skip, and mode.
If your vehicle supports steering wheel controls, connect the SWC wire during installation. Access the Ratkontrol settings in the unit's menu to program the buttons to control various functions (e.g., volume, track skip, mode).
6.9 Equalizer-indstillinger

Image: The audio equalizer settings interface, showing adjustable frequency bands and preset options, alongside a diagram of RCA audio and video outputs.
Få adgang til Lydindstillinger or EQ menu to adjust audio parameters. The unit features a 10-band equalizer with preset options (e.g., Pop, Rock, Jazz) and custom settings to tailor the sound output to your preference.
6.10 bagview Kamera input
Tilslut en bagsideview camera to the CAMIN RCA input. When the vehicle is shifted into reverse, the unit will automatically display the camera feed, enhancing parking safety.
7. Specifikationer
| Feature | Detalje |
|---|---|
| Modelnummer | Single Din Touchscreen Radio |
| Vise | 6.5 Inch HD IPS Touch Screen (1024x600 resolution) |
| Forbindelse | Bluetooth 5.3, USB, Auxiliary, Type-C (charging) |
| Smartphone integration | Apple CarPlay (Wired), Android Auto (Wired), Screen Mirroring |
| Lydudgang | 300W Peak Power, 4-CH RCA Out, 10-band EQ |
| Radio Tuner | AM (530-1710 kHz), FM (87.5-107.9 MHz) |
| Videoafspilning | 1080p Video Playback, H.264, H.265/HEVC encoding |
| Kontrolmetoder | Touchscreen, IR Remote Control, Steering Wheel Control, Voice Control |
| Dimensioner | 4.5 x 7.36 x 2.4 tommer (Produkt) |
| Vægt | 2.03 pund |
| Strømforsyning | 12V DC (negativ jord) |
8. Fejlfinding
Se dette afsnit for almindelige problemer og deres løsninger.
8.1 Ingen strøm
- Tjek ledninger: Ensure the yellow (constant 12V), red (accessory 12V), and black (ground) wires are correctly connected and have proper voltage.
- Sikring: Check the fuse on the unit's wiring harness and the vehicle's fuse box. Replace if blown.
- Batteri: Ensure the vehicle's battery is charged and connected.
8.2 Ingen lyd
- Lydstyrke: Increase the volume. Check if the unit is muted.
- Højttalerledninger: Verify all speaker wires are correctly connected and not short-circuited.
- Kildevalg: Ensure the correct audio source (e.g., Radio, USB, Bluetooth, AUX) is selected.
- Amplivligere: Hvis en ekstern amplifier is used, ensure it is powered on and correctly wired.
8.3 CarPlay/Android Auto Not Connecting
- USB-kabel: Use a high-quality, certified USB data cable. Faulty cables can prevent connection.
- USB-port: Ensure the phone is connected to the correct USB port on the unit.
- Telefonindstillinger: Check your phone's settings to ensure CarPlay/Android Auto is enabled and allowed to connect to the unit.
- Softwareopdatering: Ensure your phone's operating system and any relevant apps (e.g., Android Auto app) are up to date.
8.4 Berøringsskærmen reagerer ikke
- Nulstil enhed: Use a thin object to press the RST button on the front panel to perform a soft reset.
- Power Cycle: Turn off the vehicle's ignition, wait a few minutes, then restart.
9. Vedligeholdelse
- Rengøring af skærmen: Use a soft, lint-free cloth to gently wipe the touchscreen. For stubborn marks, slightly dampRengør kluden med vand eller et skærmsikkert rengøringsmiddel. Undgå skrappe kemikalier.
- Generel rengøring: Use a dry, soft cloth to wipe the unit's body. Do not use abrasive cleaners or solvents.
- Firmwareopdateringer: Kontroller jævnligt producentens webwebstedet for tilgængelige firmwareopdateringer for at sikre optimal ydeevne og kompatibilitet.
10. Garanti og support
SOUNDKITS provides the following support and warranty information:
- Garanti: The product comes with a 12-month responsibility for all products.
- Free Replacement/Refund: A 90-day free replacement or refund policy is available.
- Technical Guidance & Support: Lifetime technical guidance and support are provided.
- Kundeservice: Fast response within 24 hours for inquiries.
For further assistance, please contact SOUNDKITS customer support through the platform where the product was purchased or visit the official SOUNDKITS store page.
You can typically find contact information by navigating to the seller's profile on the purchase platform and selecting "Ask a question."

Image: A graphic detailing SOUNDKITS' customer service commitments: 24-hour fast response, 90-day free replacement or refund, 12-month product responsibility, and lifetime technical guidance & support.


