1. Produktet er slutview
The LINOVISION MPPT 12V/24V 10A Solar Charge Controller (Model: Solar-CMP10A) is designed to efficiently manage power from your solar panels to charge various battery types. It features Maximum Power Point Tracking (MPPT) technology for optimal energy harvesting, RS485 communication for remote monitoring, and robust industrial design for outdoor applications. This controller is ideal for solar-powered camera systems, street lights, and solar trailers.

Figure 1: LINOVISION MPPT Solar Charge Controller (Model: Solar-CMP10A)
2. Nøglefunktioner
- High Efficiency MPPT Technology: Up to 99% tracking efficiency and 98% peak PV conversion efficiency, outperforming traditional PWM controllers, especially in varying light conditions.
- Alsidig batterikompatibilitet: Supports 12V/24V systems with auto-detection for Lead Acid, Gel, and AGM batteries. Lithium batteries (LiFePO4, Ternary Lithium) require manual setup for type and voltage. Default setting is 4S LiFePO4.
- Fjernovervågning: Integrated RS485 ModBus for remote monitoring and control, allowing integration with Linovision RemoteMonit Cloud Platform (requires IOT-C101 or IOT-R51W Gateway).
- Easy Cabling: Features MC4 connectors for PV panels, XT60 for battery, and a round 2-pin connector for load devices, ensuring secure and straightforward connections.
- Avancerede sikkerhedsforanstaltninger: Includes 4-stage charging and comprehensive protections against overcharging, over-discharging, PV short circuit, excessive PV current, load failure, and battery reverse polarity. Equipped with a 20A fuse on the battery terminal.
- Industrielt design: Durable aluminum housing with IP67 waterproof rating, suitable for outdoor use. Operates reliably in a wide temperature range from -40℃ to +55℃ (-40℉ to 131℉).
- Kompakt størrelse: Dimensions of 100mm x 91.5mm x 29mm (3.74 x 3.6 x 1.14 inches) make it suitable for installations with limited space.
3. Pakkens indhold
Kontroller venligst, at alle nedenstående varer er inkluderet i din pakke:
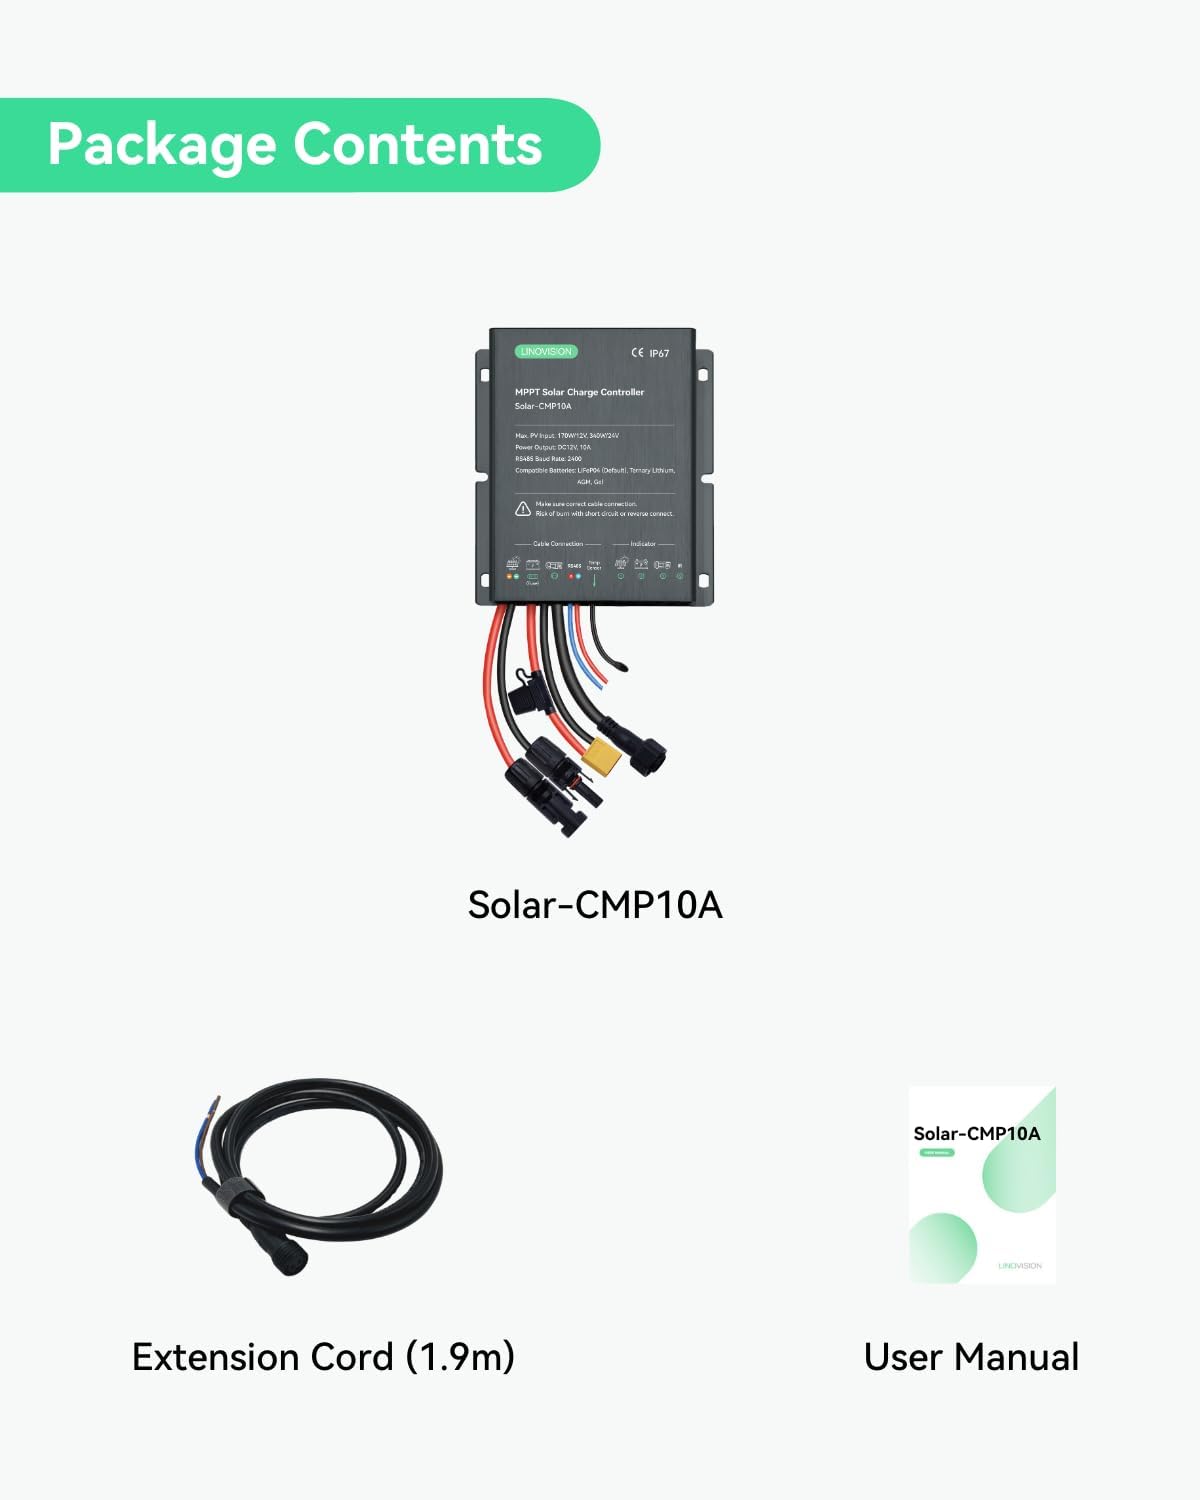
Figur 2: Pakkens indhold
- LINOVISION MPPT Solar Charge Controller (Model: Solar-CMP10A)
- Extension Cord (1.9m)
- Brugervejledning (dette dokument)
4. Product Diagram and Interface
Familiarize yourself with the various connection points and indicators on the solar charge controller.

Figure 3: Controller Interface and Connections
- Solar Panel Connector (MC4): Input for connecting solar panels.
- Battery Connector (XT60): Output for connecting to the battery.
- DC12V udgang: Output for connecting DC load devices.
- RS485-forbindelse: Port for RS485 communication for remote monitoring.
- Temperatursensor: Input for the external temperature sensor to optimize charging.
- Indikatorer: LEDs indicating PV status, battery status, load status, and IR (infrared) for remote control.
5. Opsætning og installation
Follow these steps for proper installation of your solar charge controller. Ensure all connections are secure and correct to prevent damage or injury.

Figure 4: Panel Connection Overview
- Connect Solar Panel (PV) to Controller: Connect your solar panels to the MC4 input connectors on the controller. Ensure correct polarity (positive to positive, negative to negative).
- Connect Battery to Controller: Connect your battery to the XT60 battery terminals on the controller. Observe correct polarity. The controller will auto-detect 12V/24V for Lead Acid, Gel, or AGM batteries. For Lithium batteries, manual setup is required after connection.
- Connect Load Devices (Optional): Connect your DC load devices to the round 2-pin load output. Ensure the total current draw does not exceed the controller's rated load current.
- Connect RS485 (Optional): If using remote monitoring, connect the RS485 cable to the RS485 port on the controller.
- Tilslut temperatursensor (valgfrit): For optimal battery charging, connect the external temperature sensor to the designated port. Place the sensor near the battery.
Sikkerhedsadvarsel: Always ensure correct cable connections and polarity. Incorrect wiring can lead to short circuits, reverse polarity, and potential damage to the controller, battery, or other connected devices. Disconnect power sources before making or changing connections.
6. Betjeningsvejledning
6.1 Valg af batteritype
The controller is set to 4S LiFePO4 Lithium by default. For other battery types (Lead Acid, Gel, AGM, Ternary Lithium), you will need to manually configure the battery type and voltage settings. Refer to the detailed user manual PDF for specific instructions on changing battery settings via the RS485 interface or other configuration methods.
6.2 Opladning Stages
The controller employs a multi-stage charging algorithm to optimize battery life and performance.

Figur 5: 4-Stage Charging for Gel or Lead Acid Batteries
- Vedligeholdelsesopladning: Starts with a small current to protect the battery when deeply discharged.
- Hurtig opladning: Maximizes charging efficiency and limits PV panel voltage to battery voltage.
- Udligning: Konstant voltage charging to prevent overcharging (for certain battery types).
- Flydende: Charging with a small current to maintain battery capacity once fully charged.

Figur 6: 4-Stage Charging for Lithium Batteries
- Trickle Start: Initial charging phase for deeply discharged batteries.
- Constant Current Charging: Charges the battery with a constant current until a certain voltage er nået.
- Constant Voltage Opladning: Maintains a constant voltage while the current decreases.
- Pause: Stops charging when the charging current is low enough (typically around 0.02C to 0.07C).
7. Remote Monitoring and Cloud Access
The LINOVISION Solar-CMP10A supports RS485 ModBus for remote monitoring and control, enabling integration with the Linovision RemoteMonit Cloud Platform. This feature allows you to monitor the status of your solar panels, solar trailers, or solar-powered cameras from anywhere.

Figure 7: Cloud Data Management System
To utilize cloud access, the controller needs to be bundled with an IOT-C101 or IOT-R51W Gateway. Key benefits of the cloud platform include:
- Remotely monitor solar charging status and sensor data.
- View cellular traffic usage from Linovision vSIM router (IOT-R51W) and refill data plans directly.
- Customize group display of camera video and IoT sensors on one page.
- Display camera video and IoT sensor on Google Maps.
- Provides timelapse video for camera pictures.
- Customize trigger events and workflows.
Note: Customers who purchase the Linovision Solar-CMP10A and IOT-C101/IOT-R51W bundle receive a 1-year free subscription to Linovision RemoteMonit CLOUD.
8. Vedligeholdelse
To ensure optimal performance and longevity of your LINOVISION MPPT Solar Charge Controller, follow these simple maintenance guidelines:
- Regelmæssig inspektion: Periodically check all wiring connections for tightness and corrosion. Ensure the MC4, XT60, and other connectors are securely fastened.
- Renhed: Keep the controller's housing clean and free from dust, dirt, or debris. Use a soft, dry cloth for cleaning. Do not use abrasive cleaners or solvents.
- Ventilation: Ensure the controller's heat sink (if visible) is not obstructed to allow for proper heat dissipation.
- Miljøtjek: While the controller is IP67 rated, regularly inspect for any signs of water ingress or physical damage, especially after severe weather conditions.
- Batteriets sundhed: Monitor your battery's health and ensure it is within its recommended operating parameters. A healthy battery contributes to the overall efficiency of the solar system.
9. Fejlfinding
This section addresses common issues you might encounter with your solar charge controller. If the problem persists, please contact customer support.
| Problem | Mulig årsag | Løsning |
|---|---|---|
| Controller not powering on / No indicators | Batteri ikke tilsluttet eller lav spændingtage; reverse polarity; faulty fuse. | Kontroller batteriforbindelser og voltage. Ensure correct polarity. Inspect and replace the 20A fuse on the battery terminal if blown. |
| Batteriet oplades ikke | Solar panel not connected; insufficient sunlight; PV short circuit; incorrect battery type setting. | Verify solar panel connections. Ensure adequate sunlight. Check for PV short circuits. Confirm battery type setting matches your battery. |
| Indlæsningen virker ikke | Load not connected; load current too high; battery low voltage beskyttelse. | Check load connections. Reduce load current if it exceeds controller's rating. Allow battery to charge. |
| RS485 kommunikationsfejl | Incorrect wiring; software configuration issue; faulty gateway. | Verify RS485 wiring (A to A, B to B). Check software settings on your monitoring platform. Ensure gateway is powered and functioning. |
| Overophedning | Poor ventilation; excessive load or PV input. | Ensure controller is installed in a well-ventilated area. Reduce load or check PV input specifications. |
10. Specifikationer
Technical specifications for the LINOVISION MPPT 12V/24V 10A Solar Charge Controller (Model: Solar-CMP10A).


Figur 8: Produktmål
| Specifikation | Værdi |
|---|---|
| Modelnummer | Solar-CMP10A |
| Max. PV Input (12V System) | 170W |
| Max. PV Input (24V System) | 340W |
| Strømudgang | DC12V, 10A |
| RS485 Baud Rate | 2400 |
| Kompatible batterier | LiFePO4 (Default), Ternary Lithium, AGM, Gel, Lead Acid |
| Type opladningsport | MC4 (PV), XT60 (Battery), 2-pin (Load) |
| Ingress Protection (IP) Rating | IP67 |
| Driftstemperaturområde | -40℃ til +55℃ (-40℉ til 131℉) |
| Dimensioner (L x B x H) | 100 mm x 91.5 mm x 29 mm (3.93 x 3.6 x 1.14 tommer) |
| Varens vægt | 0.72 kilo (1.58 pund) |
| Fabrikant | LINOVISION |
| Oprindelsesland | Kina |
11. Garanti og support
LINOVISION products are designed for reliability and performance. For detailed warranty information and technical support, please refer to the official LINOVISION webwebsted eller kontakt deres kundeservice.
You can also download the original User Manual in PDF format for more comprehensive details:
For further assistance, please contact LINOVISION customer support. They offer 24/7 US local and global technical support.


