Produkt overview
The Ruko 6088 Remote Control Excavator is a highly detailed and functional toy designed for engaging play. It features robust construction with alloy components and offers multiple control methods for an immersive experience.

Image: The Ruko 6088 Remote Control Excavator alongside a Ruko robot toy, showcasing the product's design and scale.
Nøglefunktioner:
- 4 Innovative Control Methods: Remote control, APP control, gravity-sensitive control, and infrared gesture sensing.
- 200 Editable Program Bar: Customize actions with 200 icons on the app, including 9 emojis, 9 music, 9 ABCs, and 10 actions. The remote also offers a 50-function program button.
- Strengthened Alloy Bucket: Key parts and the bucket are made of high-quality alloy for durability.
- Wide Angle Rotation & Light: 680° rotation for comprehensive operation and cool LED lighting effects for night play.
- Double Battery Life: Equipped with two high-performance rechargeable batteries for extended play.
Opsætning
1. Batteriinstallation
The Ruko 6088 Excavator requires batteries for both the vehicle and the remote control. Ensure you use the correct type and orientation of batteries as specified.
- Gravemaskine batteri: The excavator comes with 2 high-performance rechargeable batteries. Locate the battery compartment on the excavator, typically underneath or on the side. Insert the charged battery pack, ensuring proper connection.
- Batterier til fjernbetjening: Open the battery compartment on the back of the remote control. Insert the required batteries (e.g., AA or AAA, check packaging for specifics) according to the polarity indicators (+/-). Close the compartment securely.
2. Første opladning
Before first use, fully charge the excavator's rechargeable batteries using the provided charging cable. Refer to the charging indicator lights for charging status. Do not overcharge the batteries.
3. Parring af fjernbetjeningen
To establish a connection between the remote control and the excavator:
- Ensure both the excavator and the remote control are powered off.
- Turn on the excavator. The indicator light on the excavator may flash.
- Turn on the remote control. The indicator light on the remote control should also flash.
- Wait a few seconds for the devices to pair. Once successfully paired, the indicator lights on both the excavator and the remote control should become solid.
Betjeningsvejledning
1. Fjernbetjeningsfunktioner
The remote control allows for precise manipulation of the excavator. Familiarize yourself with the buttons and joysticks:

Image: Diagram of the Ruko remote control, detailing button functions for excavator operation.
- Venstre joystick: Controls forward/backward movement and left/right turning of the tracks.
- Højre joystick: Controls the movement of the excavator arm and bucket.
- Bucket Decline (3): Lowers the excavator bucket.
- Bucket Up (4): Raises the excavator bucket.
- Lights On (5): Activates the LED lights on the excavator.
- Lights Off (6): Deactivates the LED lights on the excavator.
- Turntable Turn Left (7): Rotates the excavator cabin to the left.
- Turntable Turn Right (8): Rotates the excavator cabin to the right.
- Auto Demo (9): Initiates an automatic demonstration sequence of the excavator's movements.
- Afbryder (10): Tænder eller slukker fjernbetjeningen.
- Programmeringsknap: Allows for custom programming of up to 50 functions.
2. Movement and Rotation
The excavator is equipped with durable rubber tracks for various terrains and can rotate extensively.
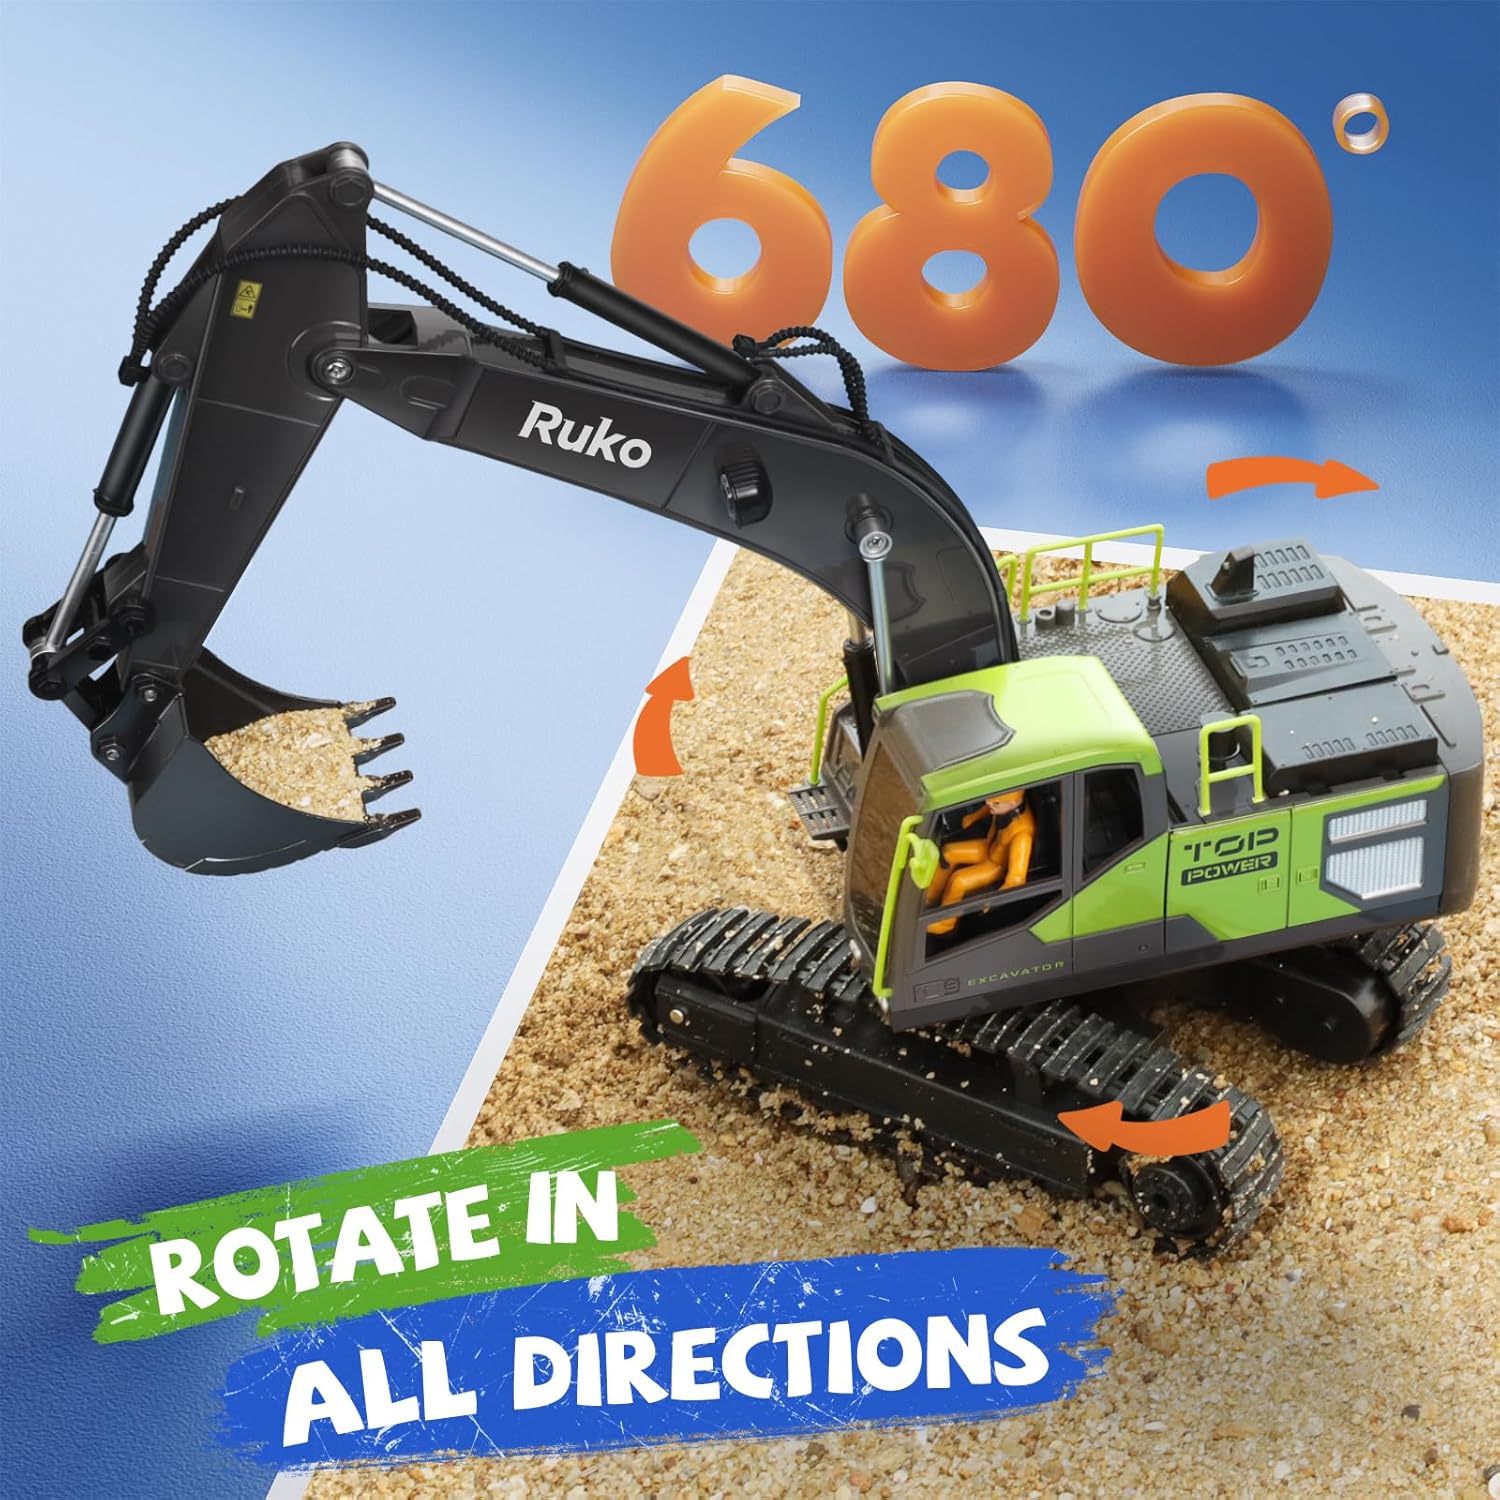
Image: The Ruko excavator demonstrating its 680-degree rotation capability, allowing for versatile operation.
- Kørsel: Use the left joystick to move the excavator forward, backward, and turn.
- 680° rotation: The excavator's cabin can rotate up to 680 degrees, providing a wide range of motion for digging and maneuvering. Use the turntable controls (7 and 8) on the remote.
3. Digging and Arm Operation
The alloy bucket and flexible arm allow for realistic digging actions.

Image: Close-up of the Ruko excavator's alloy bucket and flexible arm, highlighting its robust construction for digging tasks.
- Use the right joystick and bucket buttons (3 and 4) to control the arm's extension, retraction, and bucket's scooping and dumping actions.
- The strengthened alloy bucket is designed to handle various materials like sand and light soil.
4. App Control and Programming
Download the official Ruko app to unlock advanced control and programming features.

Image: A child happily interacting with a smartphone displaying the Ruko app interface, emphasizing its educational and fun aspects.
- App-download: Scan the QR code in the product packaging or search for the Ruko app on your device's app store.
- Forbindelse: Follow the in-app instructions to connect your device to the excavator via Bluetooth or Wi-Fi.
- Programmering: Use the 200 editable icons bar within the app to create custom sequences of movements, sounds, and expressions for the robot. This feature enhances creativity and logical thinking.
- Gravity-Sensitive Control: Control the excavator's movements by tilting your smartphone.
- Infrared Gesture Sensing: Certain models may support control via hand gestures. Refer to the app for specific instructions.
Opretholdelse
1. Batteripleje
- Always use the original charging cable provided with the product.
- Do not leave batteries charging unattended for extended periods.
- Remove batteries from the excavator and remote control if storing for a long time to prevent leakage.
- Bortskaf gamle batterier ansvarligt i henhold til lokale regler.

Image: The Ruko excavator with an illustration indicating its 60-minute battery life, highlighting the dual battery system for extended play.
2. Rengøring og opbevaring
- After use, especially in dirt or sand, gently wipe down the excavator with a dry or slightly damp klæde. Undgå at bruge skrappe kemikalier eller for meget vand.
- Ensure no sand or debris is lodged in the tracks or moving parts.
- Store the excavator and remote control in a cool, dry place away from direct sunlight and extreme temperatures.
Fejlfinding
| Problem | Mulig årsag | Løsning |
|---|---|---|
| Excavator does not respond to remote. | Batteries low or incorrectly installed; Not paired; Interference. | Check and replace/charge batteries. Re-pair the remote and excavator. Move to an area with less interference. |
| Excavator moves slowly or weakly. | Low battery in excavator. | Recharge the excavator battery fully. |
| Arm/Bucket not moving correctly. | Obstruction in moving parts; Mechanical issue. | Check for and remove any debris. If issue persists, contact customer support. |
| Problemer med app-forbindelse. | Bluetooth/Wi-Fi off; App not updated; Device compatibility. | Ensure Bluetooth/Wi-Fi is enabled. Update the app to the latest version. Check device compatibility requirements. |
Specifikationer
- Modelnummer: 6088
- Kontrolfrekvens: 2.4GHz (for remote control)
- Materiale: Alloy (bucket and key parts), durable plastic, rubber (tracks)
- Rotation: 680° turntable rotation
- Belysning: LED-lys foran
- Batteri: Rechargeable (2 included for excavator)
- Kontrolmetoder: Remote Control, APP Control, Gravity-Sensitive Control, Infrared Gesture Sensing
- Programmering: 200 editable icons via app, 50-function remote programming

Image: Visual representation of the excavator's key features including 11 channels, alloy bucket, realistic control, 2.4GHz frequency, one-click demo, and 680-degree rotation.
Garanti og support
Ruko products are designed for quality and durability. For any questions, technical support, or warranty claims, please contact Ruko customer service.
Please refer to the product packaging or the official Ruko webwebstedet for de mest opdaterede garantioplysninger og kontaktoplysninger.
For additional information or to explore other Ruko products, visit the Ruko Store on Amazon.


