1. Introduktion
This manual provides detailed instructions for the installation, operation, and maintenance of your Naifay Android 12 Double Din Car Stereo. Please read this manual thoroughly before using the product to ensure proper function and safety. Keep this manual for future reference.

Image 1.1: Naifay Android 12 Double Din Car Stereo with included backup camera, GPS antenna, and a smartphone displaying Carplay/Android Auto.
2. Produktet er slutview
2.1 Nøglefunktioner
- Operativsystem: Android 12 with 4-Core processor, 2GB RAM, and 32GB ROM.
- Vise: 10.1-inch 2.5D capacitive IPS touch screen with 1024x600 resolution, supporting 1080P video playback.
- Forbindelse: Built-in Wireless Carplay & Android Auto, Wired/Wireless Mirrorlink (iOS wireless, Android wireless/wired).
- Navigation: Integrated GPS module for offline and online navigation.
- Trådløs: WiFi connection for app downloads and internet access, Bluetooth 5.1 for hands-free calling and audio streaming.
- Lyd: FM Radio with preset stations, 10-band EQ settings with various default styles.
- Input/output: Two USB ports, AHD backup camera input, Steering Wheel Control (SWC) support.
- Yderligere funktioner: Split screen mode, multi-format music and video player, customizable UI and wallpapers.
2.2 Hvad er der i æsken
Pakken indeholder følgende komponenter:
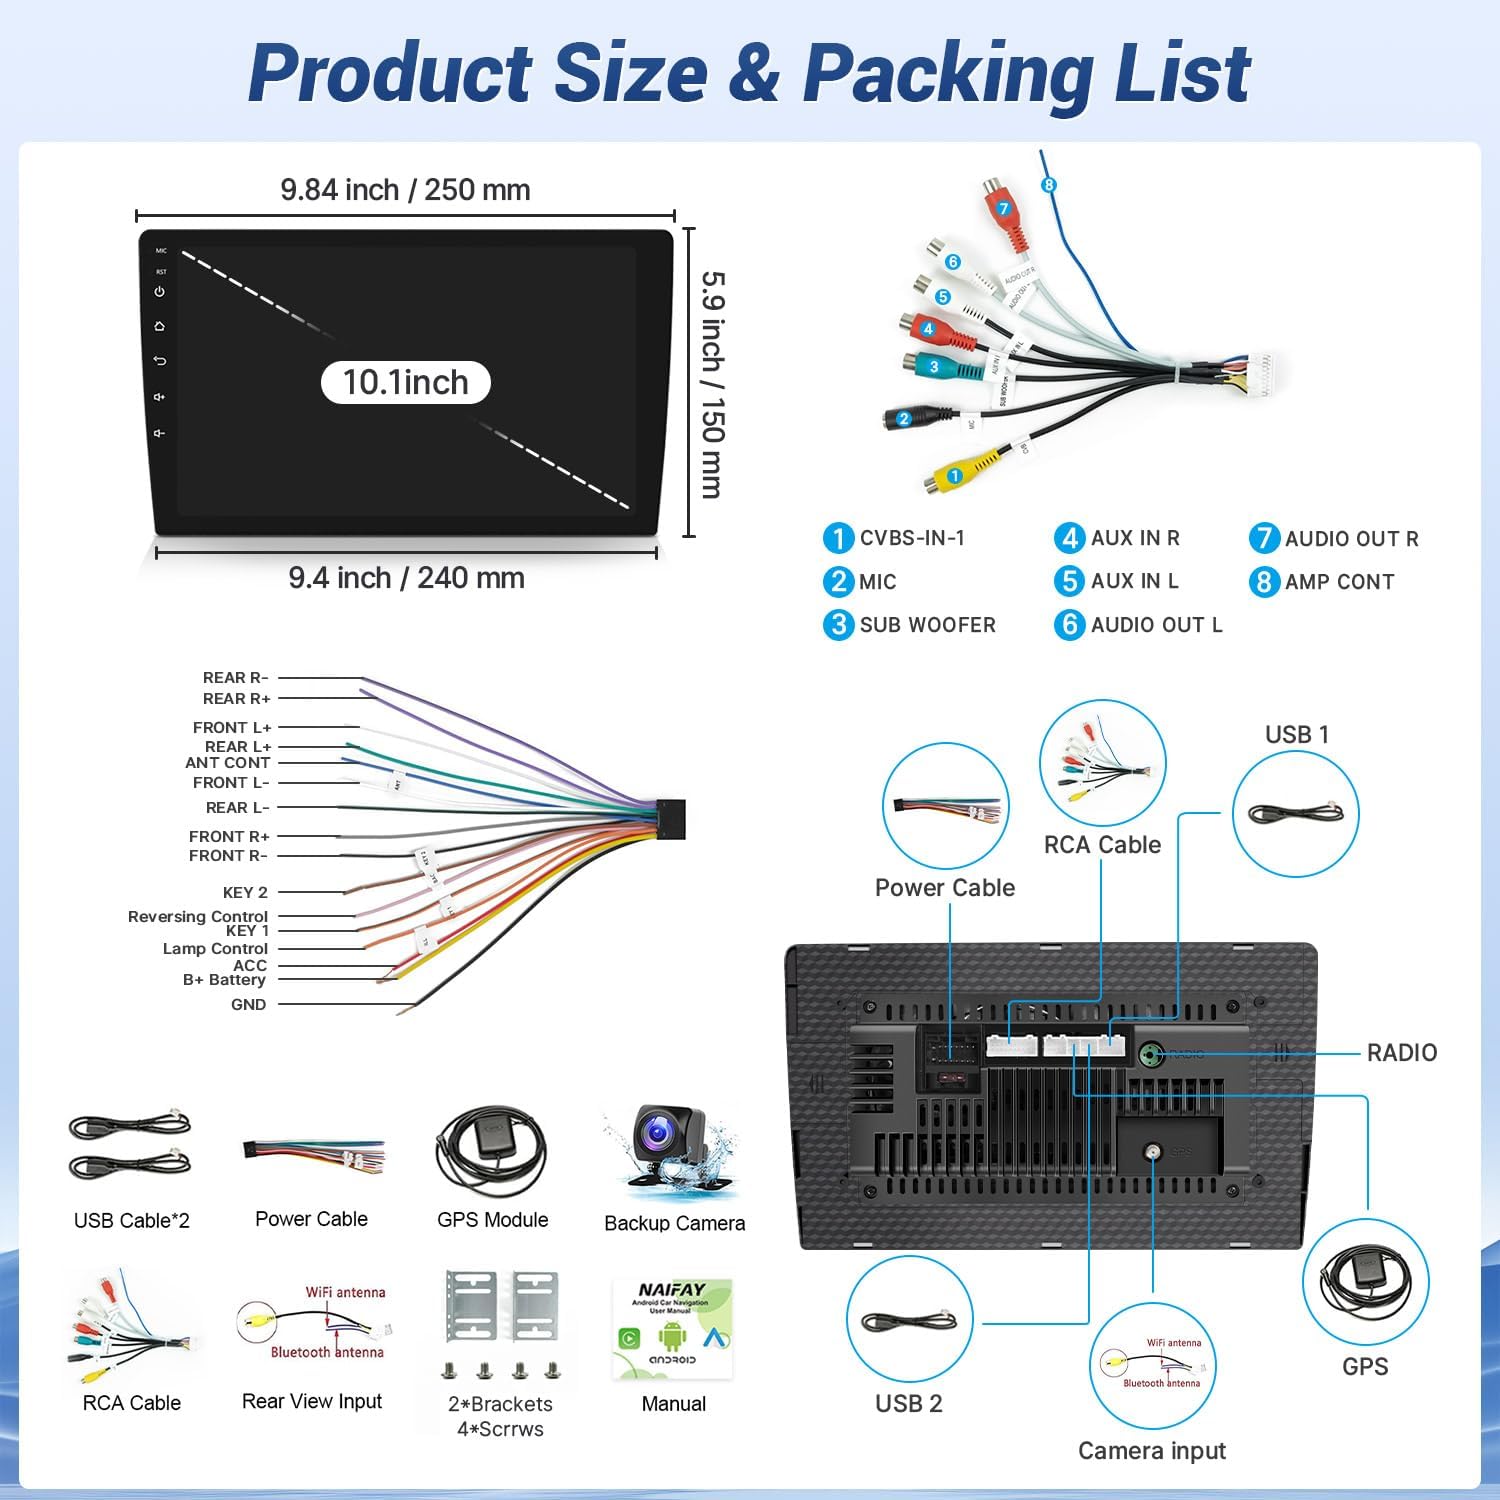
Billede 2.1: Detaljeret view of the product dimensions, rear panel connections, and the complete packing list.
- Naifay 10.1-inch Android Car Stereo Unit
- Strømkabel
- USB-kabler (x2)
- GPS modul
- Backup kamera
- RCA-kabel
- WiFi antenne
- Bluetooth antenne
- Monteringsbeslag (x2)
- Skruer (x4)
- Brugermanual
3. Sikkerhedsoplysninger
Overhold følgende sikkerhedsretningslinjer under installation og drift:
- Professionel installation anbefales: Due to the complexity of vehicle wiring, professional installation is highly recommended to prevent damage to the unit or vehicle.
- Strømforsyning: Ensure the car radio operates on a 12V power supply. Connecting to a voltage over 12V may damage the unit.
- Ledningsføring: Always use the provided power cables. Do not attempt to connect original car plugs directly to the unit without verifying compatibility. Incorrect wiring can lead to malfunctions or damage.
- Udskiftning af sikring: If a fuse needs replacement, use only the same type and rating.
- Kørselssikkerhed: Betjen ikke enheden på en måde, der distraherer dig fra kørslen. Prioritér altid trafiksikkerhed.
- Temperatur: Undgå at udsætte enheden for ekstreme temperaturer eller direkte sollys i længere perioder.
4. Opsætning og installation
4.1 Kontrol før installation
- Verify the installation size: 178(L) x 65(W) x 70(H) mm (Standard 2 DIN opening size). The 10.1-inch screen extends beyond the standard double DIN chassis. Ensure your vehicle's dashboard has sufficient space for the screen's dimensions (approximately 9.84 inches / 250 mm wide and 5.9 inches / 150 mm high).
- Frakobl køretøjets batteri, før installationen påbegyndes.
4.2 Ledningsforbindelser
Refer to the wiring diagram provided in Image 2.1 and the specific backup camera connection diagram below.

Image 4.1: Diagram illustrating the connection of the backup camera to the car stereo system.
- Connect the video input cable (yellow RCA) from the backup camera to the 'CVBS-IN-1' port on the stereo's rear panel.
- Connect the pink wire from the stereo's power cable to the reversing trigger cable (usually a reverse light signal wire).
- Connect the backup camera's power cable: the red wire to the car's reversing light positive, and the black wire to the car's reversing light negative (ground).
- Ensure all other power and speaker connections are made according to the main wiring diagram. The red and yellow wires of the stereo's power supply should be connected to the positive side of the car's power supply, and the black wire to the negative (ground).
4.3 Montering af enheden
Install the head unit into the double DIN slot using the provided mounting brackets and screws. Ensure the unit is securely fastened. The screen is designed to protrude slightly from the dash for optimal viewing.

Image 4.2: Visual comparison of a car dashboard before and after the installation of the Naifay Android 12 car stereo, highlighting the screen size and fit.
5. Betjeningsvejledning
5.1 Trådløs Carplay og Android Auto
This stereo supports wireless Apple Carplay and wireless Android Auto. To connect:
- Aktiver Bluetooth og Wi-Fi på din smartphone.
- On the car stereo, navigate to the Carplay or Android Auto application.
- Pair your phone via Bluetooth with the car stereo.
- Once paired, the system will automatically establish a Wi-Fi connection for Carplay or Android Auto.
You can now access phone functions like navigation, calls, messages, and music via the stereo's touchscreen or voice commands (Siri/Google Assistant).

Billede 5.1: Overview of wireless Carplay, Android Auto, and Mirror Link functionalities on the Naifay car stereo.

Image 5.2: Screenshot of the Wireless Apple Carplay interface on the stereo display.

Image 5.3: Screenshot of the Wireless Android Auto interface on the stereo display.
5.2 Spejllinkfunktion
The Mirror Link function allows you to display your smartphone screen on the car stereo. iOS devices support wireless connection, while Android devices support both wireless and wired connections.
- For wireless connection (iOS & Android): Connect your phone to the stereo's Wi-Fi hotspot.
- For wired connection (Android only): Connect your Android phone to the stereo via a USB cable.
- Open the Mirror Link application on the stereo and follow the on-screen prompts to establish the connection.

Image 5.4: Illustration of the Mirror Link feature, showing a smartphone screen mirrored onto the car stereo display.
5.3 GPS-navigation
The unit features a built-in GPS module for navigation. You can use pre-installed offline maps or download online maps when connected to Wi-Fi.
- To use offline maps, ensure the GPS module is connected and maps are downloaded.
- For online maps, connect the stereo to Wi-Fi or your phone's hotspot.
- Open the Navigation app and enter your destination.

Image 5.5: Display showing GPS navigation, Wi-Fi connection, and Bluetooth interface on the car stereo.

Billede 5.6: Detaljeret view of the GPS navigation map interface on the stereo screen.
5.4 Wi-Fi-forbindelse
Connect the stereo to a Wi-Fi network to access online content and download applications.
- Gå til Indstillinger > Wi-Fi.
- Vælg det ønskede netværk, og indtast adgangskoden.
- Once connected, you can use apps like YouTube, Spotify, and other Play Store applications.

Image 5.7: Display showing various applications available when the stereo is connected to Wi-Fi.
5.5 Bluetooth 5.1
The integrated Bluetooth 5.1 allows for hands-free calling and wireless audio streaming.
- Aktivér Bluetooth på din telefon og bilstereoen.
- Søg efter available devices on your phone and select the stereo's Bluetooth name.
- Bekræft parringskoden, hvis du bliver bedt om det.
Når den er tilsluttet, kan du foretage/modtage opkald, få adgang til din telefonbog og afspille musik trådløst.

Image 5.8: Screenshots demonstrating Bluetooth 5.1 features, including hands-free calling and music playback.
5.6 FM radio
Få adgang til lokale radiostationer med den indbyggede FM-tuner.
- Åbn FM-radioapplikationen.
- Use the scan function to find and save available stations.
- Adjust EQ settings for preferred audio output.

Image 5.9: Display of the FM radio interface, showing station tuning and frequency.
5.7 Ratbetjening (SWC)
The unit supports analog steering wheel controls. Manual learning is required to map your vehicle's steering wheel buttons to the stereo functions.
- Gå til Indstillinger > Ratbetjening.
- Følg instruktionerne på skærmen for at tildele funktioner (f.eks. lydstyrke op/ned, spring over spor, tilstand) til knapperne på rattet.

Image 5.10: Screenshot of the Steering Wheel Control learning interface on the car stereo.
5.8 Bakkamera
The included AHD backup camera provides a wide-angle view for mere sikker bakning.
- When the vehicle is shifted into reverse gear, the camera feed will automatically display on the stereo screen.
- Ensure the camera is properly installed and wired as per Section 4.2.

Image 5.11: Display showing the backup camera view with parking guidelines, alongside other features like split screen and FM radio.
5.9 Opdelt skærmfunktion
The split screen feature allows you to run two applications simultaneously on the display.
- To activate, long-press the recent apps button or drag an app to one side of the screen.
- Select a second app to occupy the other half of the screen.

Billede 5.12: Eks.ample of the split screen function, showing two applications running side-by-side on the stereo display.
6. Vedligeholdelse
- Rengøring af skærm: Use a soft, lint-free cloth to clean the touchscreen. Avoid abrasive cleaners or solvents that may damage the screen.
- Softwareopdateringer: Periodically check for software updates to ensure optimal performance and access to new features. Updates can usually be found through the system settings or the manufacturer's webwebsted.
- Generel pleje: Keep the unit free from dust and moisture. Ensure proper ventilation around the unit to prevent overheating.
7. Fejlfinding
If you encounter issues with your Naifay car stereo, refer to the following troubleshooting guide:
| Problem | Mulig årsag | Løsning |
|---|---|---|
| Enheden tænder ikke | Incorrect wiring; Blown fuse; Insufficient power supply. | Check all power connections (red, yellow, black wires). Verify the fuse. Ensure the car battery is providing 12V. |
| Slow performance or glitches | Too many apps running; Low RAM/ROM; Software issue. | Close unnecessary applications. Perform a factory reset (backup data first). Check for software updates. |
| Wireless Carplay/Android Auto disconnects or fails to connect | Bluetooth/Wi-Fi interference; Incorrect pairing; Software bug. | Ensure Bluetooth and Wi-Fi are enabled on both devices. Forget and re-pair the device. Restart both phone and stereo. |
| Berøringsskærm reagerer ikke | Software freeze; Hardware malfunction. | Restart the unit (press the RST button if available). If the issue persists, contact customer support. |
| Ingen lyd | Speaker wiring issue; Volume too low; Mute activated. | Check speaker connections. Increase volume. Ensure the unit is not muted. |
| Bakkameraet viser ikke | Incorrect camera wiring; Camera malfunction. | Verify the camera's power and video connections (refer to Image 4.1). Ensure the pink reversing trigger wire is correctly connected. |
| Unit does not fit dashboard opening | Incorrect vehicle application; Screen dimensions exceed space. | This unit has a 10.1-inch screen that extends beyond a standard double DIN chassis. Confirm your vehicle's dashboard has adequate space for the screen's dimensions (250mm x 150mm). Professional installation may be required for custom fitting. |
8. Specifikationer
| Feature | Specifikation |
|---|---|
| Operativsystem | Android 12 |
| CPU | 4-kerne |
| Hukommelse (RAM+ROM) | 2 GB RAM + 32 GB ROM |
| Skærmstørrelse | 10.1 tommer |
| Skærmtype | IPS Touch Screen (2.5D Tempered Glass) |
| Skærmopløsning | 1024x600 |
| Trådløs forbindelse | Wireless Carplay, Wireless Android Auto, WiFi, Bluetooth 5.1 |
| Mirror Link | Wired/Wireless (Android), Wireless (iOS) |
| GPS-navigation | Built-in GPS Module, supports offline/online maps |
| Radio Tuner | FM radio |
| Lydudgangstilstand | Stereoanlæg |
| Backup kamera | AHD, 170-degree wide angle, waterproof |
| Produktdimensioner | 9.8 x 1.57 x 5.79 inches (Unit chassis: 178x65x70mm) |
| Varens vægt | 2.72 pund |
| Fabrikant | Naifay |
9. Garanti og support
Naifay is committed to providing excellent customer service and technical support.
- Svartid: Expect a quick reply to inquiries within 24 hours.
- Returpolitik: 60 dages bekymringsfri returperiode.
- Garanti: 12 months replacement available within 12 months of purchase.
- Teknisk support: Livstids eftersalgsrådgivning og teknisk support tilbydes.
For any questions regarding pre-sales information, installation guidance, or technical support, please contact Naifay customer service. You can typically find contact information by clicking 'sold by Naifay' on the product page and then 'ask a question'.

Image 9.1: Summary of Naifay's customer support commitments, including response time, return policy, warranty, and lifetime technical support.


