1. Introduktion
This manual provides detailed instructions for the setup, operation, and maintenance of your TOPPING E4X4 Pre USB Audio Interface. The E4X4 Pre is designed for high-quality audio recording and playback, featuring ultra-linear preamps, dual headphone outputs, and comprehensive mixer control. Please read this manual thoroughly before using the device to ensure optimal performance and longevity.
2. Sikkerhedsoplysninger
- Udsæt ikke enheden for regn, fugt eller ekstreme temperaturer.
- Undgå at placere enheden i nærheden af varmekilder eller i direkte sollys.
- Brug kun den strømadapter, der er angivet til denne enhed.
- Åbn ikke enheden casing. Overlad al service til kvalificeret personale.
- Sørg for tilstrækkelig ventilation omkring enheden under drift.
3. Pakkens indhold
Bekræft at alle varer er til stede i pakken:
- TOPPING E4X4 Pre USB Audio Interface
- USB-C til USB-C kabel
- USB-C til USB-A-kabel
- Power Adapter (if included, or auxiliary power cable)
- Brugervejledning (dette dokument)
4. Produktet er slutview
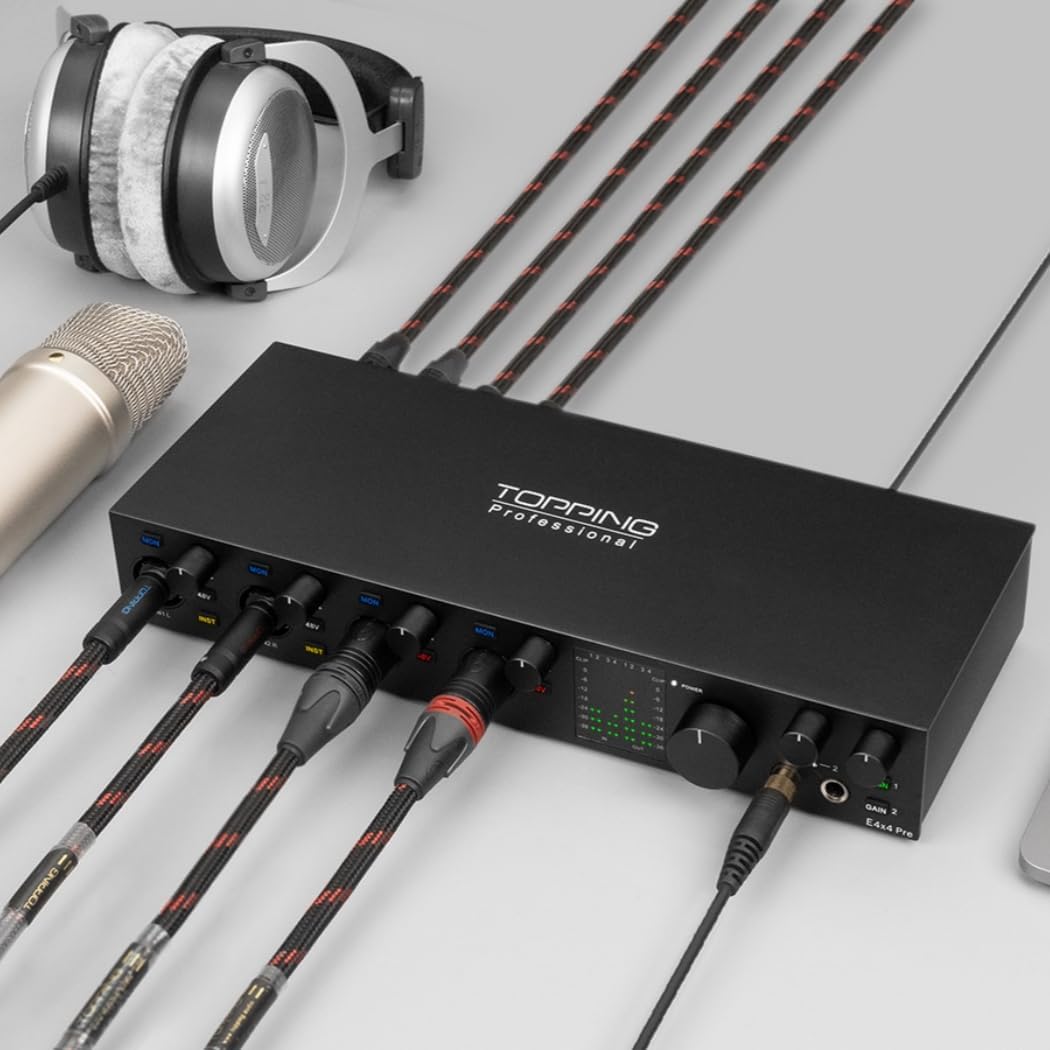
The TOPPING E4X4 Pre is a 4-input, 4-output USB audio interface designed for professional audio production. It features high-quality preamps, versatile connectivity, and robust monitoring capabilities.
4.1. Frontpanel

- Input Channels 1-4: XLR/TRS-kombinationsstik til tilslutning af mikrofoner eller instrumenter på linjeniveau.
- Gain-knapper: Juster indgangsniveauet for hver kanal.
- MON Buttons: Enable direct monitoring for individual input channels.
- 48V knapper: Activate 48V phantom power for condenser microphones on respective channels.
- INST Buttons: Switch inputs 1 and 2 to instrument level for direct connection of guitars or basses.
- LED niveaumålere: Provide visual feedback for input and output signal levels.
- MONITOR-knap: Controls the overall volume of the main monitor outputs.
- Headphone Outputs 1 & 2: Two independent 1/4-inch stereo headphone jacks.
- Headphone Gain Knobs: Adjust the volume for each headphone output independently.
4.2. Bagpanel

- USB-C porte: Two USB-C ports for connection to a computer or mobile device, and for auxiliary power if needed.
- Line Outputs (L/R): Balanced TRS outputs for connecting to studio monitors or other audio equipment.
5. Opsætning
5.1. Tilslutning til en computer eller mobilenhed
The E4X4 Pre is compatible with Windows, macOS, iOS, and Android systems. Use the provided USB-C cable to connect the interface to your device.
- Til pc/Mac: Connect one of the USB-C ports on the E4X4 Pre to a USB port on your computer.
- Til iOS/Android: Connect one of the USB-C ports on the E4X4 Pre to your mobile device using an appropriate adapter if necessary.
- Hjælpekraft: For desktop use or when 48V phantom power is required, it is recommended to connect an auxiliary power source to the second USB-C port to ensure stable operation and avoid signal interference.
5.2. Driver installation
For Windows systems, it may be necessary to install a dedicated driver for optimal performance. Please visit the official TOPPING website for the latest driver downloads. macOS, iOS, and Android devices typically operate class-compliant, requiring no additional driver installation.
5.3. Tilslutning af mikrofoner og instrumenter
- Mikrofoner: Connect XLR cables from your microphones to the XLR inputs on channels 1-4. For condenser microphones, activate 48V phantom power using the dedicated button for that channel.
- Instrumenter på linjeniveau: Connect TRS cables from line-level instruments (e.g., synthesizers, drum machines) to the TRS inputs on channels 1-4.
- Guitars/Basses: Connect your guitar or bass directly to the TRS inputs on channels 1 or 2, and press the 'INST' button for the corresponding channel to engage instrument mode.
5.4. Connecting Monitors and Headphones
- Studiemonitorer: Connect your active studio monitors to the Line Outputs (L/R) on the rear panel using balanced TRS cables.
- Hovedtelefoner: Plug your headphones into either of the two 1/4-inch headphone jacks on the front panel.
6. Betjeningsvejledning
6.1. Input Gain Adjustment
Use the individual gain knobs for each input channel to set the appropriate recording level. Observe the LED level meters to ensure the signal is strong but does not clip (peak into the red).
6.2. Phantom Power (48V)
Press the '48V' button for the specific channel when using condenser microphones that require phantom power. Ensure the microphone is connected before activating phantom power to prevent damage.
6.3. Instrument Mode
When connecting a guitar or bass directly, press the 'INST' button for input channels 1 or 2. This optimizes the input impedance for passive instrument pickups.
6.4. Realtidsovervågning

The E4X4 Pre features a zero-latency hardware monitoring system. Press the 'MON' button on an input channel to hear its signal directly through your headphones or main monitors without any delay. This is crucial for performers during recording.
6.5. Headphone Outputs


The E4X4 Pre includes two independent headphone outputs, each with its own gain control. This allows for separate monitoring mixes or individual volume adjustments for two users. The powerful NFCA-LE headphone amp module ensures clear audio even with high-impedance headphones.
6.6. Mixer Control and LoopBack Function

The E4X4 Pre features a comprehensive software control panel (available for download from the TOPPING website) that provides access to advanced mixing and routing options. This includes 12-channel input mixers, 8 DAW channels, and 6 LoopBack channels.
- Mixer: Adjust levels, panning, and routing for all inputs and playback channels.
- LoopBack: This function allows you to route audio from your computer's playback outputs back into the interface's inputs, useful for streaming, podcasting, or recording computer audio alongside live inputs.
6.7. Sample Rate og Bit Dybde
The E4X4 Pre supports high-resolution audio recording and playback from 44.1kHz/24bit up to 192kHz/24bit. These settings can typically be configured within your Digital Audio Workstation (DAW) software or your computer's sound settings.
7. Specifikationer
| Feature | Detalje |
|---|---|
| Modelnummer | TPE4X4-PRE-WH |
| Varens vægt | 2.62 pund |
| Produktdimensioner | 5.08 x 7.36 x 1.97 tommer |
| Kompatible enheder | Guitar, Headphone, Microphone, Personal Computer, Smartphone |
| Understøttet software | Avid Pro Tools, Ableton Live, Steinberg Cubase, Studio One, Logic Pro, Nuendo, Reaper, Audacity, Adobe Audition, etc. |
| Operativsystem | Android, Windows, iOS, macOS |
| Forbindelsesteknologi | AUX, USB |
| Antal kanaler | 4 |
| Input DNR (ADC) | 115dB |
| Output DNR (DAC) | 115dB |
| ADC THD+N | <0.0003 % |
| DAC THD+N | <0.001 % |
| Udgangseffekt for hovedtelefoner | 580mW x 2 @ 32 Ohm |
| Headphone Noise Floor | 0.9uVrms |
| Udgangsimpedans for hovedtelefoner | 1 ohm |
8. Fejlfinding
- Ingen lydoutput:
- Kontrollér alle kabelforbindelser (USB, skærme, hovedtelefoner).
- Ensure the E4X4 Pre is selected as the audio input/output device in your computer's sound settings and DAW.
- Verify that the MONITOR knob and headphone gain knobs are turned up.
- Check the software mixer for muted channels or incorrect routing.
- Indgangssignal for lavt/højt:
- Adjust the input gain knob for the respective channel.
- Ensure 48V phantom power is activated for condenser microphones.
- Confirm 'INST' mode is enabled for direct instrument connections.
- Intermittent Connection/Noise:
- Sørg for, at USB-kablet er korrekt tilsluttet.
- If using 48V phantom power or experiencing instability, connect an auxiliary power source to the second USB-C port.
- Prøv en anden USB-port på din computer.
9. Vedligeholdelse
- Rensning: Brug en blød, tør klud til at rengøre enhedens yderside. Brug ikke flydende rengøringsmidler eller opløsningsmidler.
- Opbevaring: Når enheden ikke er i brug i længere perioder, skal den opbevares køligt og tørt, væk fra direkte sollys og støv.
- Firmwareopdateringer: Periodically check the TOPPING official webwebstedet for tilgængelige firmwareopdateringer for at sikre optimal ydeevne og kompatibilitet.
10. Garanti og support
For warranty information, technical support, or service inquiries, please refer to the warranty card included with your product or visit the official TOPPING website. You can also contact TOPPING customer service through their designated support channels.


