1. Introduktion
Thank you for choosing the ADT HZB-45YY Commercial Ice Maker. This manual provides essential information for the safe operation, installation, maintenance, and troubleshooting of your new ice machine. Please read this manual thoroughly before operating the appliance and retain it for future reference.

Billedbeskrivelse: En front view of the ADT HZB-45YY Commercial Ice Maker, featuring a stainless steel finish and a black top. An overlay highlights the unique crescent-shaped ice cubes produced by the machine.
2. Sikkerhedsoplysninger
To prevent injury to users or damage to the appliance, observe all safety precautions. This appliance is intended for commercial use. Always ensure proper grounding and ventilation.
- Brug ikke maskinen med en beskadiget netledning eller stik.
- Sørg for, at maskinen er placeret på en stabil, plan overflade.
- Hold ventilationsåbningerne fri af forhindringer.
- Opbevar ikke eksplosive stoffer såsom spraydåser med et brændbart drivmiddel i dette apparat.
- Afbryd strømmen før rengøring eller service.
3. Pakkens indhold
Kontroller, at alle varer er til stede i emballagen:
- ADT HZB-45YY Commercial Ice Maker Unit
- Is Scoop
- In-Line Water Hose
- Afløbsslange
- Gallon-Bottled Water Hose
- Instruktionsmanual (dette dokument)

Billedbeskrivelse: This image displays the ADT HZB-45YY ice maker with its approximate dimensions (17.6 inches width, 15.7 inches depth, 31.4 inches height). Below the unit, the included accessories are shown: an ice scoop, an in-line water hose, a drain hose, and a hose for gallon-bottled water connection.
4. Produktet er slutview og funktioner
The ADT HZB-45YY is a high-efficiency commercial ice maker designed for reliable ice production. Key features include:
- Crescent-Shaped Ice Cubes: Unique design for slow-melting ice, ideal for beverages.
- Høj daglig kapacitet: Producerer op til 55 kg is om dagen.
- Hurtig isproduktion: Each ice-making cycle takes approximately 13-20 minutes.
- Efficient Evaporator: Features a 4x8 two-sided evaporator for consistent performance.
- Holdbar konstruktion: Sleek stainless steel design, rust-resistant and built for longevity.
- Digital kontrolpanel: Intuitive LCD panel for easy operation and settings adjustment.
- Selvrensende funktion: Forenkler vedligeholdelse.
- Time Reservation: Allows setting ice production time in advance.

Billedbeskrivelse: A banner highlighting eight core technologies of the ADT ice maker, represented by icons and text: Stainless Steel Body, Powerful Compressor, Energy Saving, Blue Light, Digital Control, Foamed Insulation, Self Cleaning, and Time Reservation.

Billedbeskrivelse: This image illustrates the different thicknesses of crescent-shaped ice cubes the machine can produce, along with their approximate production times: Thin Ice Cube (5-9 minutes), Medium Ice Cube (9-15 minutes), and Thick Ice Cube (15-25 minutes).
5. Opsætning og installation
Korrekt installation er afgørende for optimal ydeevne og sikkerhed.
5.1 Udpakning
- Tag forsigtigt ismaskinen ud af emballagen.
- Remove all packing materials, tape, and protective film.
- Inspect the unit for any shipping damage. Contact your retailer immediately if damage is found.
5.2 Placering
- Placer ismaskinen på en fast, plan overflade, der kan bære dens vægt, når den er fuld af is og vand.
- Ensure adequate ventilation around the unit. Maintain at least 5 inches (12.7 cm) of space from walls and other appliances.
- Undgå direkte sollys eller varmekilder.
- Omgivelsestemperaturen skal være mellem 10 °C og 32 °C.
5.3 Vandtilslutning
The ADT HZB-45YY offers two methods for water supply:
- In-Line Water Supply: Connect the provided in-line hose to a potable water source with appropriate pressure. Ensure all connections are secure to prevent leaks.
- Gallon-Bottled Water Supply: Use the provided hose to connect to a standard gallon-bottled water dispenser.
Ensure the drain hose is properly connected and directed to a suitable drain to prevent water overflow.

Billedbeskrivelse: This image demonstrates the two water input options for the ice maker. On the right, an 'In-line' connection shows a hose leading to a faucet. On the left, a 'Gallon-bottled water' connection shows a hose leading to a large water bottle.

Billedbeskrivelse: En detaljeret view of the ice maker's back panel, highlighting the connection points for easy installation. Labels indicate the 'Water outlet', 'Power line', 'In-line' water intake, and 'Gallon-bottled water' intake.
5.4 Elektrisk tilslutning
- Sørg for, at stikkontakten matcher voltage requirements of the ice maker (115 Volts).
- Sæt netledningen i en jordet stikkontakt. Brug ikke forlængerledninger eller adaptere.
6. Betjeningsvejledning
Gør dig bekendt med kontrolpanelet og de grundlæggende funktioner.
6.1 Kontrolpanel overview

Billedbeskrivelse: A detailed close-up of the ice maker's LCD control panel. The panel displays temperature and ice-making status. Buttons are labeled with their functions: 'LIGHT' (turns on blue light), 'TIMER' (for reservation time setting), 'CLEAN' (press for 5 seconds for self-cleaning), 'ON/OFF' (power button), and '+/-' (adjusts ice making process and time).
- LYS: Activates the internal blue light.
- TIMER: Press to enter the reservation time setting for delayed ice production.
- REN: Press and hold for 5 seconds to initiate the self-cleaning function.
- TIL/FRA: Tænder eller slukker for enheden.
- , Used to adjust ice making duration or set timer values.
6.2 Første opstart
- After connecting water and power, press the ON/OFF knappen for at starte maskinen.
- The machine will begin its first ice-making cycle. The first few batches of ice may be smaller or irregular; discard them.
6.3 Isproduktion
- The machine produces up to 64 pieces of ice per cycle.
- Cycle duration is typically 13-20 minutes, depending on ambient temperature and water temperature.
- Brug +/- buttons to adjust the ice-making time, which influences the thickness of the ice cubes. Longer times result in thicker ice.
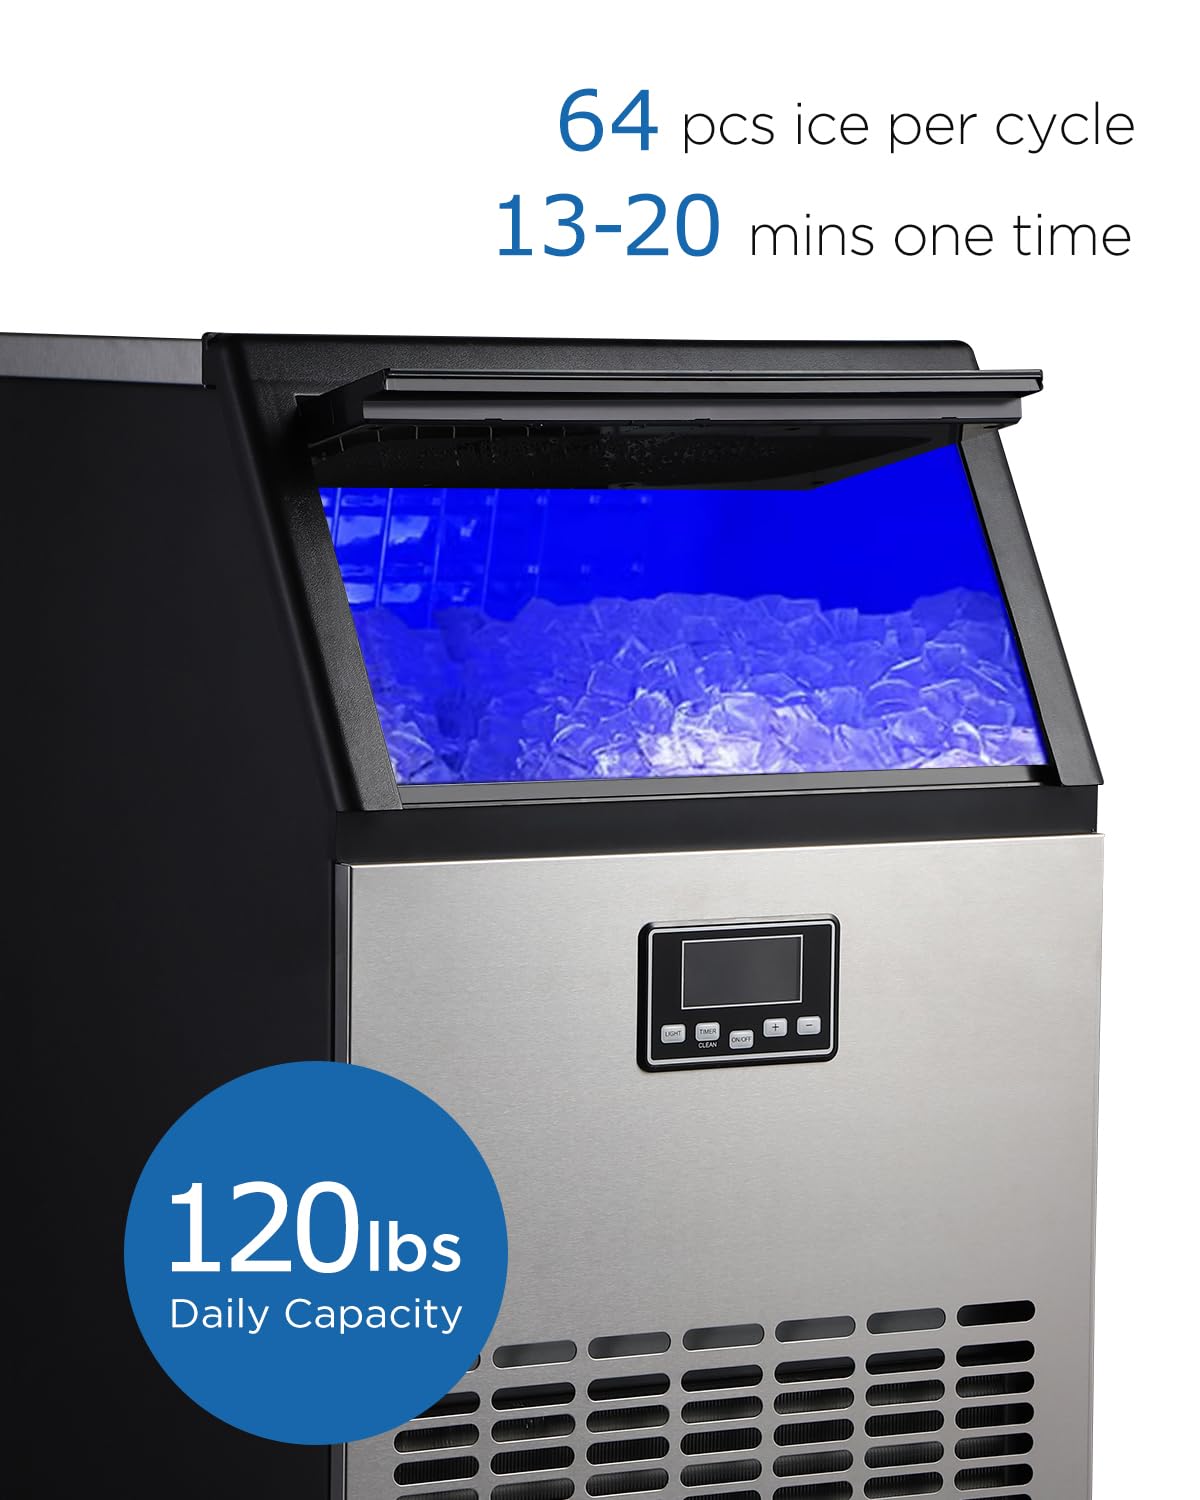
Billedbeskrivelse: Et nærbillede view of the ADT ice maker's front panel, highlighting its performance metrics. Text overlays indicate a '120lbs Daily Capacity' and '64 pcs ice per cycle, 13-20 mins one time'.
6.4 Ice Making Reservation
To set a delayed start time for ice production:
- With the machine in standby mode, press the TIMER knap.
- Brug +/- buttons to set the desired delay time (in hours).
- Trykke TIMER again to confirm. The machine will start automatically after the set time.
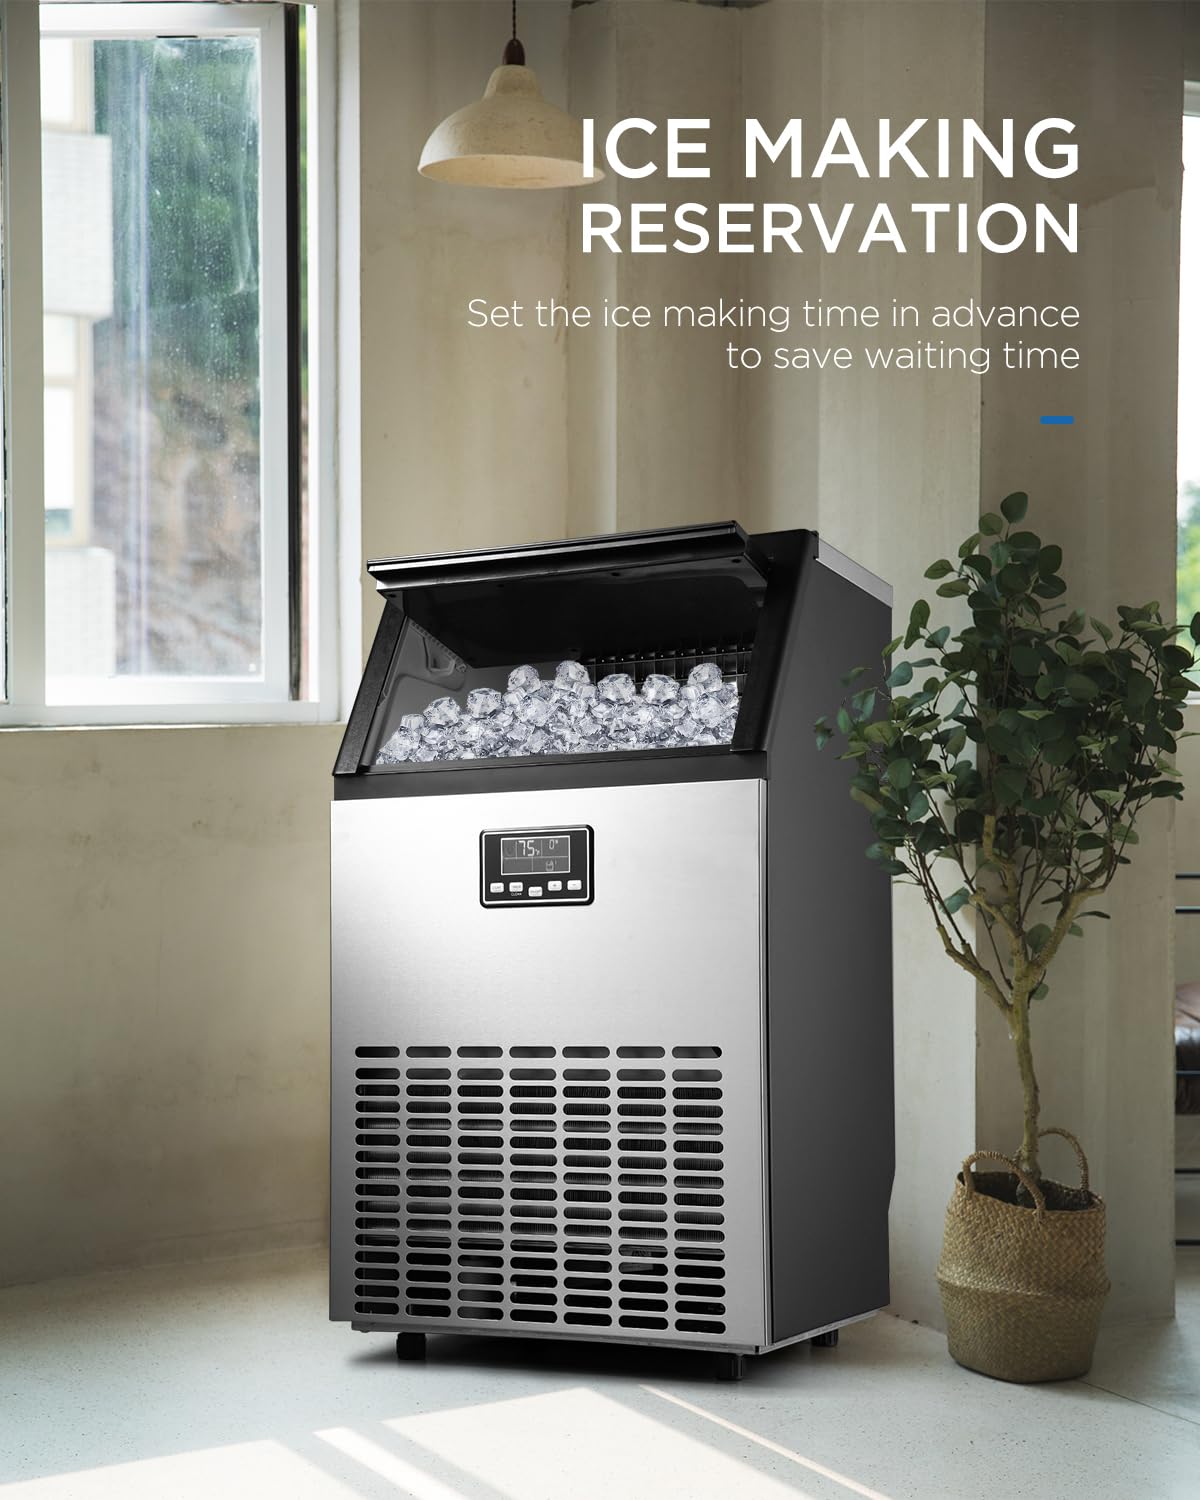
Billedbeskrivelse: The ADT ice maker is shown in a modern room setting, positioned near a window and a plant. Text on the image highlights the 'ICE MAKING RESERVATION' feature, explaining that users can 'Set the ice making time in advance to save waiting time'.
7. Vedligeholdelse
Regular cleaning and maintenance ensure the longevity and hygiene of your ice maker.
7.1 Selvrensende funktion
The machine is equipped with a self-cleaning feature:
- Ensure the machine is connected to a water supply and drain.
- Tryk og hold på REN knappen i 5 sekunder.
- The machine will automatically run a cleaning cycle.
- Once complete, drain any remaining water.
7.2 Manuel rengøring
- Ydre: Wipe the exterior with a soft cloth and mild detergent. Do not use abrasive cleaners.
- Indre: For thorough cleaning, disconnect power. Remove any remaining ice. Clean the ice storage bin and water reservoir with a solution of water and white vinegar or a food-grade ice maker cleaner. Rinse thoroughly with clean water.
- Fordamper: Periodically inspect the evaporator plates for mineral buildup. Clean gently with a soft brush if necessary.
- Luftfilter: The air filter (if present, typically on the front or side grille) should be cleaned monthly. Remove and wash with warm, soapy water, then dry completely before reinstalling.

Billedbeskrivelse: Et nærbillede view of the ice maker's internal evaporator plates, which are responsible for forming the ice cubes.
8. Fejlfinding
Se dette afsnit for almindelige problemer og deres løsninger.
| Problem | Mulig årsag | Løsning |
|---|---|---|
| Ismaskinen producerer ikke is. | No water supply; Water inlet blocked; Ambient temperature too high; Compressor issue. | Check water connection and supply; Clean water inlet filter; Ensure proper ventilation; Contact support if compressor suspected. |
| Isterningerne er for små eller tynde. | Ice making time too short; Water temperature too high. | Increase ice making time using the +/- buttons; Use colder water if possible. |
| Maskinen er støjende. | Unit not level; Fan obstruction; Normal operation sounds. | Ensure unit is level; Check for obstructions around fan; Some operational noise is normal. |
| Vandlækage. | Løse vandtilslutninger; Tilstoppet afløbsslange. | Tighten all water inlet and drain connections; Clear any blockages in the drain hose. |
| Self-cleaning not working. | Button not held long enough; Water supply issue. | Ensure the CLEAN button is held for 5 seconds; Verify water supply is connected. |
If the problem persists after attempting these solutions, please contact ADT customer support.
9. Specifikationer
| Feature | Detalje |
|---|---|
| Mærke | ADT |
| Modelnavn | HZB-45YY |
| Daglig isproduktion | Op til 121 lbs (55 kg) |
| Isterningform | Halvmåne |
| Iscyklustid | 13-20 minutter |
| Evaporator Type | 4x8 Two-Sided |
| Voltage | 115 volt |
| Vandbeholderkapacitet | 1.7 Liters (approximate) |
| Produktmål (D x B x H) | 15.7" x 17.6" x 31.4" (approximate, refer to dimension image for visual) |
10. Garanti og support
ADT provides a one-year warranty for this product from the date of purchase. This warranty covers manufacturing defects under normal use. Additionally, a 30-day return policy is offered.
For warranty claims, technical support, or any inquiries, please contact ADT customer service through the retailer where the product was purchased or visit the official ADT webwebsted.


