1. Introduktion
This manual provides comprehensive instructions for the safe and effective operation of your OMMO Laser Level. Please read this manual thoroughly before initial use and retain it for future reference. The OMMO Laser Level is designed for precise leveling and alignment tasks in various indoor and outdoor applications, featuring 3 x 360° green laser lines, a touch panel interface, and multiple operating modes.
2. Sikkerhedsoplysninger
ADVARSEL: LASERSTRÅLING
- Stir ikke direkte ind i laserstrålen.
- Undgå direkte øjeneksponering for laserstrålen.
- This device is a Class II laser product with a power output of <1mW.
- Do not disassemble the laser level. Repairs should only be performed by authorized personnel.
- Opbevar enheden utilgængeligt for børn.
- Use only the original charger for the battery.
- Kortslut ikke batteripolerne.
- Do not put the battery into fire.
Always operate the laser level in a safe environment, ensuring stable placement and clear surroundings.
3. Pakkens indhold
Bekræft, at alle nedenstående varer er inkluderet i din pakke:
- 1 x OMMO Laser Level (Model: OM-LL17)
- 1 x bæretaske
- 1 x L-formet magnetisk beslag
- 1 x 3600mAh litiumbatteri
- 1 x fjernbetjening
- 1 x Type-C ladekabel

Image: Contents of the OMMO Laser Level package, including the laser level unit, carrying bag, L-shaped magnetic bracket, lithium battery, remote controller, and Type-C charging cable.
4. Opsætning
4.1. Batteriinstallation og opladning
- Locate the battery compartment on the laser level.
- Isæt 3600mAh lithiumbatteriet, og sørg for at polariteten vender korrekt.
- Luk batterirummet forsvarligt.
- To charge the battery, connect the Type-C charging cable to the laser level's charging port and a suitable power source. The battery can be used continuously for approximately 5 hours on a full charge.
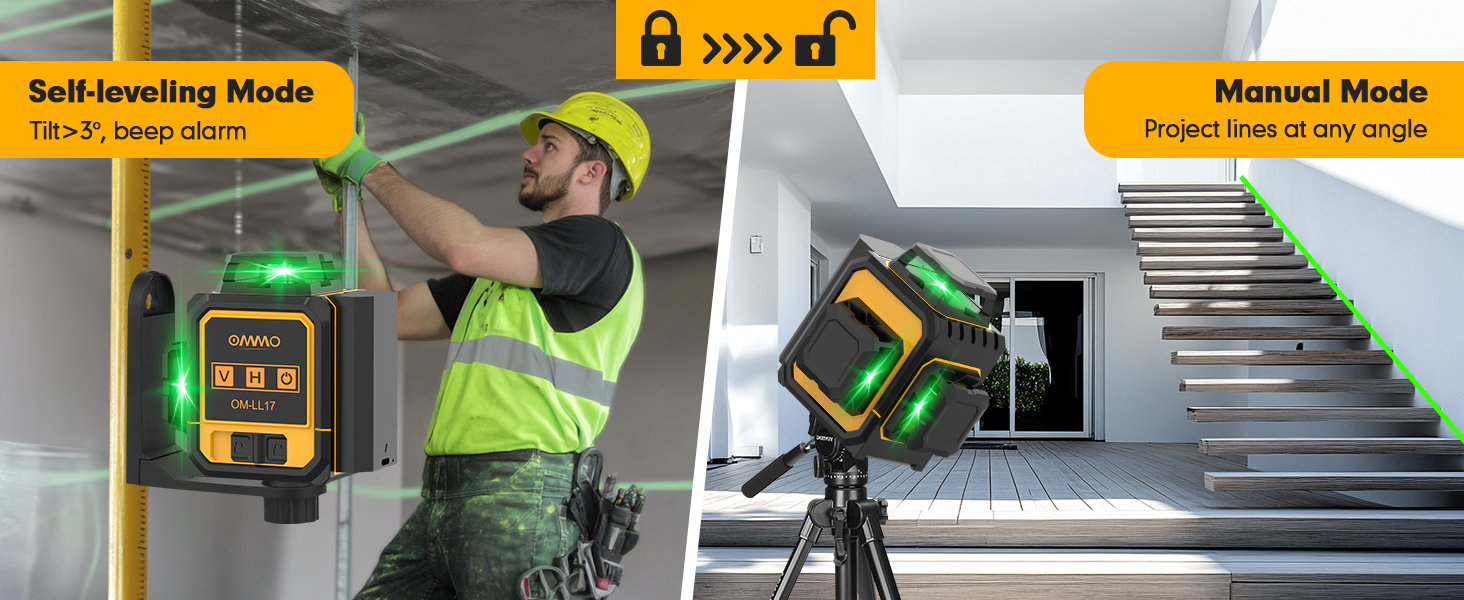
Image: The OMMO Laser Level highlighting its 3600mAh rechargeable lithium battery and Type-C charging port, indicating long working and charging times.
4.2. Montering af laserniveauet
The OMMO Laser Level offers versatile mounting options:
- L-Shaped Magnetic Bracket: Attach the laser level to the L-shaped magnetic bracket. The strong magnets on the bracket allow for secure attachment to metal surfaces.
- 1/4"-20 Mount Thread: The laser level features a 1/4"-20 mount thread on its base, compatible with standard tripods or other mounting accessories.

Image: The OMMO Laser Level demonstrating its L-shaped magnetic bracket for attaching to metal surfaces and its 1/4"-20 mount thread for tripod compatibility.
5. Operating the Laser Level
5.1. Tænd/sluk og valg af tilstand
The OMMO Laser Level features a smart touch panel for intuitive control.

Image: Close-up of the OMMO Laser Level's smart touch panel, showing the Vertical (V), Horizontal (H), and Power/Brightness Adjustment buttons.
- For at tænde: Slide the lock switch on the side of the unit to the unlocked position. The laser level will automatically enter Self-Leveling Mode.
- Selvnivellerende tilstand: In this mode, the laser level will automatically self-level within a ±3° range. If the tilt exceeds 3°, an audible beep will sound, and the laser lines will flash, indicating it is out of level. Place the device on a flat surface to stop the alarm.
- Manuel tilstand: To activate Manual Mode (for projecting lines at any angle), keep the lock switch in the locked position. Then, touch the Power On/Off icon on the touch panel to turn on the laser. In this mode, the device will not self-level, and you can project tilt lines without an alarm.
- For at slukke: Slide the lock switch to the locked position.

Image: Visual representation of the OMMO Laser Level operating in Self-Leveling Mode (automatically leveling) and Manual Mode (projecting lines at an angle).
5.2. Valg af laserlinje
Use the touch panel buttons to select desired laser lines:
- Touch the "V" icon to activate or deactivate vertical laser lines. The unit features two 360° vertical lines.
- Touch the "H" icon to activate or deactivate the 360° horizontal laser line.
- Lines can be used simultaneously or individually.

Image: Diagrams illustrating the 360° horizontal line, 360° vertical line, and two 360° vertical lines projected by the OMMO Laser Level.
5.3. Justering af lysstyrke
The laser level offers three adjustable brightness levels for optimal visibility in various lighting conditions. Touch the Power On/Off icon repeatedly to cycle through the brightness settings.
5.4. Betjening af fjernbetjening
The included remote controller allows for convenient operation from a distance (up to 160ft), reducing the need to constantly approach the unit.
- Vertical Line (V): Press the 'V' button on the remote to toggle vertical lines.
- Horizontal Line (H): Press the 'H' button on the remote to toggle the horizontal line.
- Power/Brightness Adjustment: Press the Power/Brightness button on the remote to turn the unit on/off or adjust laser brightness.

Image: The OMMO Laser Level being operated by its remote control, showing the convenience of adjusting settings from a distance.
6. Typiske applikationer
The OMMO Laser Level is suitable for a wide range of tasks, including but not limited to:
- Installing floor and ceiling tiles.
- Aligning wall decorations and pictures.
- Setting cabinets and shelves.
- Framing and drywall installation.
- Electrical outlet and switch alignment.
- General construction and renovation projects.

Image: Collage showing the OMMO Laser Level being used for installing kitchen cabinets, laying flooring, and aligning stairs, demonstrating its versatility.
7. Vedligeholdelse
- Rensning: Tør enheden af med en blød, damp klæde. Brug ikke slibende rengøringsmidler eller opløsningsmidler.
- Opbevaring: Store the laser level in its carrying bag in a cool, dry place when not in use. Avoid extreme temperatures and direct sunlight.
- Batteripleje: For prolonged storage, charge the battery to approximately 50% and recharge every few months to maintain battery health.
- Holdbarhed: The device is IP54 rated, offering dustproof and waterproof protection against splashes. However, avoid submerging the unit in water.

Image: The OMMO Laser Level shown in a dusty and wet environment, illustrating its IP54 dustproof and waterproof capabilities.
8. Fejlfinding
| Problem | Mulig årsag | Løsning |
|---|---|---|
| Laserlinjerne er svage eller ikke synlige. | Low battery; Bright ambient light; Incorrect brightness setting. | Charge the battery; Use in lower light conditions or with a laser detector; Adjust brightness using the Power/Brightness button. |
| Laser level beeps and flashes in Self-Leveling Mode. | Unit is tilted beyond its self-leveling range (±3°). | Place the laser level on a more level surface. |
| Fjernbetjeningen reagerer ikke. | Remote battery low; Obstruction between remote and unit; Out of range. | Replace remote battery; Ensure clear line of sight; Move closer to the unit. |
| Laserlinjerne er ikke lige eller præcise. | Unit is not in Self-Leveling Mode; Unit has been dropped or damaged. | Ensure the lock switch is in the unlocked position for self-leveling; Contact customer support for repair if damaged. |
9. Specifikationer
| Feature | Detalje |
|---|---|
| Mærke | OMMO |
| Modelnummer | OM-LL17 |
| Laser klasse | Klasse II, <1 mW |
| Laser linjer | 3 x 360° Green Lines (1 Horizontal, 2 Vertical) |
| Selvudjævningsområde | ±3° |
| Driftstilstande | Self-leveling Mode, Manual Mode |
| Batteritype | 3600mAh litium-ion (inkluderet) |
| Kontinuerlig arbejdstid | Ca. 5 timer |
| Strømkilde | Batteridrevet |
| Voltage | 3.7 volt |
| Produktdimensioner | 7.55 cm L x 3.6 cm B |
| Varens vægt | 1.38 pund |
| Materiale | Plast |
| IP-vurdering | IP54 (støvtæt, vandtæt) |
10. Garanti og support
For warranty information or technical support, please refer to the contact details provided on the product packaging or visit the official OMMO webwebsted. Behold din købskvittering som købsbevis i tilfælde af garantikrav.
Fabrikant: OMMO


