1. Introduktion
Thank you for choosing the VOKSUN 657PS Wireless Weather Station. This device is designed to provide accurate indoor and outdoor temperature and humidity readings, along with a 12-hour weather forecast, time, date, alarm, and moon phase display. Its large color screen ensures clear readability of environmental conditions in your home or office. Please read this manual carefully before use to ensure proper operation and to maximize the lifespan of your weather station.

Image: The VOKSUN 657PS Wireless Weather Station main unit and its accompanying outdoor sensor.
2. Pakkens indhold
Kontroller venligst pakkens indhold ved åbning for at sikre, at alle varer er til stede og ubeskadigede:
- 1 x VOKSUN 657PS Main Weather Station Unit
- 1 x trådløs udendørssensor
- 1 x DC strømadapter
- 1 x brugermanual
Note: 2 x AA batteries for the main unit and 2 x AAA batteries for the outdoor sensor are NOT included and must be purchased separately.

Image: The weather station main unit, outdoor sensor, and power adapter as typically found in the product package.
3. Produktet er slutview og komponenter
Familiarize yourself with the main unit and outdoor sensor components and their functions:

Image: A detailed diagram highlighting the various display areas and control buttons on the weather station and sensor.
Main Unit Display Areas:
- A1: Comfort Indicator: Displays indoor comfort level (HUMID, GOOD, DRY).
- A2: Outdoor Temperature: Current outdoor temperature reading.
- A3: Outdoor Humidity: Current outdoor humidity reading.
- A4: Outdoor Temp Alerts: Indicates if outdoor temperature alerts are active.
- B1: Alarms: Alarmindikatorer.
- B2: Time: Nuværende tidsvisning.
- B3: Weather Forecast: Predicted weather conditions for the next 12 hours.
- B4: Weather Trends: Indicates temperature and humidity trends.
- C1: Week: Dag i ugen.
- C2: Date: Nuværende dato.
- C3: Room Temperature: Current indoor temperature reading.
- C4: Indoor Humidity: Current indoor humidity reading.
- C5: Indoor Temp Alerts: Indicates if indoor temperature alerts are active.
Main Unit Buttons/Ports:
- ① Down Button: Used for decreasing values or navigating menus.
- ② Mode Button: Used to switch between display modes or enter settings.
- ③ Snooze/Light Button: Activates snooze for alarms or adjusts backlight.
- ④ Channel Button: Selects different outdoor sensor channels (supports up to 3).
- ⑤ Up Button: Used for increasing values or navigating menus.
- ⑥ Alerts Button: Sets or reviews temperature alerts.
- ⑦ Alarm Button: Sets or reviews alarm settings.
- ⑧ USB Port: For charging external devices (output only).
- ⑨ DC Input Port: Til tilslutning af strømadapteren.
4. Opsætning
Follow these steps to set up your weather station:
4.1 Strømforsyning til hovedenheden
- Batteriinstallation (valgfrit): Open the battery compartment on the back of the main unit. Insert 2 x AA batteries, observing the correct polarity (+/-). This mode allows the screen to light up for 15 seconds when touched, then automatically turn off to save energy.
- DC Power Adapter (Recommended): For continuous backlight display, connect the provided DC power adapter to the DC Input Port (⑨) on the back of the main unit and plug it into a standard wall outlet.
4.2 Strømforsyning til udendørssensoren
- Åbn batterirummet på bagsiden af udesensoren.
- Insert 2 x AAA batteries, observing the correct polarity (+/-).
- Luk batterirummet forsvarligt.

Image: Illustration of the two power options for the main unit (DC adapter or AA batteries) and the AAA battery requirement for the sensor.
4.3 Sensor Pairing and Initial Calibration
- Once both units are powered, the main unit will automatically search for the outdoor sensor. Ensure the sensor is within range.
- The outdoor temperature and humidity readings should appear on the main unit's display. If not, press and hold the 'Channel' button (④) on the main unit to initiate a manual search.
- For accurate weather forecasting, the weather station requires an initial learning and calibration period of approximately 7 days. During this time, the device collects barometric pressure data to generate personalized forecasts for your location.
5. Betjeningsvejledning
5.1 Displayfunktioner
The large color display provides a comprehensive overview af forskellige miljødata:
- Indendørs/udendørs temperatur og luftfugtighed: Continuously displayed in large, easy-to-read digits.
- Vejrudsigt: Icons representing sunny, partly cloudy, cloudy, rainy, heavy rain, and snowy conditions for the next 12 hours.
- Tid og dato: Viser aktuel tid, ugedag og dato.
- Månefase: Viser månens aktuelle fase.
- Komfortindikator: Provides a visual indication of indoor comfort levels (HUMID, GOOD, DRY).

Image: The weather station's clear LCD color display, demonstrating its readability and the different backlight brightness levels.

Image: Visual representations of the six weather forecast icons and eight moon phase icons that the weather station can display.
5.2 Setting Time and Date (DCF Function)
The weather station features a DCF (Atomic Clock) function for automatic time synchronization.
- Upon initial power-up, the station will attempt to synchronize with the DCF signal to set the correct time, date, and day of the week. This process typically occurs every morning.
- The DST (Daylight Saving Time) function ensures time accuracy during seasonal changes.
- If the DCF signal is weak in your location, you can disable this function and set the time manually. Refer to the detailed instructions in the full manual for manual time setting.
5.3 Justering af baggrundsbelysning
The backlight has four adjustable levels:
- When powered by DC Adapter: Press the 'Snooze/Light' button (③) to cycle through Bright → Normal → Turn Off → Bright (Loop). The backlight remains on continuously.
- When powered by Batteries: Touch the top of the unit to activate the backlight. It will cycle through Bright → Normal Bright (Loop) and automatically turn off after 15 seconds to conserve battery life.
5.4 Alarmindstillinger
Sådan indstilles alarmen:
- Press the 'Alarm' button (⑦) to enter alarm setting mode.
- Use the 'Up' (⑤) and 'Down' (①) buttons to adjust the hour and minute.
- Press 'Alarm' again to confirm and exit.
- To activate/deactivate the alarm, press the 'Alarm' button briefly outside of setting mode.
5.5 Temperature Unit Conversion (℃/℉)
Sådan skifter du mellem Celsius (℃) og Fahrenheit (℉):
- Locate the ℃/℉ button, usually on the back or side of the main unit.
- Press it once to toggle the temperature display unit.
6. Placering og rækkevidde
Proper placement of both the main unit and the outdoor sensor is crucial for accurate readings and reliable wireless communication.
6.1 Placering af hovedenhed
The main unit can be placed on a desktop or mounted on a wall, making it suitable for various scenarios:
- Living room, bedroom, kitchen, office, etc.
- Ensure it is placed away from direct sunlight or heat sources that could affect indoor temperature readings.
6.2 Placering af udendørs sensorer
The outdoor sensor has a transmission range of up to 200FT/60M in an open space and supports up to 3 remote sensors for monitoring multiple locations.
- Place the outdoor sensor in a shaded area, away from direct sunlight and precipitation, to ensure accurate temperature and humidity readings.
- Avoid placing it near large metal objects, electrical appliances, or thick walls that could interfere with the wireless signal.
- While the sensor is designed for outdoor use, protecting it from direct heavy rain or snow (e.g., by placing it under an overhang or in a protective enclosure like a plastic jar) can extend its lifespan.
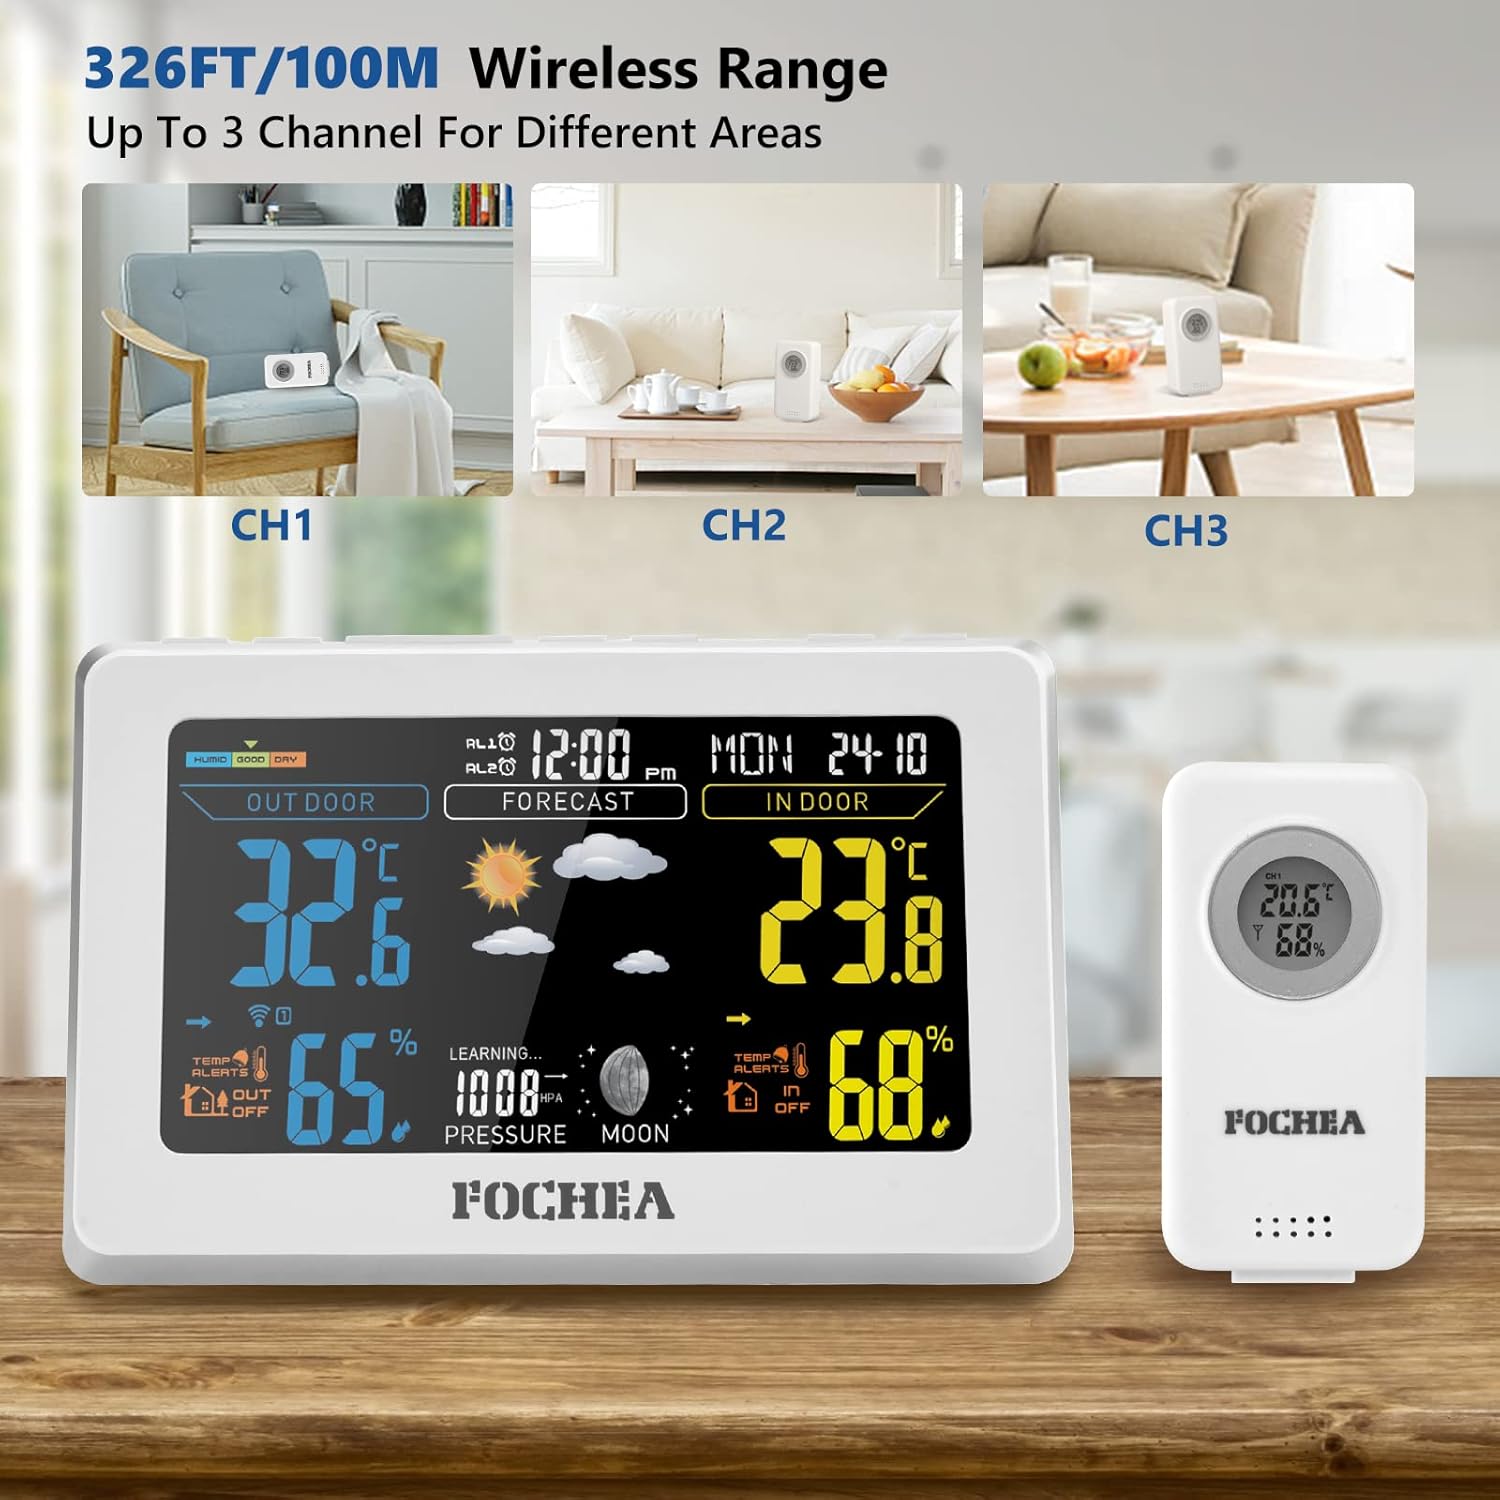
Image: An illustration demonstrating the wireless range of the weather station, showing how it can connect to sensors in different areas of a home.

Billede: Eksamples of how the weather station can be used in different settings, such as hanging on a wall or placed on a desk or shelf.
7. Vedligeholdelse
To ensure the longevity and accuracy of your weather station, follow these maintenance guidelines:
- Udskiftning af batteri: Replace batteries in both the main unit and the outdoor sensor when the low battery indicator appears on the display. Always replace all batteries at the same time with new ones of the same type.
- Rensning: Tør hovedenheden og sensoren af med en blød kludamp cloth. Do not use abrasive cleaners or solvents, as they may damage the plastic components or display.
- Sensorbeskyttelse: Although designed for outdoor use, extreme weather conditions (heavy rain, snow, direct prolonged sunlight) can affect the outdoor sensor. Consider placing it under a protective cover or in a sheltered location to extend its lifespan.
- Opbevaring: If storing the weather station for an extended period, remove all batteries to prevent leakage.
8. Fejlfinding
If you encounter issues with your VOKSUN Weather Station, refer to the following common problems and solutions:
| Problem | Mulig årsag | Løsning |
|---|---|---|
| Ingen visning på hovedenheden | Low or no batteries; Power adapter not connected/faulty. | Replace batteries; Ensure power adapter is securely connected and functional. |
| Udendørs aflæsning vises ikke eller er unøjagtig | Sensor out of range; Low sensor batteries; Interference; Sensor not paired. | Move sensor closer; Replace sensor batteries; Relocate sensor away from interference; Re-pair sensor (see Setup section). |
| Vejrudsigten er upræcis | Still in learning phase; Local atmospheric pressure changes. | Allow 7 days for initial calibration; Forecasts are based on barometric pressure trends, not real-time conditions. |
| Cannot change temperature unit (℃/℉) | Incorrect button pressed or button not responding. | Ensure you are pressing the dedicated ℃/℉ button, usually a small button on the back or side of the unit. |
| DCF time synchronization fails | Svagt signal; Interferens. | Relocate unit to an area with better signal reception (e.g., near a window); Disable DCF and set time manually if signal remains weak. |
9. Specifikationer
Key technical specifications for the VOKSUN 657PS Wireless Weather Station:
| Feature | Specifikation |
|---|---|
| Modelnummer | 657PS |
| Mærke | VOKSUN |
| Strømkilde (hovedenhed) | DC Adapter (included) or 2 x AA Batteries (not included) |
| Strømkilde (sensor) | 2 x AAA batterier (medfølger ikke) |
| Forbindelsesteknologi | Trådløs, 433.92 MHz |
| Wireless Range | Up to 200FT / 60M (open space) |
| Temperatur nøjagtighed | ±1 ℃ |
| Særlige funktioner | Alarm, Clock, Wireless, Adjustable Backlight, DCF Function |
| Materiale | Acrylonitril Butadien Styren (ABS) |
| Farve | Hvid |
10. Garanti og support
VOKSUN is committed to providing high-quality products. For specific warranty information, please refer to the warranty card included in your product packaging or contact VOKSUN customer support directly. If you have any questions or require assistance with your weather station, please reach out to the manufacturer's customer service team through the contact information provided with your purchase or on the official VOKSUN webwebsted.


