1. Introduktion
This manual provides detailed instructions for the installation, operation, and maintenance of your BOTSLAB R810 Wireless Doorbell Camera. Please read this manual thoroughly before using the product to ensure proper functionality and safety.
The BOTSLAB R810 offers a 180° panoramic view, 5MP video resolution, and flexible power options (battery or wired). It includes advanced AI detection features and supports cloud storage without monthly fees.
2. Pakkens indhold
Bekræft, at alle nedenstående varer er inkluderet i din pakke:
- Dørklokkekamera x 1
- Ladestation x 1
- Monteringsbeslag x 1
- Bracket Positioning Stickers x 1
- Power Plug x 1
- Installation Accessory Kit x 1 (includes screws and wall anchors)
- AC Cable Pack x 1
- Ejektorstift x 1
- Brugervejledning x 1
- Doorbell Button Sticker x 1
- Parcel Sticker x 1
- Ladekabel x 1

Image: Illustration of all items included in the BOTSLAB R810 package.
3. Produktspecifikationer
| Feature | Beskrivelse |
|---|---|
| Modelnavn | R810 Video Doorbell |
| Video opløsning | 5 MP |
| Panoramaudsigt View | 180° |
| Strømkilde | 5200mAh rechargeable Battery / Wired (AC Power) |
| Batterilevetid | Up to 150 days (based on 20 daily detections, 10s per video) |
| Forbindelse | 2.4 GHz Wi-Fi |
| Opbevaring | $0 Lifetime Cloud Service, Local Storage (Micro SD card up to 256G, not included) |
| Opdagelse | AI-powered Human Detection, Visitor Recognition, Stay Detection, Radar & PIR sensors |
| Lyd | Two-way Audio with Voice Modulation |
| Nattesyn | Up to 24ft Night Vision Range (NIR) |
| Vejrbestandig vurdering | IP66 |
| Smart Home-kompatibilitet | Alexa, Google Assistant |
| Dimensioner (L x B x H) | 6.6 x 1.96 x 7.8 tommer |
| Vægt | 1.19 pund |
4. Opsætning og installation
4.1 Charging the Doorbell
Before initial use, fully charge the doorbell camera using the provided charging cable. The 5200mAh rechargeable battery can last up to 150 days on a single charge, depending on usage frequency.

Image: A hand connecting the charging cable to the doorbell camera.
4.2 Choosing Installation Method
The BOTSLAB R810 offers two installation methods: screw-mounted or adhesive. Choose the method suitable for your installation surface. For adhesive mounting, ensure the surface is flat, smooth, and non-metal.

Image: Visual representation of screw-mounted and adhesive installation methods.
4.3 Montering af dørklokken
- Use the bracket positioning stickers to mark drill holes on the wall.
- Drill holes and insert the wall anchors (if screw-mounting).
- Screw the flat back plate onto the wall.
- Attach the doorbell camera to the mounted back plate.
Video: R810 Installation Guide. This video demonstrates the steps for installing the doorbell camera, including drilling holes and mounting the back plate.
4.4 Tilslutning af basestationen
The base station extends the connection range and ensures data is not lost if the doorbell is damaged or stolen. Plug the base station into a power outlet. It connects to the doorbell via Wi-Fi.

Image: Comparison showing the base station for enhanced performance, indicating 2X connectivity range, 2X networking speed, and 10% battery efficiency compared to other doorbells with chimes.
4.5 App-opsætning
Download the Botslab APP from your device's app store (iOS or Android). Register and sign in. Follow the in-app instructions to add your new doorbell camera. Press and hold the power button of the doorbell for at least 5 seconds until you hear "Welcome to using Botslab Video Doorbell".

Image: Illustration showing the Botslab App icon and download options for Google Play and App Store.
5. Betjeningsvejledning
5.1 Live View og optagelse
Access the live feed from your doorbell camera through the Botslab app. The 180° panoramic view allows you to see a wide area. You can switch between different view modes (Horizontal Correction, Panoramic, VR Mode, Vertical Correction) for optimal viewing.
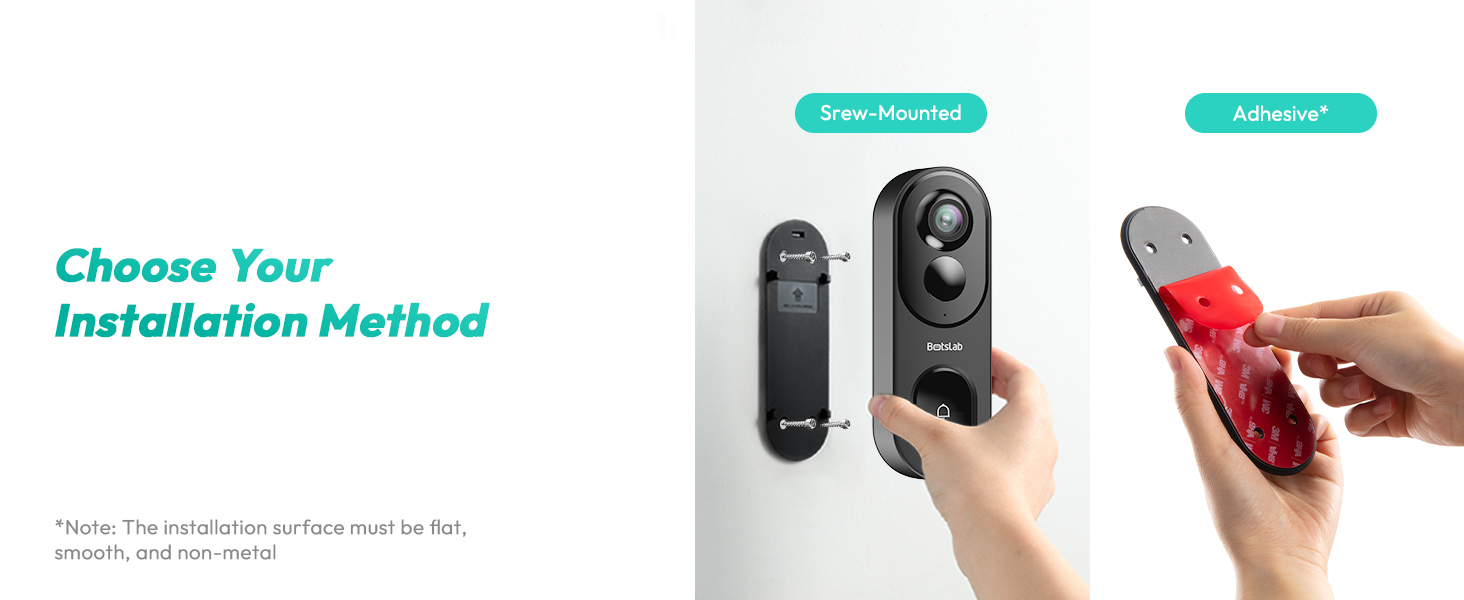
Image: Depicts the four available view modes: Horizontal Correction Mode, Panoramic Mode, VR Mode, and Vertical Correction Mode.
Recordings are stored in the cloud (free lifetime service) or locally on a Micro SD card (up to 256G, not included). The system is TÜV Rheinland and ISO/IEC 27001 certified for privacy assurance.
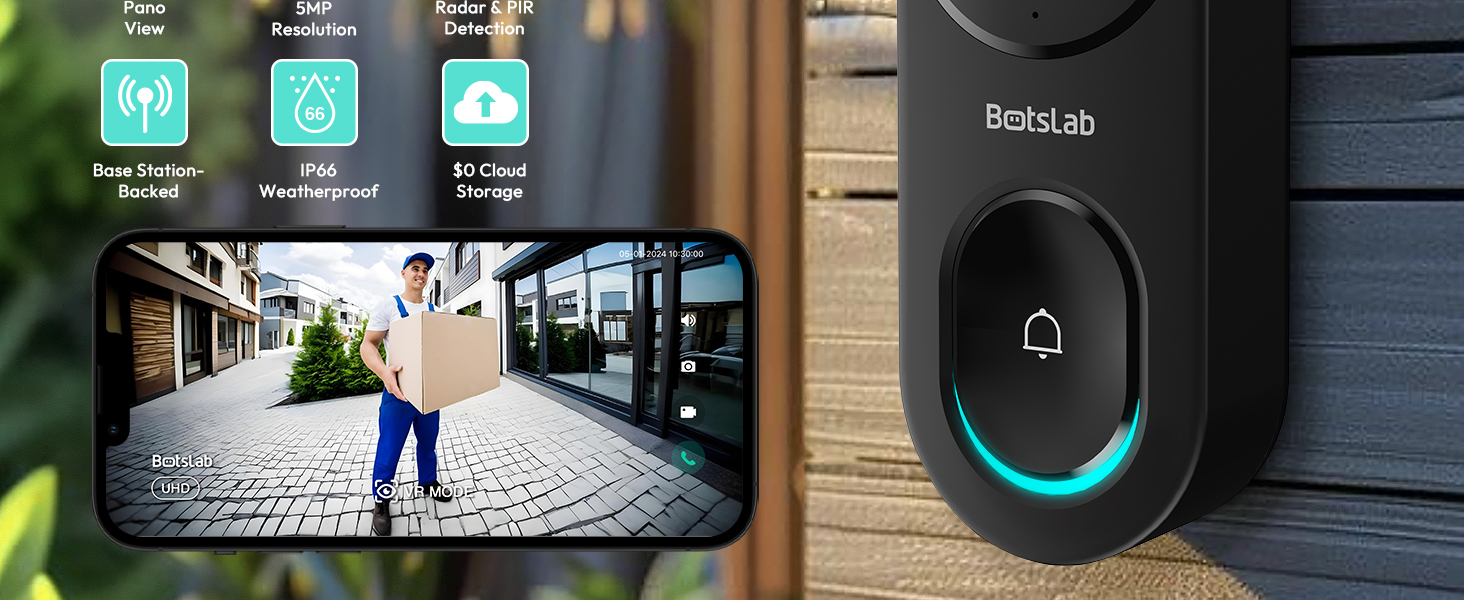
Image: Illustrates the cloud storage (no monthly fee) and local storage (Micro SD card up to 256G) options for video recordings.
5.2 AI Detection and Alerts
The doorbell features AI-powered human detection, visitor recognition, and stay detection. Radar and PIR sensors work together to reduce false alarms. You can customize detection zones within the app.
Image: A visual demonstrating the dual detection system (Radar & PIR) to reduce false alarms, showing a bird being ignored while a person is detected.
Receive precise alerts on your phone for detected events. Customizable lingering alerts can be set to trigger an alarm if someone lingers at your front door for a specified duration.

Image: Shows the doorbell's view with a person detected and a notification for "Person Detection" and "Lingering Alert".
5.3 Two-Way Audio and Voice Modulation
Communicate with visitors using the clear two-way audio feature. For added security, you can use voice modulation to change your voice (e.g., male, funny) when speaking through the doorbell.
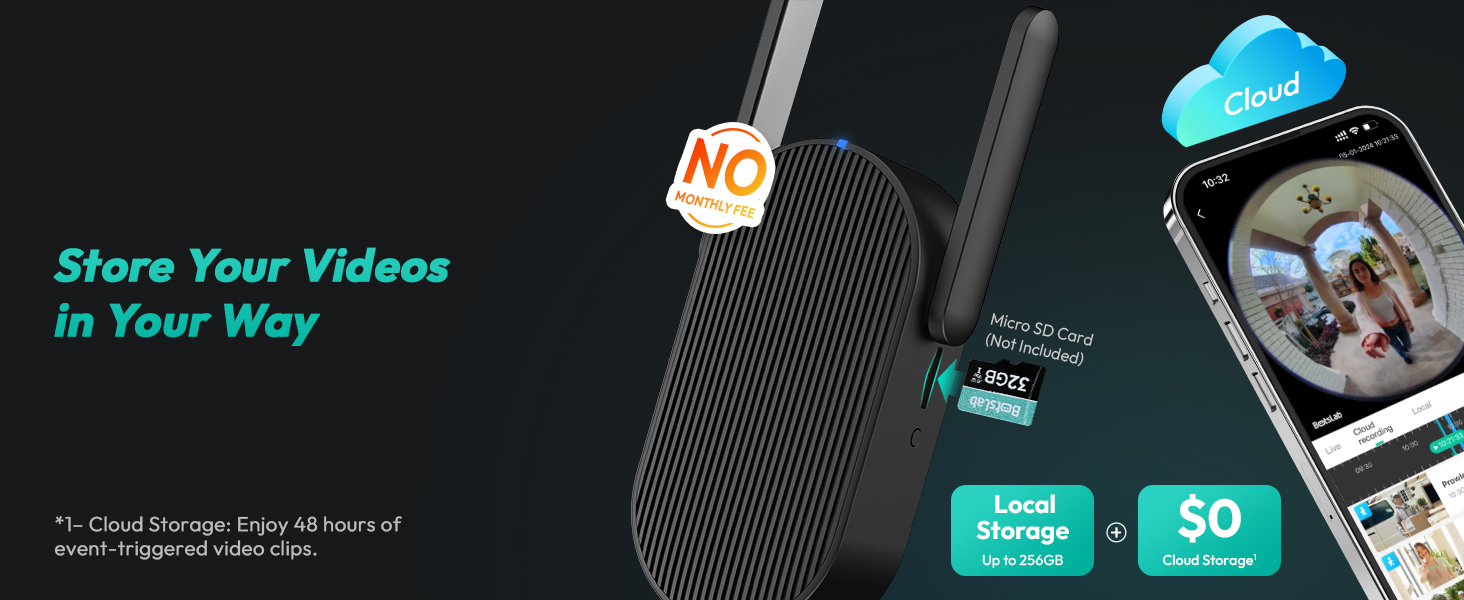
Image: Illustrates the two-way audio feature with options for voice modulation (Normal, Male, Funny) for privacy and security.
5.4 Nattesyn
The doorbell camera provides clear night vision up to 24 feet, ensuring visibility even in low-light conditions.

Image: Shows the doorbell's night vision capability, allowing clear visibility of visitors in the dark.
5.5 Smart Home-integration
Integrate your BOTSLAB R810 with Amazon Alexa and Google Assistant for convenient voice control. For example, you can say, "Hey Alexa, show me the video doorbell camera."

Image: Depicts the doorbell camera's compatibility with Amazon Alexa and Google Assistant for voice control.
6. Vedligeholdelse
6.1 Rengøring
Regularly wipe the camera lens and doorbell surface with a soft, damp cloth to ensure clear image quality and proper button functionality. Avoid using harsh chemicals or abrasive materials.
Video: Doorbell Camera Wireless. This video shows the doorbell being cleaned and installed, highlighting its weatherproof design.
6.2 Batteriopladning
When the battery level is low, remove the doorbell camera from its mounting bracket for recharging. Use the provided ejector pin to release the doorbell from the bracket. Reinsert after charging.
Video: Let's learn more about the BOTSLAB 5MP Video Doorbell. This video demonstrates how to remove the doorbell from its mount for charging using the ejector pin.
6.3 Vejrbestandighed
The doorbell has an IP66 weatherproof rating, ensuring reliable performance in various weather conditions, from -20°C to 55°C.

Image: Illustrates the IP66 weatherproof rating and operating temperature range of the doorbell camera.
7. Fejlfinding
| Problem | Mulig løsning |
|---|---|
| Dørklokken opretter ikke forbindelse til Wi-Fi | Ensure the base station is powered on and within range. Check your Wi-Fi network (2.4GHz only). Restart the doorbell and base station. |
| Hyppige falske alarmer | Adjust detection sensitivity in the app. Customize detection zones to exclude areas with frequent non-human motion (e.g., trees, passing cars). |
| Dårlig videokvalitet | Clean the camera lens. Ensure adequate lighting. Check Wi-Fi signal strength. |
| Kort batterilevetid | Reduce detection frequency or video recording duration in settings. Ensure the doorbell is fully charged. Consider wired power option for continuous use. |
| Cannot remove doorbell from mount | Use the provided ejector pin to press the release button located at the top of the doorbell. |
8. Garanti og support
BOTSLAB offers a 365-Day Quality Guarantee and Lifetime Technical Help for your product. For any issues or inquiries, please contact BOTSLAB customer support:
- 24 Hours Live Chat: Download the Botslab APP > Register and sign in > Me > Support > Live Chat
- Webwebsted: global.botslab.com
- E-mail: Service@botslab.com
- Facebook: Botslab Users Group
Enjoy 30-Day Free Returns and 48 Hours Fast Support.

Image: Contact information for Botslab customer support, including live chat, website, email, and Facebook group.


